Microsoft’s Snipping Tool allows users to take screenshots of their Windows screen. However, this tool is first introduced in Windows Vista. But, till now, Microsoft has changed everything in this tool; you can take a snapshot of an open window, rectangular area, a free-form area, or the entire screen.
But unfortunately, with the Windows 11 latest cumulative update, the Snipping Tool start showing a broken error. However, there isn’t any clear reason why this error occurs. But, we have some tricks using which you can easily resolve the Windows 11 Snipping Tool broken error. So, let’s get started.
Best Ways to Fix Windows 11 Snipping Tool Broken
A faulty security update, an expired digital certificate, or a missing folder/registry value will usually lead to this kind of problem. But don’t worry because we have some workarounds that you can use to resolve this issue permanently. So, let’s take a look:
Fix 1: Restart Your PC
Most importantly, you must first try restarting your PC as there are chances that due to some random bug files or cache data, your Snipping Tool continues to show broken or crashing issues. However, the cache data gets flushed from your RAM by rebooting your device. Therefore, simply restart your Windows 11 PC and check if the issue gets resolved or not.
Fix 2: Update Windows
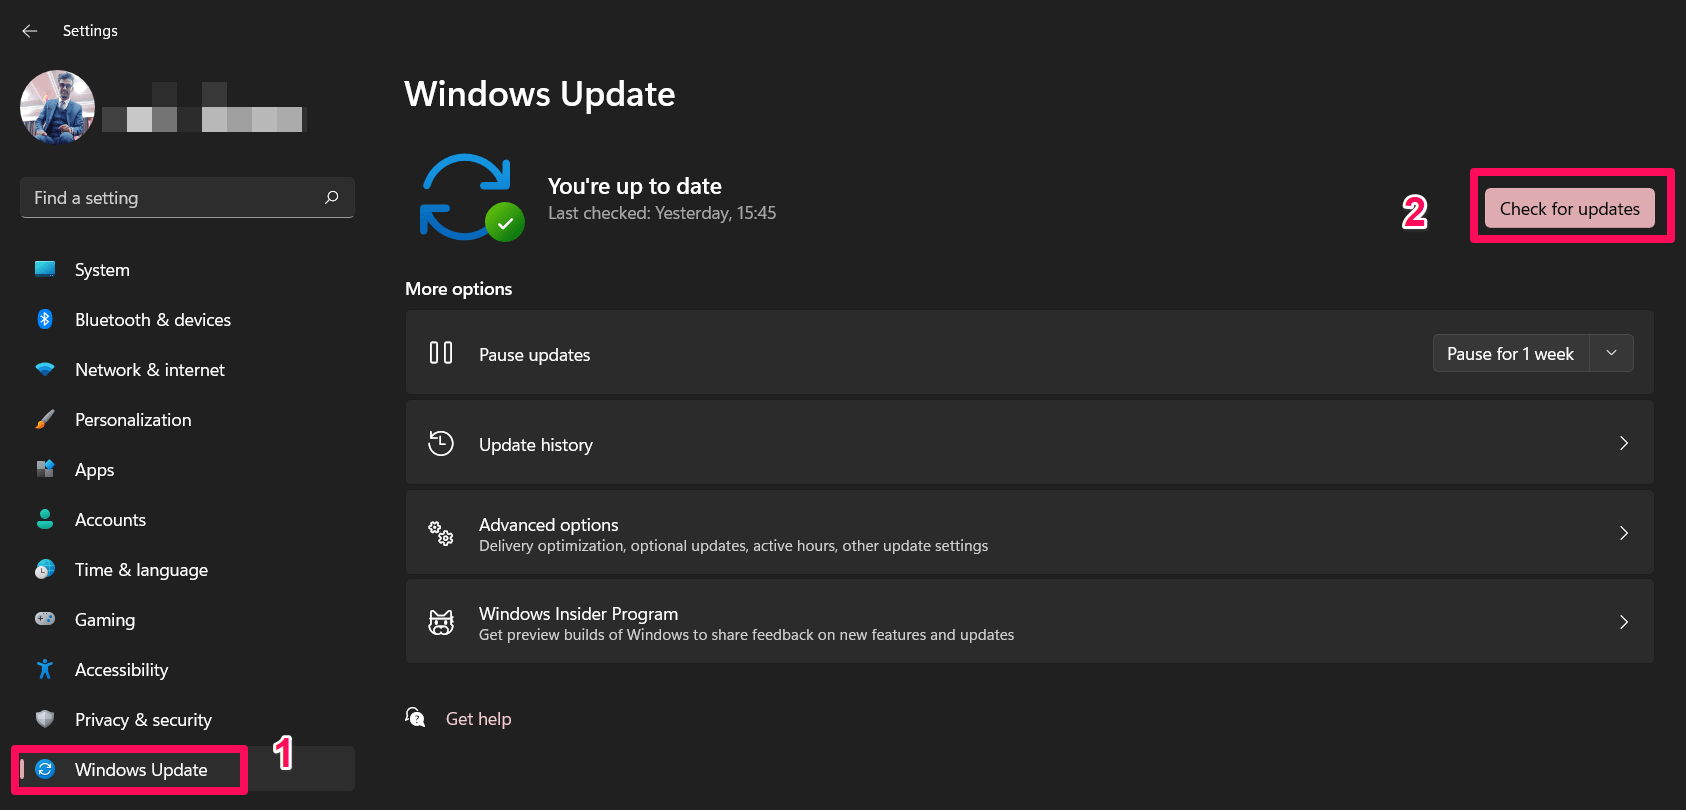
Did you check if your system has any pending Windows 11 patch updates? Yeah, chances are there that your device may have some pending updates due to which you are facing this Snipping Tool broken error on your Windows 11 PC. Therefore, you must have to make sure to perform these steps to check if your device is updated or not:
- Initially, tap on the Start button and open the Windows Settings page.
- Afterward, click on the Windows Security tab and hit the Check For Updates.
Fix 3: Reset Date & Time Manually
There are possible chances that your device’s date and time might not be configured properly, due to which sometimes this type of issue occurs. Therefore, you must have to configure it properly, and to do so; these steps will help you:
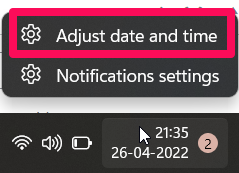
- Firstly, right-click on the Date & Time located at the bottom right corner of the Task Bar.
- After that, hit the Adjust Date & Time.
- Now, tap on the Date & Time.
- Then, hit the Change button located next to Set the Date & Time Manually.
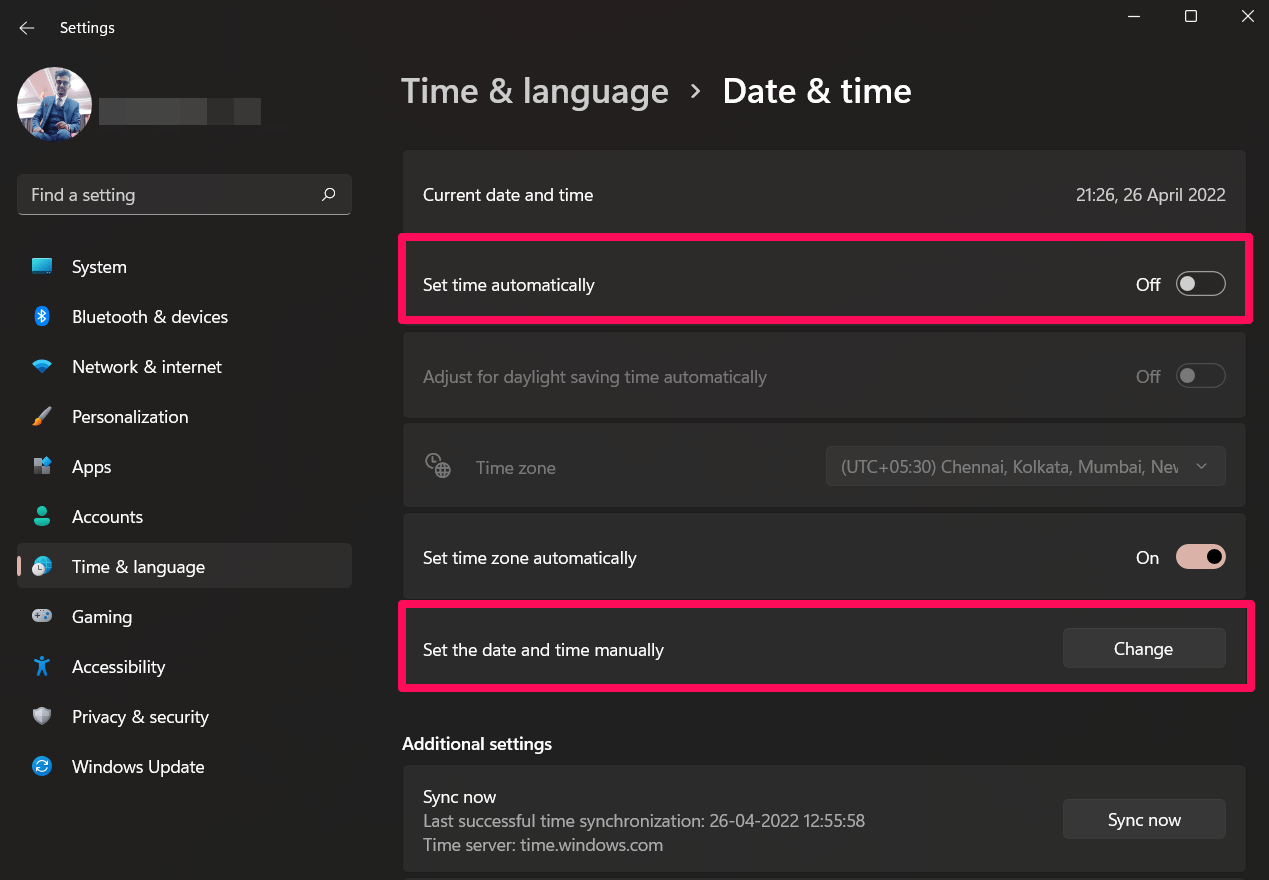
- Finally, configure your device’s date and time. After that, see if the problem has been resolved.
Fix 4: Run Snipping Tool From Windows.old folder
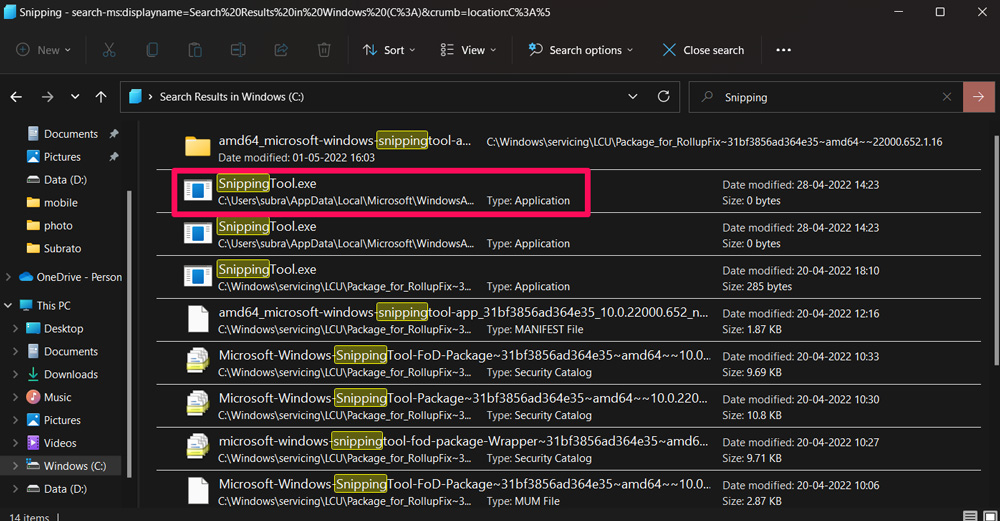
If you are still not able to use the Snipping Tool, then try running it directly from the Windows.old folder. So, to do this, make sure to perform these steps:
- Open the C: drive of your Windows PC, then locate the Windows.old folder and locate the Snipping Tool application from there.
- Alternatively, you can also directly search for Snipping Tool from the folder search menu on Windows File Explorer.
- Once find it, simply double-click on it. This will launch the Snipping Tool directly from the Windows.old folder.
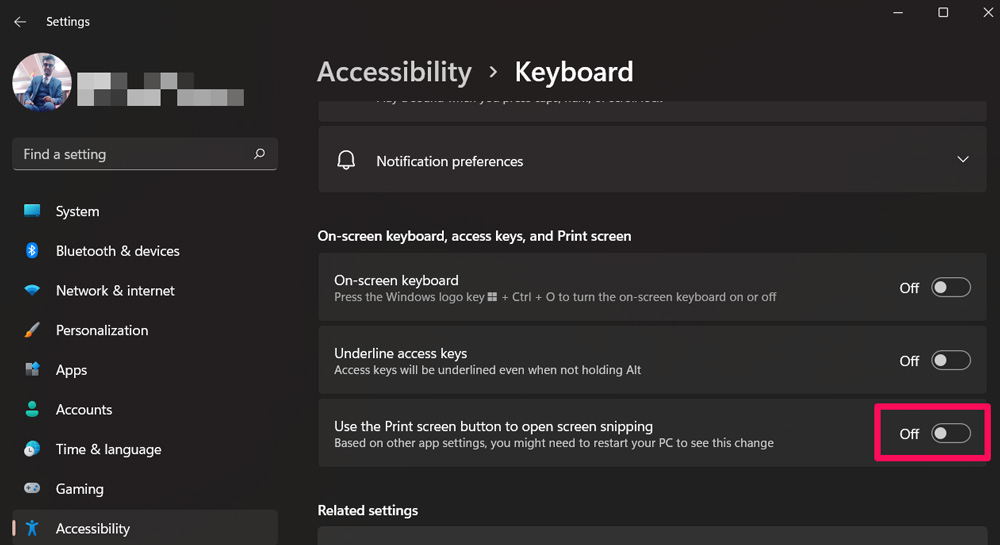
Fix 5: Set Print Screen Key To Launch Snipping Tool
In case you have already tried to open the Snipping Tool using Windows.old folder and still getting the Windows 11 Snipping Tool broken error, then you should try to set the print screen key to launch the Snipping Tool, as many users previously reported that this helps them to resolve this issue.
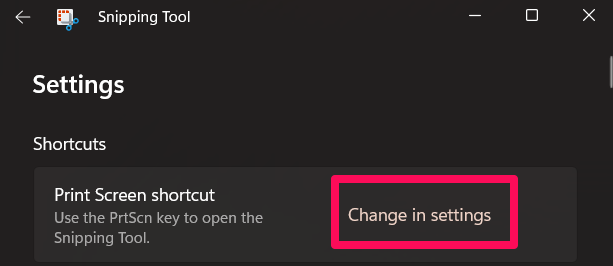
- Initially, open the Snipping Tool and tap on the three-dot menu to open the Settings.
- Afterward, tap on the Print screen shortcut and select the Change in settings.
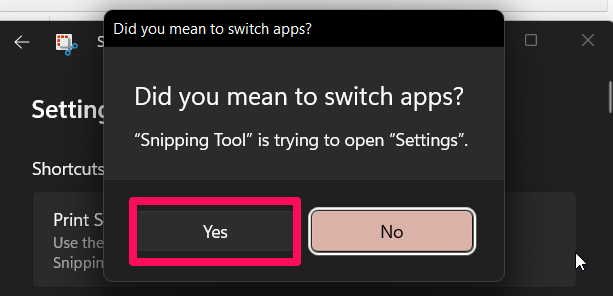
- Now, a screen will ask you Did you mean to switch apps? You need to hit the Yes button.
- Finally, toggle the button next to Use the Print Screen button to open screen snipping.
Fix 6: Check Permissions
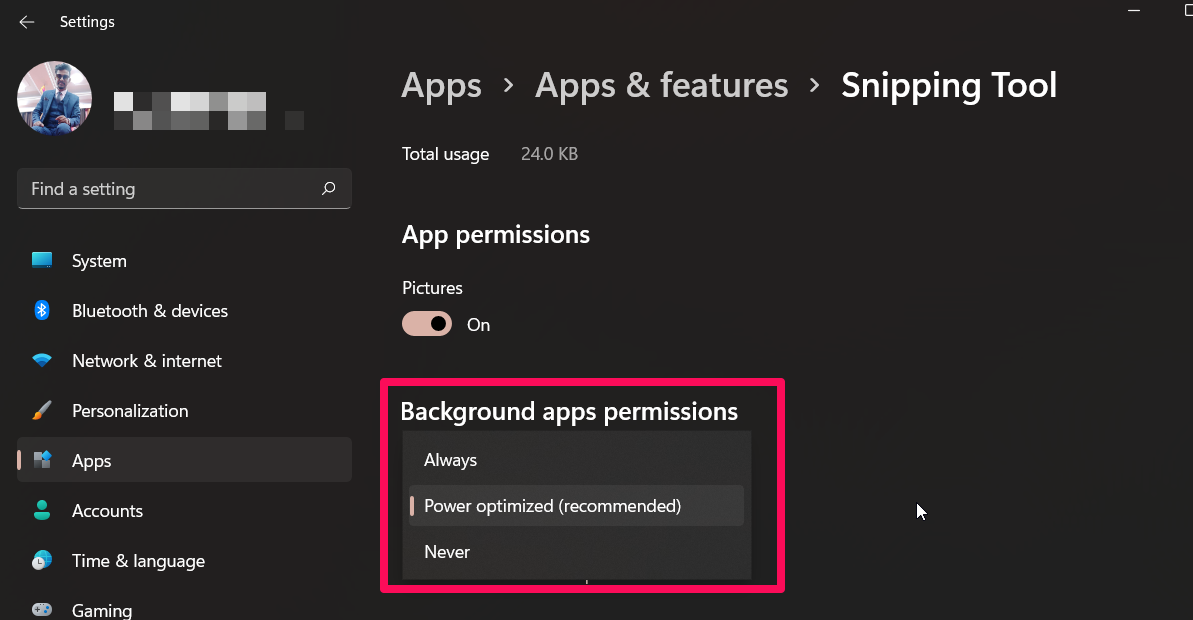
Sometimes, due to some random updates, all the set permission gets changed, which further resulting this kind of issue. Therefore, you need to properly set up the permissions for your Snipping Tool. However, in case you don’t know how to do so, follow these steps:
- First of all, press the Win+I to open the Windows Settings option.
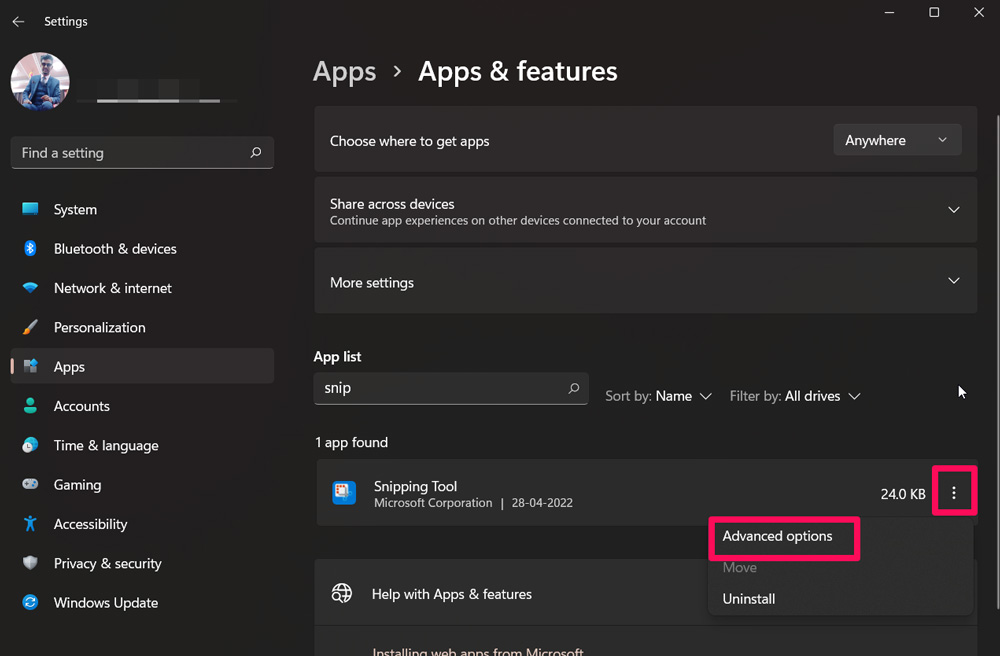
- Afterward, go to the Apps section and select the Snipping Tool > Advanced Settings.
- You need to enable app permissions for the pictures. Furthermore, set it to the Power optimized permission or the Always permission.
Fix 7: Turn on The Auto Copy Mode
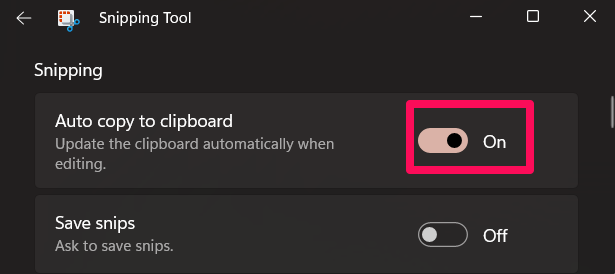
You can also try turning on the auto-copy to clipboard mode on your Snipping Tool, as many users claim that this helped them to resolve the Windows 11 Snipping Tool broken error. To do this,
- Firstly, open the Snipping Tool and tap on the three-dot menu to open the Settings.
- Now, toggle the button next to Auto copy to clipboard to On position.
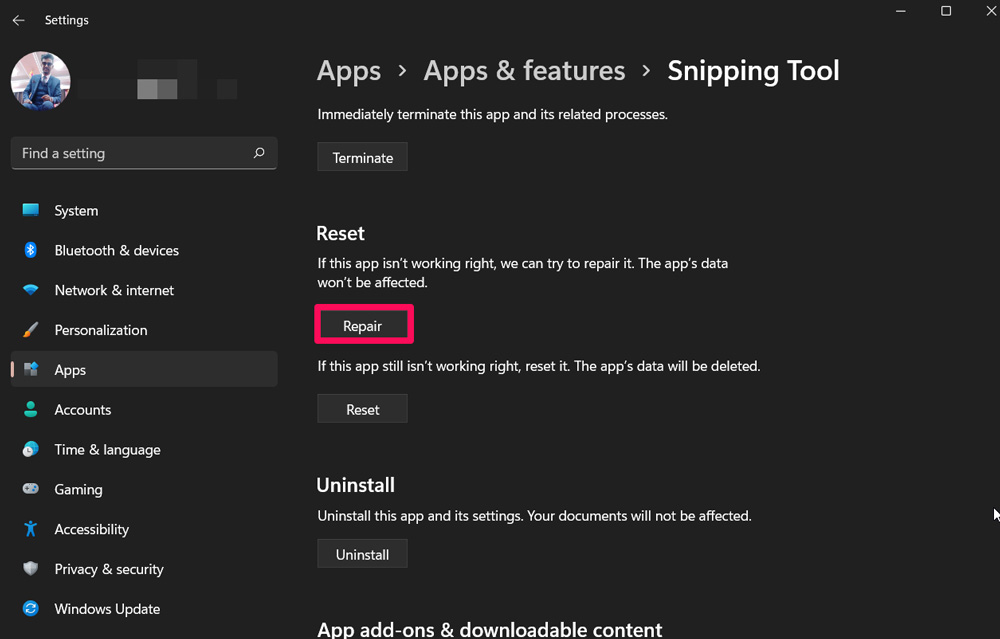
Fix 8: Repair The Snipping Tool
If the above troubleshooter doesn’t help you, then you must try repairing your Snipping Tool files as possibilities are there that there is some issue with the files. So, to do this,
- Open The Windows Settings using the Win+I button.
- Afterward, go to the Apps section and locate the Snipping Tool.
- Now, tap on the three-dot menu and select the Advanced options.
- Then, go to the Reset section and hit the Repair button.
Fix 9: Reinstall The Snipping Tool
Are you tired of performing the different fixes to resolve the Windows 11 Snipping Tool broken error? If so, then you reinstall the tool because this is the best option for you to resolve the error. However, to do so,
- Firstly, open the Windows Settings by pressing the Win+I.
- Thereafter, navigate to the Apps section and find out the Snipping Tool.
- Then, click on the three-dot button and hit the Uninstall button.
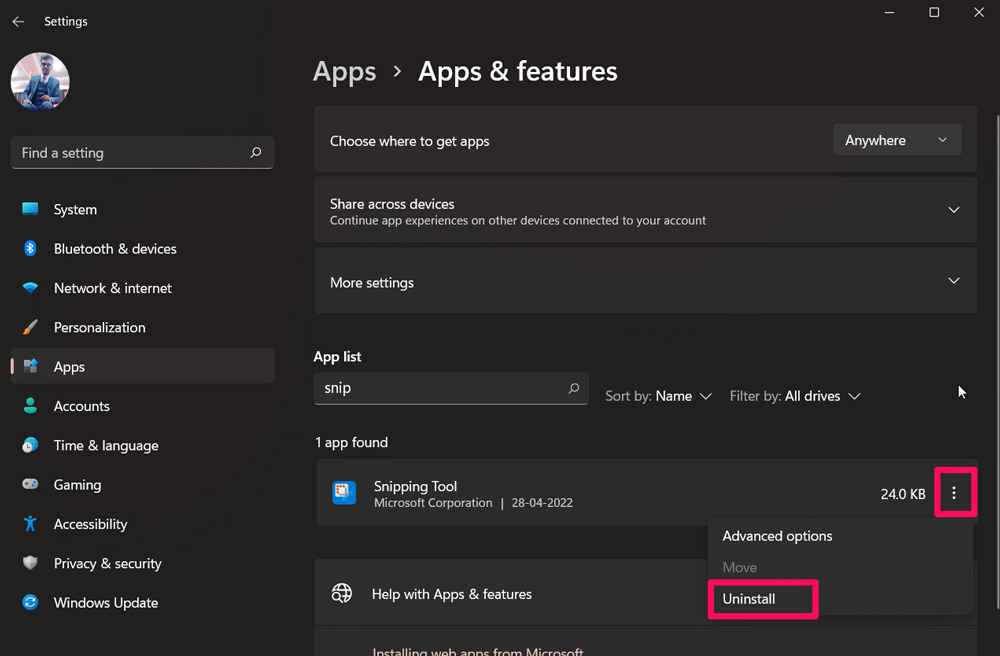
- Once you have uninstalled the Snipping Tool from your device successfully, hover to the Microsoft website and download the latest patch for Snipping Tool. Then, install it as you normally do.
Fix 10: Use Local Policy Editor
Using the Local Policy Editor to resolve this broken error is also another option that will allow you to fix the issue permanently. Thus, if you don’t know how to do it, make sure to perform these steps:
- Launch the Run box and type gpedit.msc. This will open the Local Policy Editor window.
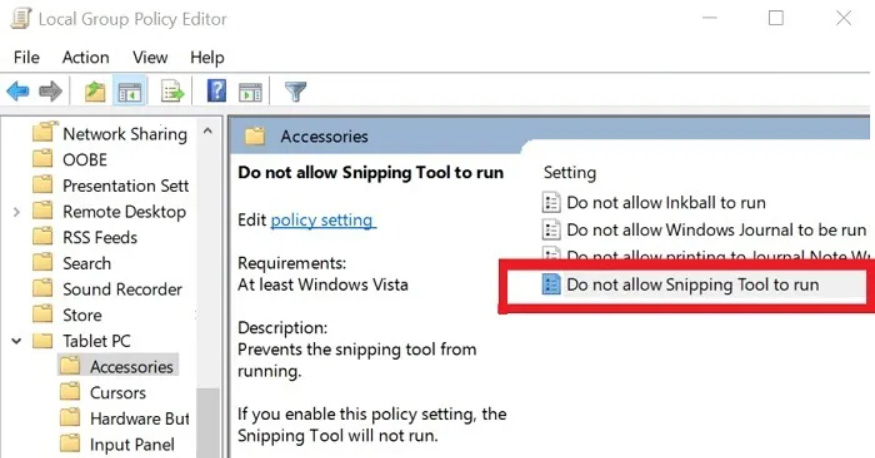
- After that, locate and tap on the Tablet PC folder.
- Then, hit the Accessories, followed by Do not allow Snipping Tool to run.
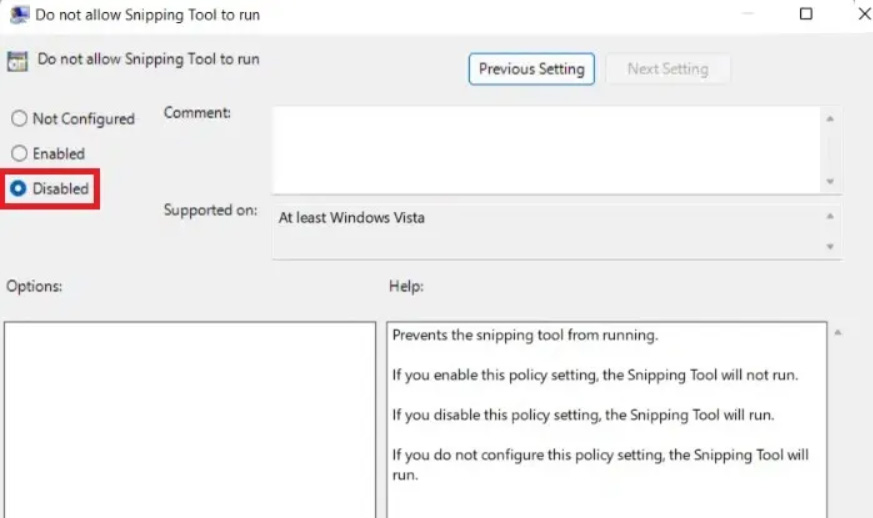
- Now, on the next page, under the Do not allow Snipping Tool to run section, tap on the Disabled option.
Fix 11: Use Windows Registry Tool
Did you try the Windows Registry tool tricks before to fix the Snipping Tool broken error? If the answer is no, then use these steps to do so:
- First of all, open the Windows Registry Tool using the Windows Search bar.
- Then, go to the patch:
Computer\HKEY_LOCAL_MACHINE\SOFTWARE\Policies\Microsoft
- Now, right-click on the Microsoft folder and create a new key.
- Thereafter, name it TabletPC and right-click on it.
- Then, select the New > DWORD (32-bit) value.
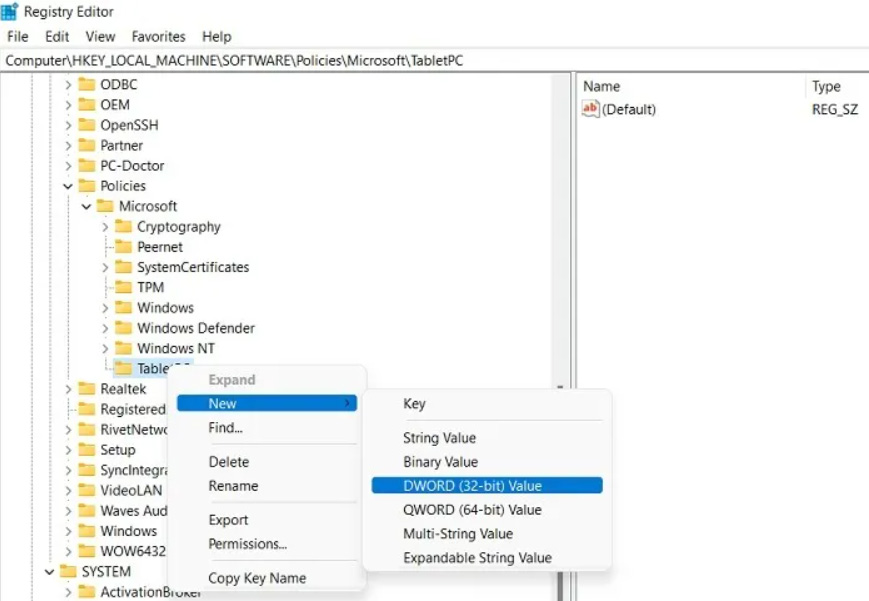
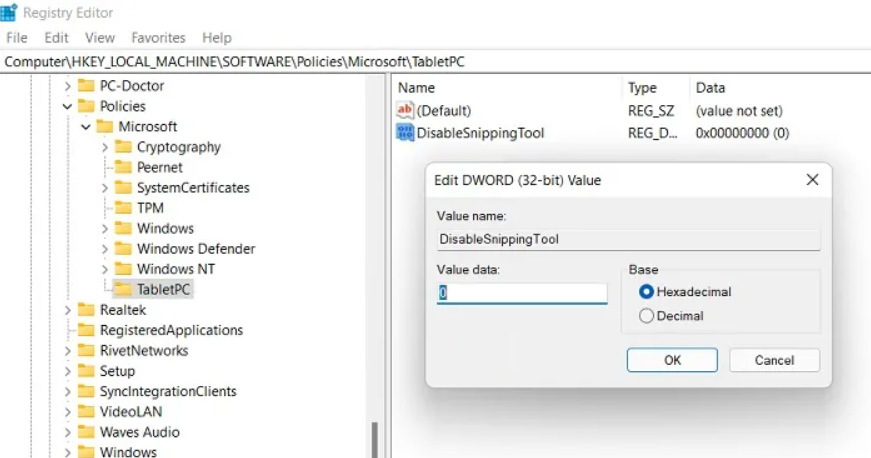
- After that, double-click on the newly created DWORD (32-bit) value string and give it a value of 0 as it is by default set to 1.
If you've any thoughts on How to Fix The Windows 11 Snipping Tool Broken Error?, then feel free to drop in below comment box. Also, please subscribe to our DigitBin YouTube channel for videos tutorials. Cheers!


