Windows 11 is the most feature-rich and user-friendly operating system developed by Microsoft to date. It has some very distinctive features, like an advanced start menu, futuristic widgets, virtual desktops, etc. But did you know that Microsoft has marketed Windows 11 as the best operating system for game enthusiasts and promised features like direct storage.
Optimizing Windows 11 for running high-end games will make it a heavy operating system to run, and you may need to consider visual upgrades. But, won’t enabling this many features and running them even in the background consume a lot of processing power? Indeed, it will. Optimizing Windows 11 and turning these many features on, and keeping them running in the background will take a lot of processing power. But isn’t that what you want to get the best gaming experience from your PC?
There are various ways to optimize Windows 11 for gaming. Read the article to find out the best Windows 11 gaming settings that you need to enable.
What gaming features are there in Windows 11?
Microsoft has offered new Xbox features in Windows 11, and the first one is Auto HDR. This feature doesn’t impact performance but makes the gameplay more detailed with vibrant colors. To access this feature, you will need a monitor that is HDR compatible. But do keep in mind that you will need to change the settings as it is enabled by default.
The other feature is direct storage, allowing games to load faster by forwarding 3D assets directly to the graphics card. You need a high-speed SSD to use this feature.
Below are the best Windows 11 gaming settings that you need to enable.
1. Update the Drivers of your Graphic Card
Most Windows 11 devices come with a graphics card installed for gaming and other graphic-incentive tasks. Update the drivers of your graphics card to get the maximum output from them.
2. Enable Game Mode and Modify the Graphics Settings
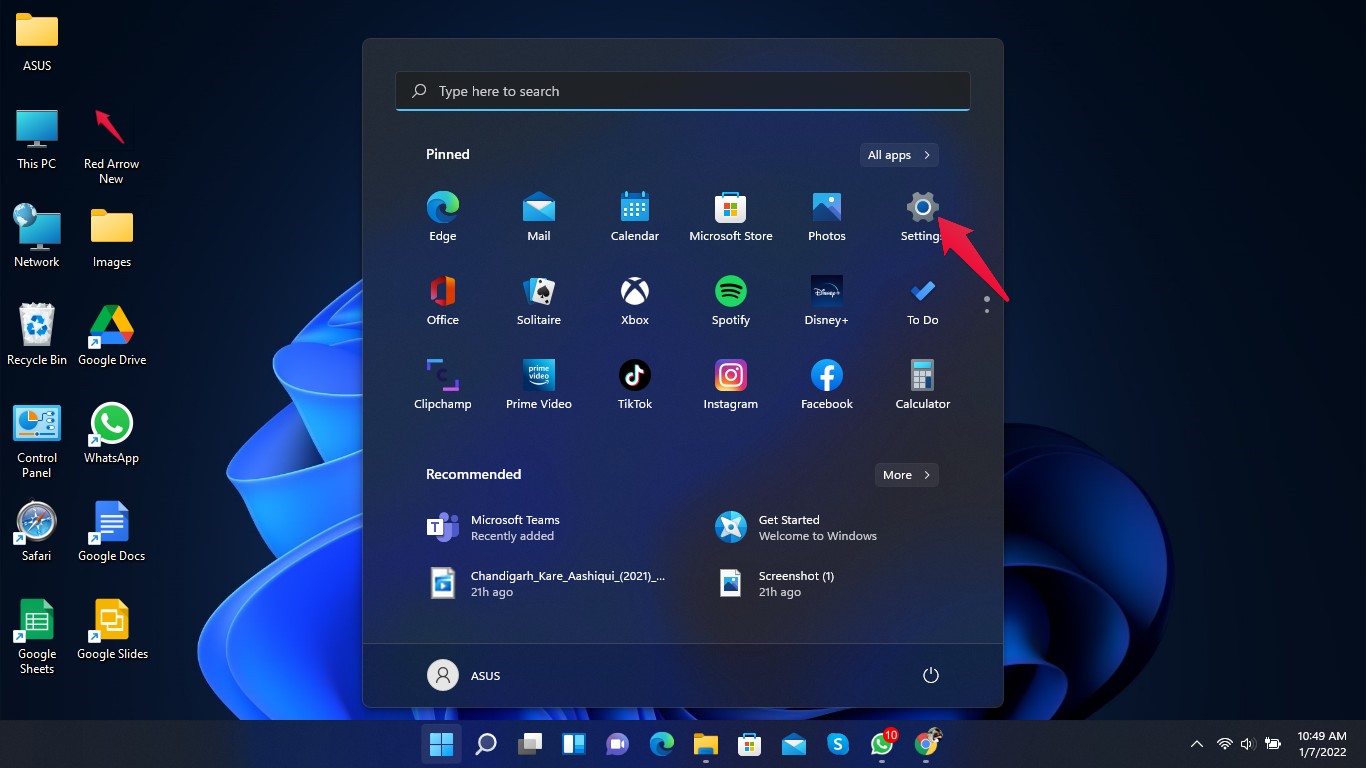
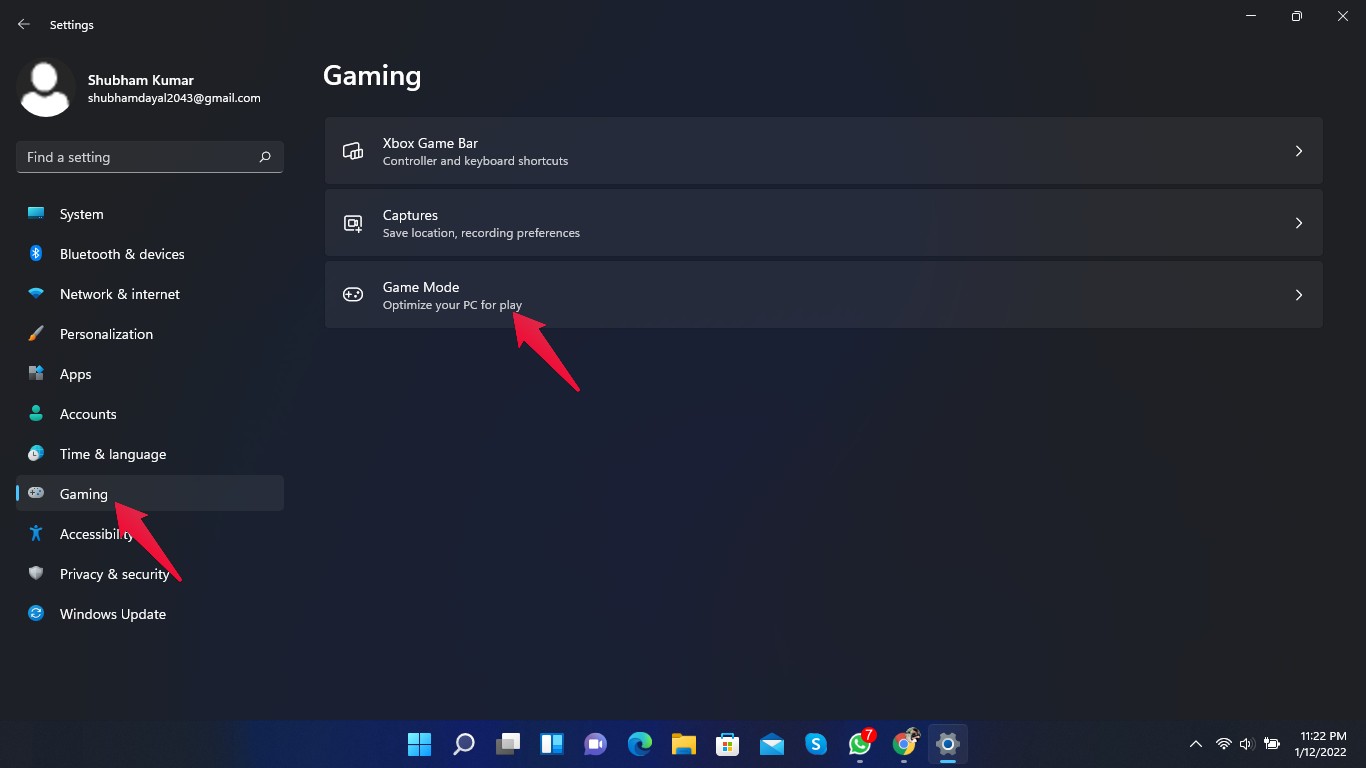
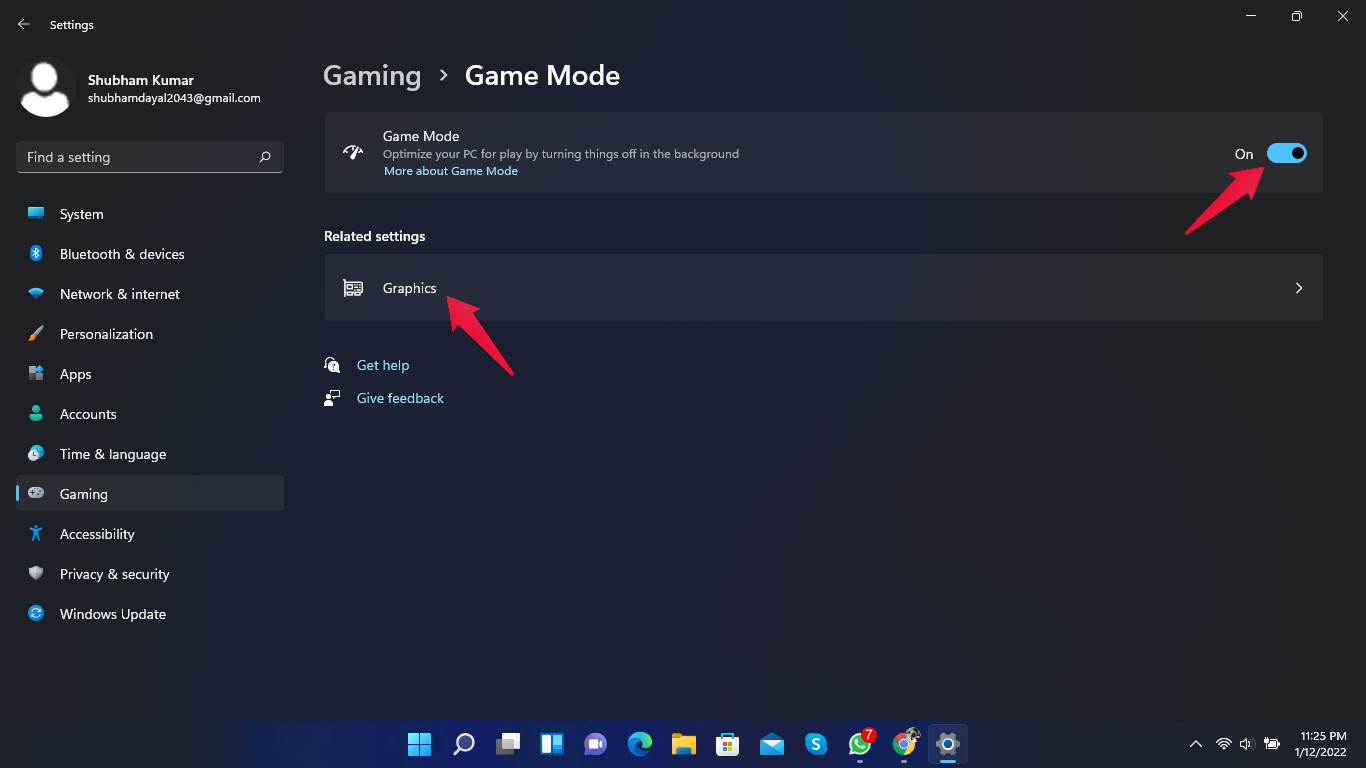
It is recommended to turn on the game mode to boost performance, especially on systems with low-end hardware. The game mode increases performance by blocking background apps to allocate game-specific components. Follow these steps to enable game mode in Windows 11:
- Click on Start and open Settings.

- Click on “gaming” in the left pane.
- Now click on Game Mode.

- Click on the toggle switch next to game mode to enable the feature.
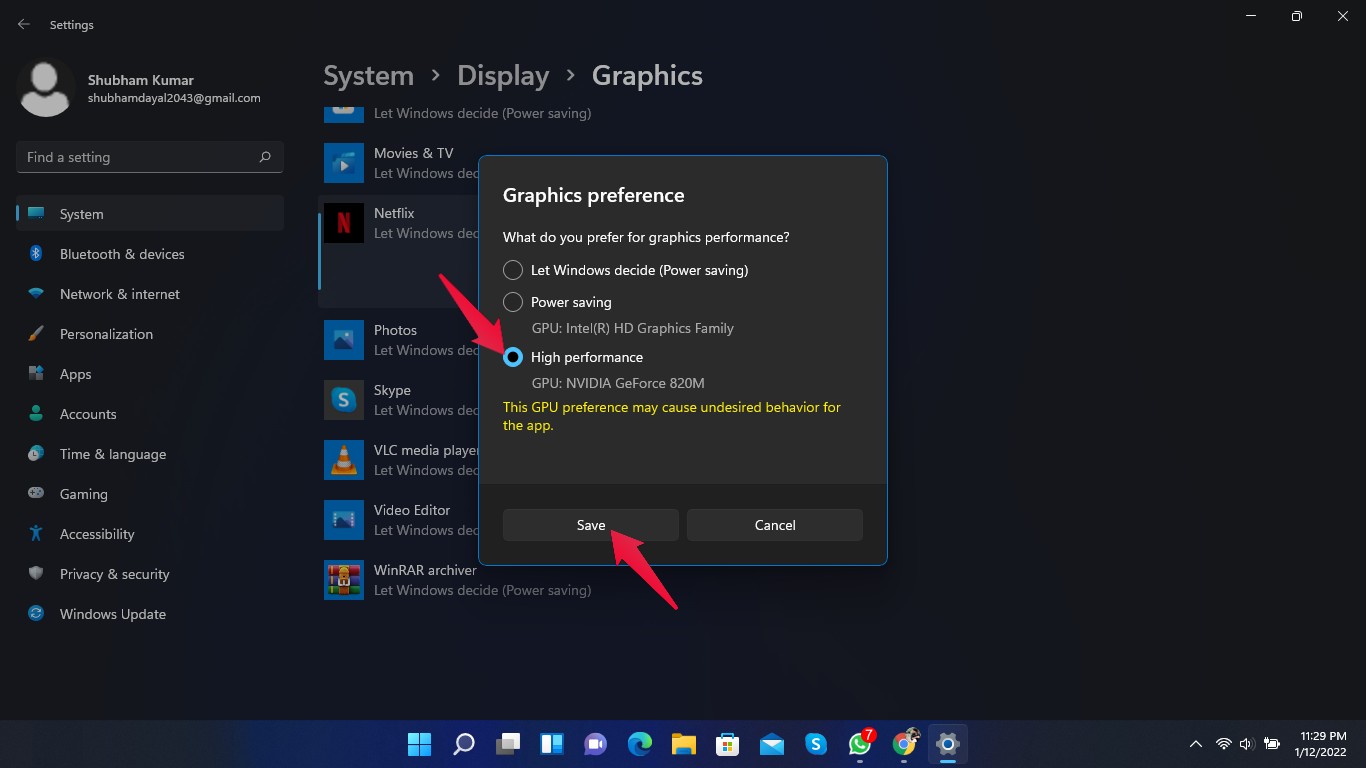
- Now click on graphics under related settings.

- Search for your desired game from the list. If it isn’t available, click on the browse button and add it manually.
- Choose the game and click options.

- Select High performance and click save.

3. Use Dedicated Graphics Card Software
Using dedicated software to manage your graphics card allows you to enable all features and unleash its full potential. For example, if you have an Nvidia GeForce GPU on your Windows 11 PC, use GeForce Experience to access all the features of your GPU.
4. Select the High-Performance Power Plan
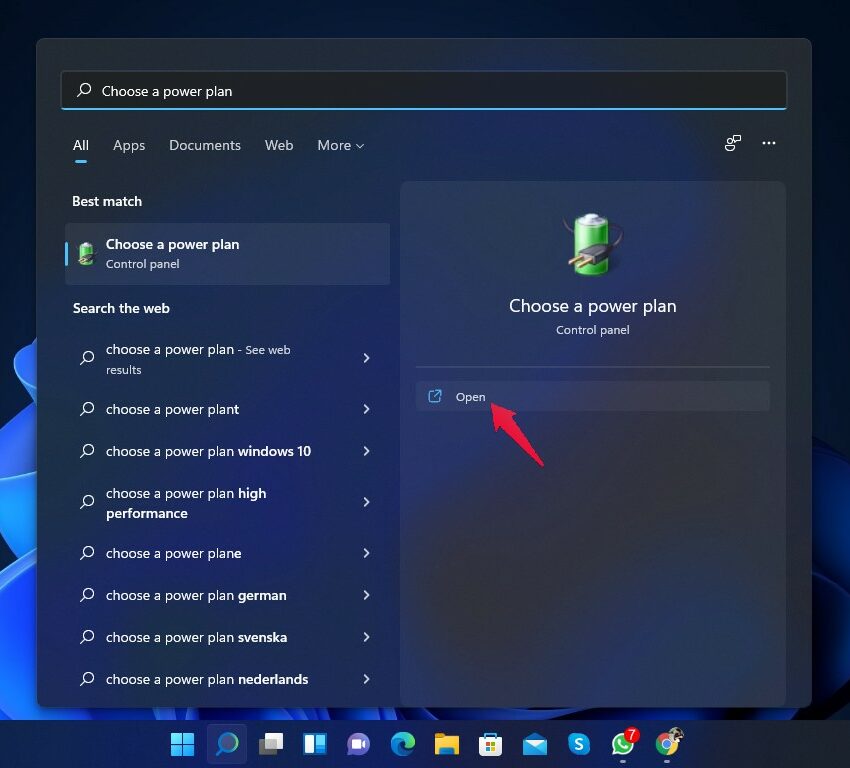
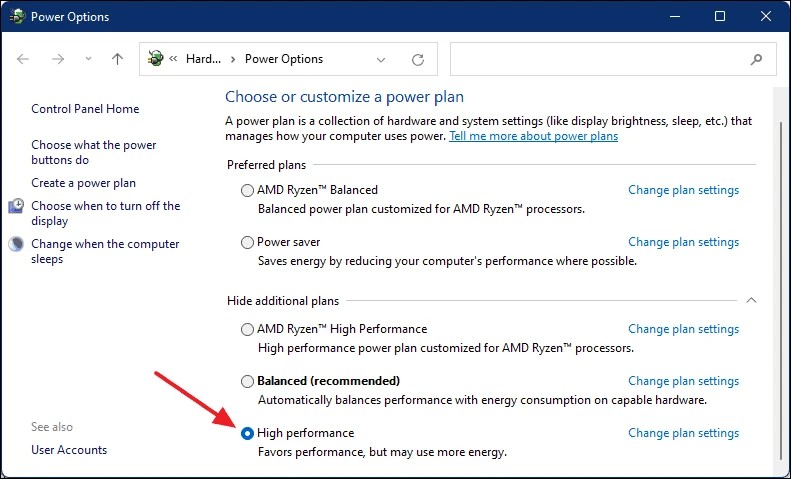
By changing your power plan to high performance, you may expect more performance from your device. Do make sure that this may favor performance but will use more energy. Here is how you can enable a high-performance power plan:
- Click on Start and search for Choose a Power plan.
- Click on Open.

- Click on the high-performance power plan.

5. Enable Ultimate Performance Mode using the CMD
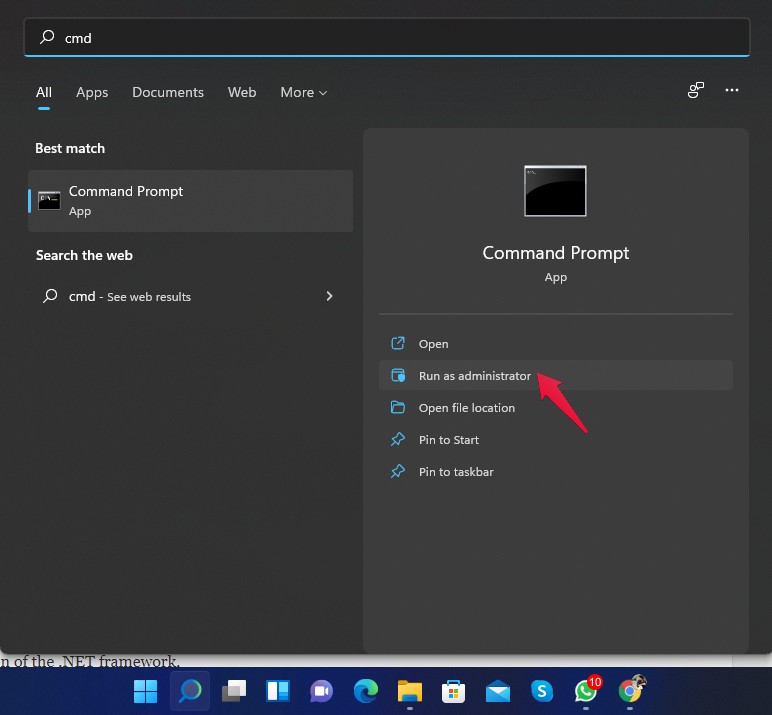
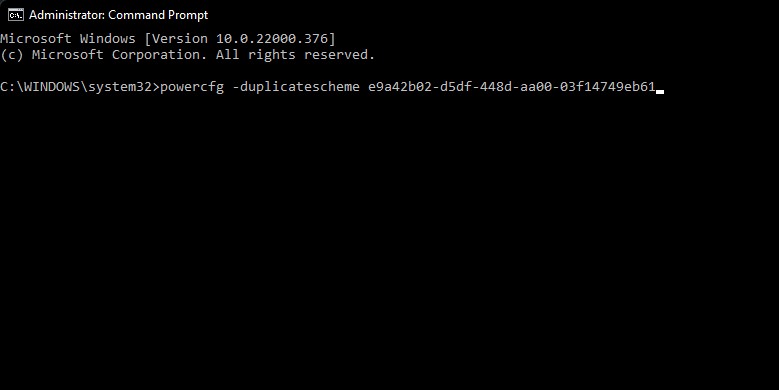
Enabling ultimate performance mode using the command prompt can drastically enhance your PC’s performance. Here is how you can do it:
- Click on start and search for cmd.
- Click on Open as Administrator.

- Run the following command in the command prompt.
powercfg -duplicatescheme e9a42b02-d5df-448d-aa00-03f14749eb61
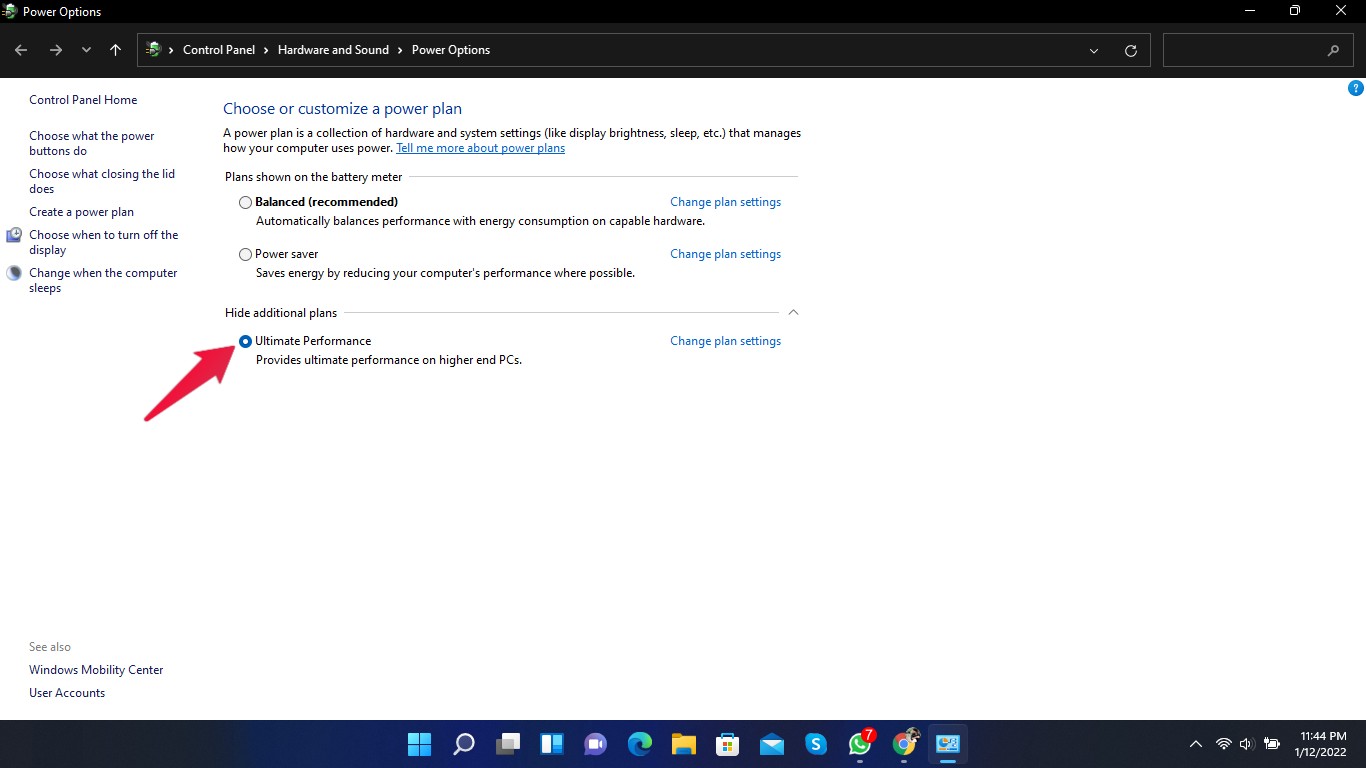
- Now close the command prompt and head to Choose a power plan window as stated in the previous step.
- Click on Show Additional Plans.
- Enable Ultimate performance mode.

6. Delete Temporary Files
By deleting temporary files from your PC, you can free cache data and boost performance. Follow these steps to clear temporary files in Windows 11:
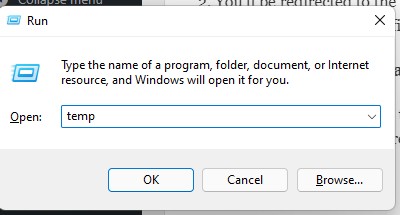
- To open the run window, press Windows+R, then type temp and press Enter.

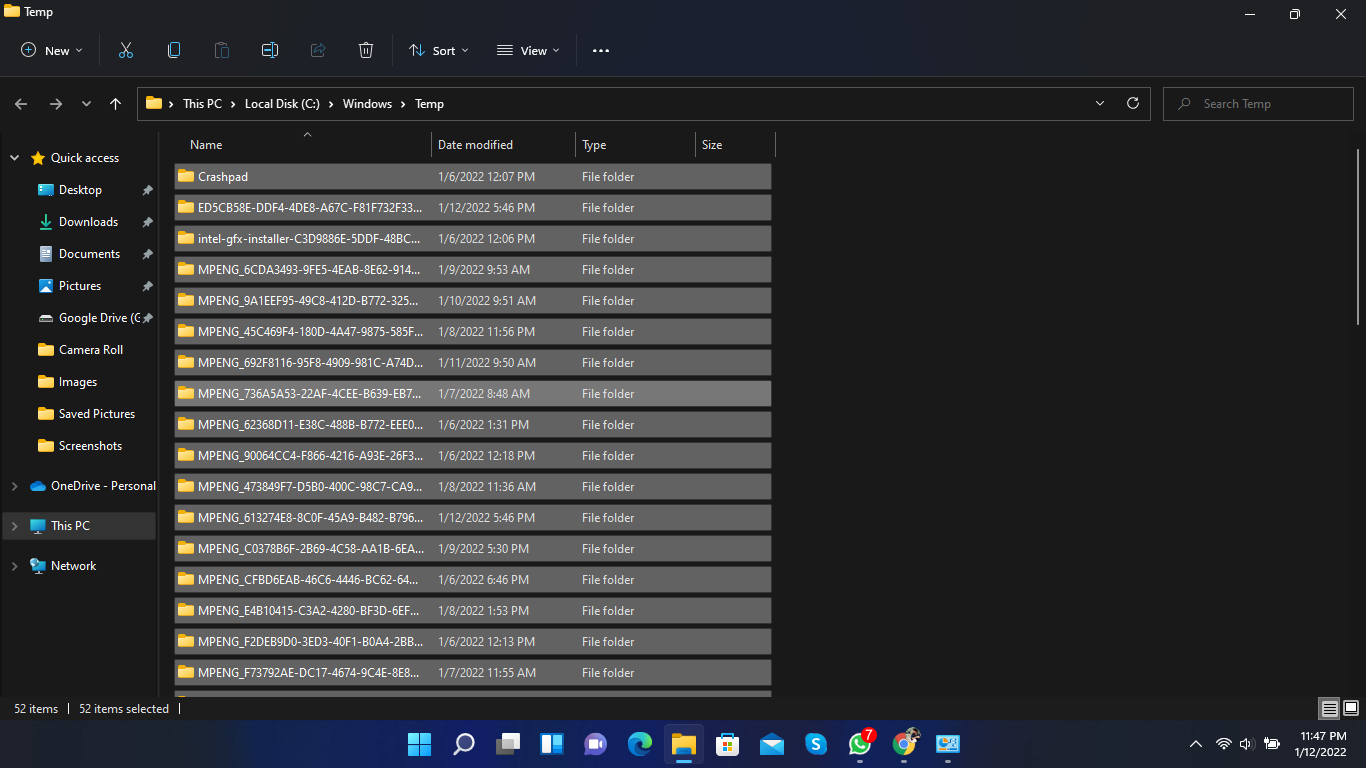
- You’ll be redirected to the directory where all temporary files are saved on your PC.

- Press Ctrl+A to select all files and then press Delete to delete them.
7. Uninstall unnecessary applications
Uninstalling apps and software that are no longer required can increase your PC’s performance. It won’t only free up space for more games but also reduce the number of apps that run in the background.
8. Run an SFC Scan
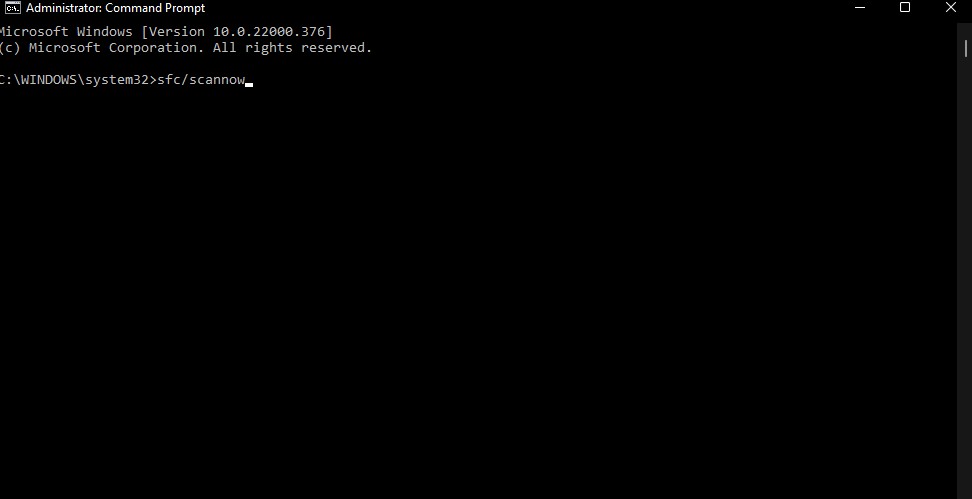
Corrupted files can slow down your system and ruin your gaming experience. Run an SFC scan to get rid of any corrupted files present on your device. Here is how you can run an SFC scan.
- Click on start and search for cmd.
- Click on Open as Administrator.

- Type sfc /scannow and press Enter.

- Restart your computer once the process is complete.
9. Defragment your Drives
Defragmenting your drives makes them run more efficiently. Here is how you can defragment your drives:
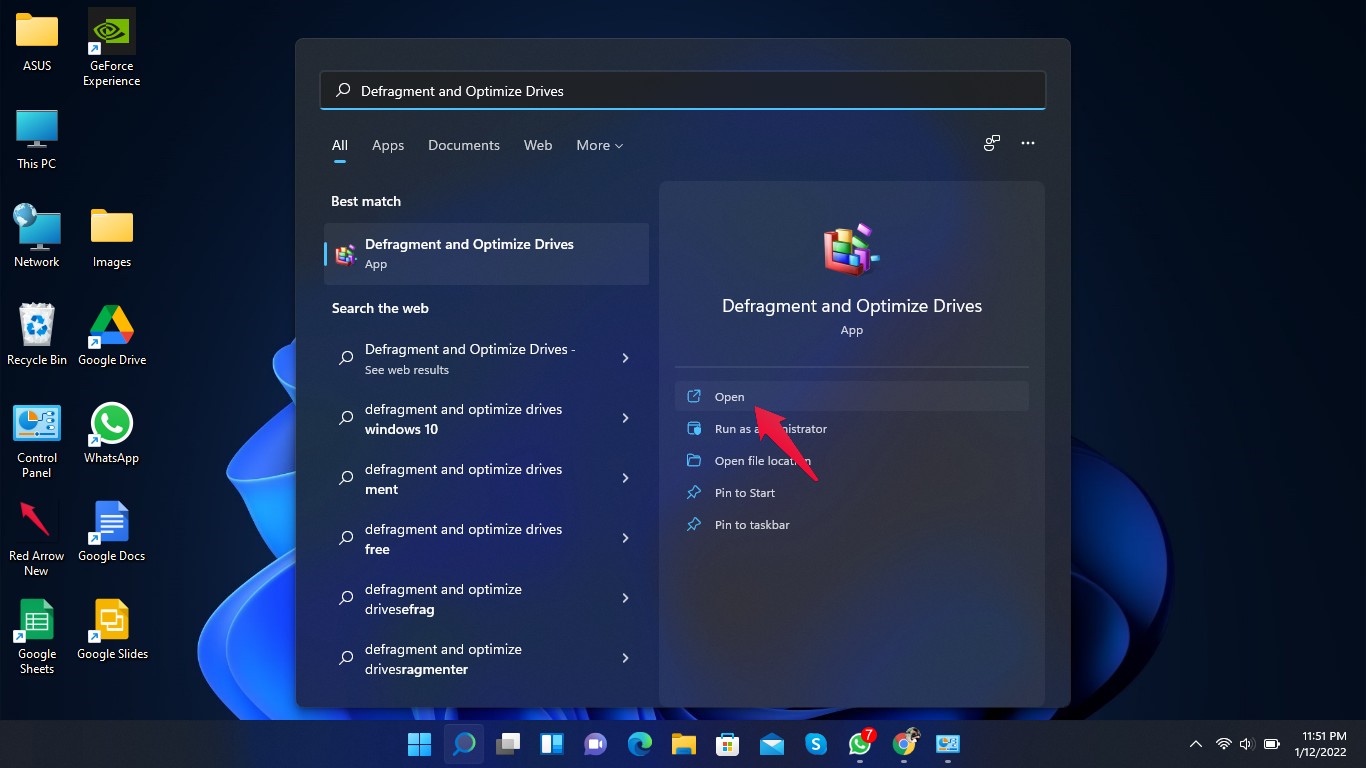
- Click on Start and search “Defragment and Optimize Drives.”
- Click on Open.

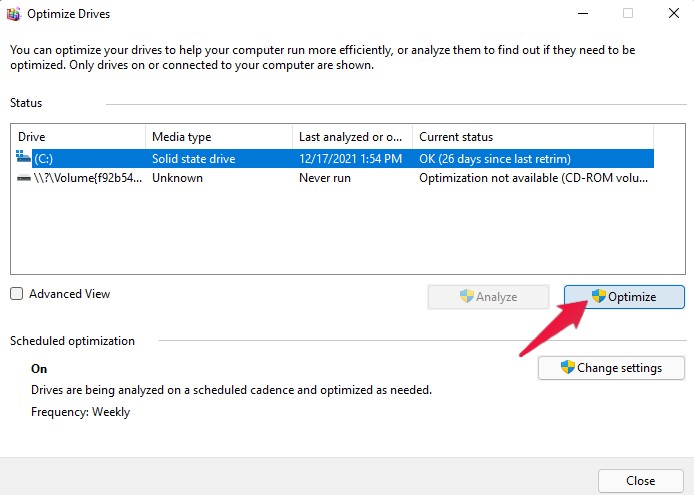
- In the optimize drives window, select a drive and click on optimize.

10. Disable Enhanced Pointer Precision
The enhanced pointer precision feature is required to be enabled on your laptop as it keeps your trackpad usable. Still, if you use a gaming desktop, it’s worth turning off this feature to ensure there isn’t any acceleration in any of your games. Here is how you can disable enhance pointer precision:
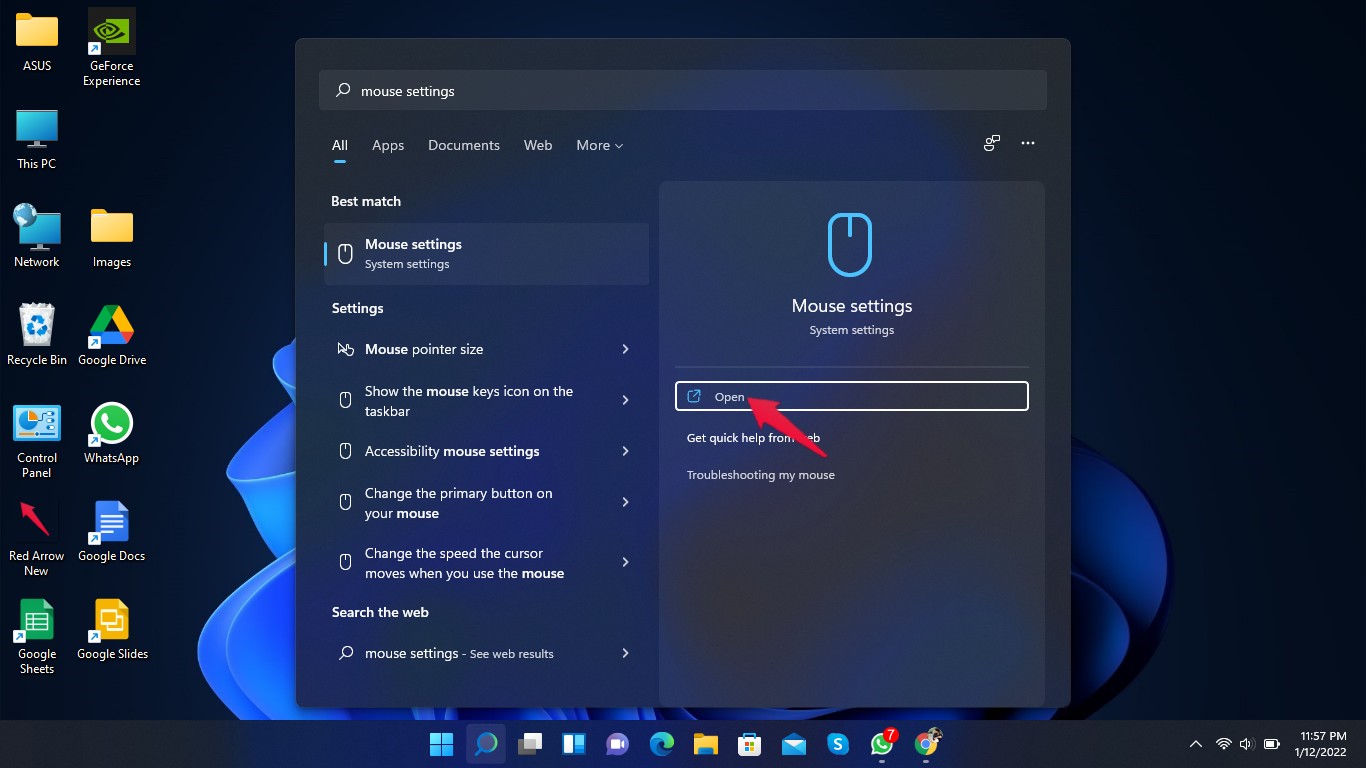
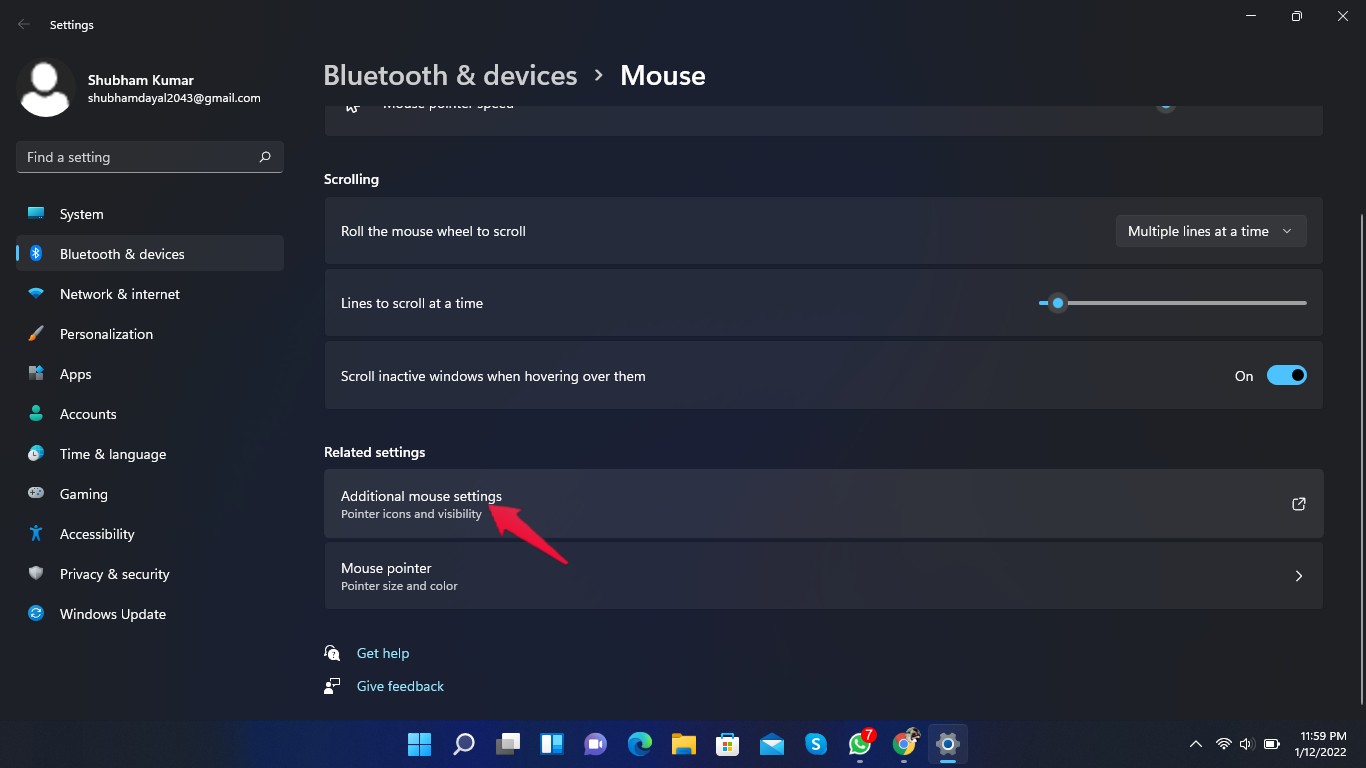
- Click on Start and search for mouse settings.
- Click on open.

- Scroll down and click on Additional mouse settings.

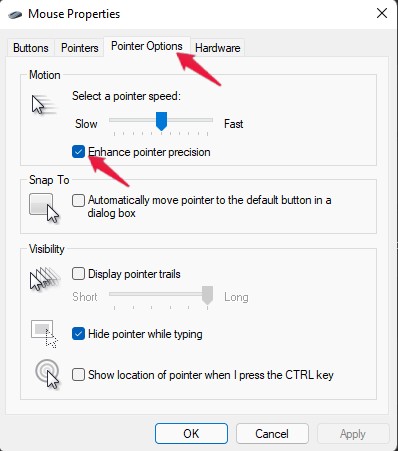
- In the mouse properties popup, click on the pointer options tab.
- Uncheck the enhanced pointer precision box.

11. Disable unnecessary apps at startup.
Managing the bloatware plays a key role in optimizing Windows 11 for gaming. Disabling unnecessary apps at startup can reduce CPU usage and boost your gameplay. Here is how you can disable unnecessary apps at startup:
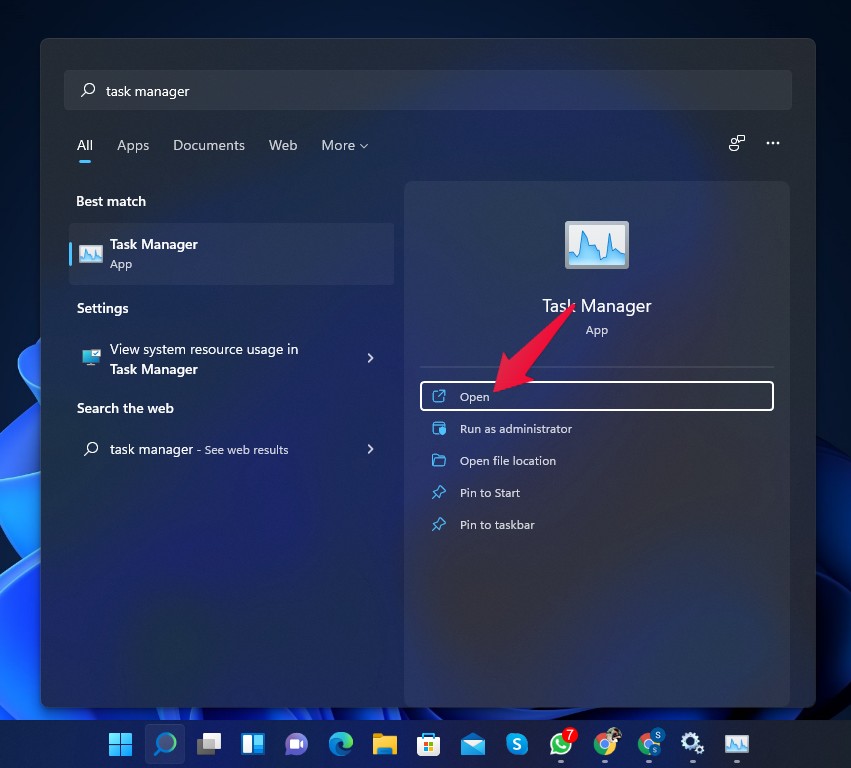
- Click on Start and search for “Task manager.”

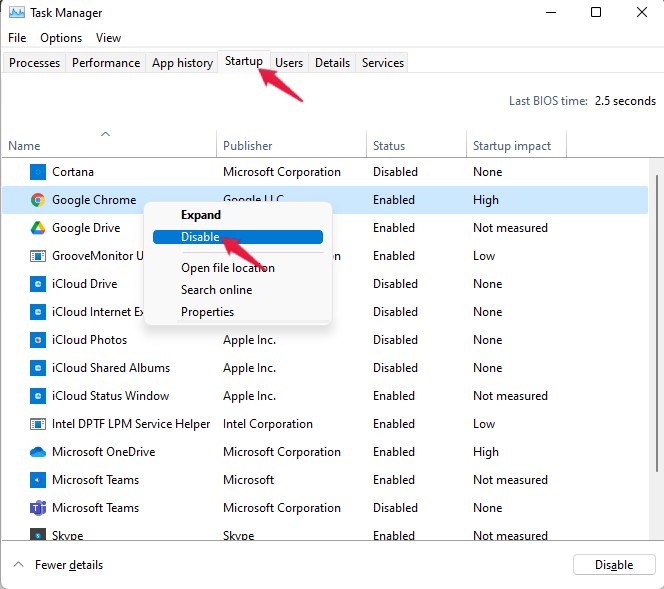
- Navigate to the Startup tab.
- Right-click on the app you want to Disable.

- Click on disable.
12. Disable overlays from third-party apps.
Third-party applications like Steam and Discord provide additional information and help with different tasks during gaming. However, using these apps increases memory and CPU usage a lot. Try disabling overlays if your PC struggles with running games.
Wrapping Up
This was how you could optimize Windows 11 for gaming. By following these steps, you will be able to extract every last bit of performance from your Windows 11 PC.
We hope these Windows 11 gaming settings work for you. Still, if you have any trouble, feel free to contact us in the comments section.
If you've any thoughts on 10 Best Windows 11 Gaming Settings that you Need to Enable, then feel free to drop in below comment box. Also, please subscribe to our DigitBin YouTube channel for videos tutorials. Cheers!
