The cloud storage service from Apple needs no introduction of sorts. All your photos, emails, contacts, reminders, etc are safely backed up over to the clouds and could be easily accessed by all the synced devices. But what about Google’s owned OS?
Could you access this cloud storage service inside the Android ecosystem? Well, the reply is in the affirmative, though there are a few workarounds that you need to carry out. And in this guide, we will make you aware of just that. Follow along for the instructions.
How to Use iCloud Storage on Android?
Today, we will show you the steps to access your iCloud Photos, Emails, Calendars, Notes, and Contacts on your Android device. For that, the first prerequisite calls for heading over to the iCloud website on your Android device. You could do so via any browser of your choice. Once you open that site and log in with your credentials, you should see a fairly simple UI with just three options: Photos, Notes, and Find iPhone.
However, you could further expand this page and get hold of the remaining features. To do so, tap on the overflow icon situated at the top right and tick mark the Desktop Site option.
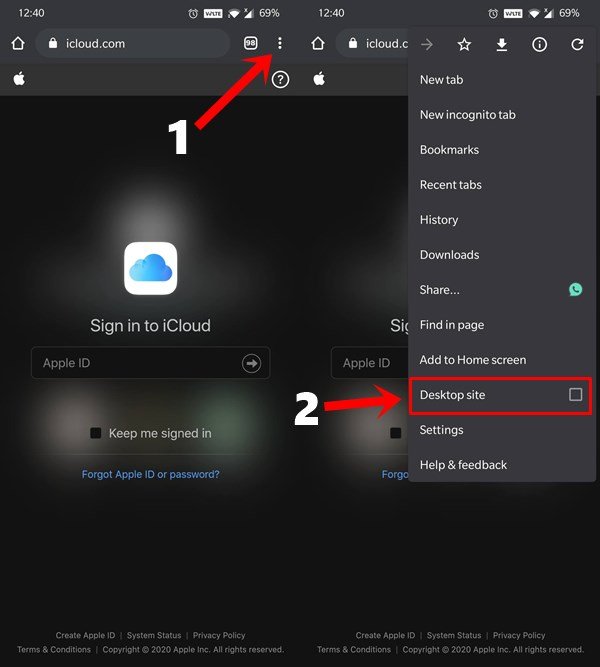
Now the page will reload and features like Mail, Contacts, Calendar, Reminders, etc will be now visible. On that note, here’s how to make full use of all these features:
Accessing Photos on Android
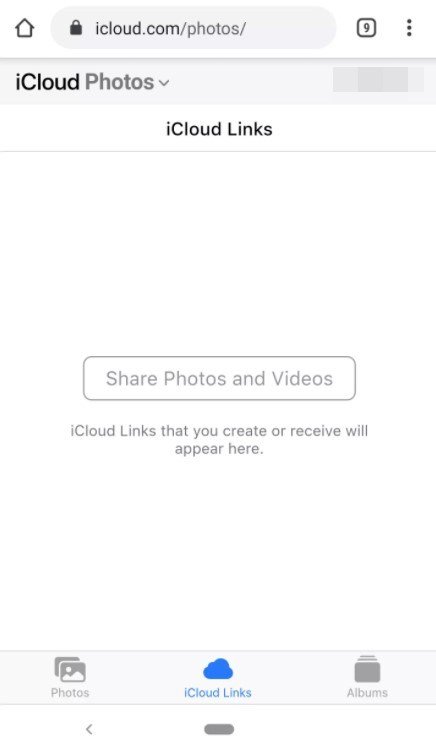
Once you tap on Photos from the iCloud page, it will show you all the photos stored on the iCloud. Likewise, you could also upload new images, delete existing ones, or download your preferred ones locally on your Android device. Then the next option, iCloud links, allows you to create shareable links for your media files. The last option is Album which is self-explanatory in itself- it beholds all your albums, including the ones added to the Favorites.
Find My Device Feature
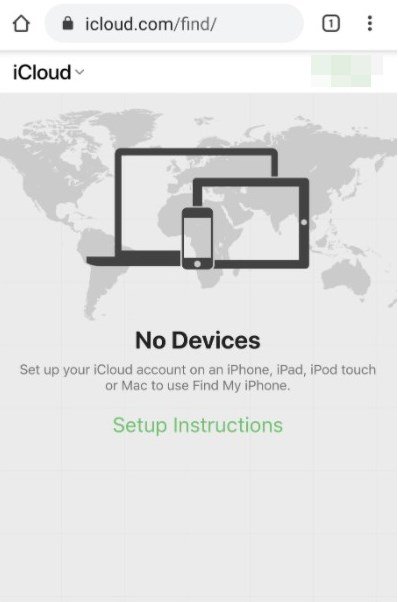
The second tab on this page is Find My Device that further beholds three important features: Play Sound to ring up your lost device, Erase <device> to remotely wipe off all the data from your Apple device, and Lost Mode that lets you display a message on your lost device. All in all a rather nifty option for finding your lost iPhone or iPad via an Android device.
Accessing Notes
The third and final option on iCloud’s homepage (in mobile view) is Notes which stores all your saved notes. Not only you could view these notes, but also edit or delete them. Likewise, it also has the option of creating new notes. However, there’s another way of carrying out the aforementioned task, i.e accessing iCloud notes on Android.
Head over to the System Preferences > Internet Account on your Mac and select your Google Account. There you should find the Notes app. Now any changes you make here would reflect inside the Notes label created in your Gmail Account.
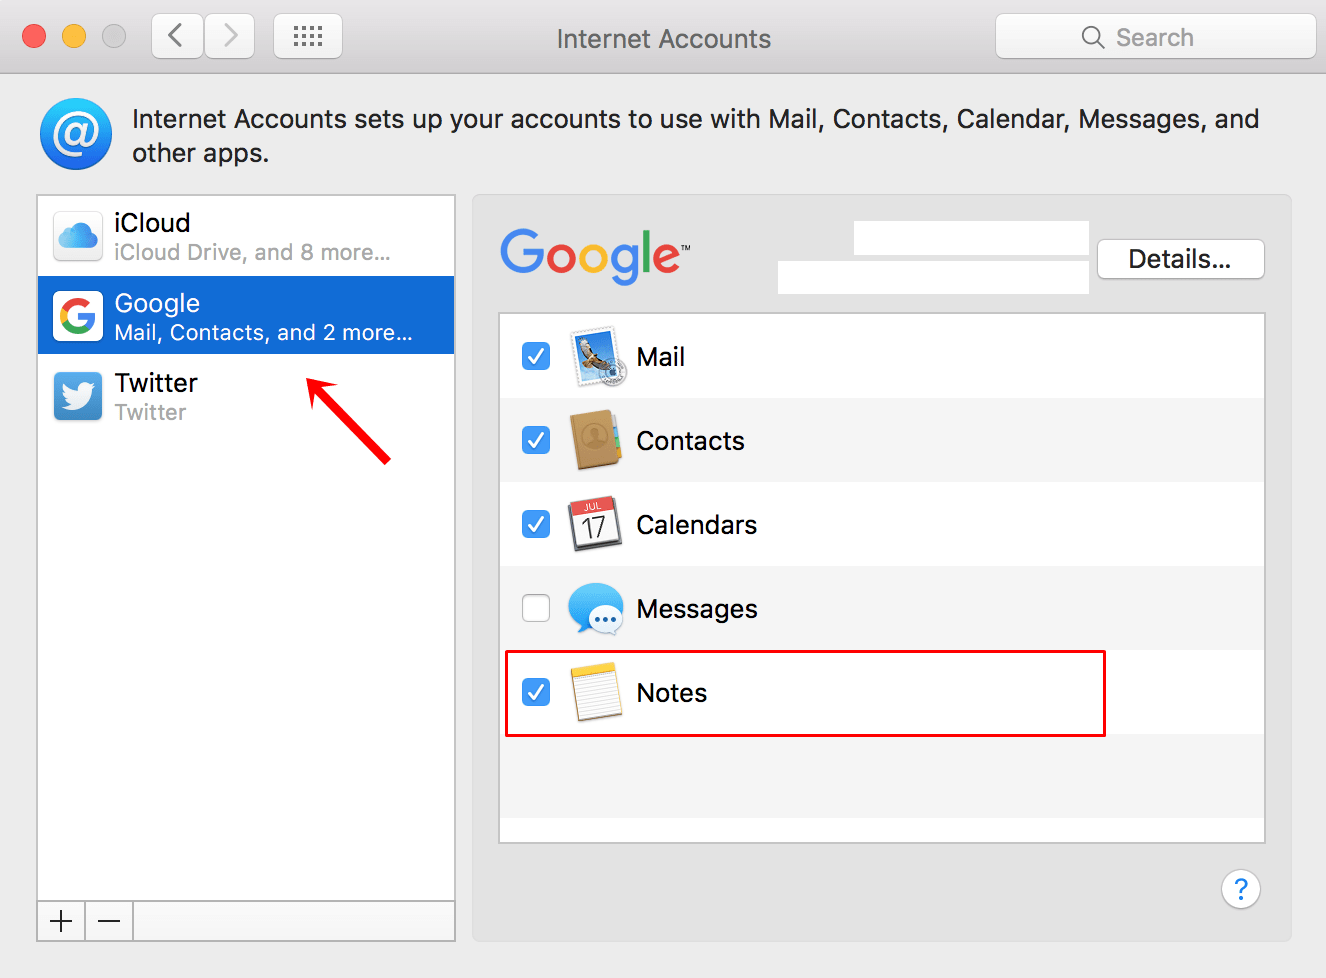
The only flaw with this usage is that these notes wouldn’t be synced with iCloud. If you head over to the Apple Notes app on your Mac, you should now see two separate sections, one named iCloud and the other one as Google. Notes saved under the latter heading wouldn’t be synced with the former.
Accessing iCloud Email on Android
You could access the Email option by viewing the iCloud site in the Desktop mode. However, the same could also be done directly from the Gmail app on your device. Being more feasible and easy to use, this has been the preferred method for many. The below instructions should further help us in cementing this statement.
- Launch the Gmail app and tap on the hamburger menu situated at the top-left.
- Scroll to Settings > Add Account.
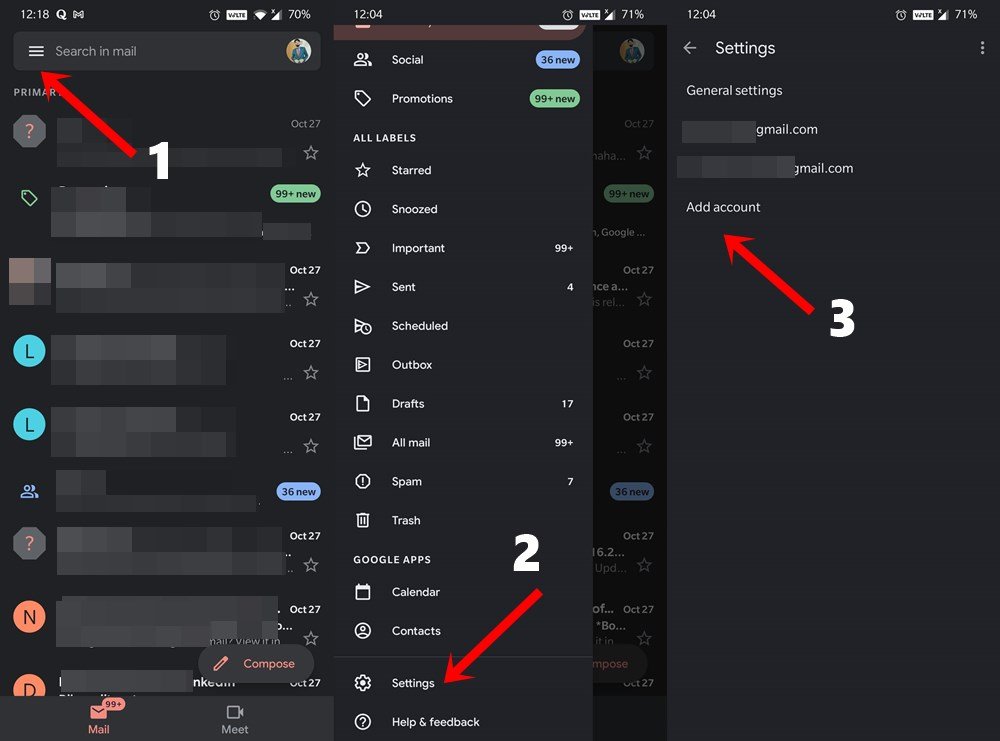
- Select Other and enter your Email address ending in @mac, @me, or @icloud.
- Finally, enter the password and the email will be added to Gmail.
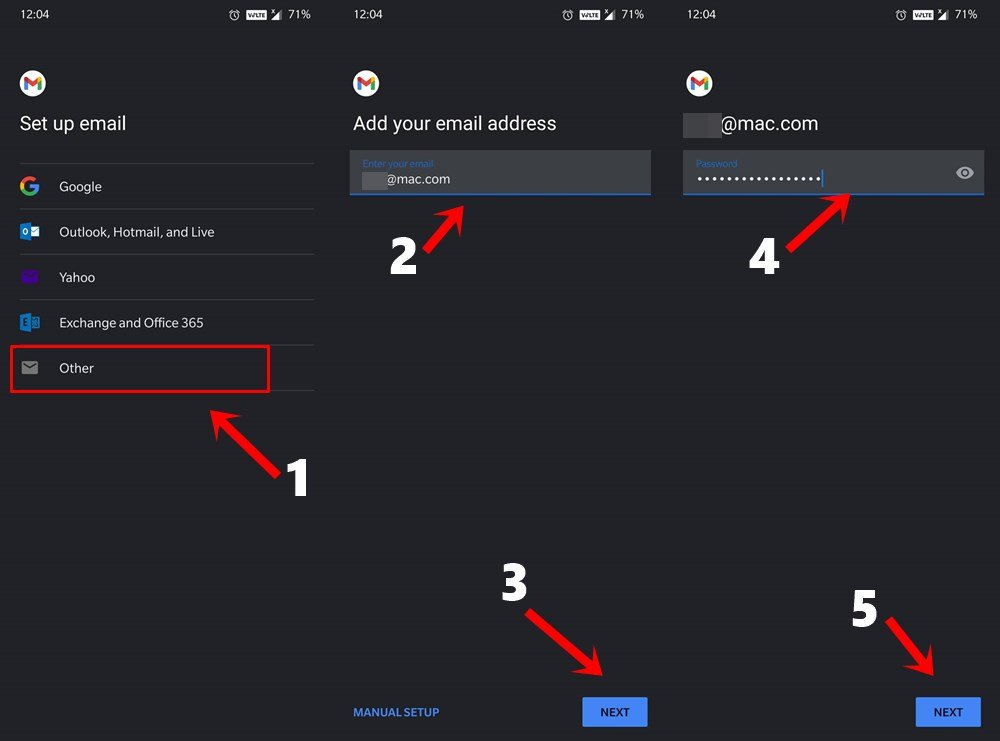
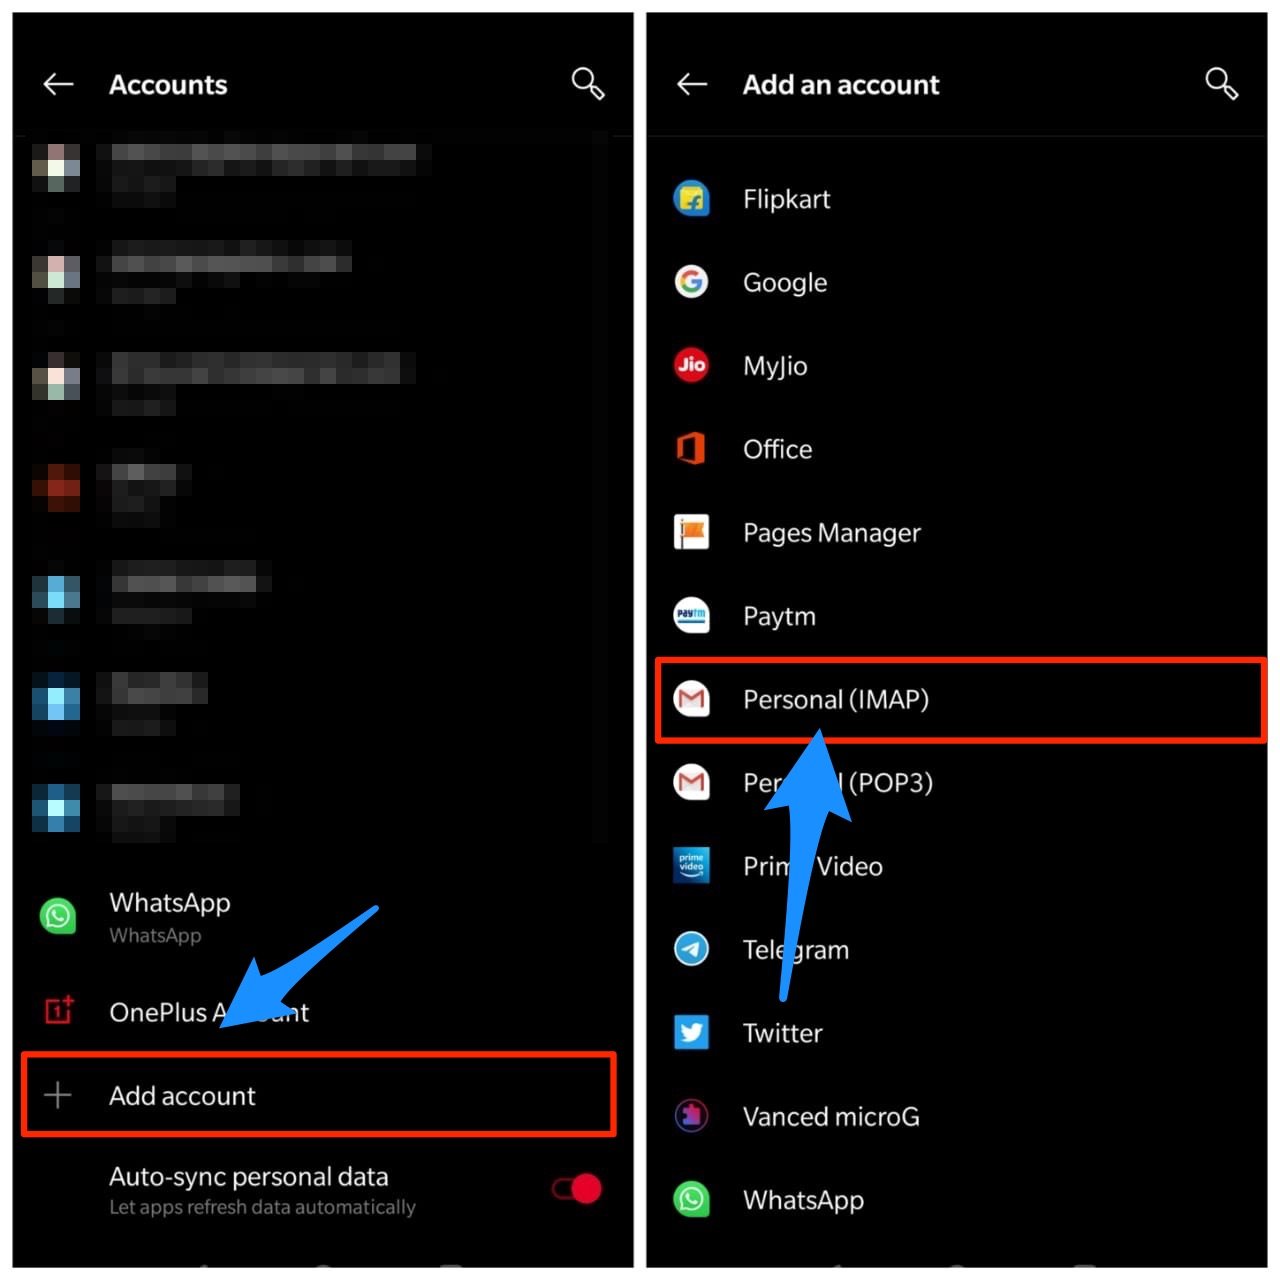
That’s it. You could now easily access all your iCloud inbox. However, if for some reason this doesn’t spell out success for you, then there’s another way out. Head over to Android Settings → Accounts → Add Account → Personal IMAP and enter your Apple account credentials.
Accessing iCloud Calendars on Android
The method isn’t straightforward when it comes to accessing calendars on Android. But while this calls for efforts, the result is definitely to cherish. In a nutshell, we will export the calendar from your iCloud in .ics extension and then import it to your Google Calendars. The latter in turn could easily be accessed on your Android device. So with that said, let’s get on with the steps:
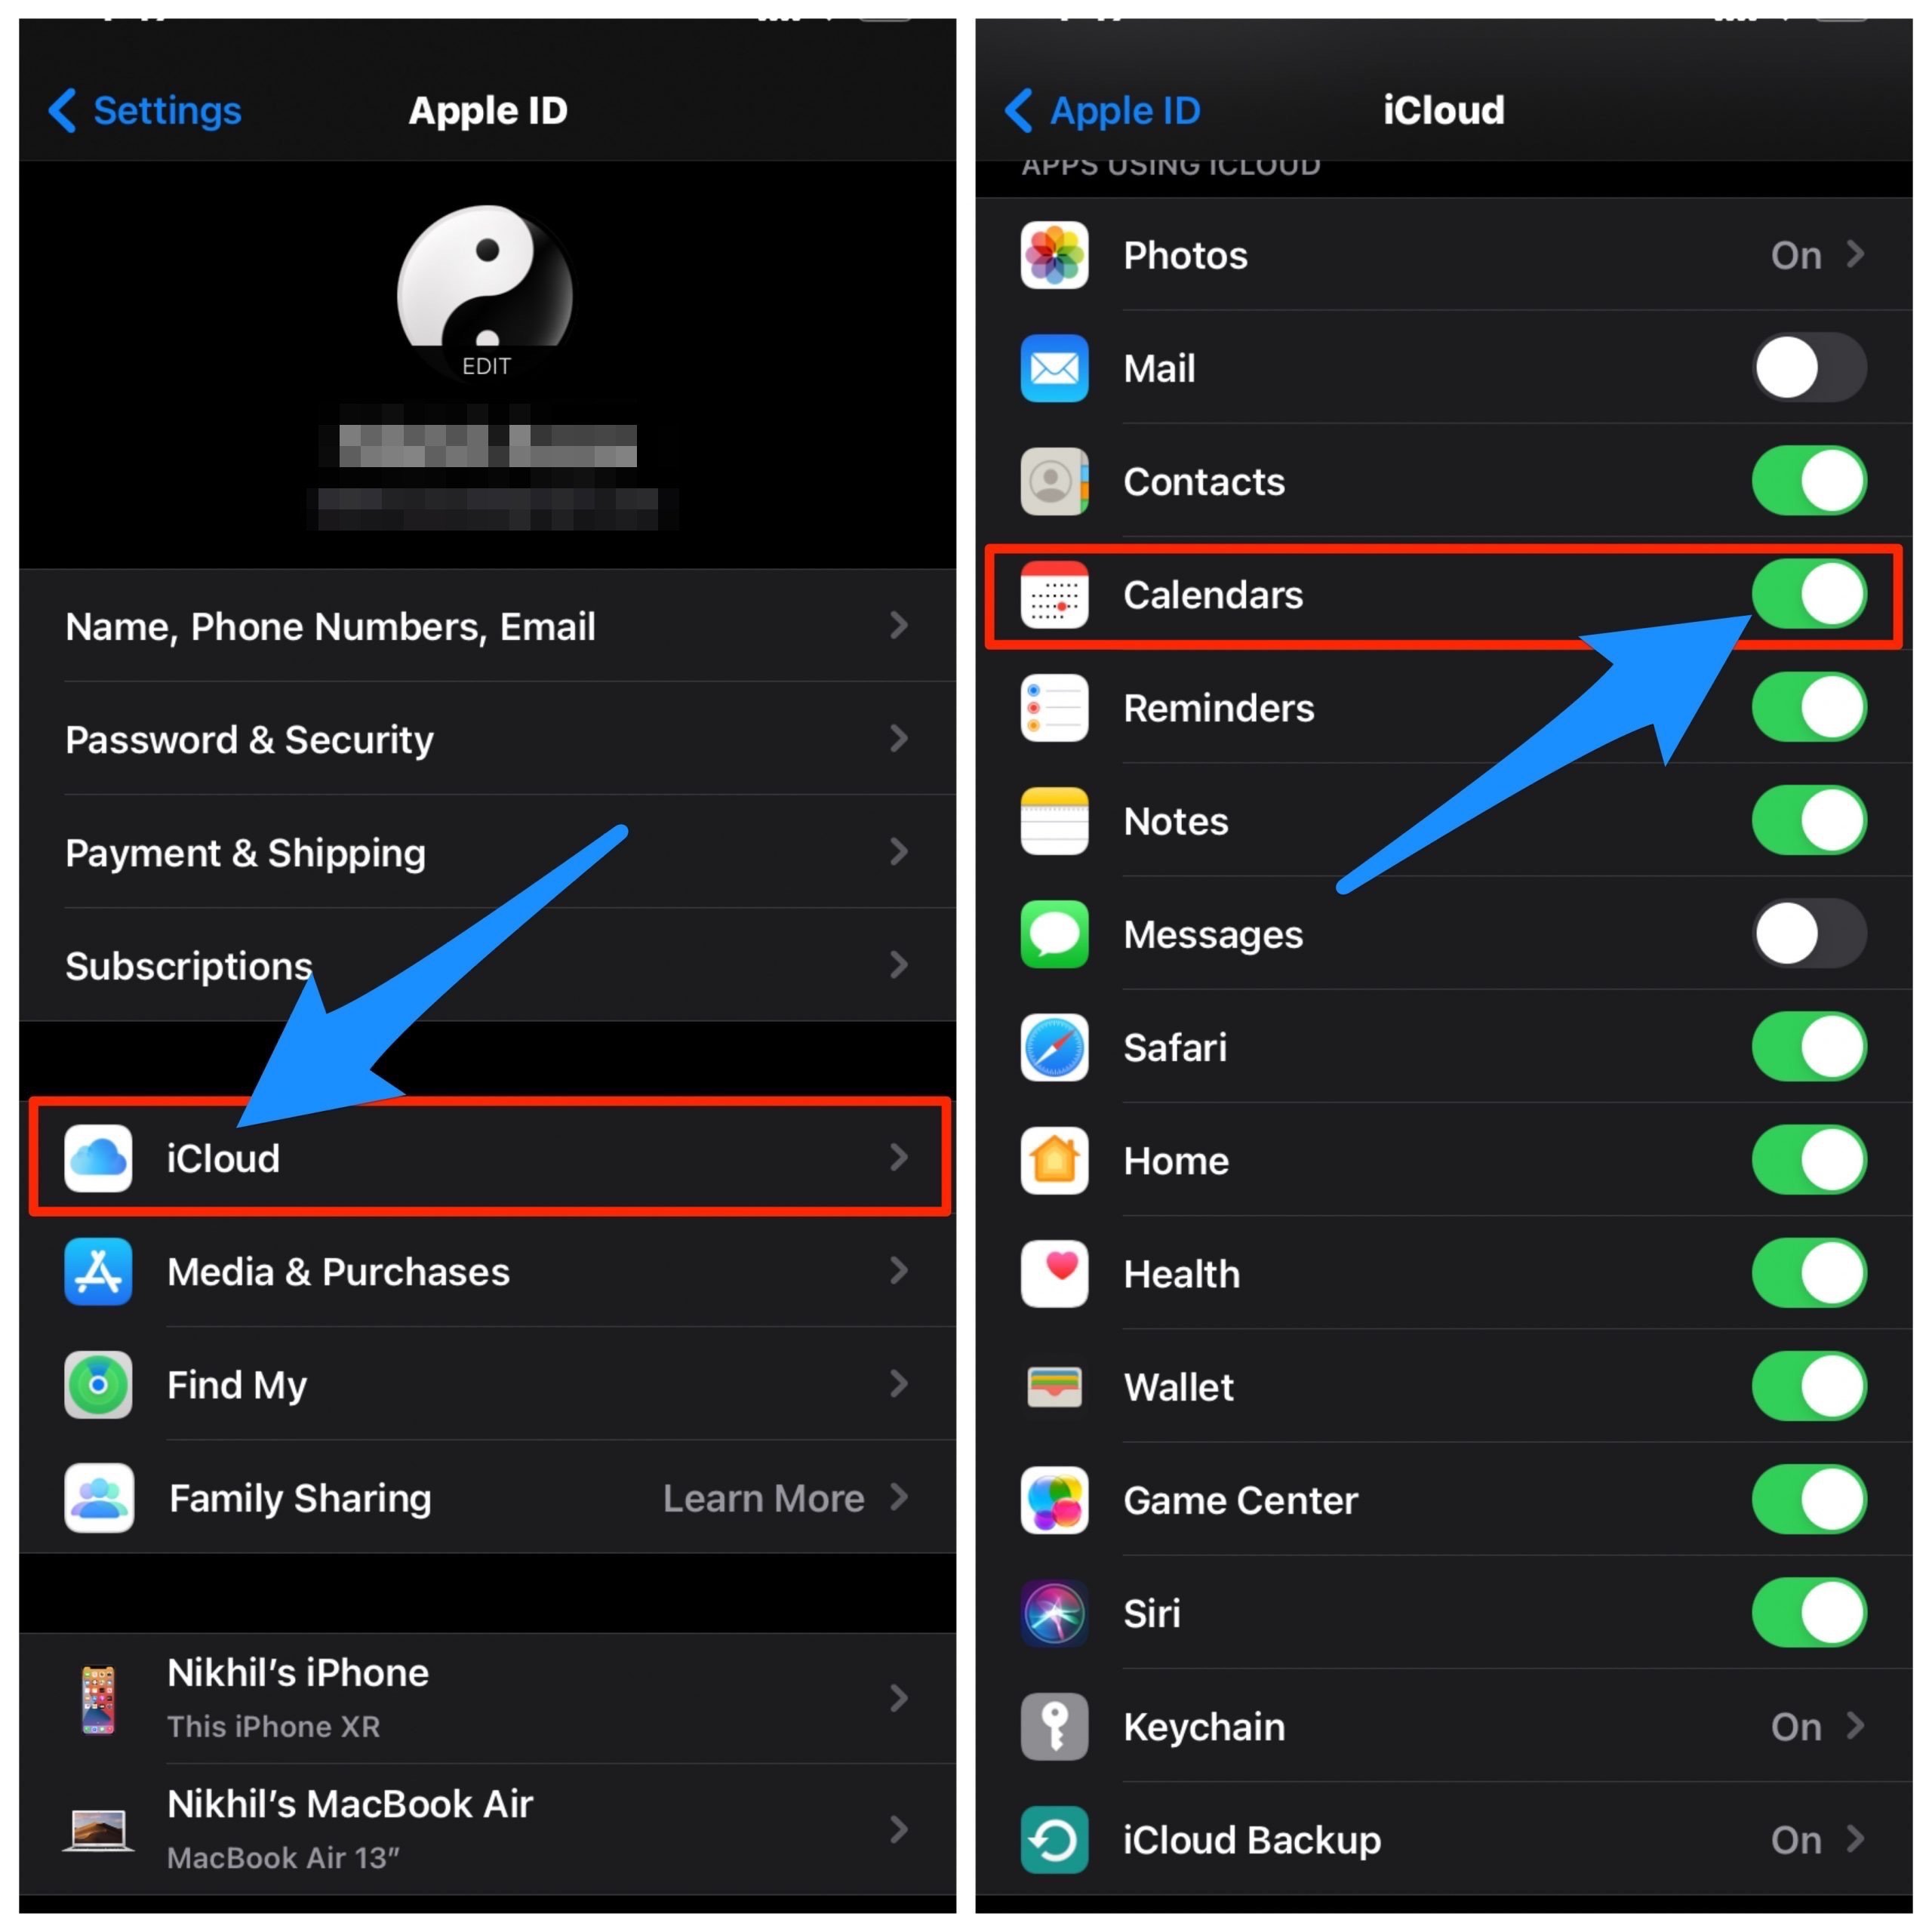
- Head over to the Settings menu on your iPhone and tap on your name.
- Then go to the iCloud section and enable the toggle next to Calendar.
- Once that is done, visit the iCloud website and go to the Calendar section.
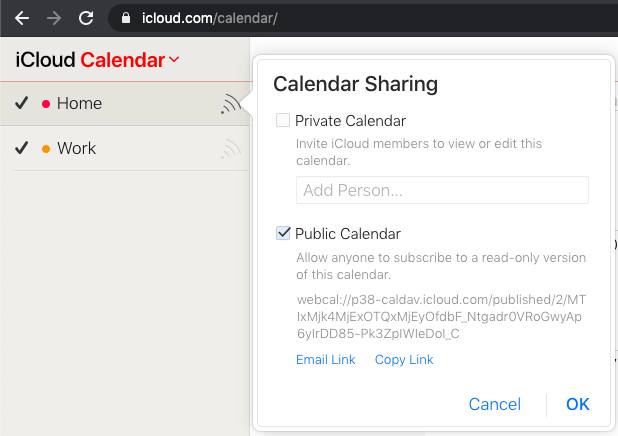
- Now click on the Share Calendar button next to the calendar that you wish to export.
- Then select Public Calendar in the dialog box that appears. Select Copy Link followed by OK.
- Now open that link in a new tab and as soon as it loads fully, you should get the Save As dialog box. Type in the name of your choice and save it (leave the extension in .ics format only).
- Once that is done, head over to the Google Calendar website and sign in with your credentials. You will have to view this page in Desktop Mode to access its complete features. Or you could also make use of a PC to carry out this one-time setup process (recommended).
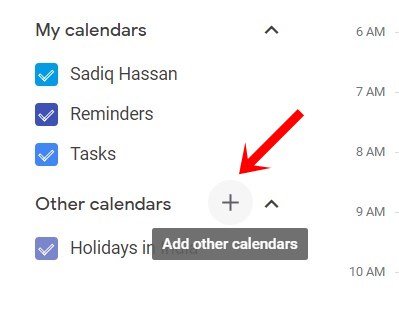
- Then click on the plus icon situated next to Other Calendar at the bottom left of your screen.
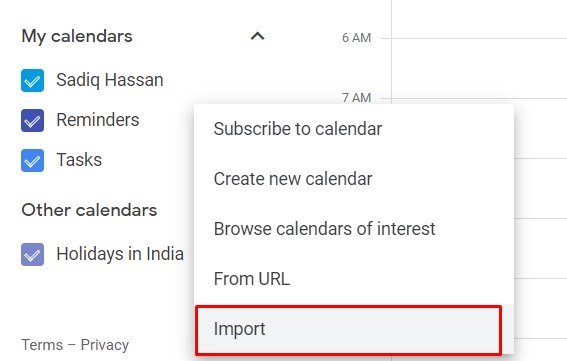
- Select Import from the menu and upload the calendar that you had exported from iCloud.
- As soon as the calendar is imported, you could then easily access it across all the devices signed in with this Google ID, including your Android smartphone.
Accessing Contacts on Android
You could handle your saved contacts via the iCloud website in Desktop Mode on your smartphone. Likewise, one could also export these contacts from iCloud in a VCF format and import it over to the Google Calendar. The latter could then be accessed right from your Android device itself. Here are the required instructions for the same:
- To begin with, head over to the Settings page on your iPhone and make sure that Contacts sync is turned on.
- Now go to the iCloud website and head over to Contacts.
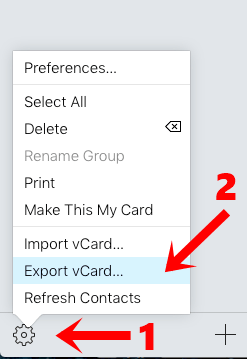
- Click on the Settings icon and select the Export VCard option. This will save all your contacts in a VCF format.
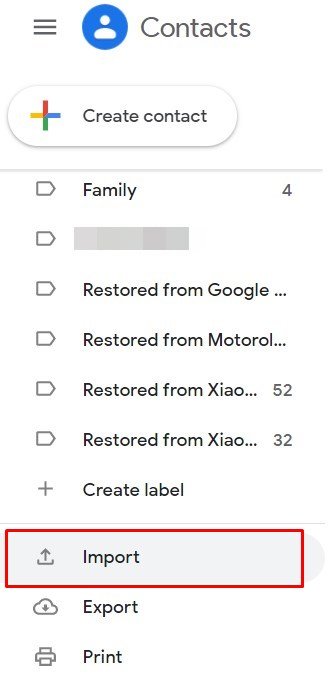
- Once that is done, go to the Google Contacts site and select the Import option from the left-hand side.
- Upload the VCF file that you had downloaded from iCloud and wait for the process to finish.
- As mentioned before, the export/import process might prove to be a little bit challenging on your smartphone. Hence you could carry out these steps on your PC for the first time setup.
- Moving on, once the upload is finished, all your contacts synced with iCloud will now be available on your Android device that is logged in with this Google ID.
iCloud APK Download for Android
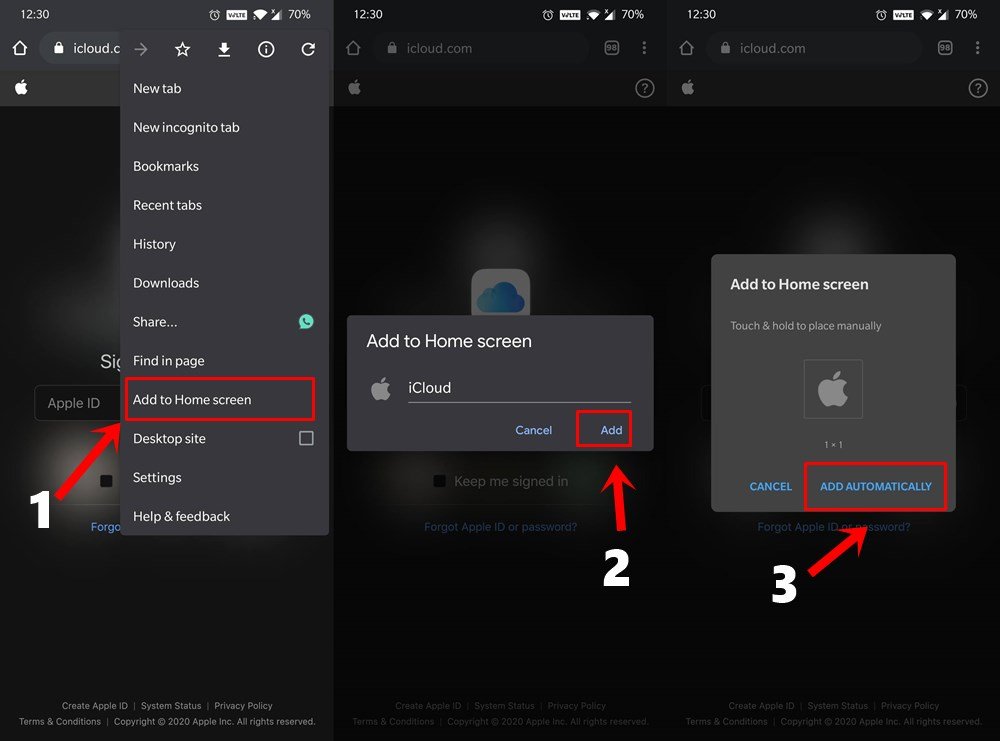
There is no Standalone Native iCloud App for Android but you can still access the Web App which works as a mobile application. This way you won’t have to open Chrome every time to access iCloud. Rather, the Web App will now be treated as a standalone application.
To try it out, launch the iCloud website on your smartphone via Chrome and tap on the overflow icon. Then select the Add to Home Screen option. Give it a name and tap on Add > Add Automatically. This will now create an iCloud PWA on your home screen that could be directly accessed as and when required. That’s it!
Conclusion
Rounding off, if you would prefer to use iCloud on Android on a regular basis, then it’s better that you create a Progressive Web App of the same. With this, we conclude the guide on how to access iCloud on your Android device. Do let us know your views about this handy workaround in the comments section below.
If you've any thoughts on [Guide] How to Use & Sync iCloud Storage on Android?, then feel free to drop in below comment box. Also, please subscribe to our DigitBin YouTube channel for videos tutorials. Cheers!
