When your computer connects to an internet source, the local Dynamic Host Configuration Protocol (DHCP) server allocates a dynamic IP address to your Windows 11 PC. As the name suggests, the dynamic IP address changes every time the computer reboots, the router restarts, after the settings expire, or when devices leave and join the network. This prevents you from using port forwarding features or problems in connecting with the remote desktop.
This calls in for the static IP address which does not change under any circumstance. A static configuration retains the same settings allowing service hosting when it needs to be accessed across networks. Thus, a static IP address is ideal for sharing files and folders, accessing printers on a local network, or configuring port forwarding settings.
If you are clueless about how to address the static IP address on a Windows 11 PC, we’ve got you covered. In this detailed guide, we have provided a step-by-step tutorial to set a static IP (version 4) address on your Windows 11 PC. So without wasting any time, let’s get started.
Ways to Change the Static IP Address on Windows PC
Below are the different ways offered by Microsoft by which you can change the static IP address on your Windows 11 device.
1. Set the Static IP using the Command Prompt
You can set the static IP address on the Windows 11 PC directly by executing the commands on the command prompt window. Here is the step-by-step process of the same:
- Press the Windows key to launch the Start menu. Type cmd in the search bar on top and choose the Run as administrator option from the results section.
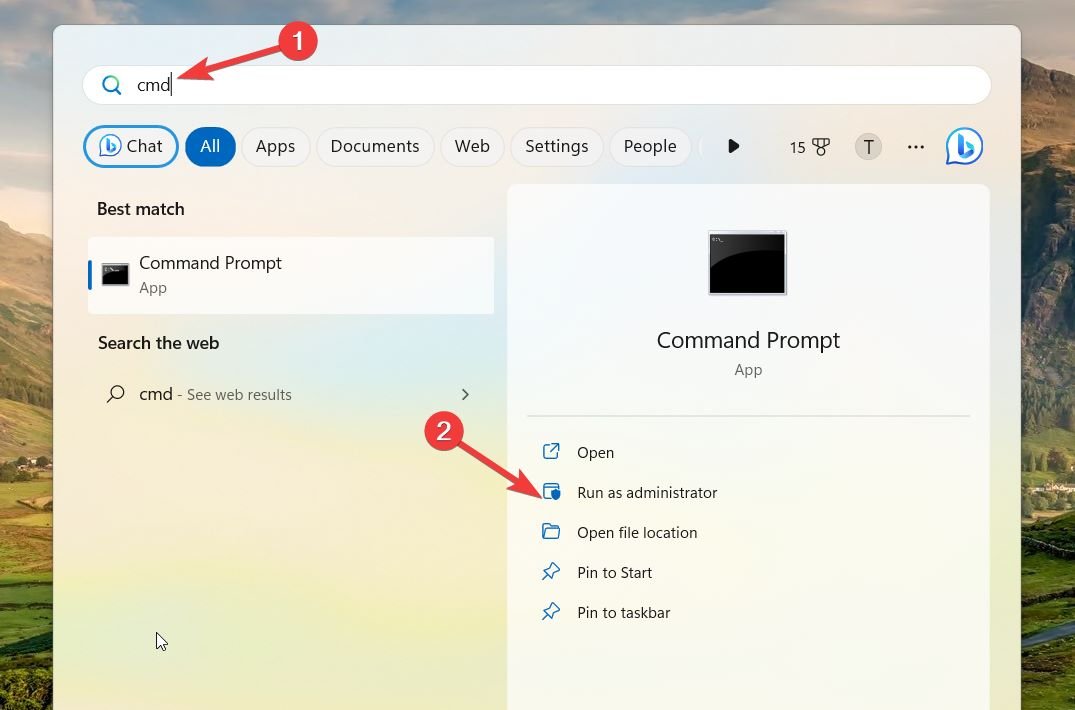
- Choose Yes from the User Action Control prompt to provide administrative privileges to the Command Prompt.
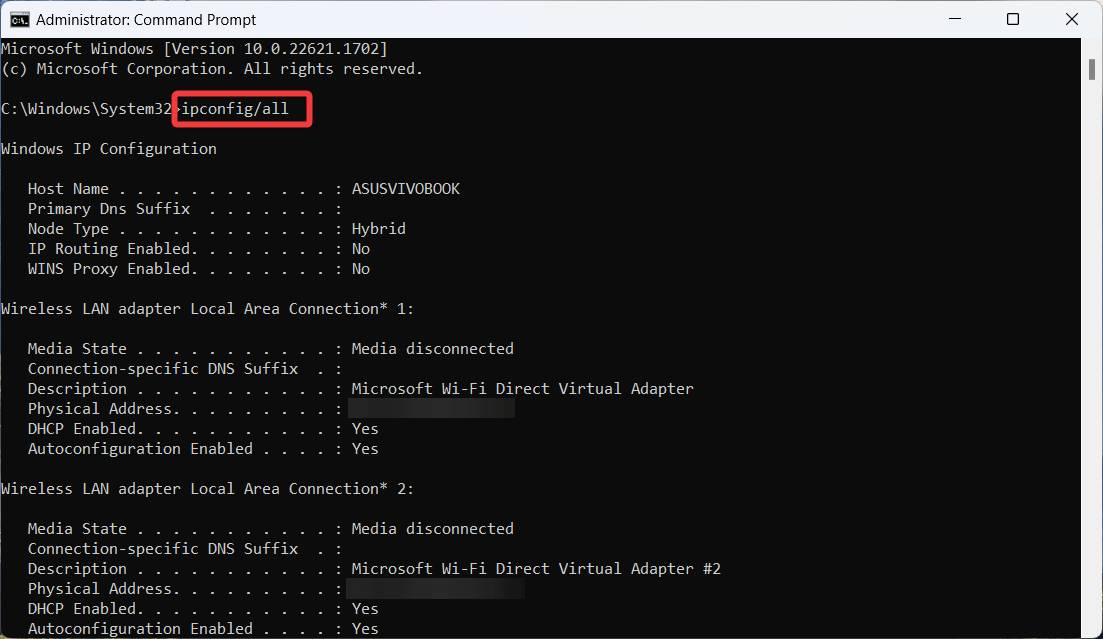
- Type the ipconfig /all and press the Enter key to view the configuration settings.
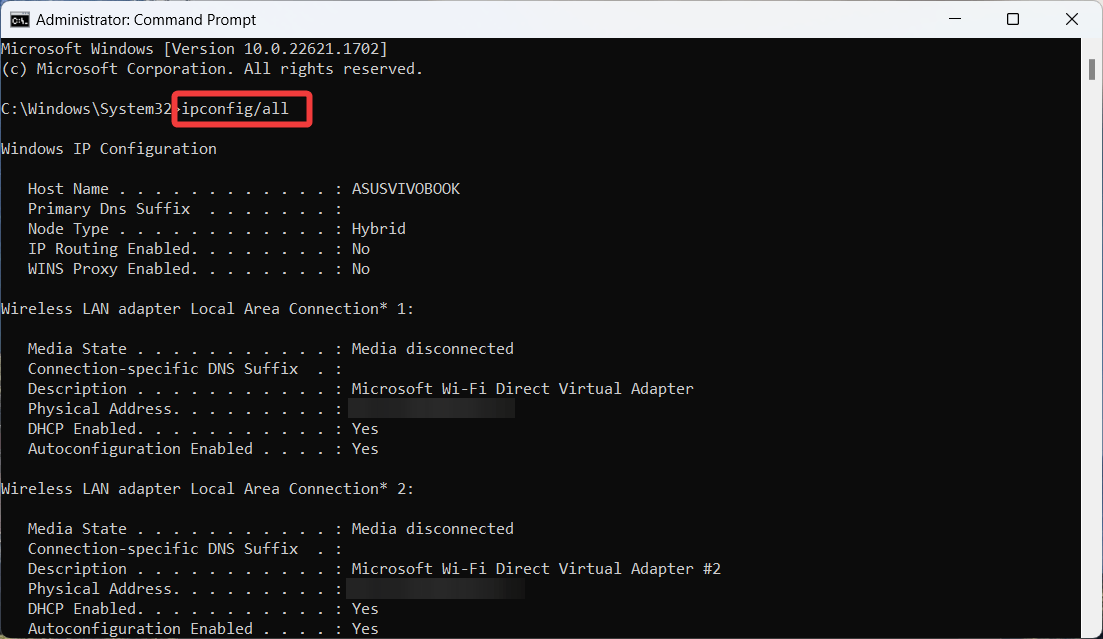
- When the information is displayed, note down the following details for later use. IPv4 Address Subnet Mask Default Gateway DNS Servers
- Next, type the command and press the Enter key to execute it. Replace the placeholders with the values copied above.
netsh interface ip set address name= “[Adapter Name]” static [IPv4 address] [Subnet Mask] [Default Gateway]
For example, the command should look like this: netsh interface ip set address name= “Ethernet” static 10.221.55.4 255.255.255.0 10.201.58.1
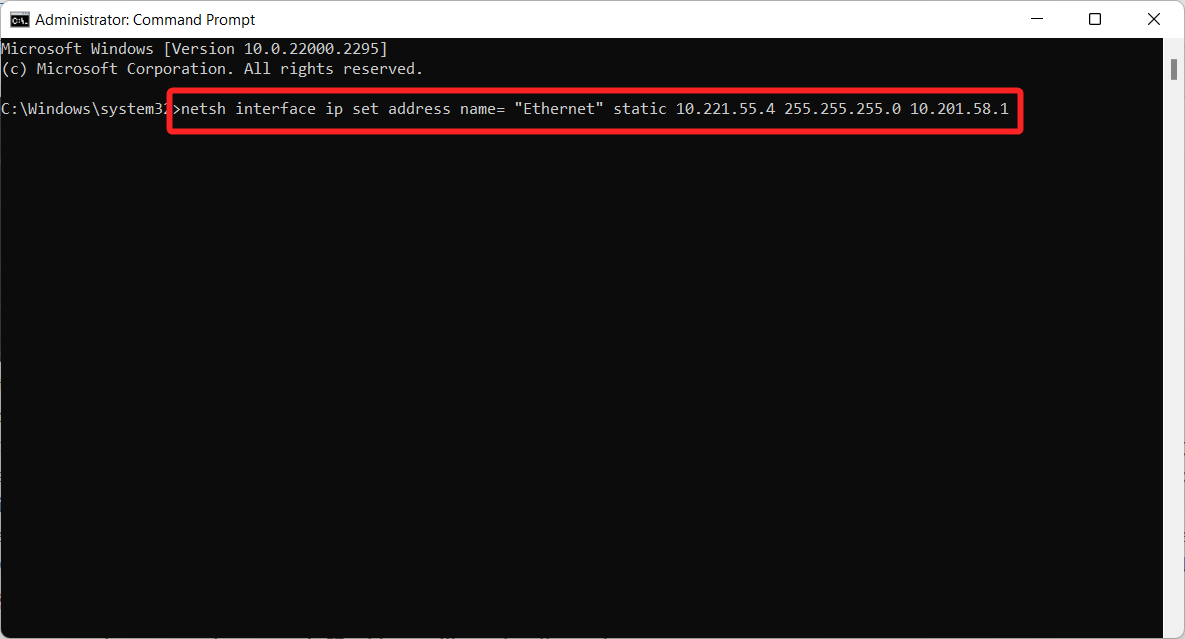
- Next, execute the command by pressing the Enter key to set a DNS server.
netsh interface ip set dns name = “[Adapter Name] static [First DNS Server]
For instance, the command will look like this: netsh interface ip set dns name= “Ethernet” static 10.211.55.1 windows 11 netsh set dns command
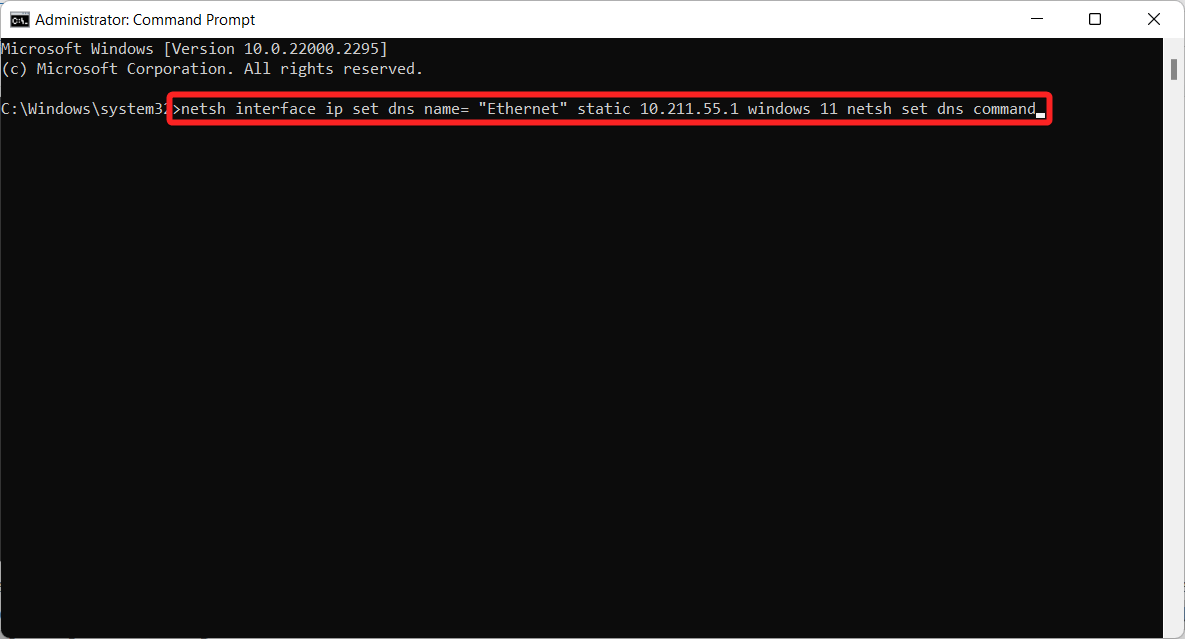
As soon as you execute the command, your static IP address will now be allocated.
2. Set the Static IP using the Windows Settings app
If you are not well versed with the command prompt, you can directly set the static IP address using the Windows 11 settings app. However, you need to copy the current network configuration by executing the command in the command prompt window.
- Press the Windows button to bring up the Start menu. Type cmd in the search bar on top and choose the Run as administrator option from the search results.
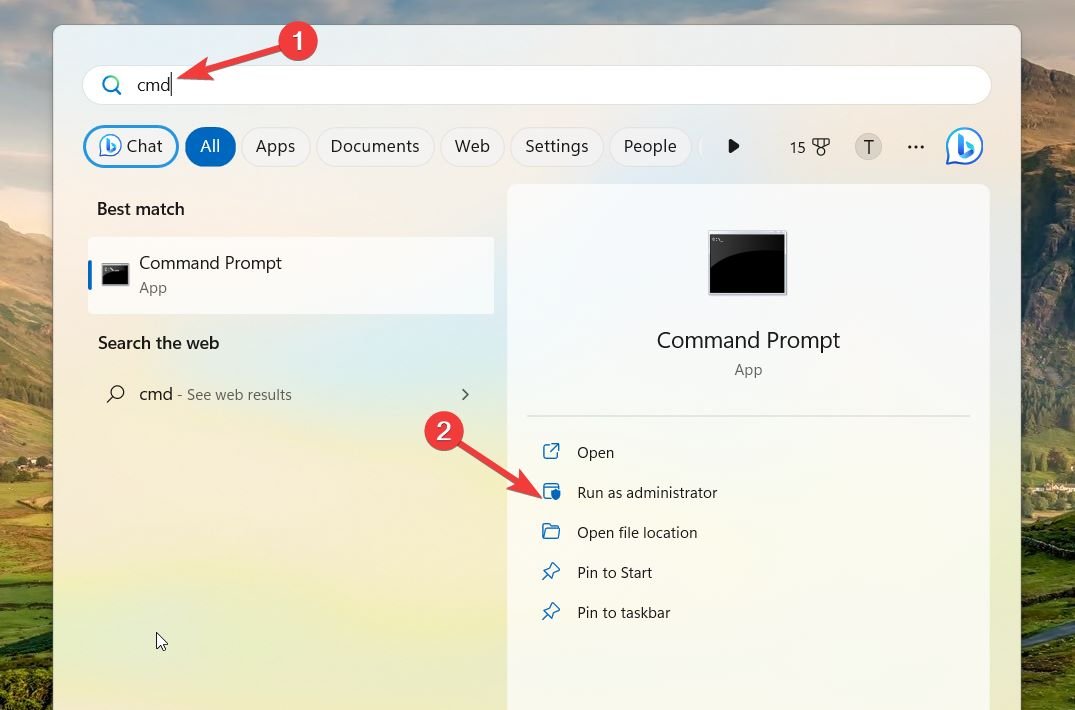
- Type the following command in the command prompt and press the Enter key to execute it. ipconfig /all
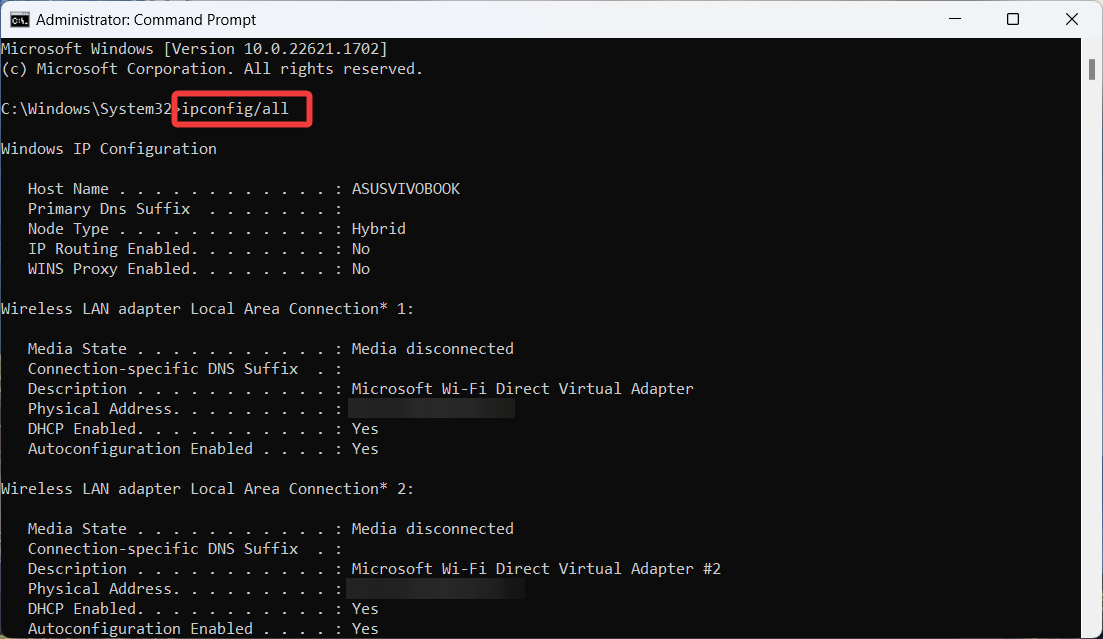
- Note down the following details for later use. IPv4 Address Subnet Mask Default Gateway DNS Servers
- Use the Windows + I shortcut to launch the Settings app on Windows 11 PC.
- Choose Network & Internet from the left sidebar and then WiFi or ethernet from the right section.
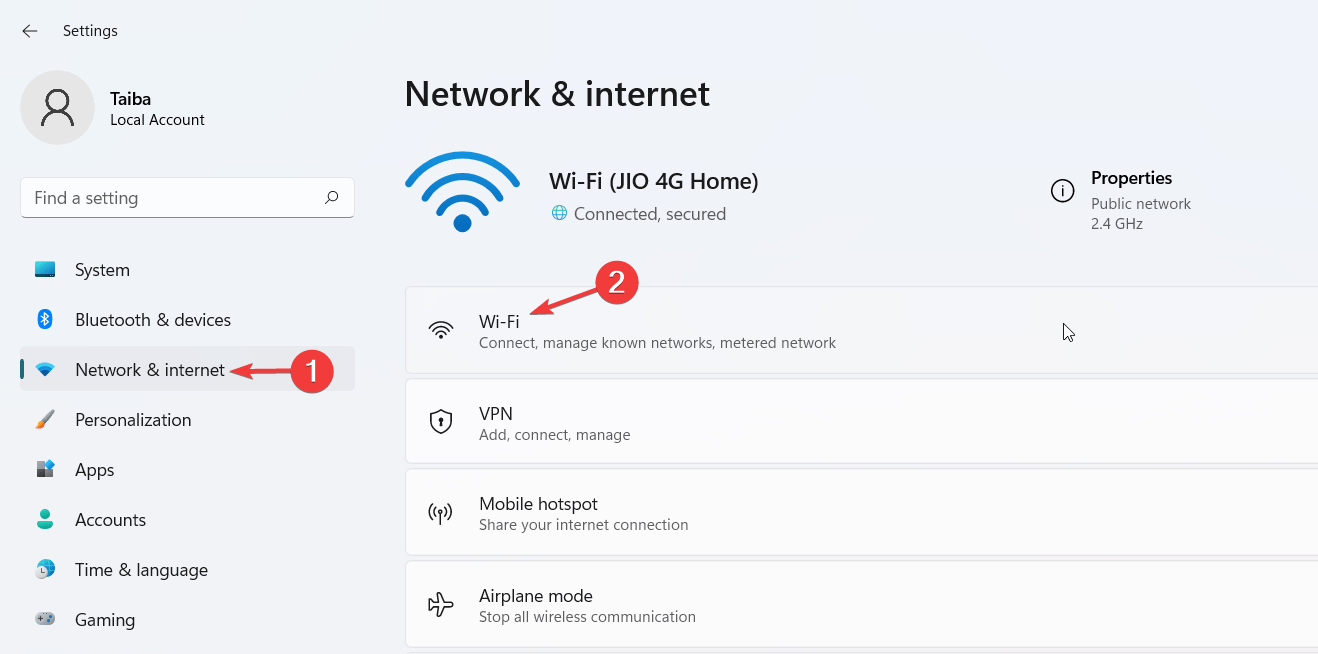
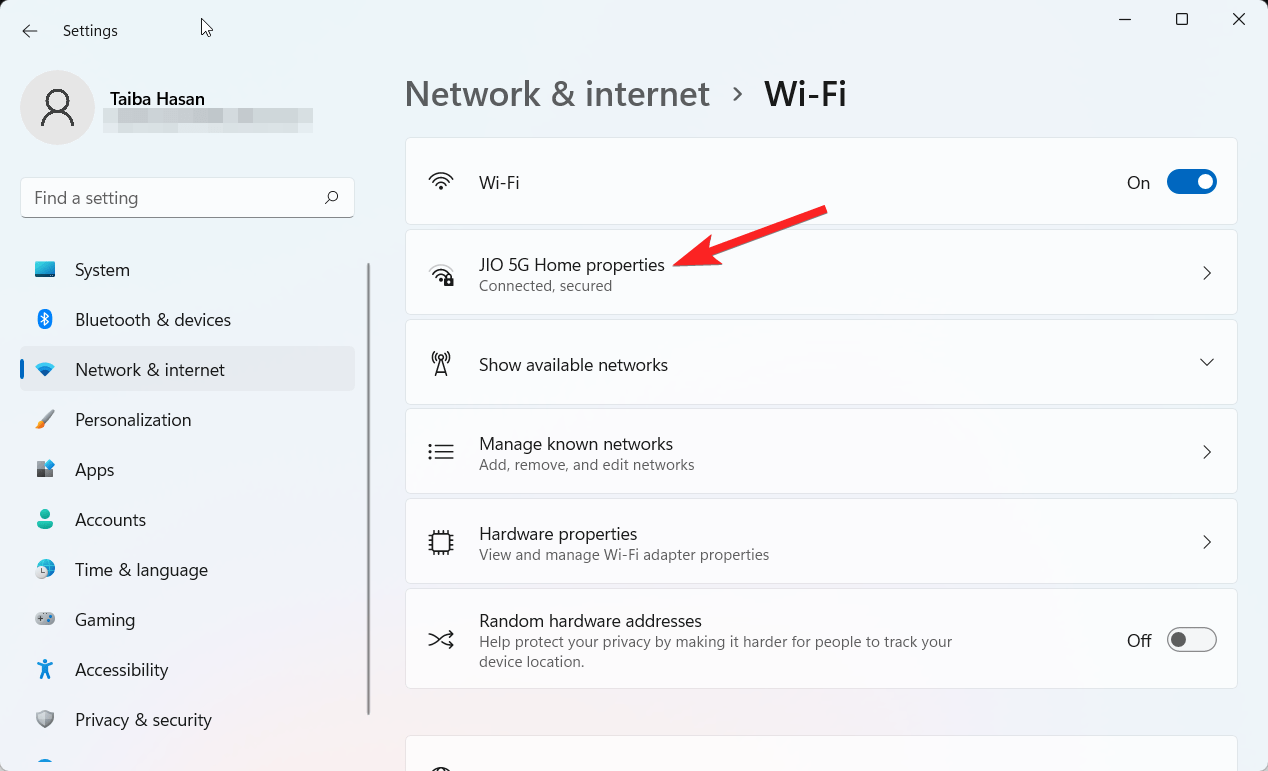
- Choose Wi-Fi Properties from the next window to expand the settings.
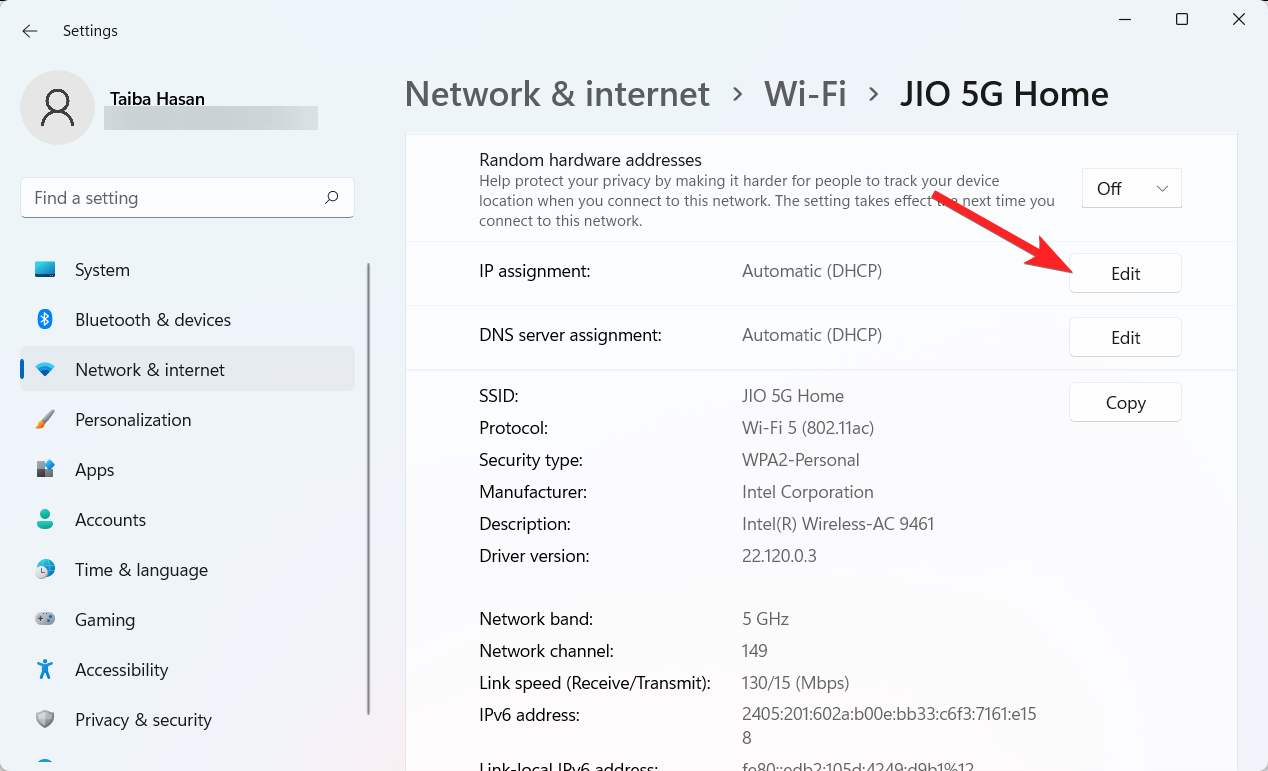
- Scroll down and press the Edit button next to the IP assignment.
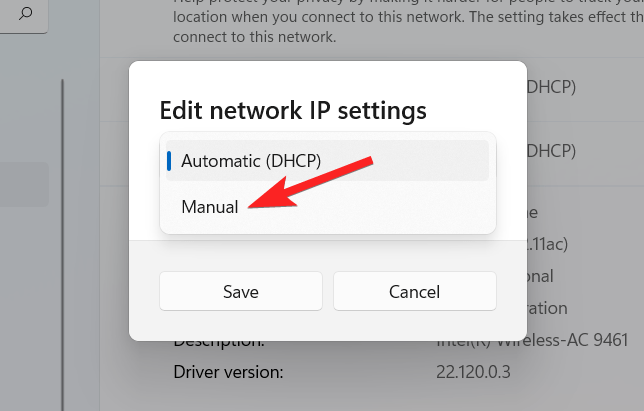
- Expand the drop-down in the popup window and choose the Manual option.
- Enable the toggle next to the IPv4 option.
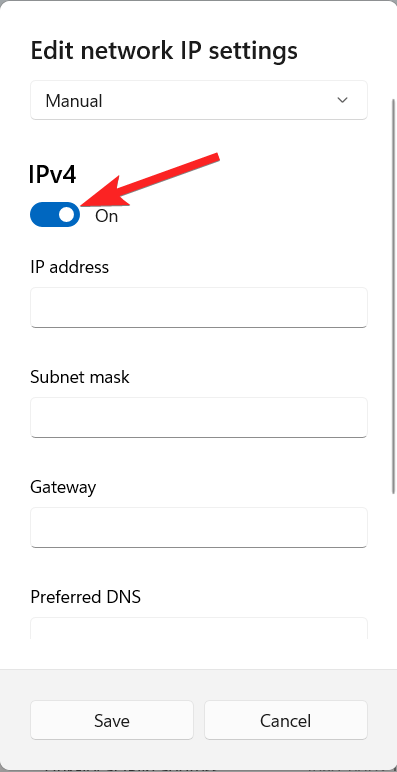
- Enter the IP Address, Subnet Mask, Gateway, and Preferred DNS values that you copied previously and put them in the appropriate fields.
- Once done, press the Save button to apply the changes.
3. Set static IP on Windows 11 using Windows PowerShell
It is also possible to set the static IP address using Windows PowerShell built inside Windows 11 PC, but there is a catch! Using the Windows Powershell, you cannot set the current IP address to static. To fix this, you need to change the last digit of the IP address to something else.
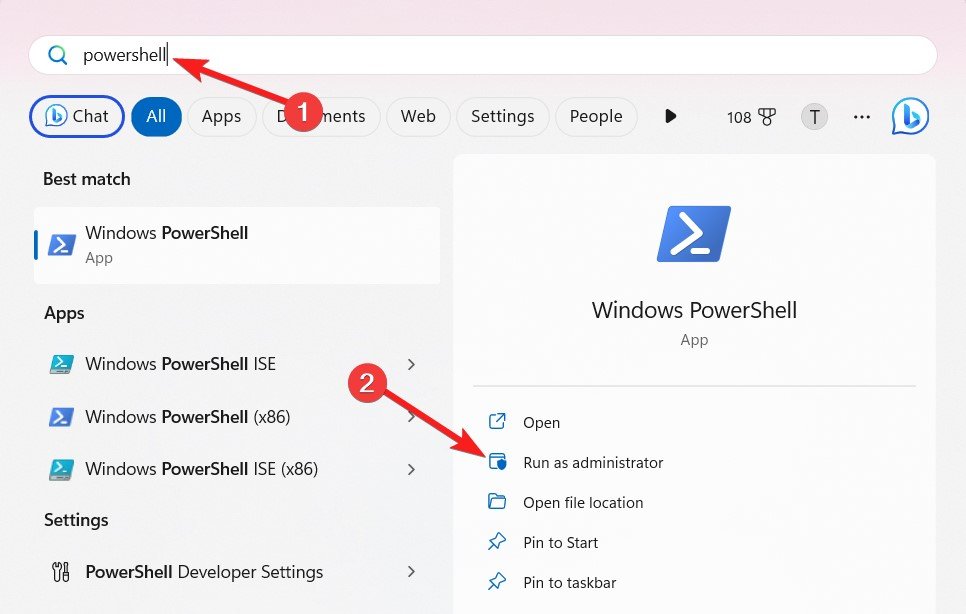
- Press the Windows key to launch the Start menu. Type PowerShell in the search bar on top and select Run as administrator from the results section.
- Type the following command in the PowerShell window and press the Enter key to execute it. Get-NetIPConfiguration
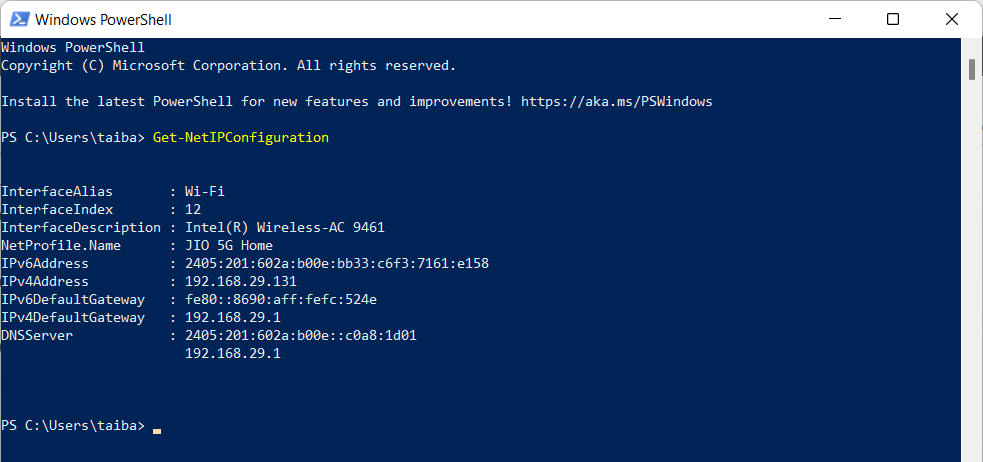
- Now note down the following details from the information section: InterfaceIndex, IPv4Address, IPv4DefaultGateway, DNSServer
- Now execute the command and replace the square bracketed placeholders with the values written earlier. Do not forget to replace the last digit of the IPv4 address with something else.
New-NetIPAddress -InterfaceIndex [InterfaceIndex] -IPAddress [IPv4Address] -PrefixLength 24 -DefaultGateway [IPv4DefaultGateway]
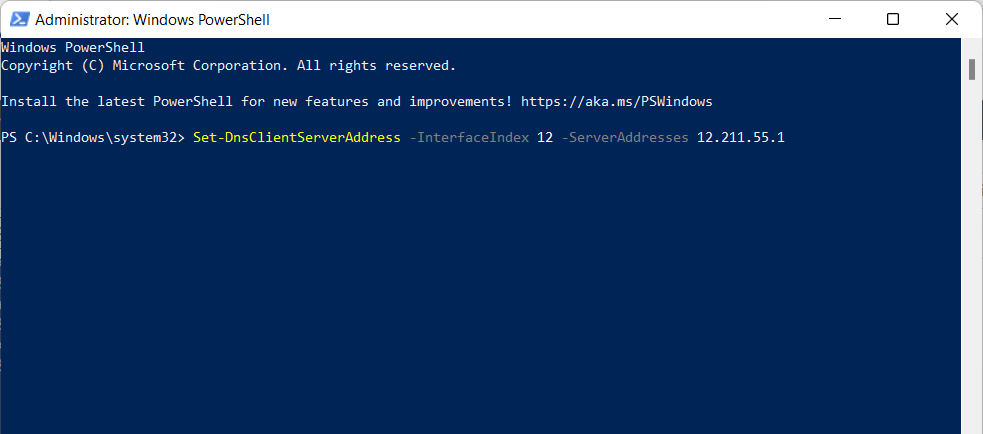
- In the next step, type the command and press the Enter key to change the DNS server. Replace the square bracketed placeholders with the values copied earlier.
Set-DnsClientServerAddress -InterfaceIndex [InterfaceIndex] -ServerAddresses [DNSServer]
4. Set the Static IP using the Control Panel
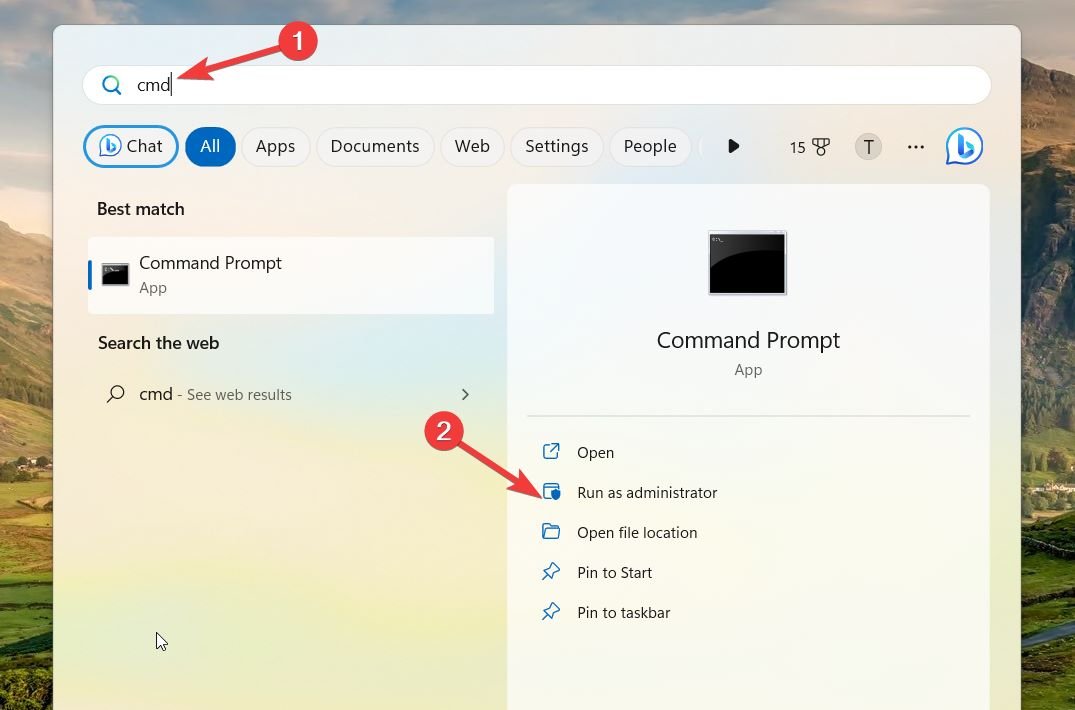
- Press the Windows icon to launch the Start menu. Type cmd in the search bar and select Run as administrator option from the results section.
- Choose Yes from the User Action Control prompt to provide administrative privileges to the Command Prompt.
- Type ipconfig /all and press Enter. Make a note of the following details: IPv4 Address, Subnet Mask, Default Gateway, and DNS Servers
- Now exit the command prompt window and launch the Start menu by pressing the Windows key. Type Control Panel in the search bar and launch the app from the search results.
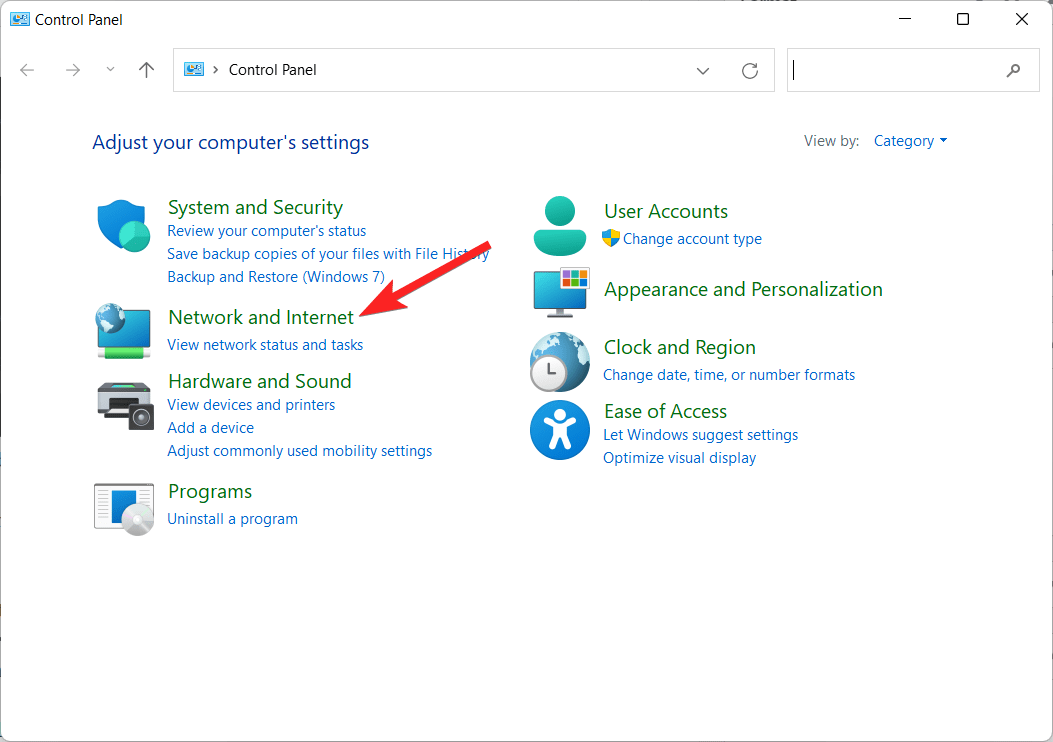
- Set View by to Category and choose Network and Internet from the window.
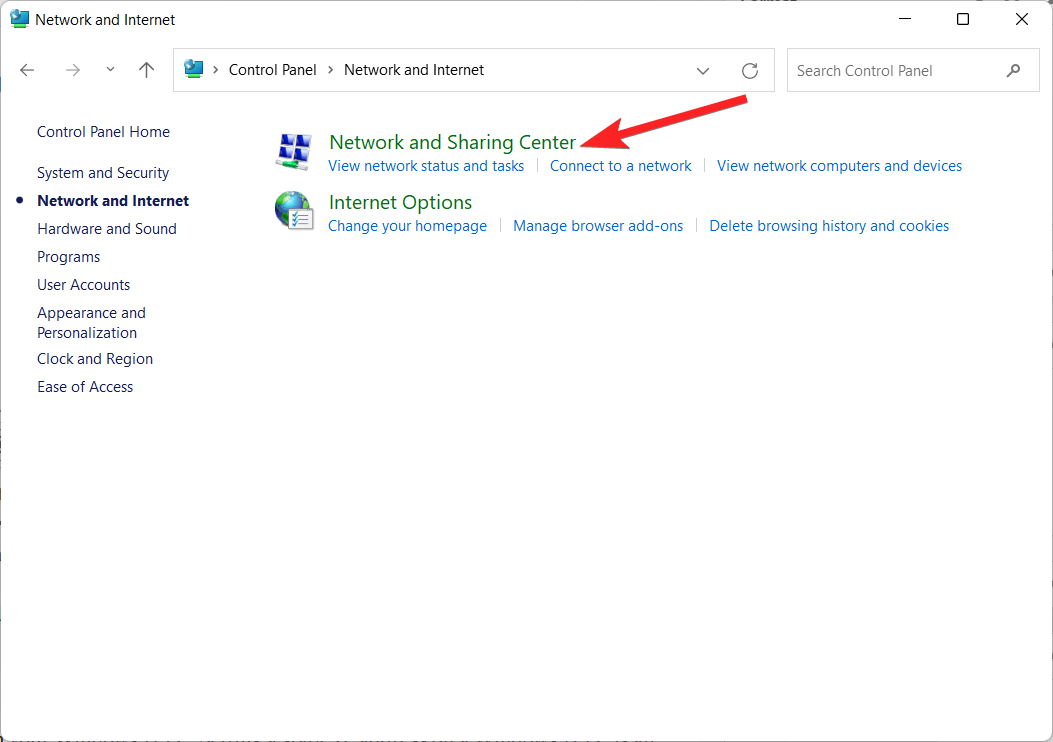
- Select Network and Sharing Center from the next window.
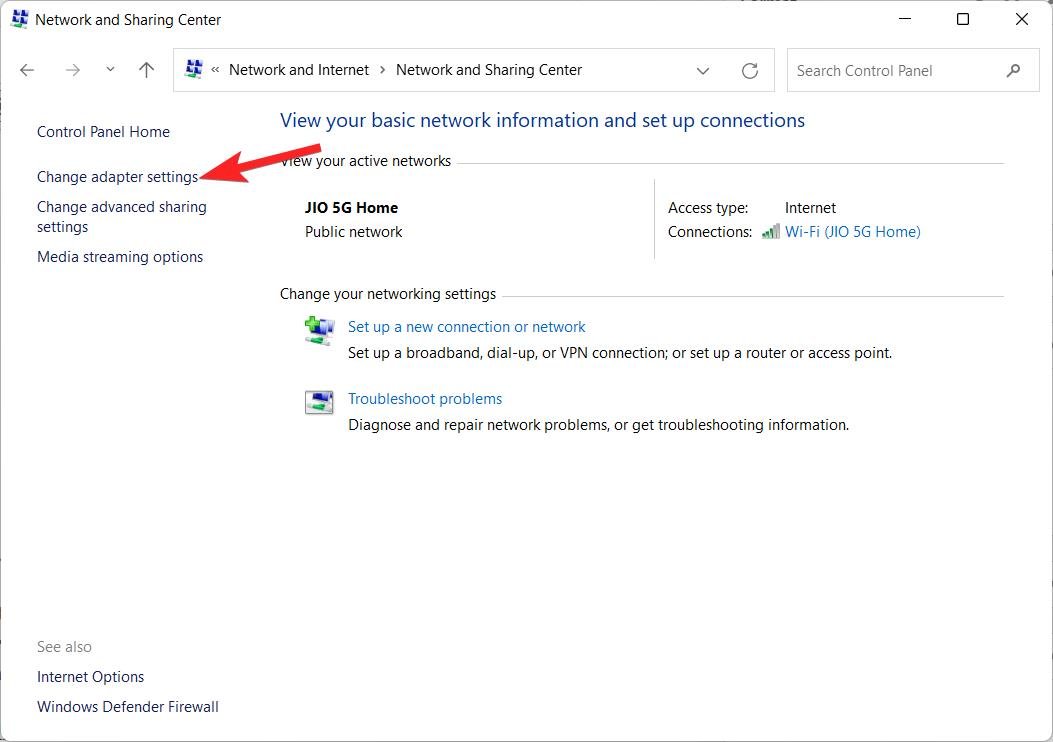
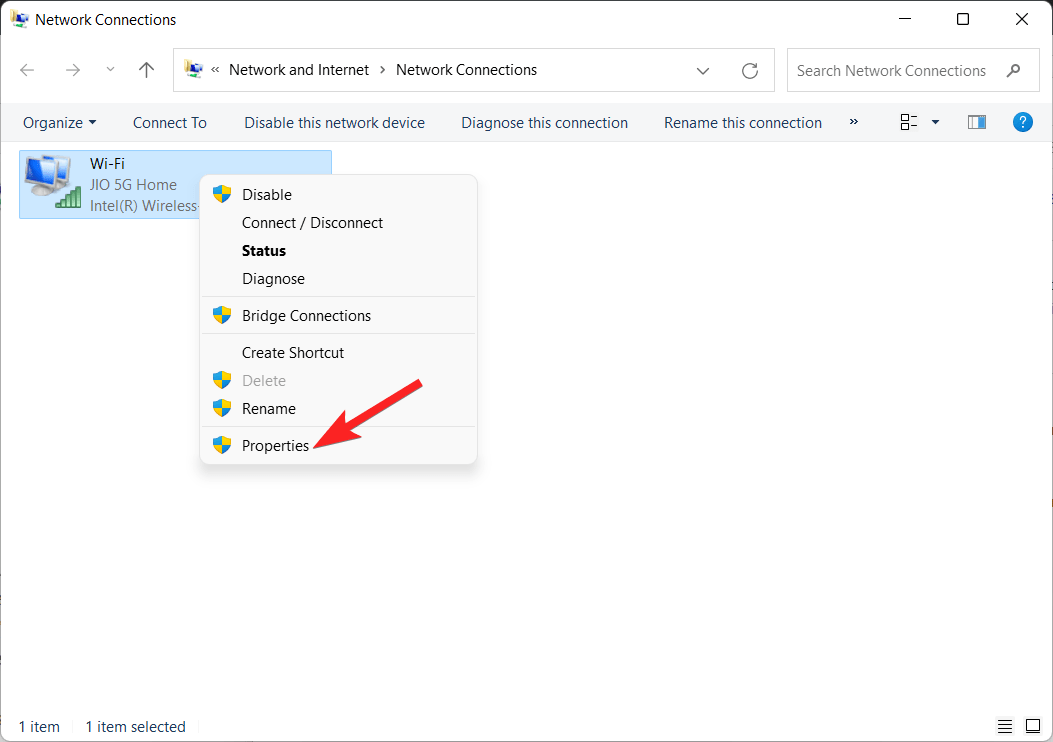
- Choose Change adapter settings from the left menu bar.
- Right-click the Network Adapter and select Properties from the context menu.
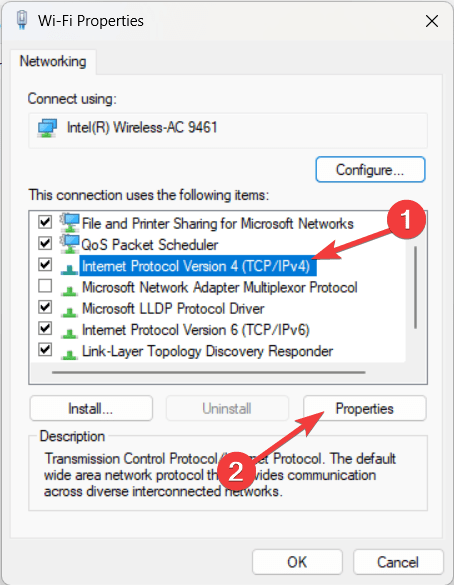
- Select Internet Protocol Version 4 (TCP/IPv4) and click the Properties button.
- Enable the radio button next to Use the Following IP Address and enter your IP Address, Subnet Mask, Default Gateway, and DNS Servers.
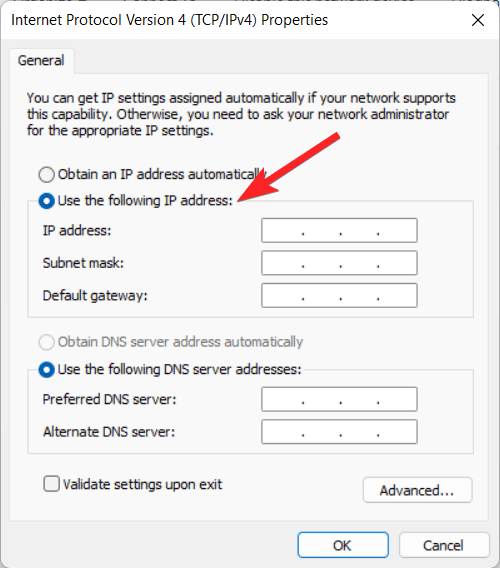
- Press the OK button to save the changes and to set your static IP address.
Conclusion
These are all the methods by which you can change the static IP address on your Windows 11 PC. Setting a static IP address on a Windows 11 PC is an uncomplicated task, and it ensures that the local IP address remains the same throughout.
If you have any questions regarding the same, do let us know in the comments section below.
If you've any thoughts on How to Set a Static IP Address on Windows 11?, then feel free to drop in below comment box. Also, please subscribe to our DigitBin YouTube channel for videos tutorials. Cheers!
