Gone are the days where you need to transfer every file from your smartphone onto your PC in order to be displayed. The fact of the matter, you no longer need to put your data on a USB to see them on the big screen of your smart TV. With the advancement of technology, devices like Google Chromecast, and features like screen mirroring have just removed the hassle that we used to previously go through, just to watch media from our smartphone to our laptop or smart TV. While other features of Android like rooting and customization are pretty popular among the masses, the screen mirroring option is not that widespread.
But if you own an Android device and a Windows 10 running desktop or laptop, then you can easily share or mirror your screen onto the display of your Windows 10 laptop. Screen mirroring allows a user to remotely share the smartphone’s screen. This is a good feature to have if you want to show your images, videos, or any content for that matter to a group of people. In this post, we will give you a detailed guide on how you can mirror or cast your Android smartphone’s screen to a Windows 10 laptop. With that being said, let us get straight into the article itself:
Mirror Android Screen on Windows 10 PC
We will show you two methods that you can make use of in order to cast or mirror your phone’s display onto your Windows 10 laptop or desktop. The first method makes use of the in-built Windows 10 feature to share your Android smartphone’s screen onto the Windows 10 laptop or desktop. The second method makes use of some apps that support screen mirroring feature. So, let us take a look at both the methods, one by one:
Screen Mirror Android to Windows 10 Using The Connect App
The first requirement in order for this method to work is that you need to have the latest version of Windows 10 installed on your PC. This process makes use of the WiFi connection to cast the Android screen onto the Windows 10 PC. Follow the steps below to turn your Windows 10 PC into a Miracast-capable wireless display;
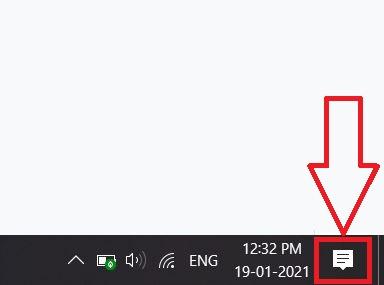
Step 1. Tap on the speech bubble button to open the action center, located at the extreme right-end corner of your Windows screen.
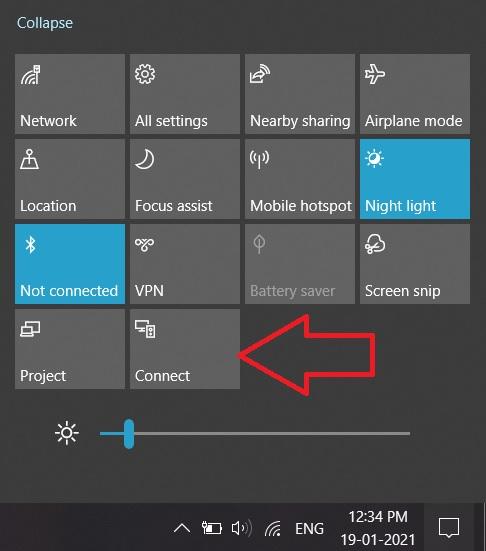
Step 2. You will see an option called ‘Connect’. Note that this option will only be visible if you have the latest version of Windows 10 installed. Click on the ‘Connect’ button.
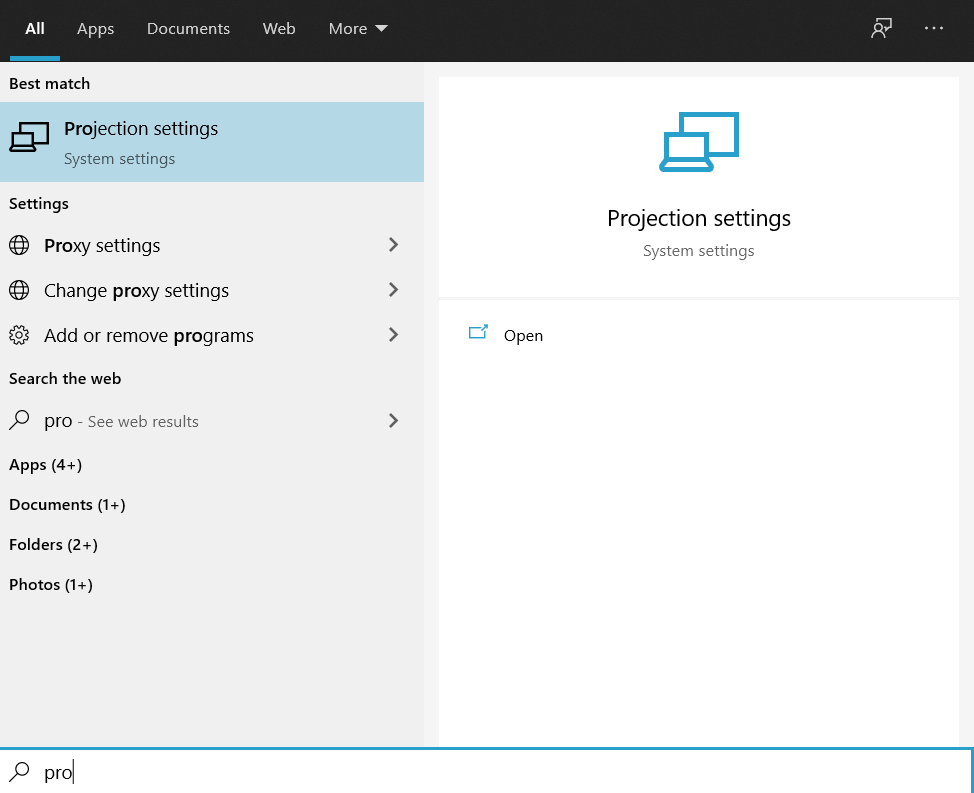
Step 3. Click Projecting to this PC option at the bottom of the new menu. If this option does not appear, then you can open the Start menu or press the Windows button and search for Projection Settings.
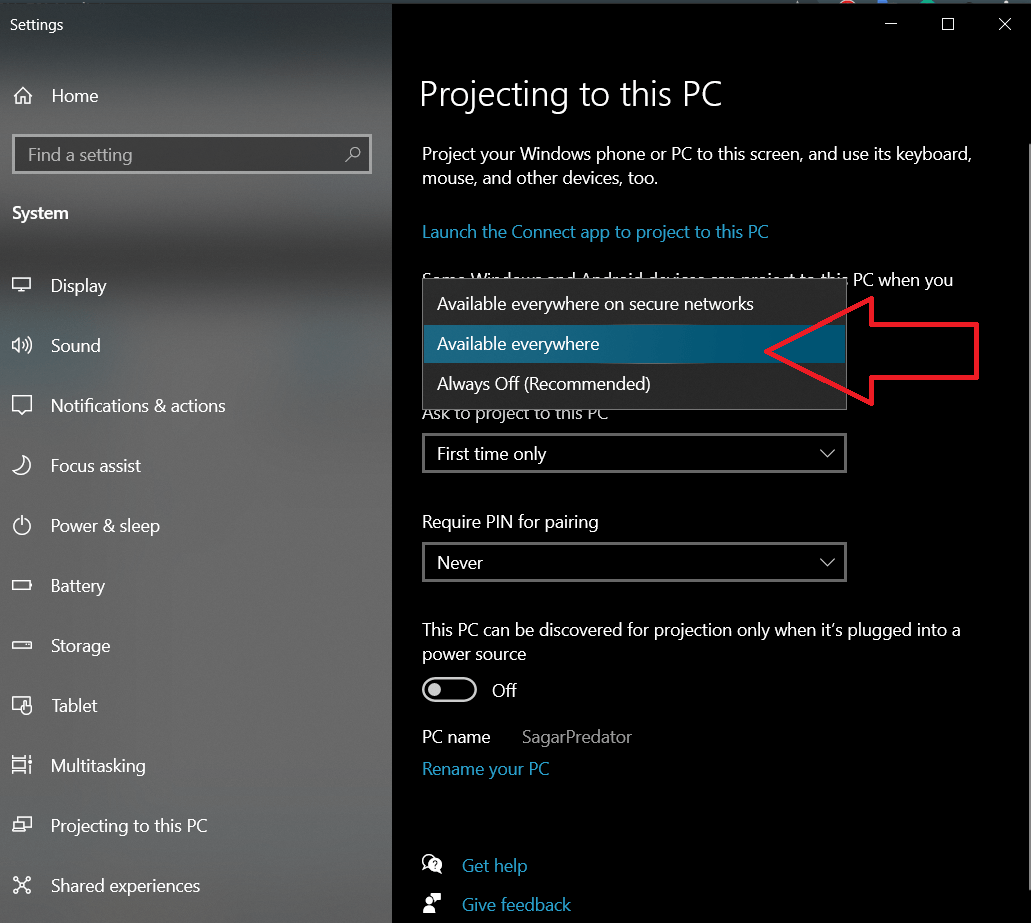
Step 4. A new settings menu titled “Projecting to this PC” will appear. Here you need to select “Available Everywhere” or “Available everywhere on secure networks” from the first pulldown menu.
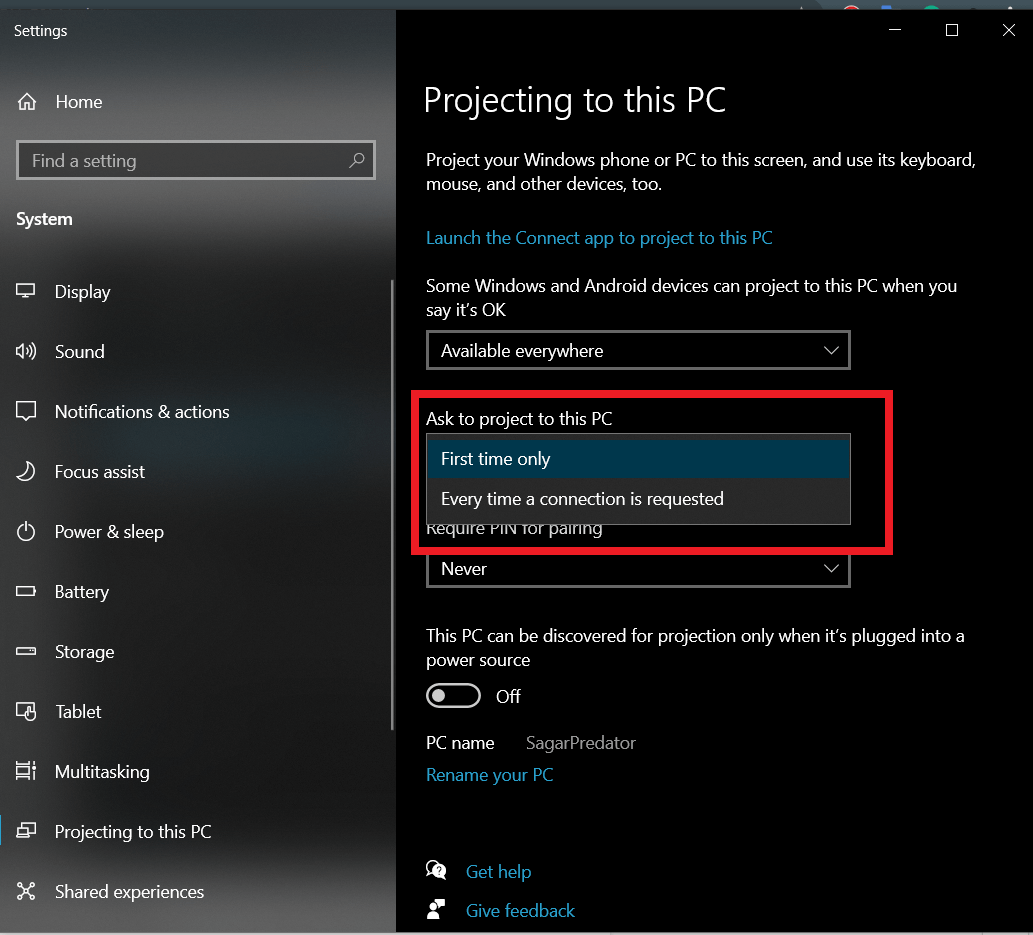
Step 5. Now under the second pulldown menu option titled “Ask to project to this PC” select “First time only” or “Every time” as per your convenience.
Step 6. Now coming to the last option, i.e. “Require PIN for pairing”, you should leave it as “Never” since you need to grant permission on the receiving computer anyway.
Step 7. If Windows alerts you that a device wants to project to your Windows 10 PC pops up, then you need to click Yes.
Step 8. After you are done with all the above-mentioned tweaks to the settings, you need to head over to your Android smartphone and tap on the Cast option. Different devices will have this option named differently, for example, Screen Mirror, etc. So keep an eye out for this.
Step 9. Tapping on the Cast button will show your Windows 10 PC pop up on your Android smartphone’s screen.

Step 10. Click on it and it will launch the Connect app on your Windows 10 PC.
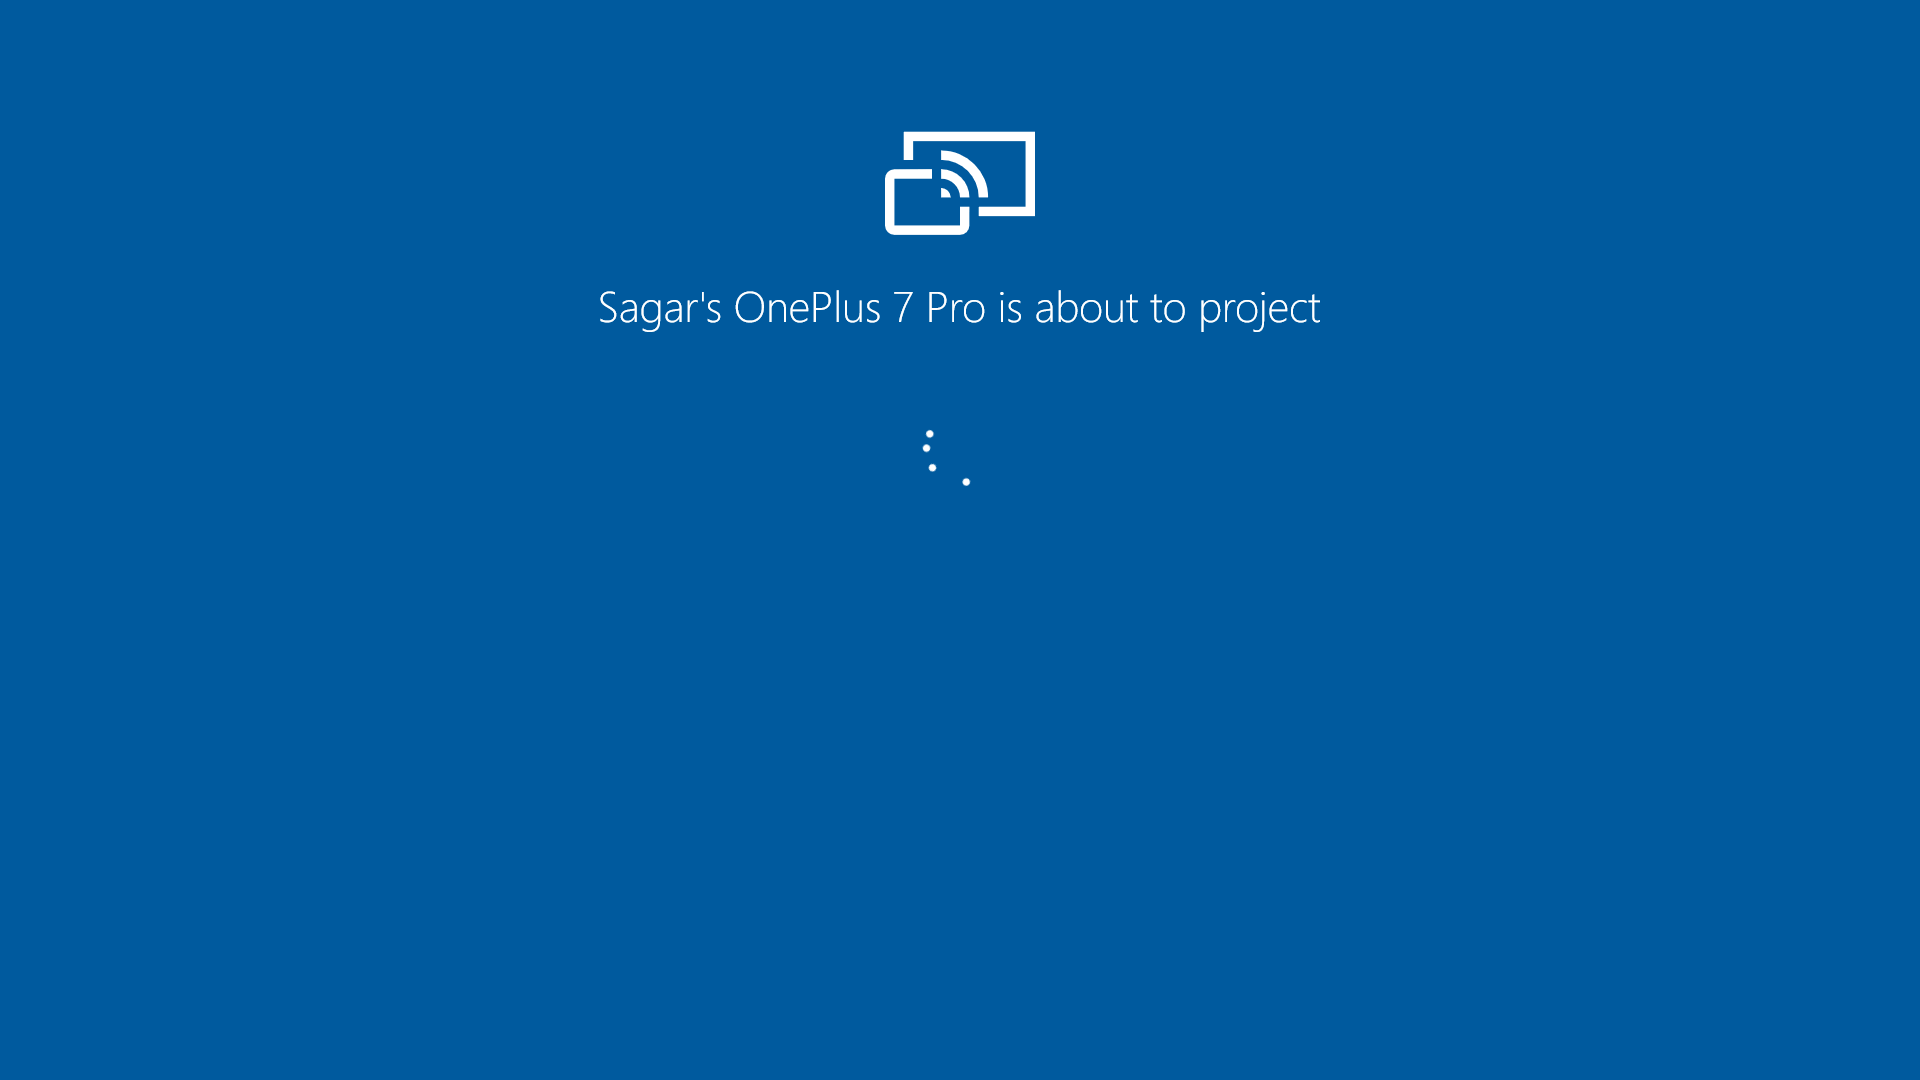
Step 11. That’s it! Your Android smartphone screen is mirrored. Moreover, you can drag, resize, or maximize the window, and play any content from your Android phone and watch it on your laptop’s or desktop’s screen.
Fix if ‘Projecting to this PC’ option Not Available
Note that for some, the Projecting to this PC option may be greyed out. This is because you need to have the Wireless Display software installed on your PC. There is nothing to worry about here. Follow the steps below to install Wireless Display on your Windows 10 PC:
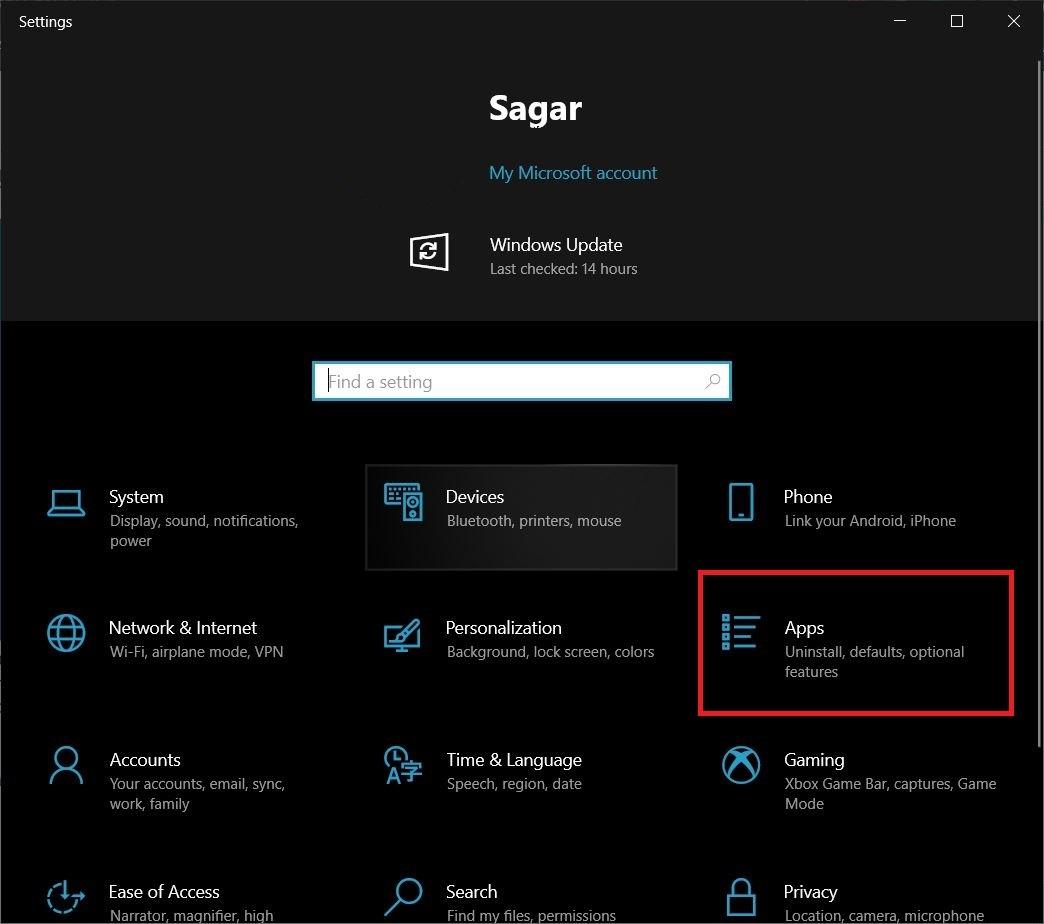
- Open the Settings menu.
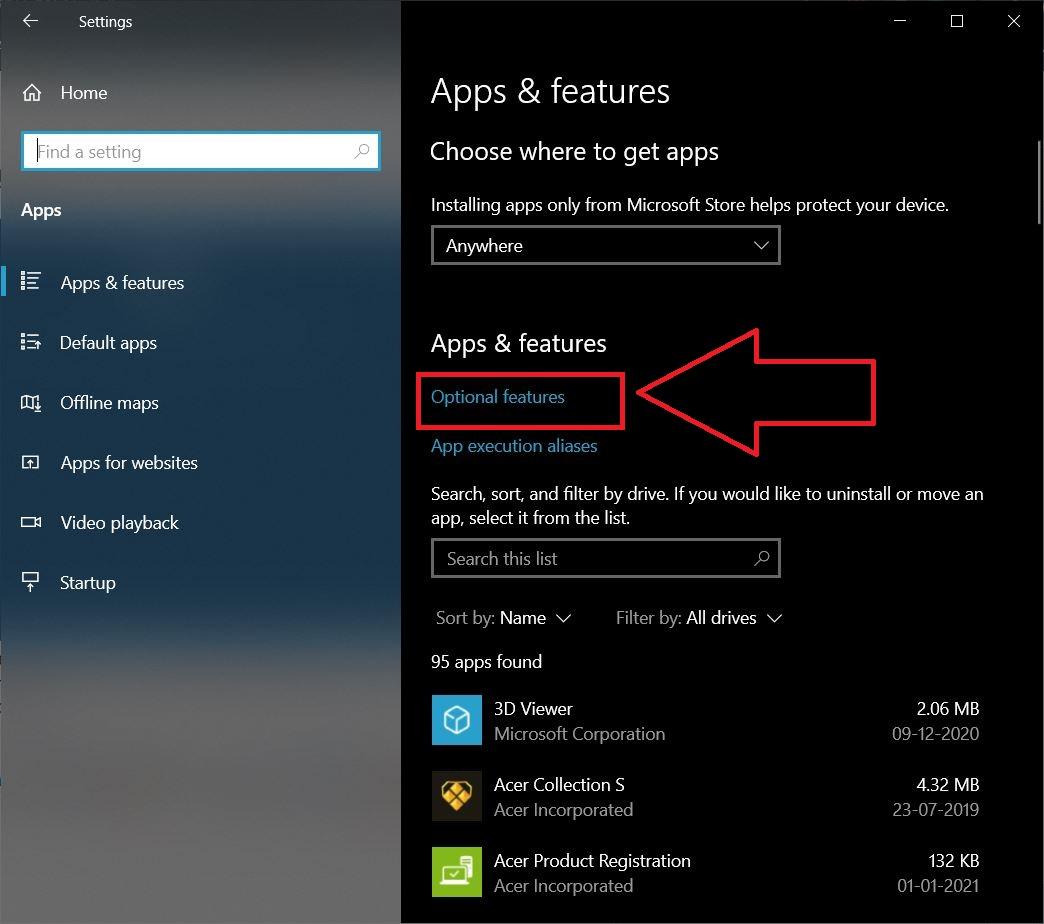
- Now tap on the Apps option.

- Click on Optional Feature.

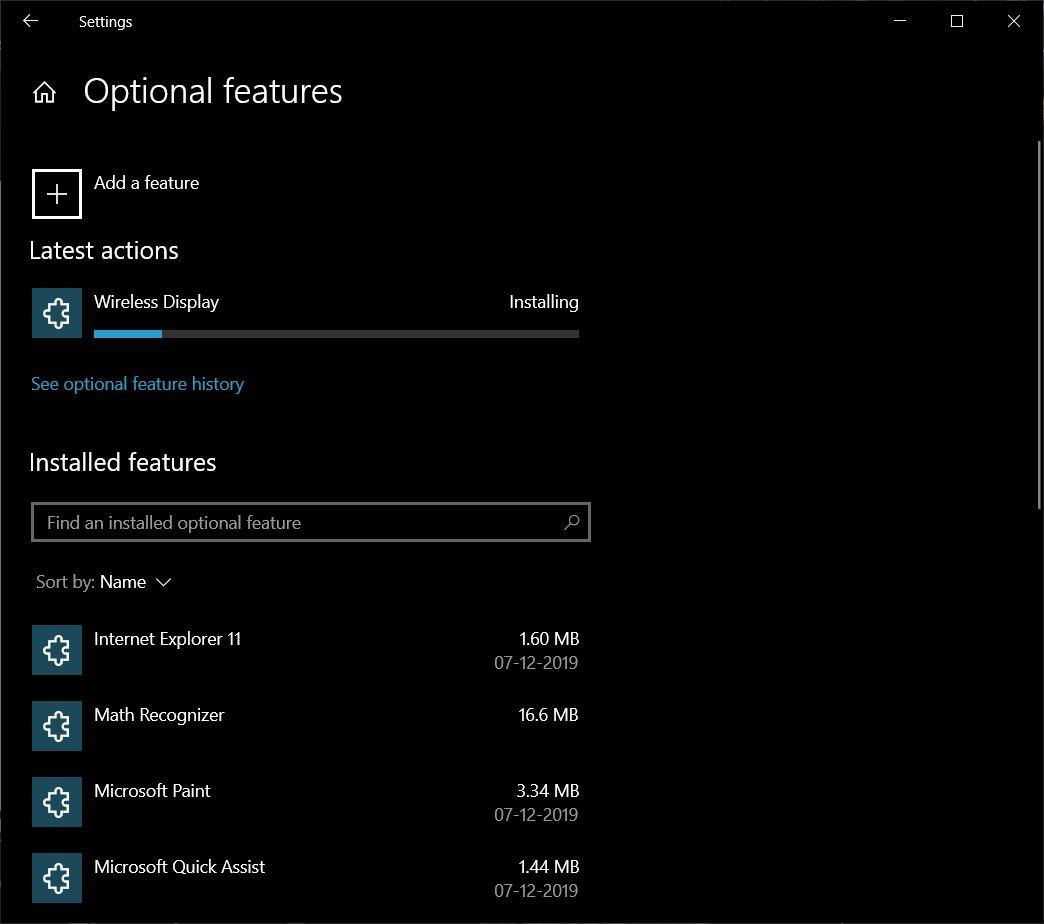
- Click on the Add Feature button and search for Wireless Display.

- Once the installation is complete, close everything.
- Now, again head over to the Projection to this PC option and you will see every option will be unlocked.
Once you see all the options under Projection to this PC option unlocked, you need to follow the steps right from the start as mentioned above. Following which you will be able to cast your Android smartphone’s screen onto Windows 10. The important thing that one should know is that some protected content, like content from Netflix, Amazon Prime Video, etc. may not show up on your Windows 10 screen and will show a blank display with audio playing in the background.
Casting Android Screen Using Apps
There are several apps that you can install on your Android smartphone using the WiFi on your Windows 10. Apps like AirDroid etc. allow users to mirror the Android screen onto the Windows 10 desktop or laptop. Let us take a look at how you can make use of AirDroid to mirror your Android screen on Windows 10.
- You need to first grab the AirDroid application from the official website and install it on your laptop.
Windows: Link
macOS: Link
AirDroid Web: Link - Also, you need to install the AirDroid APK on your Android device.
- If you do not have an AirDroid account, then you need to create one.
- After the account creation, log in with the same account on both the desktop client and mobile app.
- Now open the Desktop app and the mobile app.
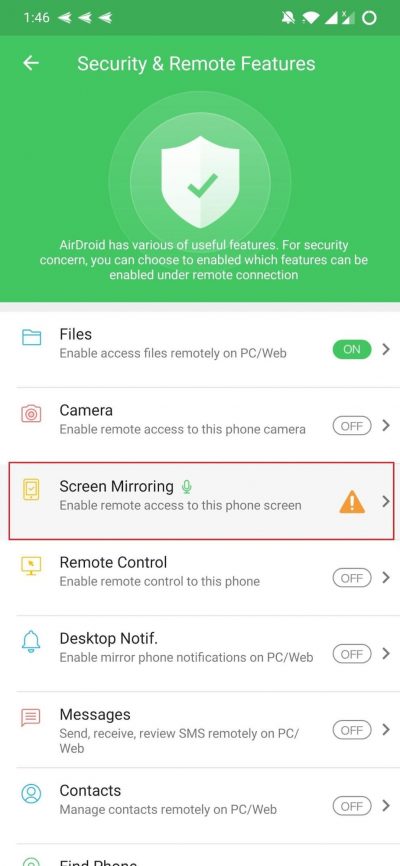
- On your smartphone, you need to open the Android AirDroid app and head to the Security & Remote Features option.
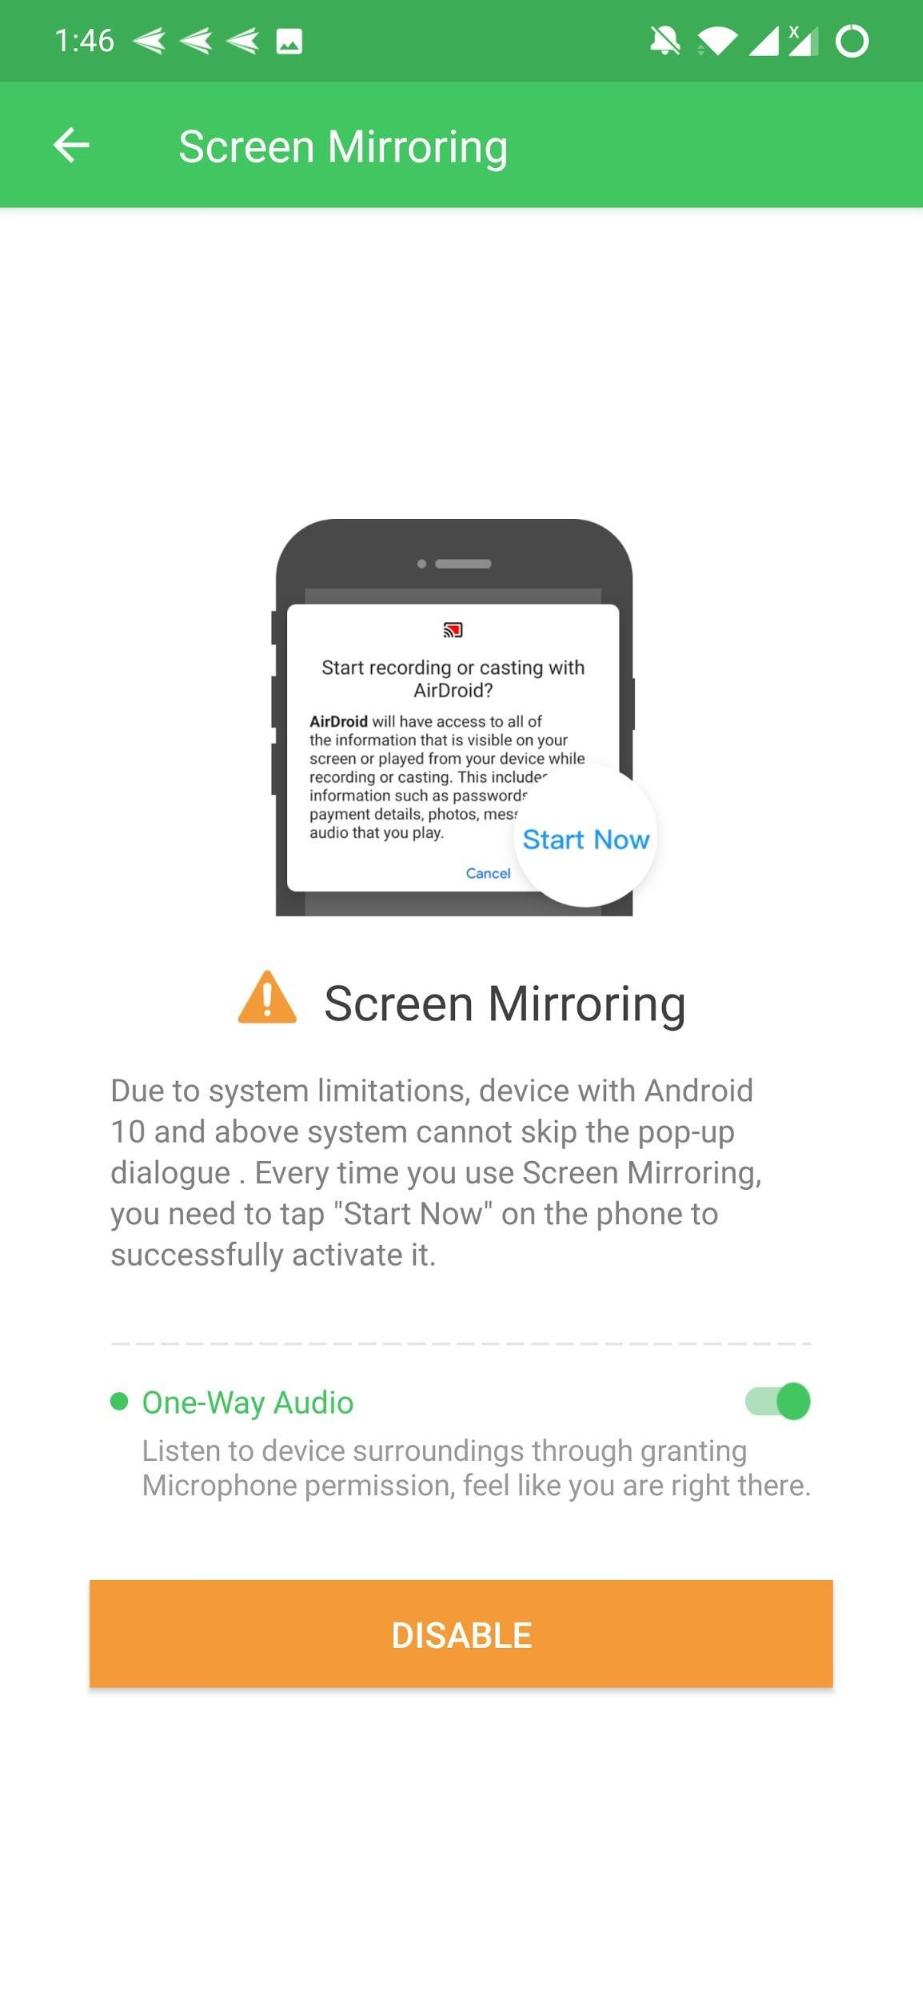
- Here, tap on the Screen Mirroring option.

- Tap on the One-Way Audio option and that’s it!

- Select your device in the desktop app.
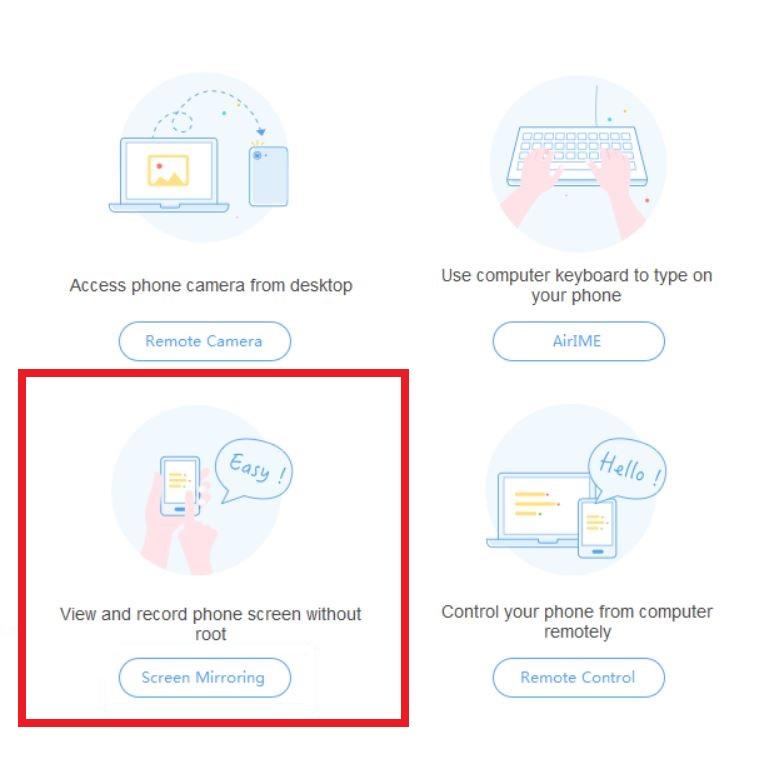
- Now you need to select the Screen Mirroring option, as shown in the image below.

- You need to grant permission for screen mirroring on your smartphone. Then your screen will show up on your Windows 10 laptop or desktop.
The good thing about AirDroid is that not only you can mirror your smartphone’s screen onto your Windows 10 desktop, you can also access all of your Android phone’s files, access messages, call history and contacts, use your computer’s keyboard to type in your Android phone, remotely access phone’s camera from Windows 10 laptop, and much more. So, the AirDroid method provides you a much greater range of options to choose from.
Conclusion
So, there you have it from my side in this post. Note that there are other apps also that can help you mirror your Android smartphone’s screen on any Windows 10 laptop or desktop. However, some may require you to have a USB Debugging option enabled on your phone and require the need of USB cable.
The above two methods are some of the best and easy to use ways to remotely access your device’s screen and play content on your Windows 10 PC. Besides, some methods work only with video with no sound or vice versa. But the above two methods are effective and provide you with more option including playing content with video and audio both.
Let us know in the comments below if you liked this post. Also, do let us know if there are other methods of mirroring your Android device’s screen on a Windows 10 laptop or desktop that you would like to share with other readers. For more such awesome coverage, do follow DigitBin. Until the next post…Cheers!
If you've any thoughts on How to Screen Cast Android to Windows 10?, then feel free to drop in below comment box. Also, please subscribe to our DigitBin YouTube channel for videos tutorials. Cheers!
