Microsoft allows you to reinstall Windows 11 in several ways, such as using the installation assistant from the Settings window or the Microsoft Recovery Environment. However, there may be a situation when your PC runs into a problem, crashes with the BSOD error, and fails to boot at all. In this scenario, you will not be able to access the system interface to reinstall Windows 11.
Interestingly, Microsoft allows you to reinstall Windows 11 directly from the BIOS settings whenever you run into a problem, as discussed above. The complete Windows 11 reinstallation procedure might be confusing for some novice users but worry not! In this detailed guide, we have explained the step-by-step process to reinstall Windows 11 from the BIOS settings easily.
How do I Reinstall Windows 11 from BIOS?
Reinstalling Windows 11 from BIOS requires you to have at least an 8 GB flash drive and Windows 11 ISO file. If you do not have the Windows 11 ISO file, you can visit the official Microsoft website to download the Windows 11 Disk Image (ISO) for x64 devices.
Once you have downloaded the ISO file, you need first to create a bootable USB disk to be able to reinstall Windows 11 on your PC. So let’s begin.
Create a Windows 11 bootable disk
To create a bootable USB drive, you will have to download RUFUS, an open-source third-party tool. RUFUS comes in handy when creating USB installation media from bootable ISO files. Follow the step-by-step process described below to create the Windows 11 bootable disk drive:
- Insert the USB drive into the USB port of your Windows PC.
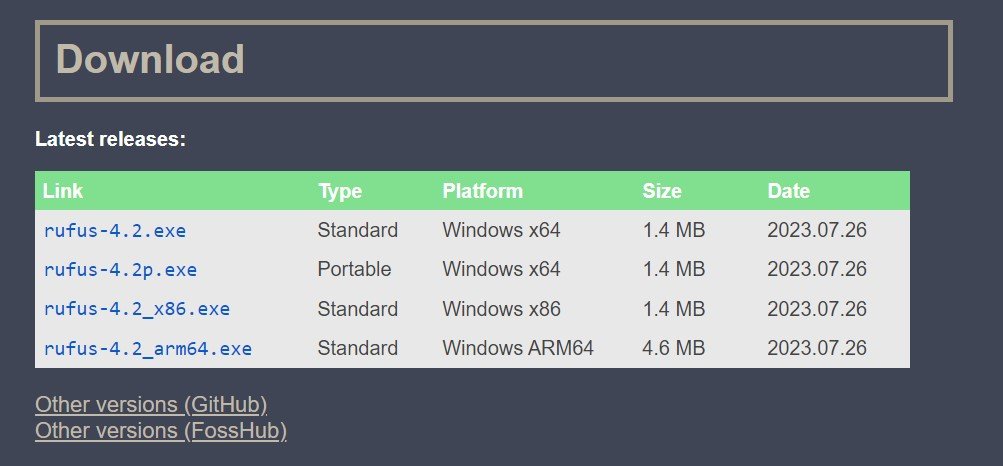
- Visit the official website from your preferred web browser and download the latest version of the Rufus utility.
- Navigate to the download location, and as the program does not need installation, double-click the executable file to launch the tool.

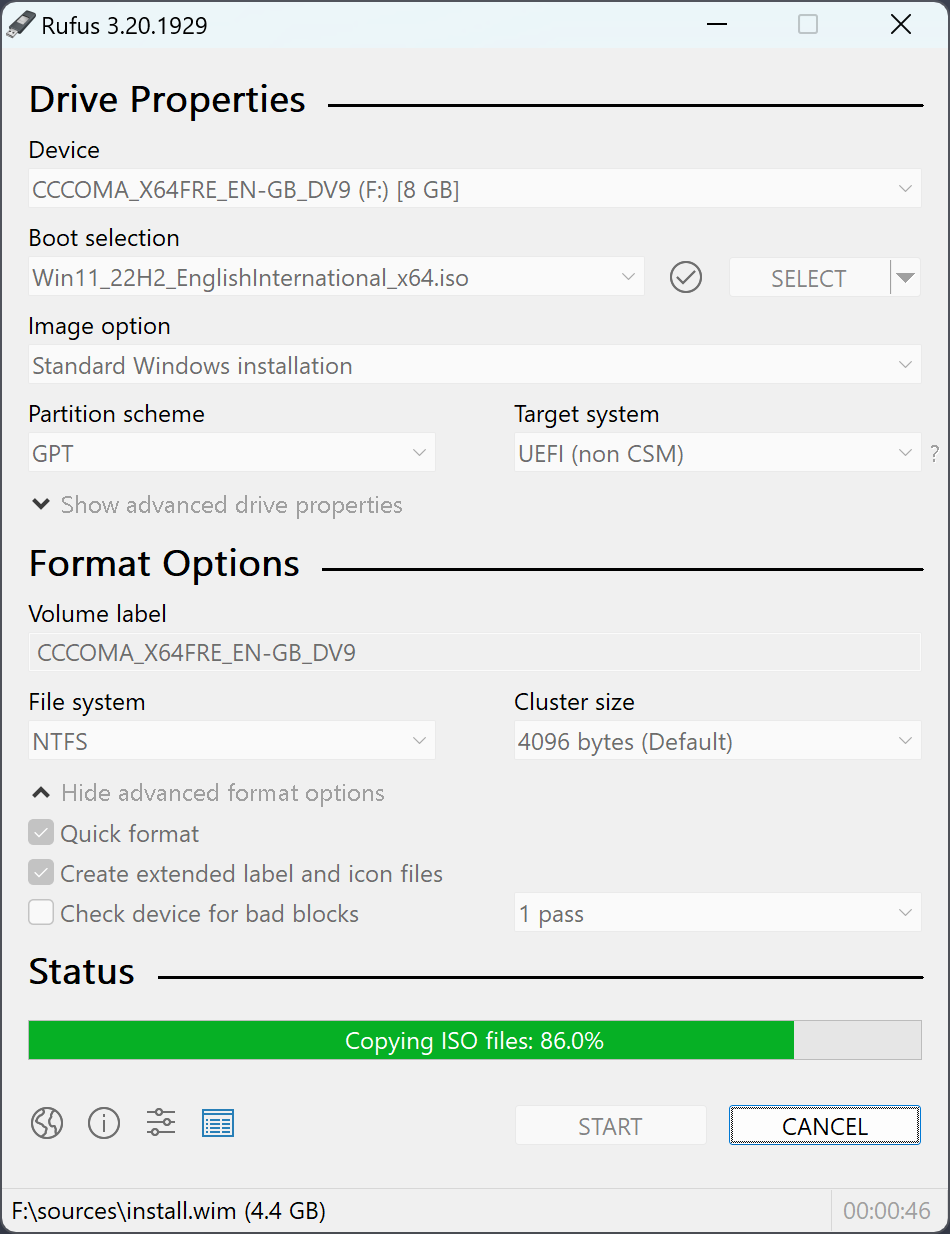
- Expand the drop-down to select the USB drive in the Device section.

- Next, select Disk or ISO image in the Boot Selection drop-down and press the Select button to browse the location where the Windows 11 ISO is located.
- After this, you need to choose the Standard Windows installation in the Image Option drop-down if it is present. (Optional)
- Expand the Partition scheme drop-down and select GPT if your PC is in UEFI BIOS mode. In case your PC runs on Legacy BIOS, choose MBR instead.
- Finally, press the Start button to initiate the Windows 11 bootable disk creation process. In case you get a confirmation prompt, press the OK button.
Note: Back up your USB drive before creating the bootable disk, as the drive contents will be deleted during this process.
Wait patiently for the Windows 11 bootable disk creation process to complete, as it may be time-consuming. Do not interrupt the process to avoid rendering your USB unusable.
Reinstall Windows 11 on your PC
Now that the bootable USB drive with Windows 11 is ready follow these steps to reinstall Windows 11 from BIOS.
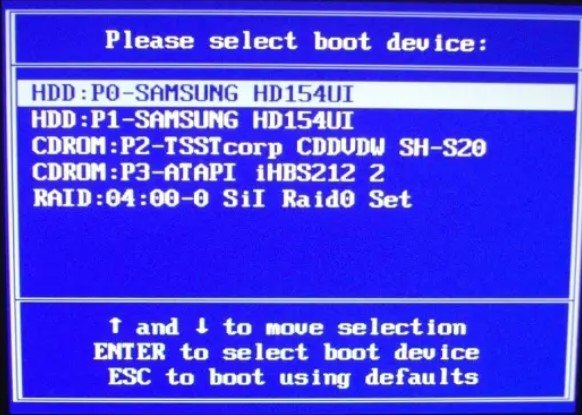
- Power off your PC completely. Press the Power key to turn it on, and immediately press the relevant BIOS key (F2 or F12) to access the BIOS settings.
- When the BIOS screen loads, go to the Boot Manager Menu option. Now, select your USB Storage as your boot device and press the Enter key to save the changes.

- Insert the bootable pen drive into your computer and wait for your computer to boot up completely.
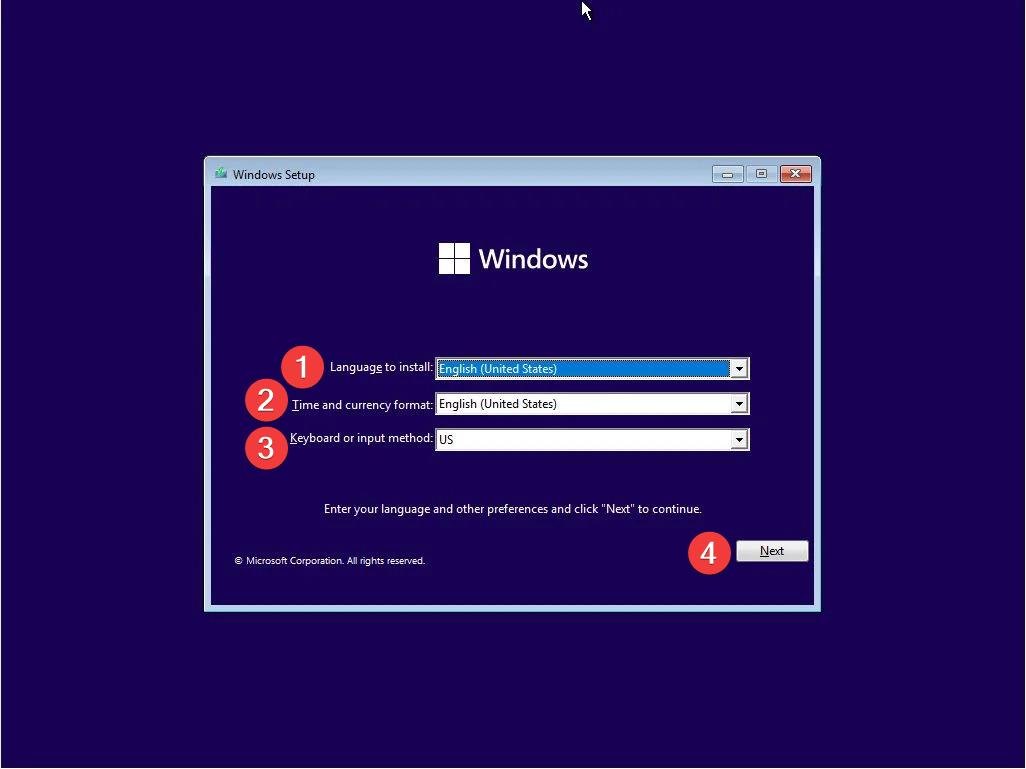
- Wait for the Windows Setup screen to show up. Select your Preferred Language, Time format, and Keyboard layout using the drop-down menu and click the Next button.

- Click the Install Now button on the next screen.
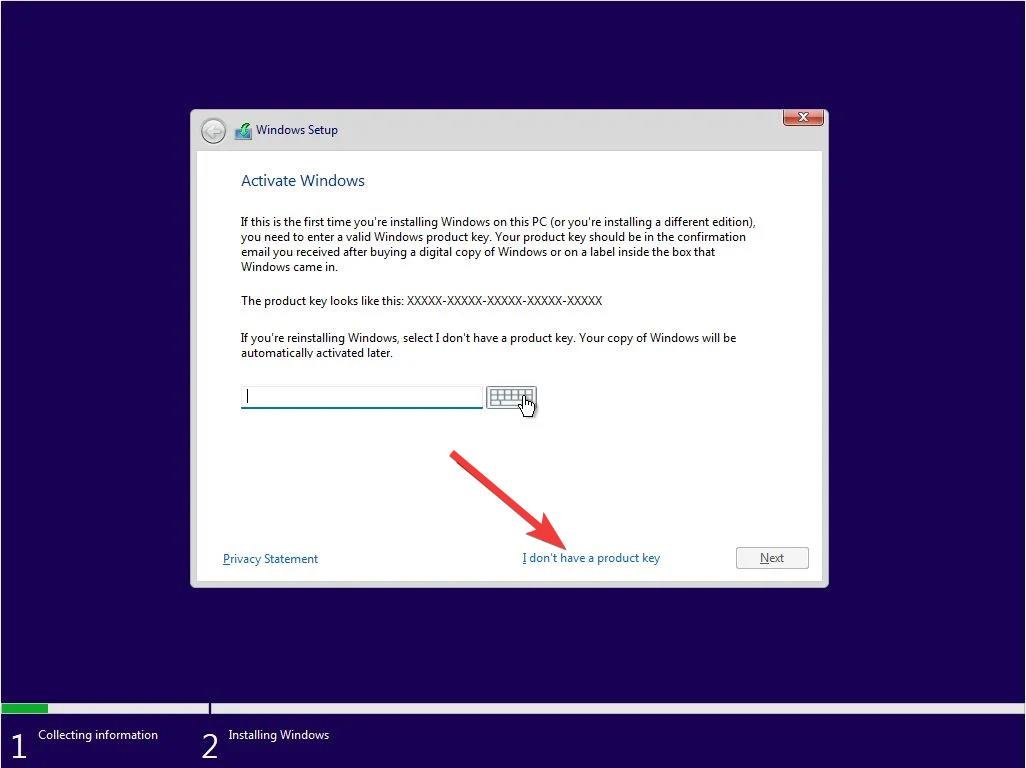
- On the next screen, you will be asked to activate Windows. Click the I don’t have a product key option to skip the step at the moment.

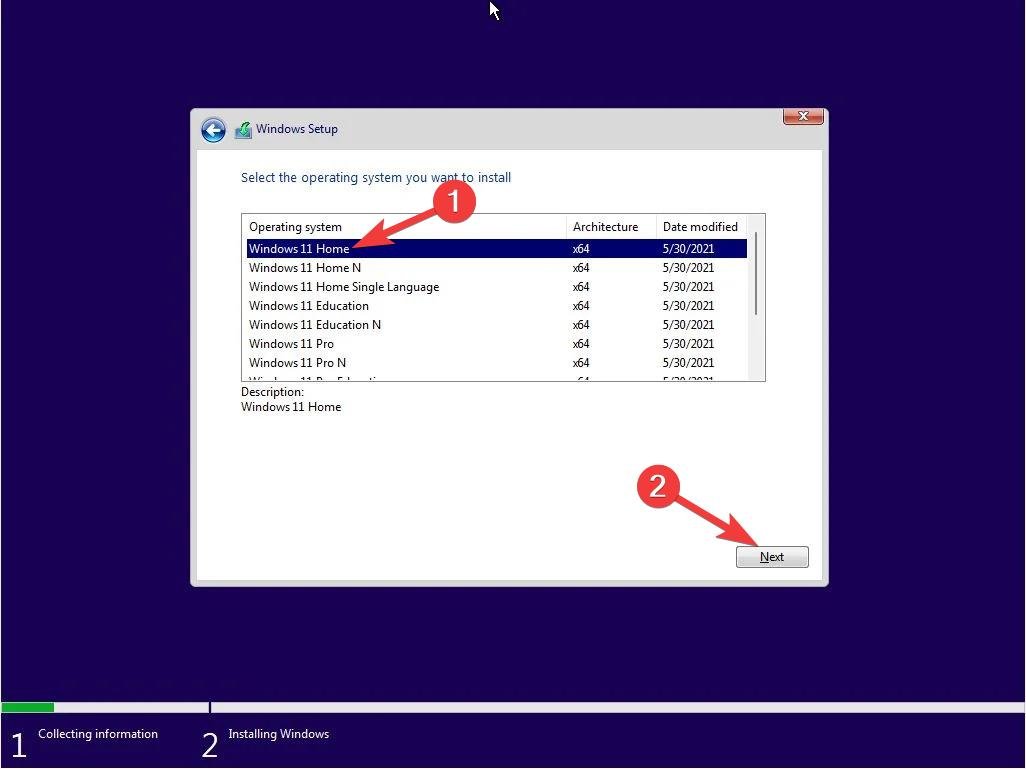
- Choose the preferred Windows 11 version that you wish to install on your PC and click Next.

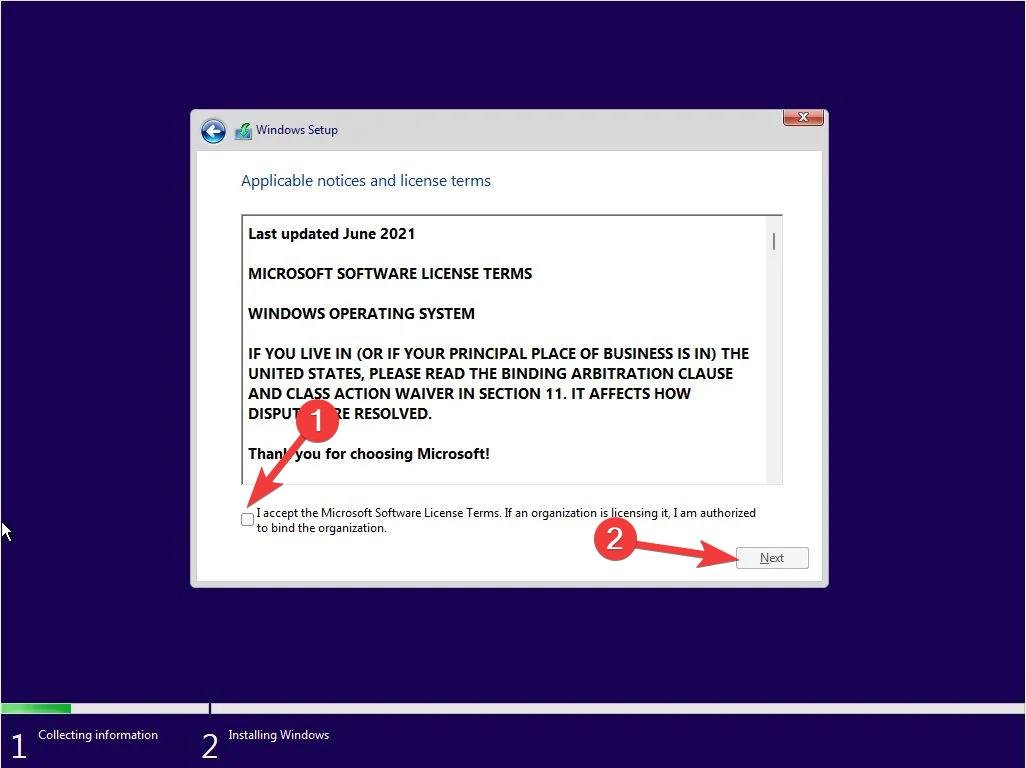
- On the next page, you will have to agree to the Applicable notices and license terms. Enable the checkbox next to the I accept the Microsoft Software License Terms option and click the Next button.

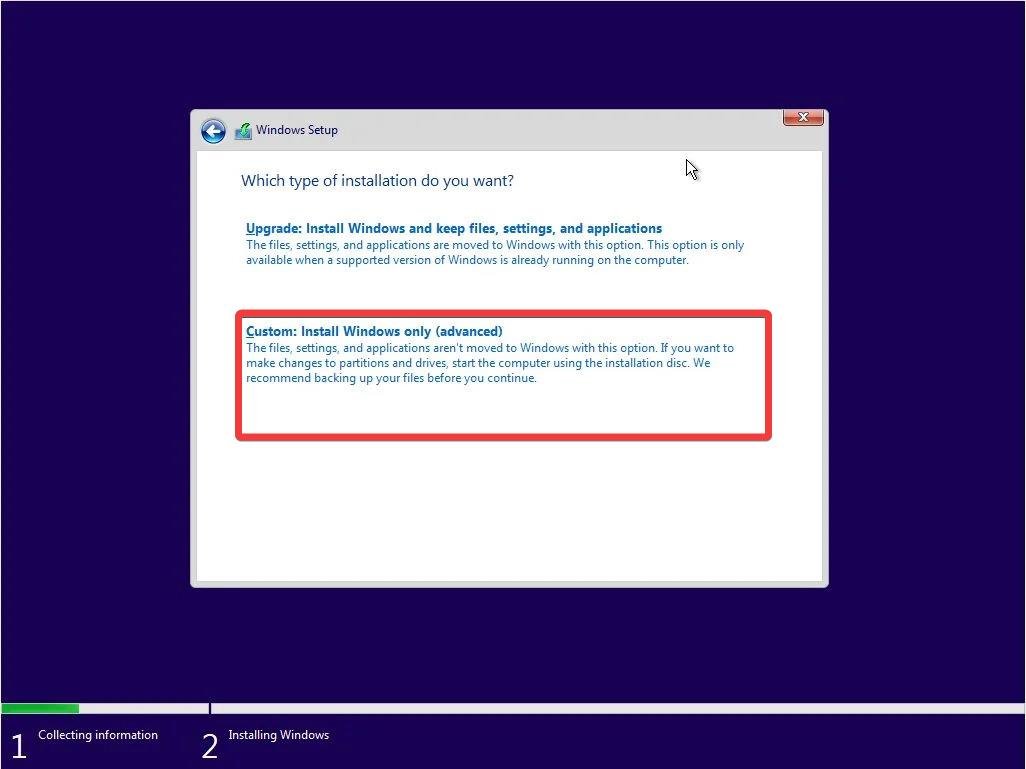
- Next up, you need to choose between the two types of installation you want to go with – Upgrade and Custom. The upgrade option allows you to install Windows 11 without affecting your data, system settings, and the applications installed. You can choose this option if you want to repair the installation or have to upgrade from a previous Windows version. You can go with the Custom option if you want to clean install Windows 11 and do not wish to retain your files and system settings.

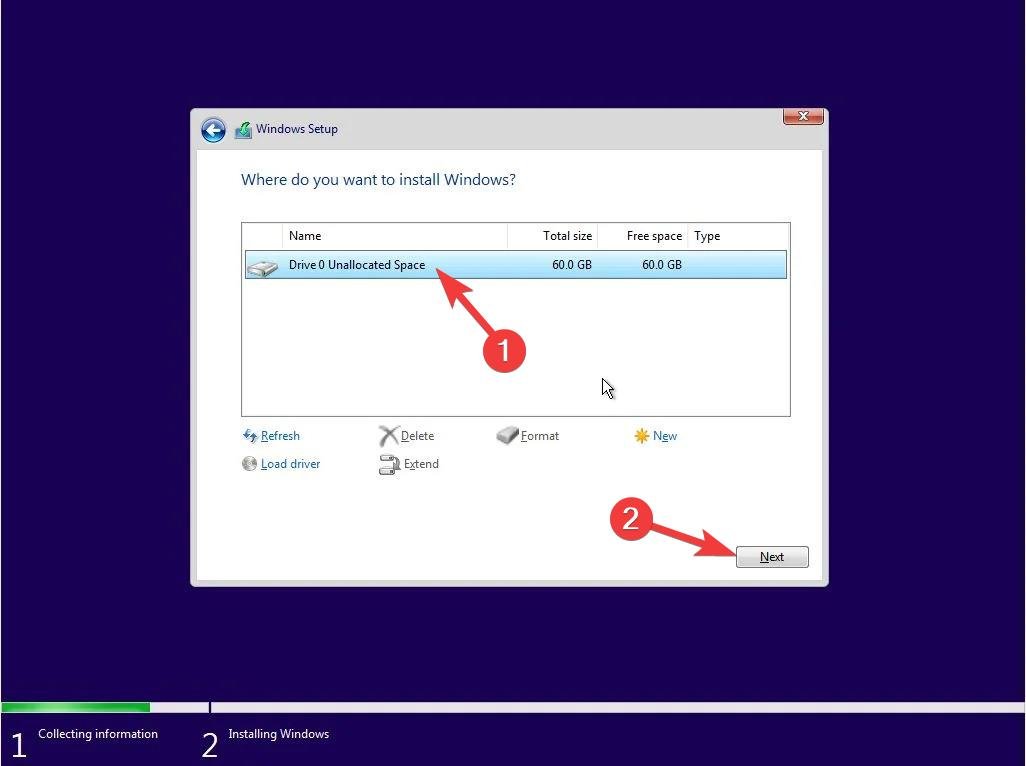
- After this, your PC will detect and display the list of available disks. Select the hard disk partition on which you want to reinstall Windows 11 and press the Next button. In case you get the confirmation prompt, press the OK button.

- The Windows 11 installer will now copy the essential installation files from the installer to the final location and begin the installation process. Your PC will now reboot several times until Windows 11 installation procedure is completed. The installation of Windows 11 on your PC is automatic, and you do not have to intervene or power off your PC.
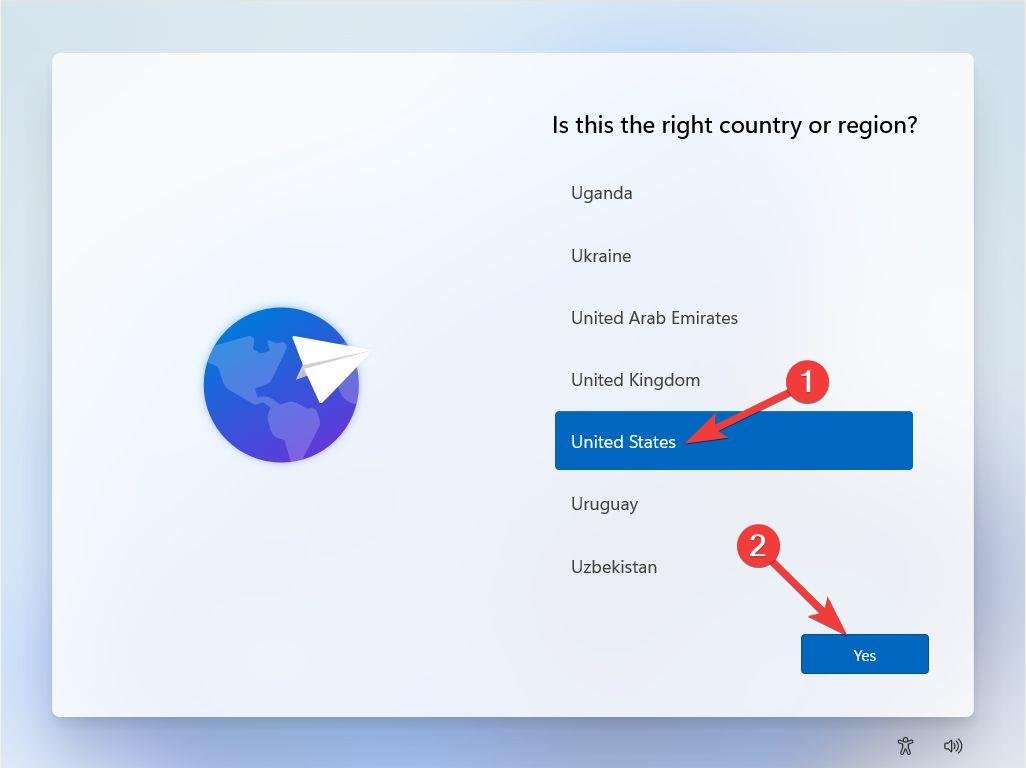
- After the installation is complete, you will be prompted to select your country or region as well as your keyboard layout. The selection can be different than the choices made earlier.

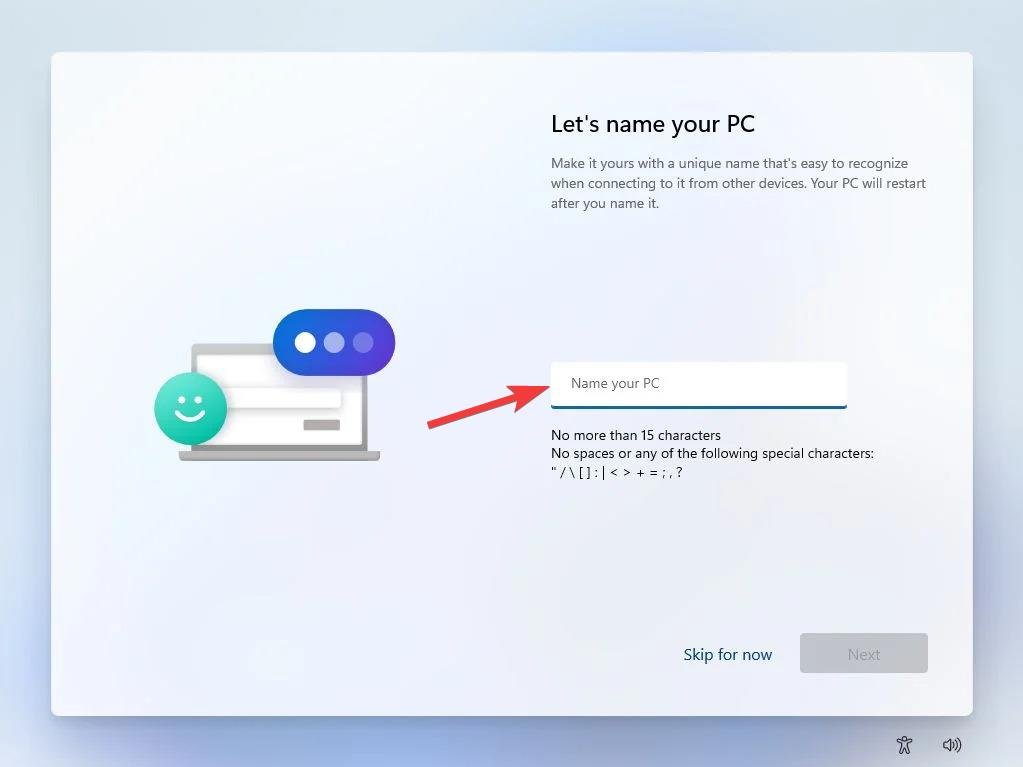
- On the next screen, you can assign a name to your PC that you can easily remember. You can click Skip Now if you want to do it later.

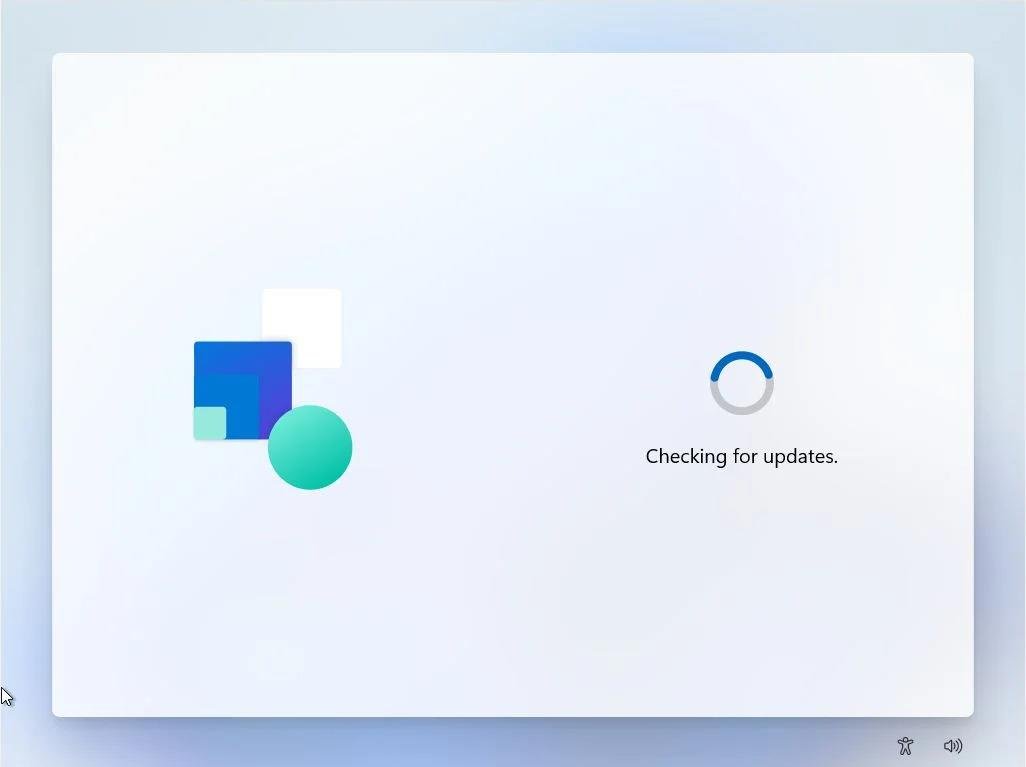
- The installer will now check for any available updates and will download and install them.

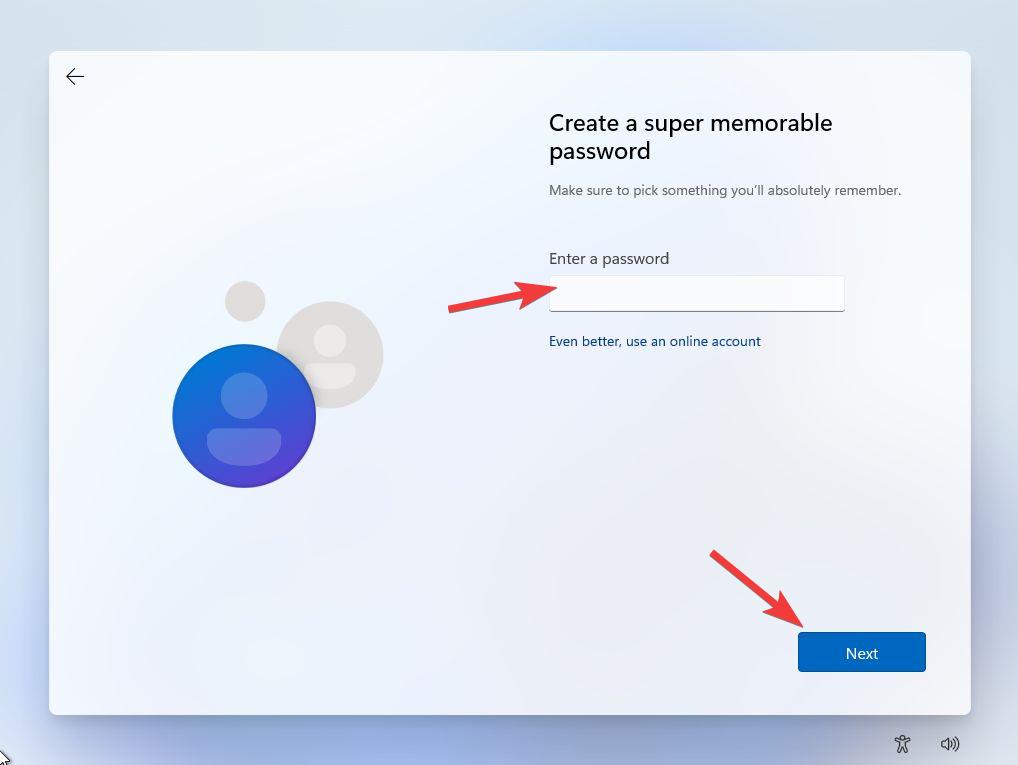
- After the updates are installed, you will have to create an administrator account by clicking on the Sign-in options and then typing a password in the Enter a password field.

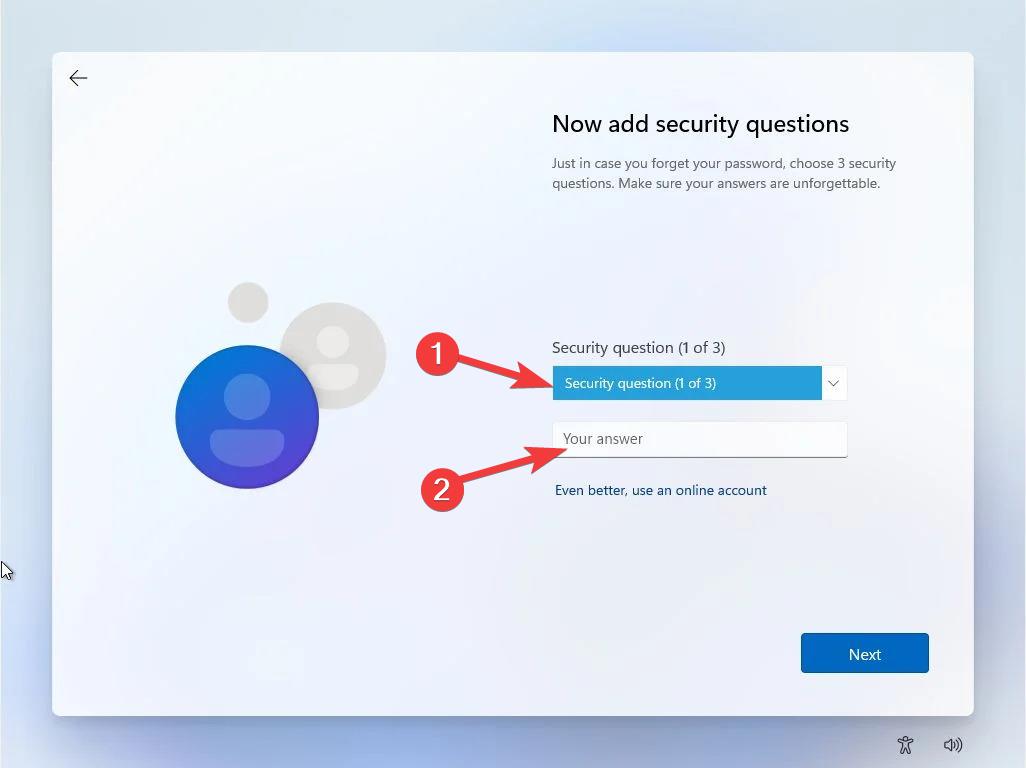
- You will then have to set up three Security questions and provide their answers if, in case you do not remember the password in the future.

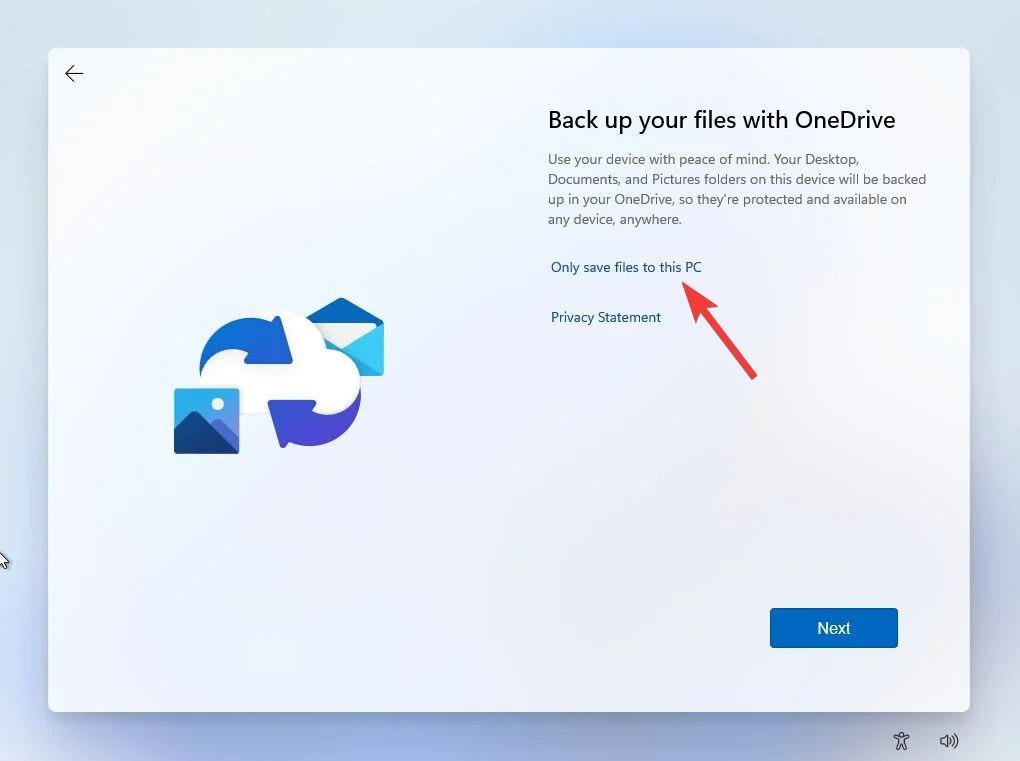
- Next, you may be prompted to set up the automatic backup option using Microsoft OneDrive. To enable it, simply click the Save only files to this PC option and press the Next button.

- After a few more steps, the new Windows 11 desktop screen will appear, signifying that Windows 11 has been successfully reinstalled on your PC.
Last Words
There you go! Hopefully, the step-by-step process explained in this guide helped reinstall Windows 11 on your PC from the BIOS menu. The process is rather simple, and you can complete it single-handedly. However, if you face any problems during the Windows 11 reinstallation process, please feel free to let us know in the comments section.
If you've any thoughts on How to Reinstall Windows 11 from BIOS?, then feel free to drop in below comment box. Also, please subscribe to our DigitBin YouTube channel for videos tutorials. Cheers!

