A lot of users have been complaining that after upgrading to Windows 11, the Windows Spotlight not working. If you are one of those users, then this guide will help you out. I have put up various troubleshooting tips that have helped a lot of users to enable Windows spotlight on Windows 11.
The spotlight feature displays attractive images on the lock screen of the PC, which are fetched from the internet. In the regular interval, the image dynamically changes. You will see the date and time and some information about the image that will be on display.
The update to Windows 11 brought significant changes. Some of these changes do mess up a few system components. Hence, the Windows spotlight feature gets buggy. Even after it is enabled from the Windows settings, users complain about seeing a Blue screen with white waves displaying the calendar.
This issue is 100 percent fixable. After digging through various Microsoft forums and personally trying out several fixes, I have compiled this guide for you.
Reasons Why Windows 11 Spotlight feature May Not Work
- If you don’t have an active internet connection on your computer, the Windows 11 spotlight feature won’t work.
- Also, if you have metered your internet usage, then you may not have stable internet to regularly fetch high-quality images from the internet.
- Some system files may have become corrupt, causing a few features to glitch out, including the Windows spotlight feature.
- The location, date, and time information are incorrect and not in sync with your actual location.
- It may be a bug in the current build of Windows 11 OS installed on your computer, causing the Spotlight feature to not work.
Let us start the troubleshooting Windows 11 Spotlight Feature is Not Working Issue
1. Update Windows OS
Start by updating the Windows operating system to the latest build. Bugs are a never-ending issue on Windows OS. Upgrading to the latest version of Windows should fix the problem.
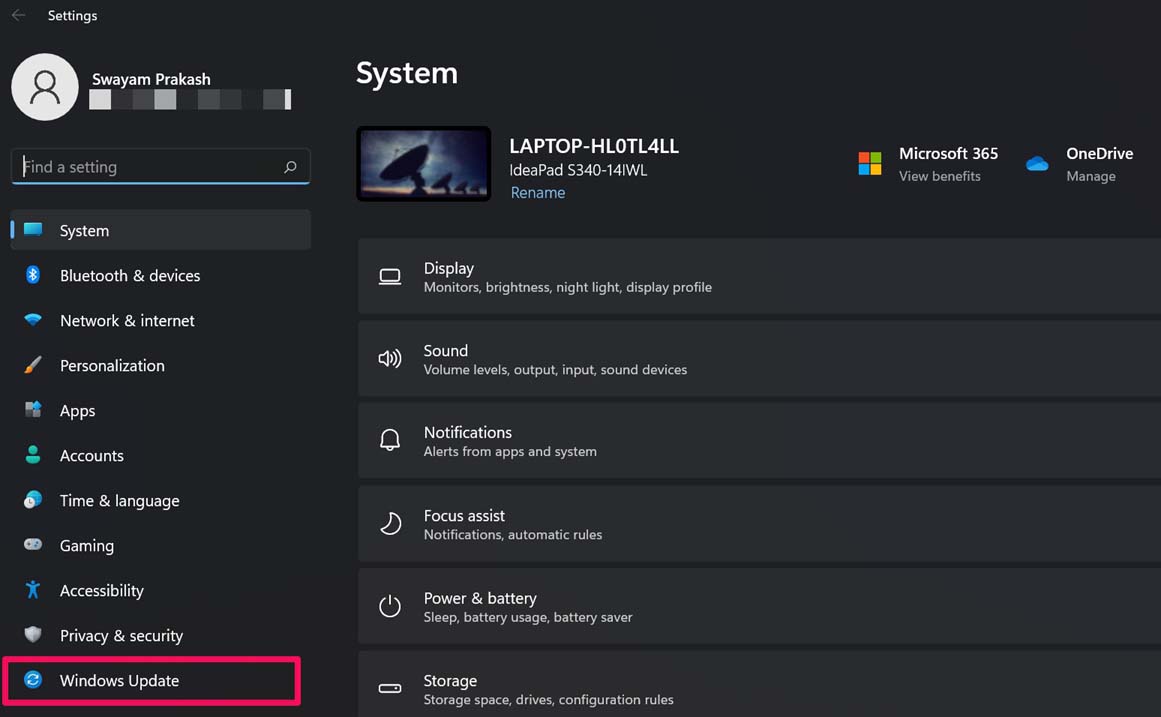
- Go to Settings by pressing Windows + I.
- Then on the left-hand side, navigate to Windows Update and click on it.

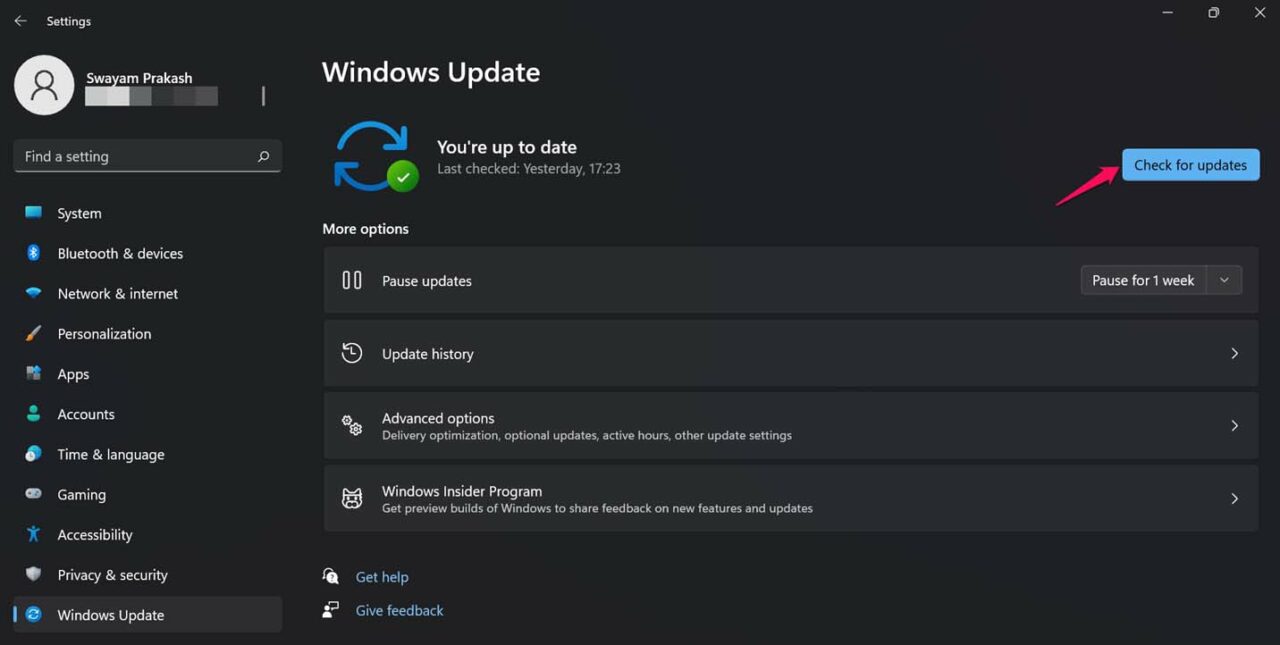
- Then click on Check for Updates.

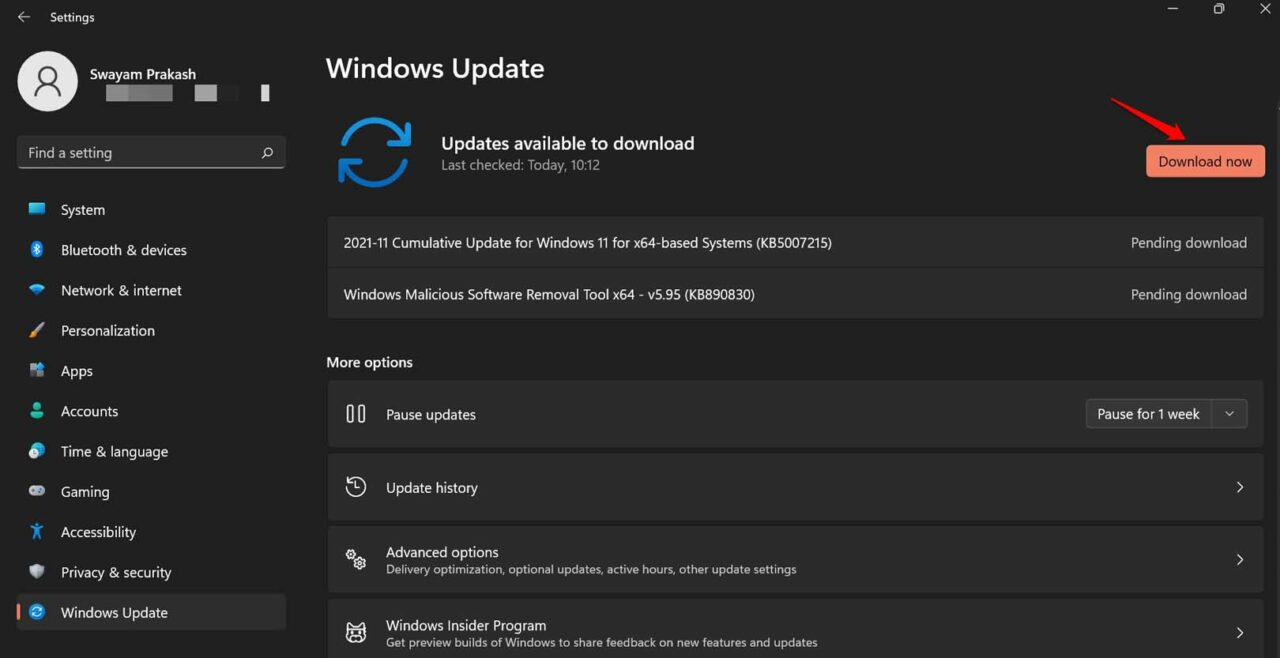
- If an update is available, it shows up, there will be an option Download Now which you have to click.

After installing the new build of Windows OS, the PC will reboot, and then you try to enable the Windows Spotlight feature.
2. Check the Internet Connection is Active or Not
It would be best to have an active internet connection to have random high-resolution images update automatically on the lock screen with information about them.
If your internet is not working, ask for technical support from the ISP or switch to some other WiFi. A stable network is desirable to have images change dynamically on the lock screen.
3. Disable Metered Internet Connection
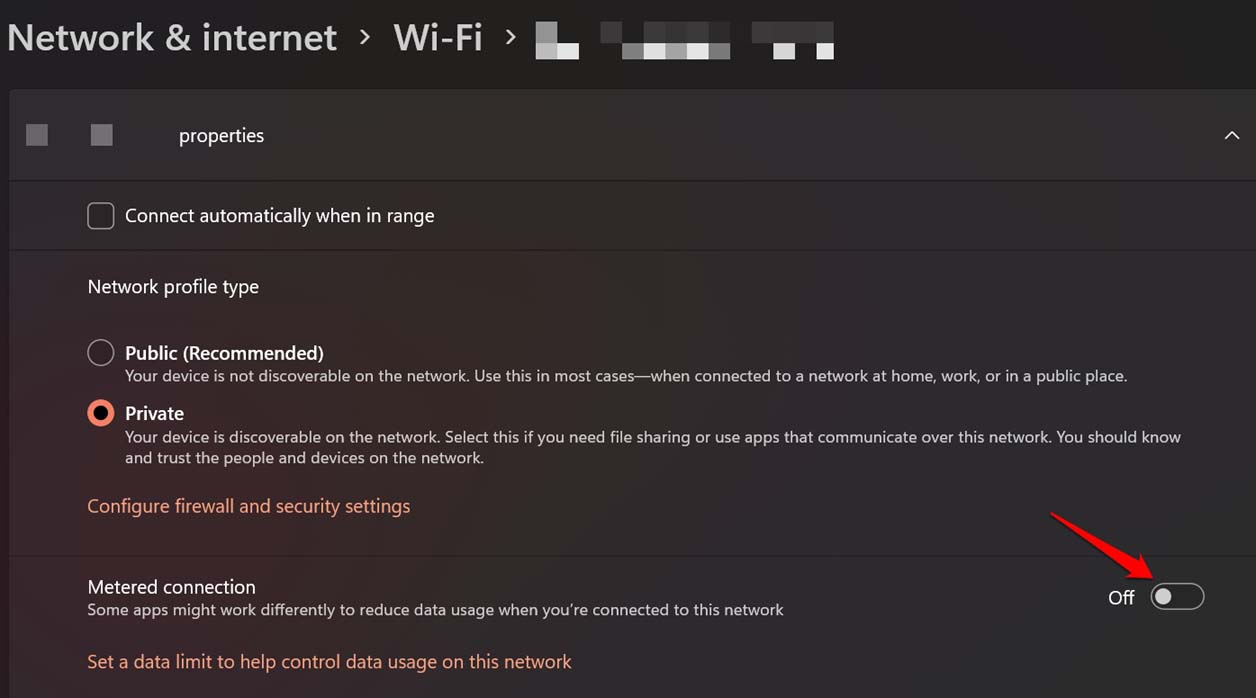
Often metered connection, when enabled, limits the internet usage and may cause you to not see the Windows Spotlight feature on Windows 11. So, you can turn that off.
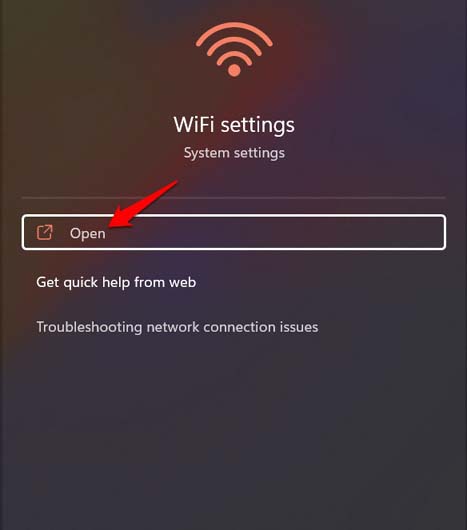
- Using the Windows search, look for WiFi Settings.
- Click Open.

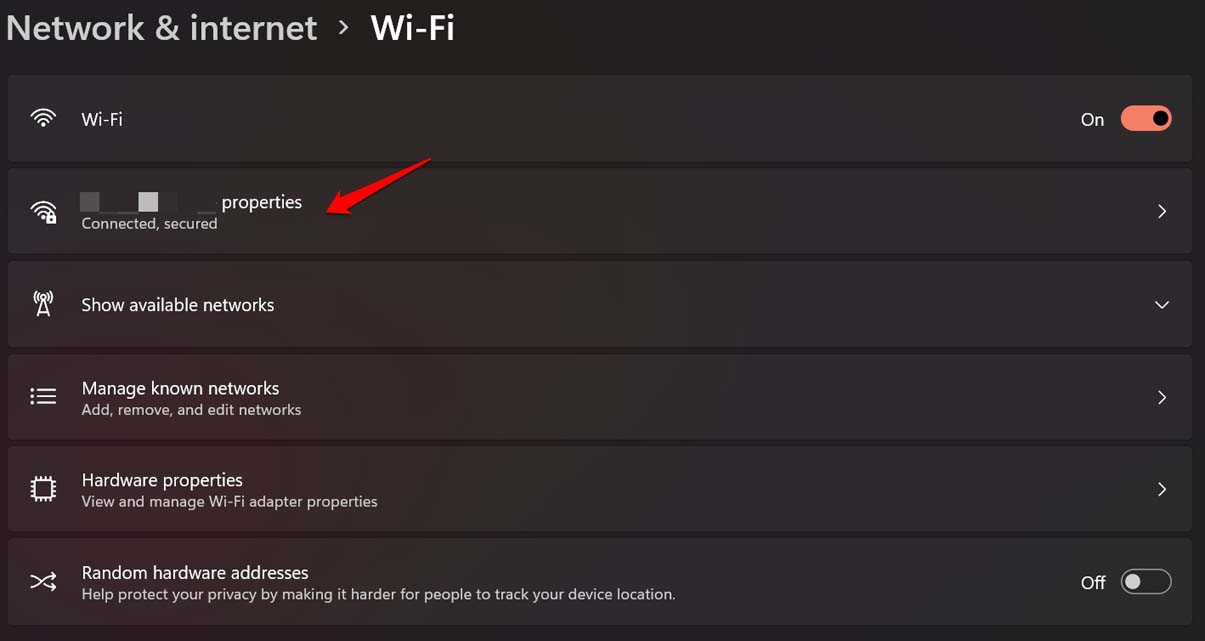
- Then click on the WiFi Properties [WiFi name will vary as per the network you are on]

- Navigate to Metered connection and click on the switch beside it to disable the feature.

Now, check if Windows Spotlight Wallpaper is working or not.
4. Set the Correct Date and Time/Time Zone on Your PC
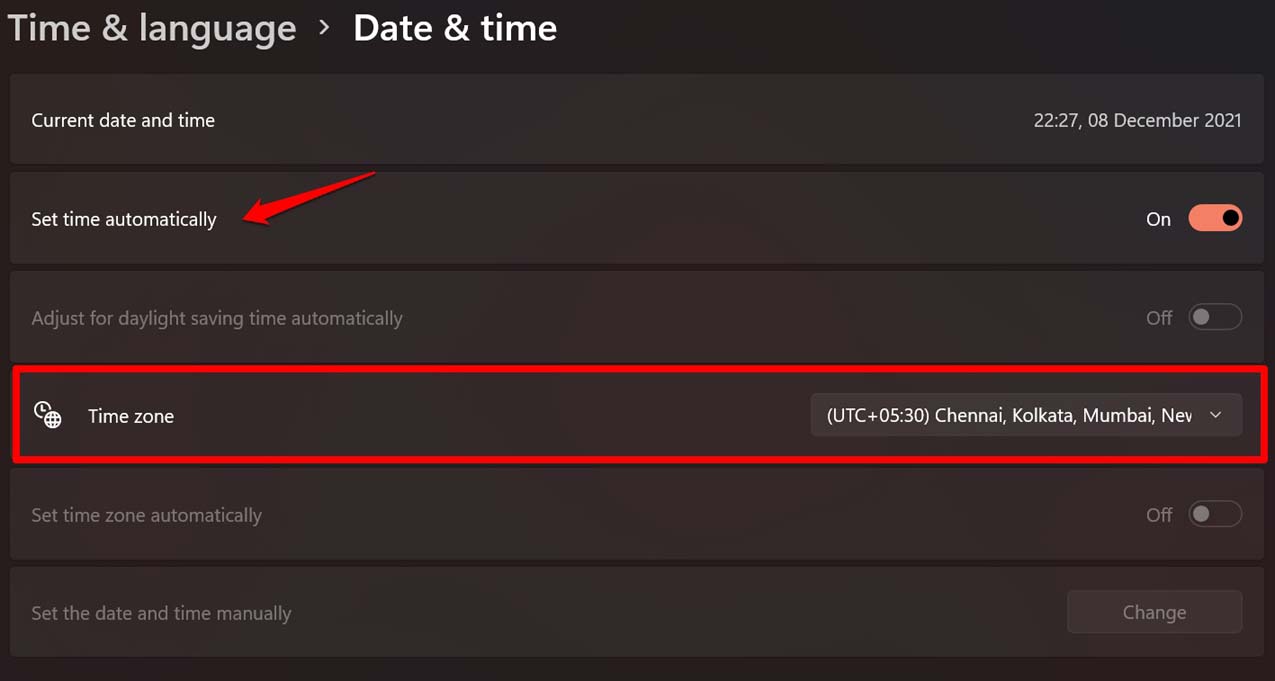
You need to enable automatic time on your computer. Also, check that you have set the correct time zone and language.
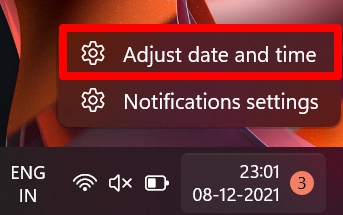
- On your desktop, right-click on the Time/date section on the taskbar.
- Click on Adjust Date and Time.

- Click the switch beside Set Time Automatically to enable the feature.
- Also, check the time zone and set it according to your respective region.

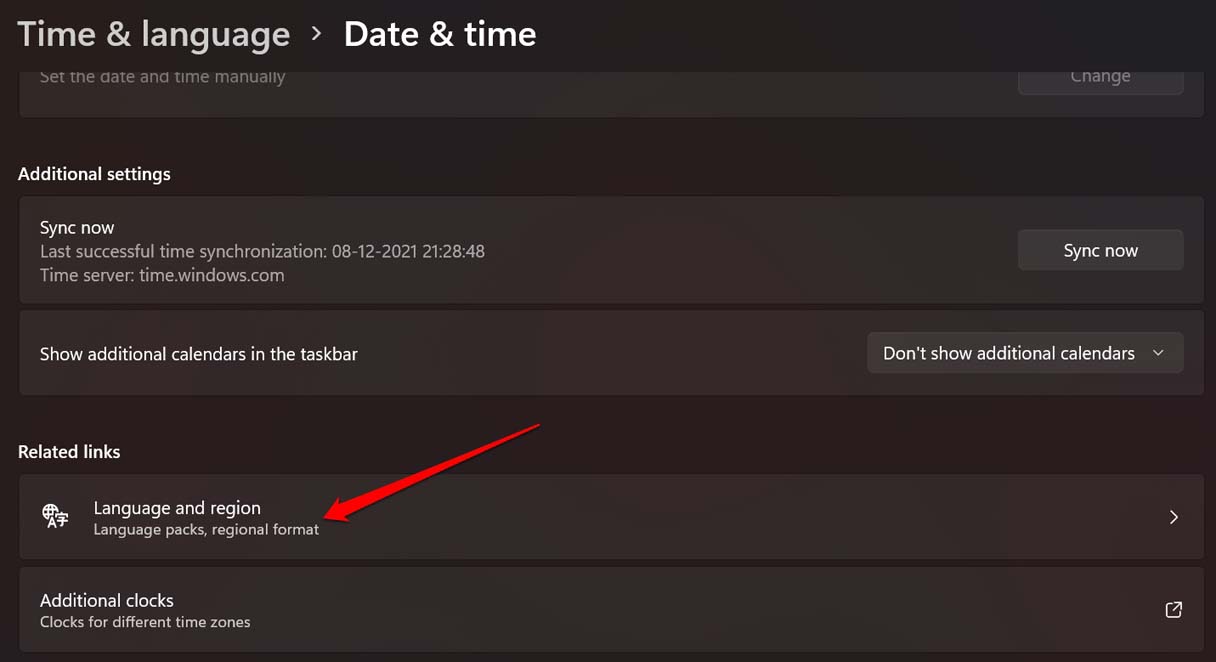
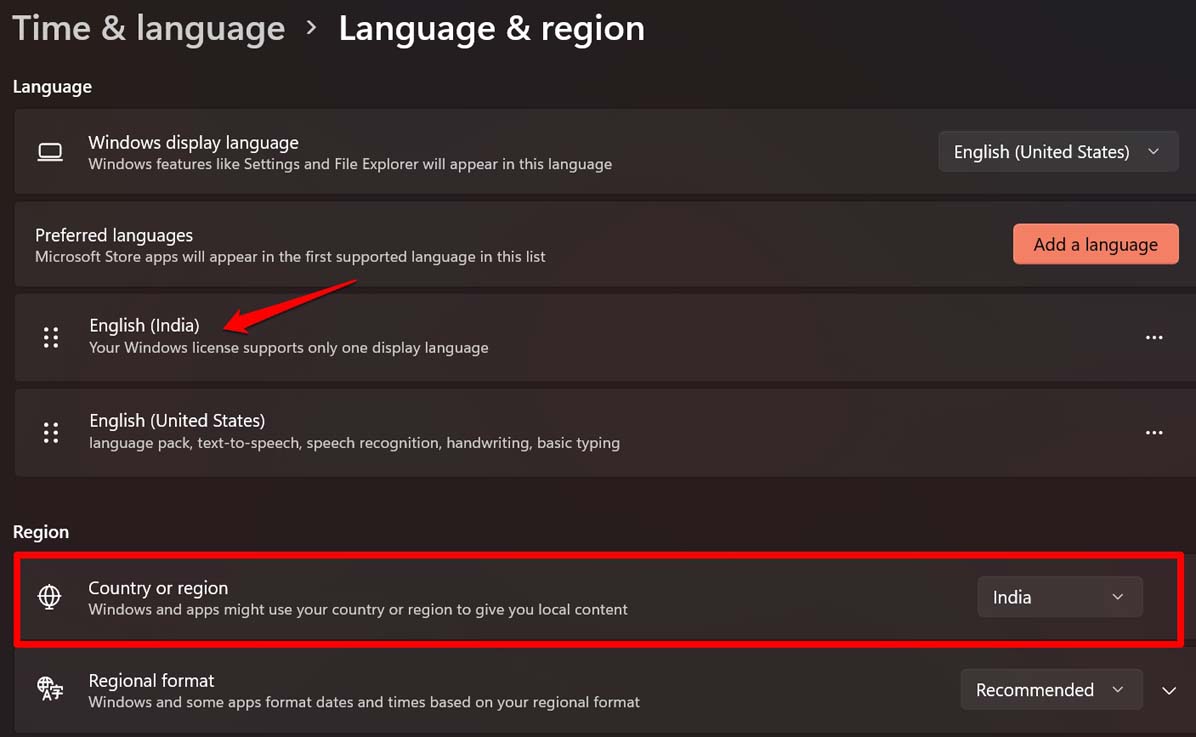
- Now navigate to Language and Region and click on it.

- Set your Preferred Language as per your requirement
- Also, check if the correct Country is set.

5. Reset the Spotlight Components
There is another fix that involves clearing out the spotlight components manually, which a few users reported worked for them. So, you can try that as well.
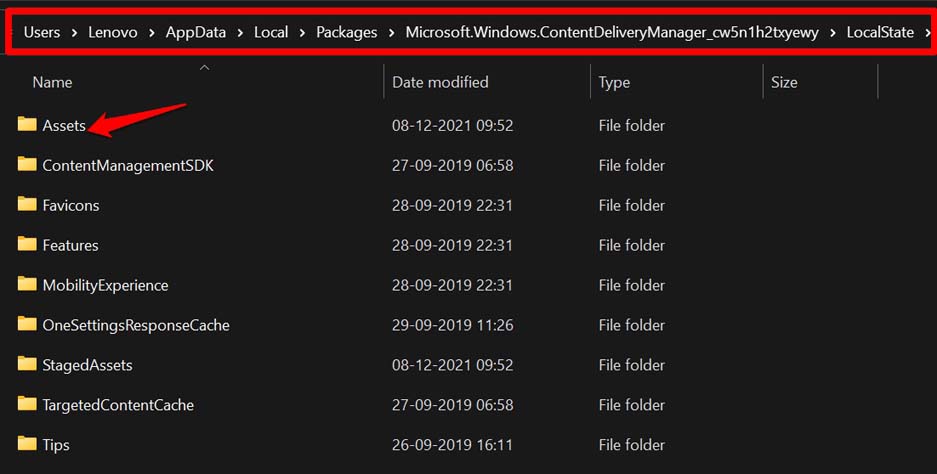
- Open the C: Drive.
- Click on Users.
- Click on Username [This will vary from computer to computer. For example, on my PC, it is Lenovo].
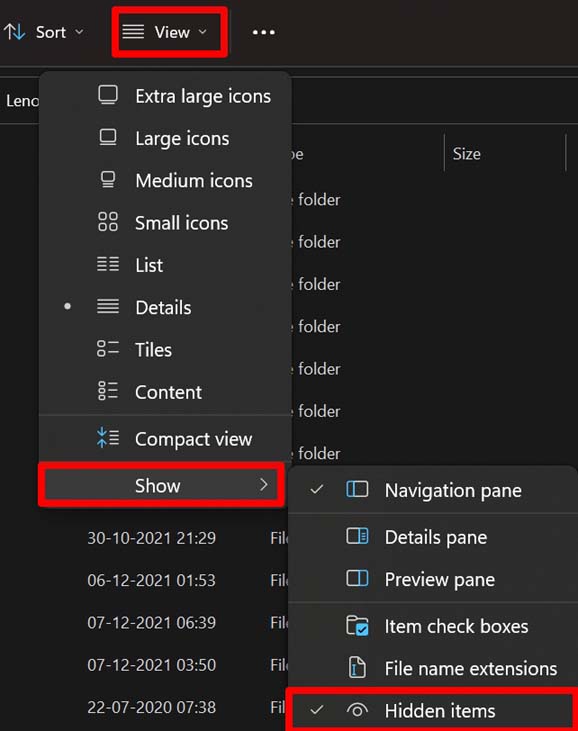
- Click on App Data [make sure you have enabled viewing hidden items]
- Next, follow the folder sequence
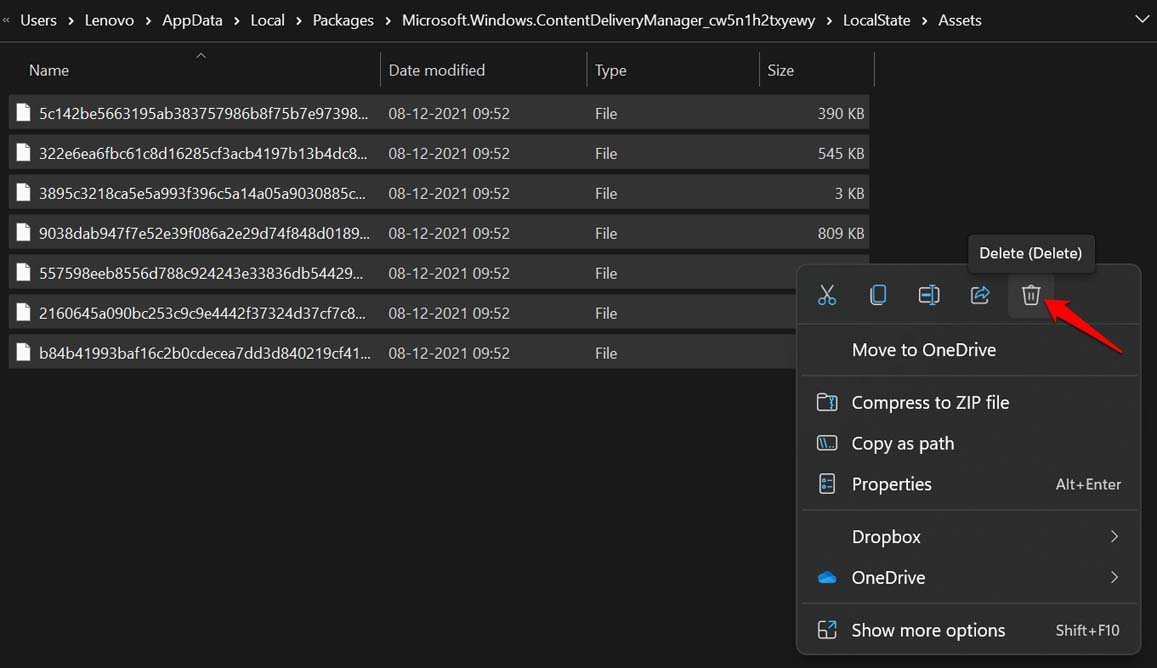
Local > Packages > Microsoft.Windows.ContentDeliveryManager > LocalState > Assets

- Select and delete all the items present in the folder Assets.

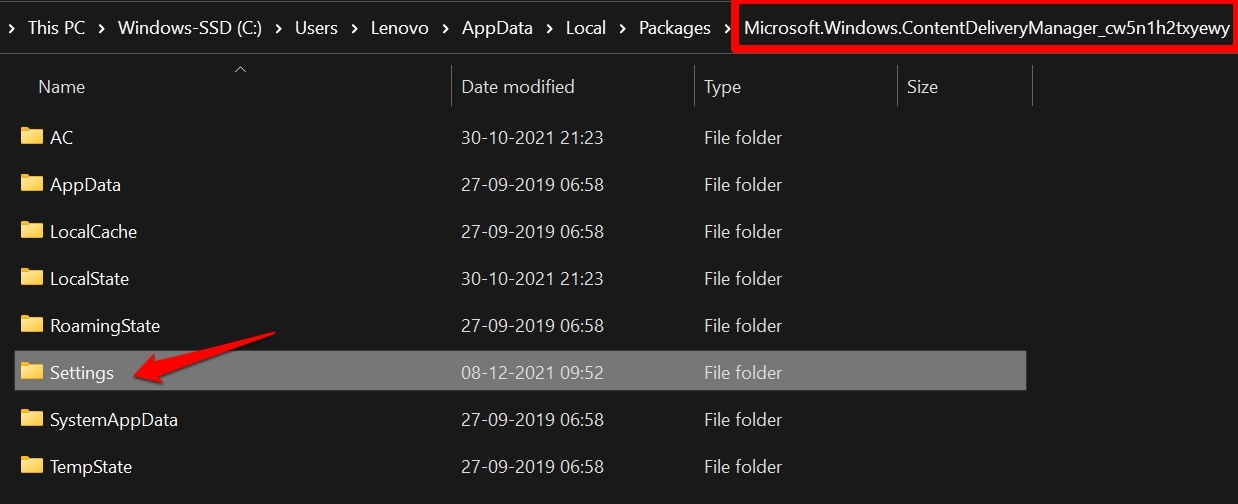
- Now get back to the screen where you have the folder LocalState.
- In that section, click on Settings.

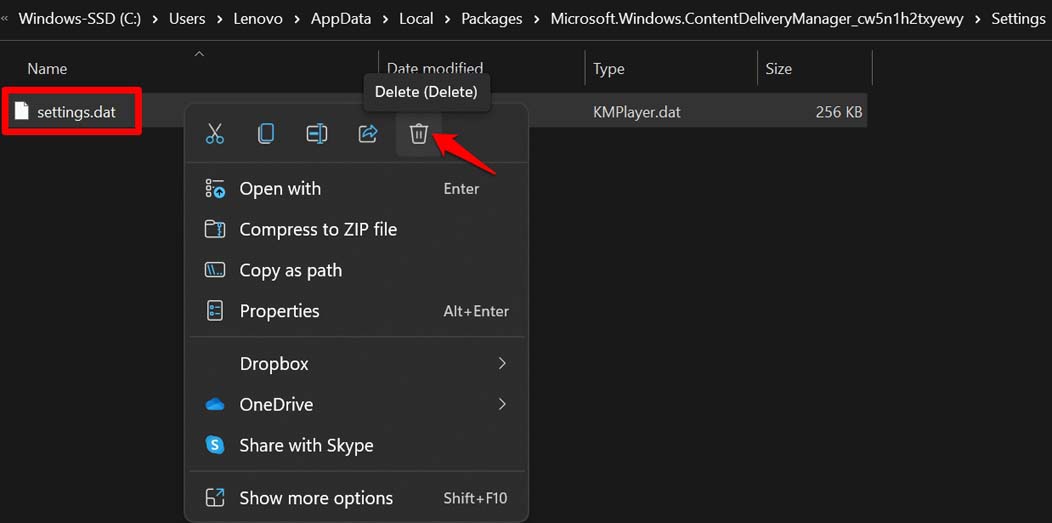
- There will be two file settings.dat and roaming.lock
- Delete these two files. [sometimes you may only see the settings.dat file]

- Restart your computer and connect to wiFi
- Try to set the Windows spotlight and check the lock screen.
In case you did not know how to enable viewing hidden items on Windows 11, then check the screenshot below. Follow the steps.
6. Install Dynamic Theme App on Windows 11
Now, this is the troubleshooting that worked for my PC running on Windows 11. Even I was not able to enable the Windows spotlight feature. I tried other tricks, and somehow it did not work. After installing the dynamic theme, the lock screen displayed the images by fetching them from the internet. Here is how to do this.
- Open the Microsoft Store app or go to store.microsoft.com.
- Search for Dynamic Theme.
- Click on Get.

- It will take a few seconds to install.
- Open the Dynamic Theme app.
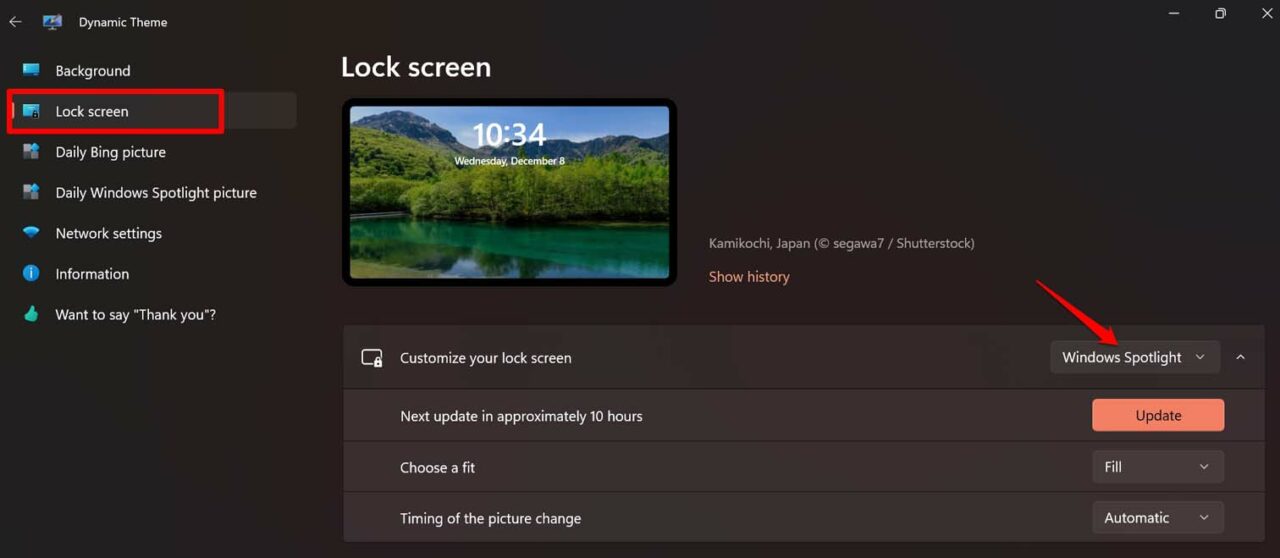
- On the left-hand side, click on Lock Screen.
- Now, click the drop-down menu beside the option Customize Your Lock Screen.
- Set it to Windows Spotlight.

Also, under Personalization, make sure that Windows Spotlight has been enabled for the lock screen from your PC settings. You can follow the next troubleshooting tip for the same.
7. Disable and Re-enable Spotlight
You can try to disable and re-enable the Spotlight feature from the Windows 11 personalization settings.
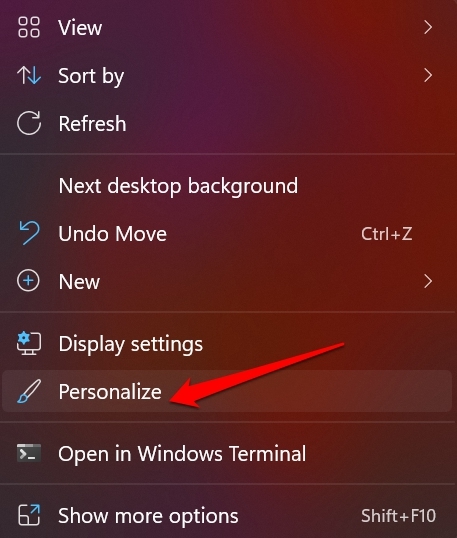
- Right-click on your desktop.
- From the menu, select Personalize.

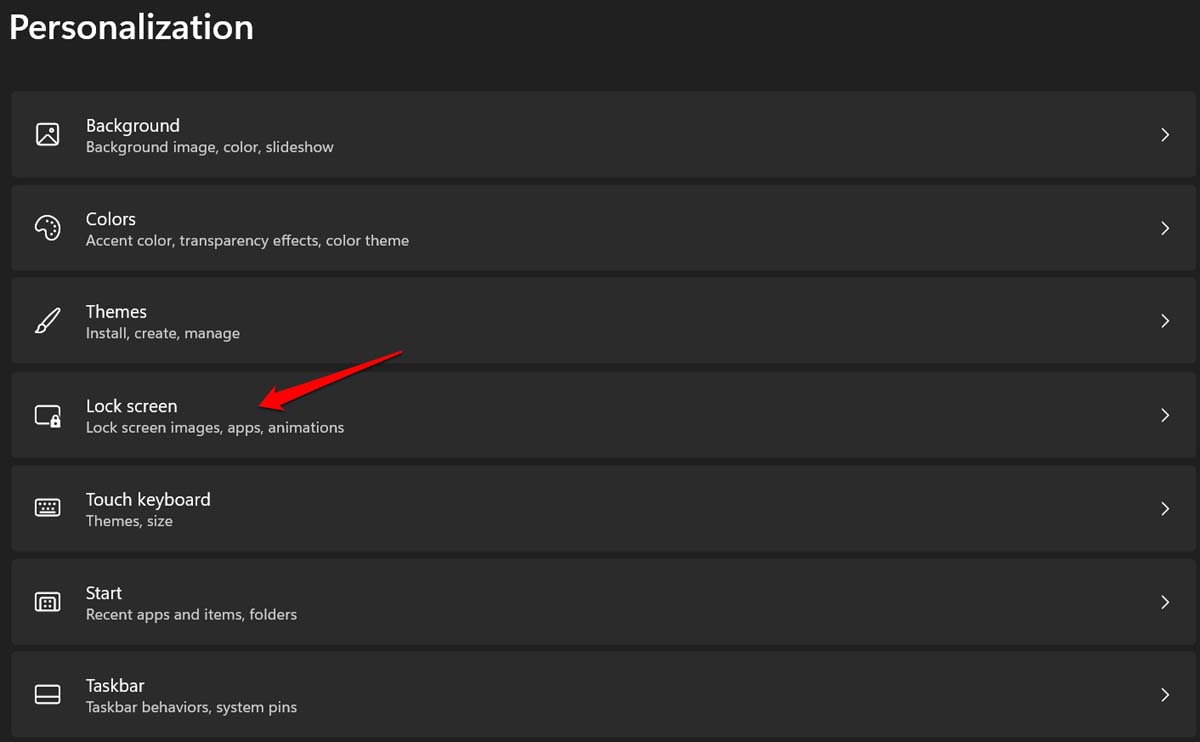
- Click on Lock Screen.

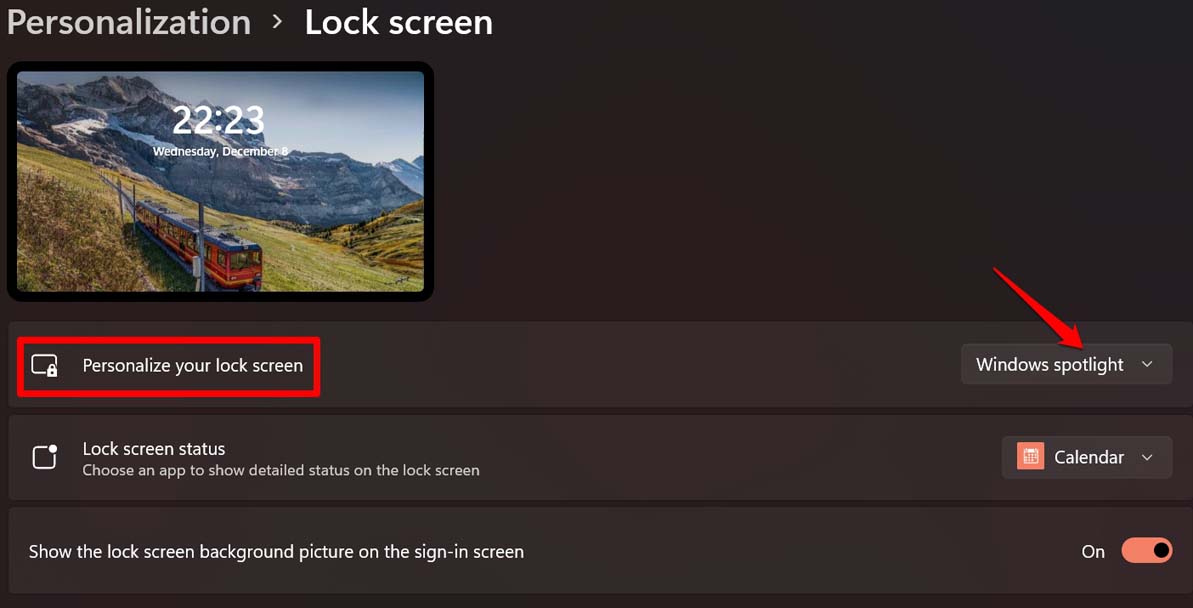
- Then click on the drop-down menu beside Personalize your lock screen.
- Select Windows Spotlight from the drop-down menu.

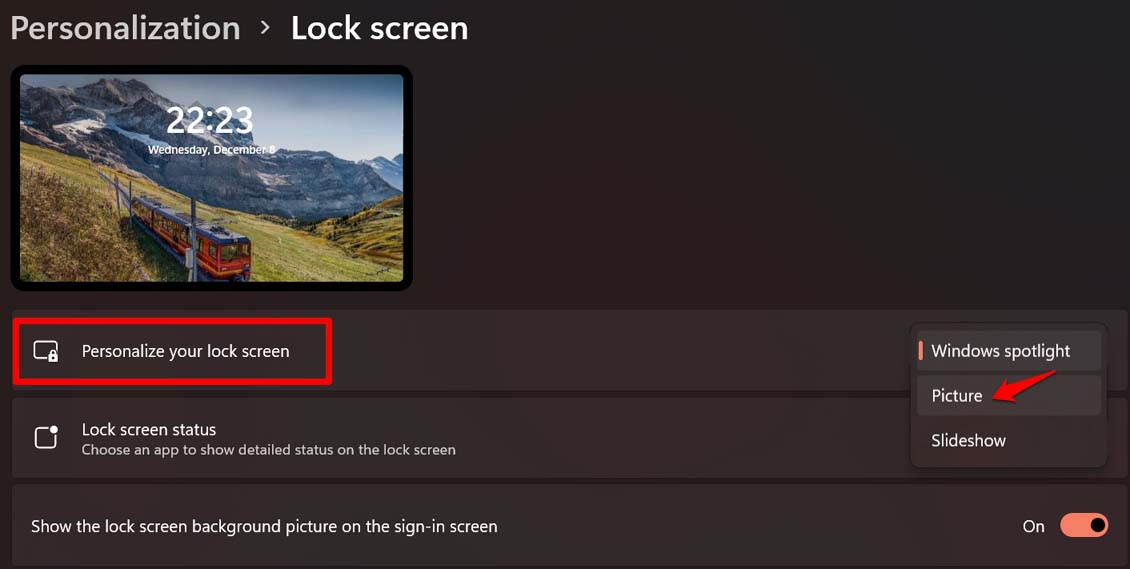
- Then from the same drop-down, many switch to Picture.

- Again switch back to the Windows Spotlight.
This should fix the issue, and you should be able to view the Windows Spotlight on the lock screen.
8. Re-register Spotlight Using PowerShell
Some users mentioned that re-registering the Spotlight feature through the PowerShell command enabled the feature on their Windows 11 computers.
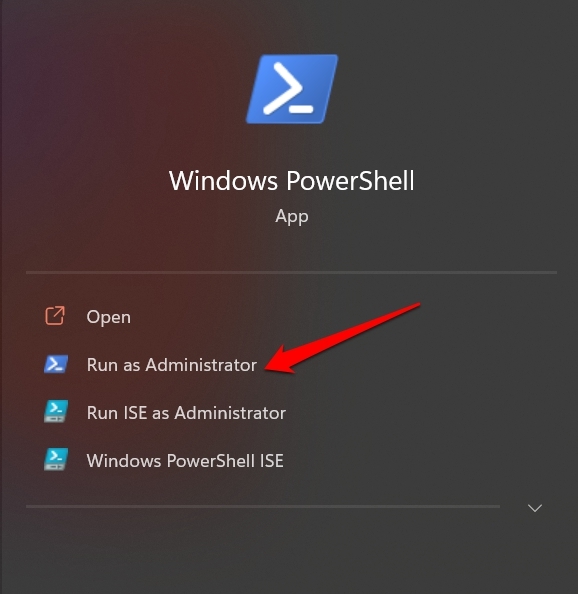
- Open PowerShell using Windows search options.
- Click Run As Administrator.

- Now, enter the following command and press enter.
Get-AppxPackage -Name Microsoft.Windows.ContentDeliveryManager | Foreach {Add-AppxPackage -DisableDevelopmentMode -Register "$($_.InstallLocation)\AppXManifest.xml" -Verbose}
- It will take a few seconds to deploy.
- Once done, close the PowerShell and restart your computer.
- After restarting, check if the Windows Spotlight feature is now showing on the lock screen or not.
So, these are the various working fixes to enable the Windows 11 spotlight feature on your computer. Try these out, and let me know which method solved the issue for you in the comments.
If you've any thoughts on [Fixed] Spotlight Wallpaper Not Changing on Windows 11, then feel free to drop in below comment box. Also, please subscribe to our DigitBin YouTube channel for videos tutorials. Cheers!
