Do you know that your Apple iPhone or iPad can act as a scanner.? Yes, you can scan any physical document using iOS or iPadOS. This guide will show you how to scan documents on iPhone or iPad using the native Notes app present in iOS and iPadOS.
Today everything is getting digital. Gone are the days when you had to carry around a lot of papers for your classes or office works. Now, you can simply scan any document using this feature present on your iPhone or iPad and carry them in digital format right within your devices.
You don’t even have to scan it using an actual scanner. If you have an iPhone or iPad, your work will be done. For example, you can keep a digital copy of your personal documents such as the PAN Card, Driving License simply by scanning them through iPhone or iPad.
Scan Document on iPhone Or iPad Using the Notes App
There is another primary advantage of using the scan documents feature in iOS and iPadOS. It makes the file platform-independent.
This means once you scan a document and save a digital copy on your Apple devices, iCloud will also save a copy of the same file, thus making it available across all the Apple devices that you use.
Why only Apple devices, you can easily save the digital copy of your file online through any cloud drive or email and access it any time from any other device.
Steps to Scan Documents using the Notes app of iPhone and iPad
Now, let’s get down to the steps you need to follow to scan your documents.
- Grab your iPhone or iPad whatever you use.
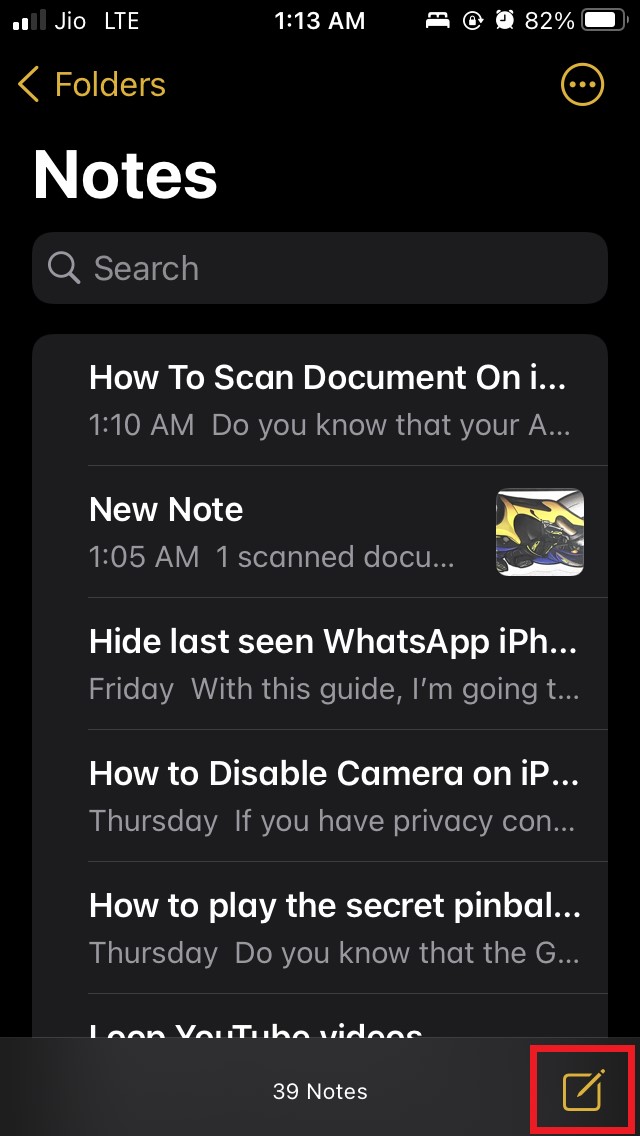
- Open the Notes app
- At the bottom right corner, tap on the create new note icon.

- A new note with blank space will be created.
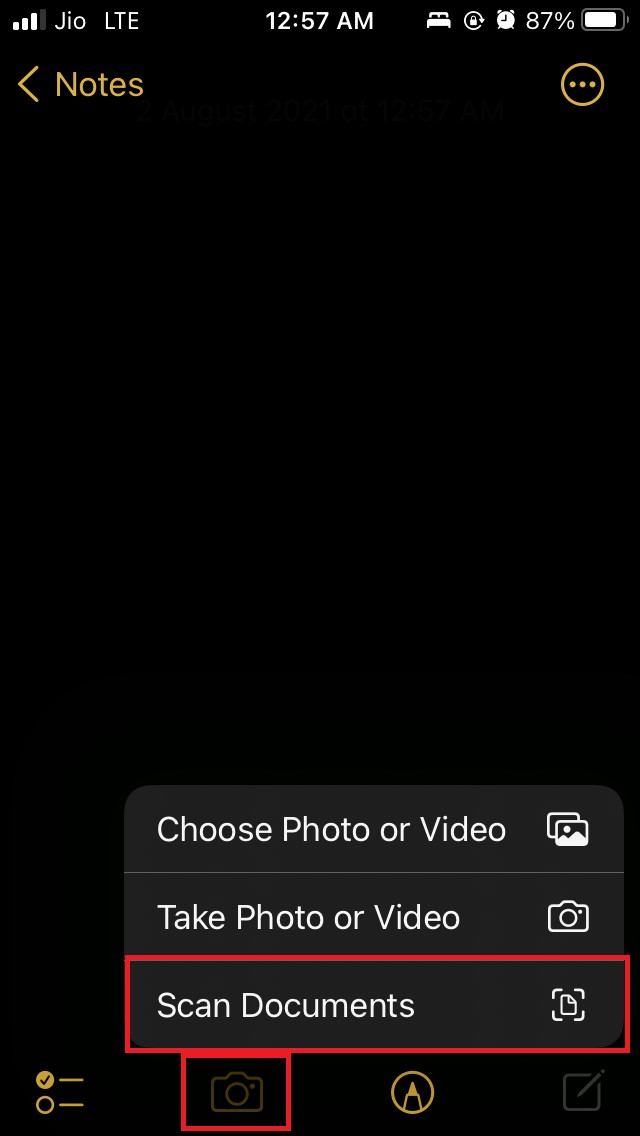
- At the bottom of the blank space, there will be a camera icon. Tap on it.

- A small menu will show up with a few options. One of the options is to scan documents. Tap on it.

- The scanner will now activate with the camera.
- Make sure that you have positioned your document to be scanned on a flat surface so that the scanner can capture it clearly.
- Point the iPhone or iPad with its scanner right over the document
- Automatically, within a few seconds, the document scan will complete
- The digital image will be saved to your Notes app. There is an option Save that you can tap as well.

- The scanning will happen on its own as the scanner will sense that there is a document when you begin to point the camera/scanner.
- Then visit the Notes app home page to see the document you just scanned.
Remember that the older versions of iOS and iPadOS also support the scanning of documents. So, if you are using an iPhone or iPad with an older software build, then also you won’t have any issues in scanning your preferred documents.
Some of you may think, what will be the picture quality of the documents that you will scan using iPhone and iPad.?
To be honest, it depends upon the camera quality of your iPhone. Needless to say that the modern-day iPhones and iPads do come with a good camera system, so you will get a good quality scanned digital version of your document.
So, with the above info, I wrap up this guide about how to scan documents using iPhone or iPad using the Notes app.
If you've any thoughts on How To Scan Document On iPhone Or iPad Using the Notes App?, then feel free to drop in below comment box. Also, please subscribe to our DigitBin YouTube channel for videos tutorials. Cheers!
