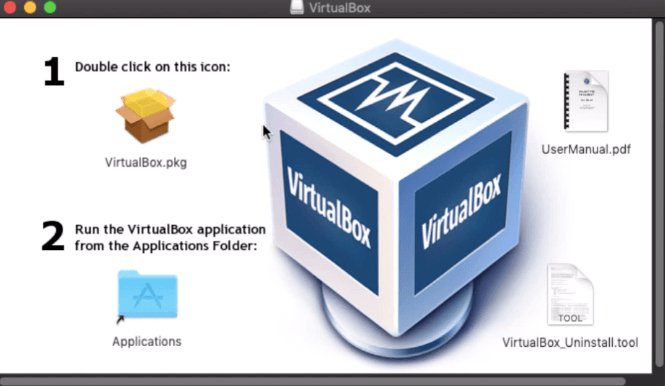
VirtualBox Installation Package Window in macOS
Trying to install VirtualBox on macOS? But why it is needed? Every computer will arrive preinstalled with one default operating system.
For example, Macbook with macOS; Surface or Dell with Windows OS; few machines are also preloaded with Ubuntu or any Linux Distributions. This will limit ourselves using only a particular default operating system.
What if someone like me wants to try out more than one operating system? Or want to test operating systems in BETA before upgrading the base OS?
That’s where the Virtual Machine comes into the picture. The beauty of virtual machines is to spin another operating system without touching the main OS. You can install another operating system alongside the default OS which was preloaded on your machine.
One of the virtual machines and my personal favorite is VirtualBox. In this article, we are going to learn how to install VirtualBox on macOS in three easy steps.
VirtualBox is a free open source program application software that helps to virtualize any operating system. In simple terms, VirtualBox can virtually host any operating system independent of the host operating system. The program can be downloaded and installed on all the major operating systems like Windows, macOS, Linux Distributions, and even SunOS.
VirtualBox is supported by community developers and also backed by Oracle to keep the software up to industry-standard level. The updates are released frequently with the best security and privacy. The current latest version is VirtualBox 6.0.
VirtualBox is free open source software and can be downloaded from their official site. Click on the below button to download VirtualBox 6.0.12 for macOS.
You can also visit this VirtualBox download page to verify if any new versions are available. Select OS X hosts to download VirtualBox on Macbooks.
The VirtualBox will be downloaded in the Download folder with the extension .dmg.
Open the downloaded VirtualBox .dmg file to proceed with the installation. You’ll see be able to see the VirtualBox installation package window.
Just double click on the file to start the installation. While installation, you may be also asked to allow software installation from Oracle since we are not installing the program for the App Store. Do not worry, just allow the installation permission, it’s safe.
Proceed with all the installation steps as guided by the installer and agree with terms wherever requested.
Once the installation is completed the VirtualBox app will be created in the Applications folder. If the VirtualBox app is not created then we drag and drop the app into the folder.
Applications directory is the default home folder for all the apps and software installed on the macOS or Macbook.
Just double click on the VirtualBox app after moving into the Applications folder and your VirtualBox is ready to use.
As a next step you can start using VirtualBox to:
Here is the video demo of installing the VirtualBox virtual machine on Macbook OS X.
Hope you liked the video, please subscribe to our channel.
That’s it. We have successfully installed the VirtualBox virtual machine on the macOS. Open the application and play around to understand what all options and settings are available.
If you want to try out different operating systems on your base machine, then VirtualBox is your best bud.
There are also few other virtual machines, however personally I prefer VirtualBox given the strong community support and frequent security updates along with Open source nature.
Let me know if are facing any challenges or have any other virtual machines in your mind.
This post was last modified on December 29, 2019 5:23 pm