Is it possible to use Apple’s macOS on Windows 11? Can a Windows PC run MacOS? These questions roam around in the mind of every Windows user who cannot afford a MacBook. The answer to these questions is yes. It is possible to use it on Windows 11 by following some workarounds. Keep reading this post to know how to install MacOS on Windows 11.
You can install MacOS on your Windows device by creating and using virtual machines or VMs. The most preferred software to create a virtual machine on Windows for this procedure is VirtualBox by Oracle. Using VirtualBox, you can install multiple operating systems on a single device and switch between them without any problem. The other operating system will boot within an application to virtualize the hardware. In this article, we will be installing MacOS Big Sur on a Windows device.
Steps to Install Mac on Windows 11
Before starting the installation procedure, you will need to install VirtualBox and its extension pack. Follow the steps mentioned below to install MacOS on a Windows device:
- Click here to download VirtualBox.
- Install it on your device.
- Once VirtualBox is installed, click here to download VirtualBox Extension Pack.
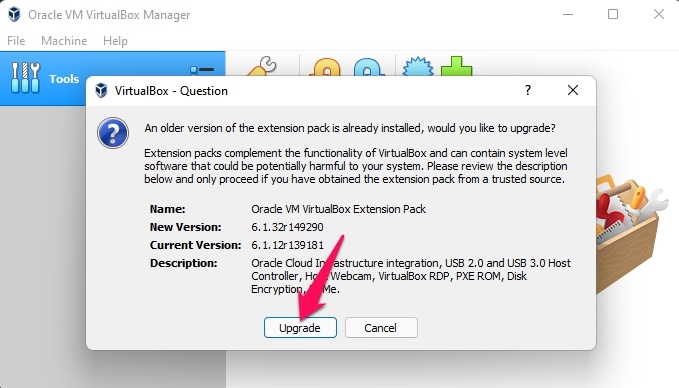
- After the Extension Pack is downloaded, click on it. A prompt will appear, click on Install > I Agree.

- The extension pack will now be installed in VirtualBox.
- Now download the MacOS Big Sur ISO file from here.
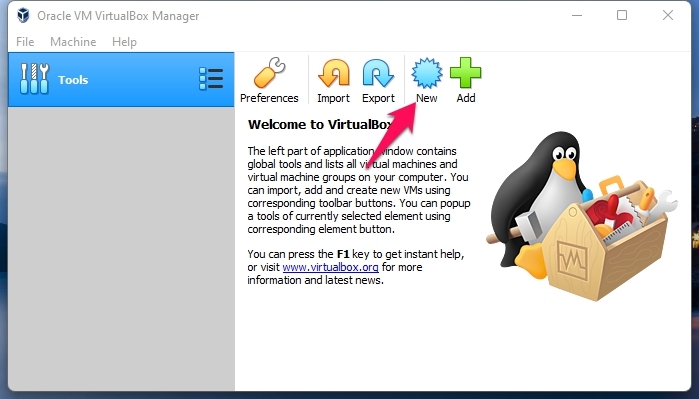
- Now open Oracle VM VirtualBox and click on New.

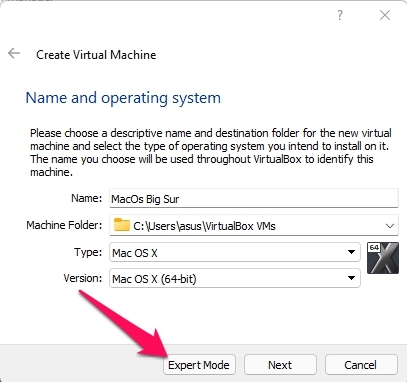
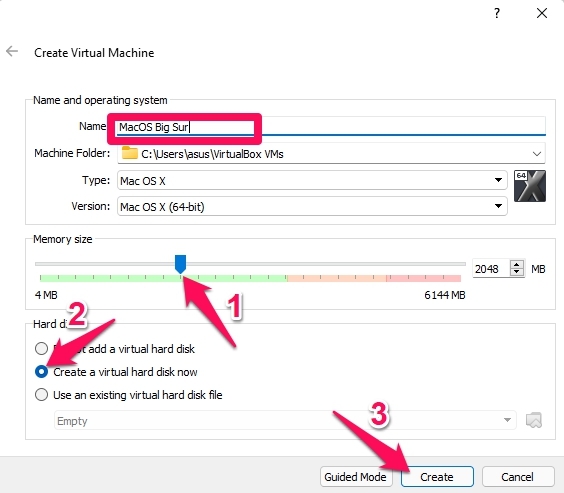
- Type MacOS Big Sur in the Name section, then tap on Expert Mode.

- Now name the operating system as MacOS Big Sur. Using the slider increases the memory size up to 8GB. If your PC doesn’t allow it, use at least 50% of physical RAM.
- Check the Create a Virtual Hard Disk option and click on the Create button.

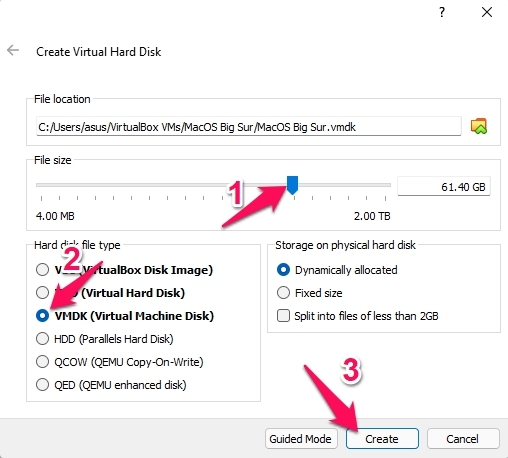
- Use this slider again to set the size of the virtual hard disc according to your preference. It may only depend upon how much storage you have available on your PC. It’s recommended to allocate 60 GB for the virtual machine.
- Now select the option VMDK(Virtual Machine Disk) for the hard disk file type and click on Create.

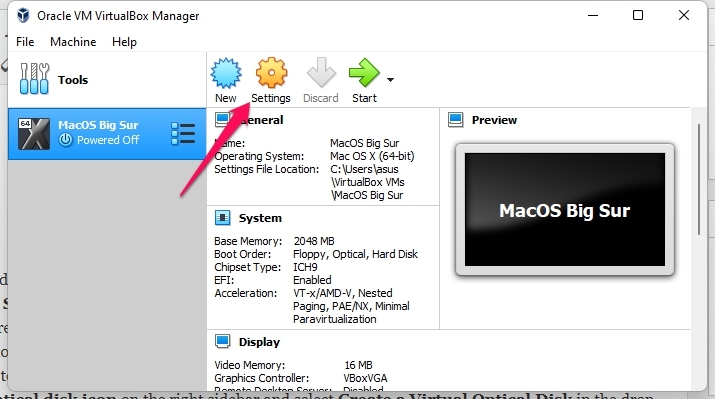
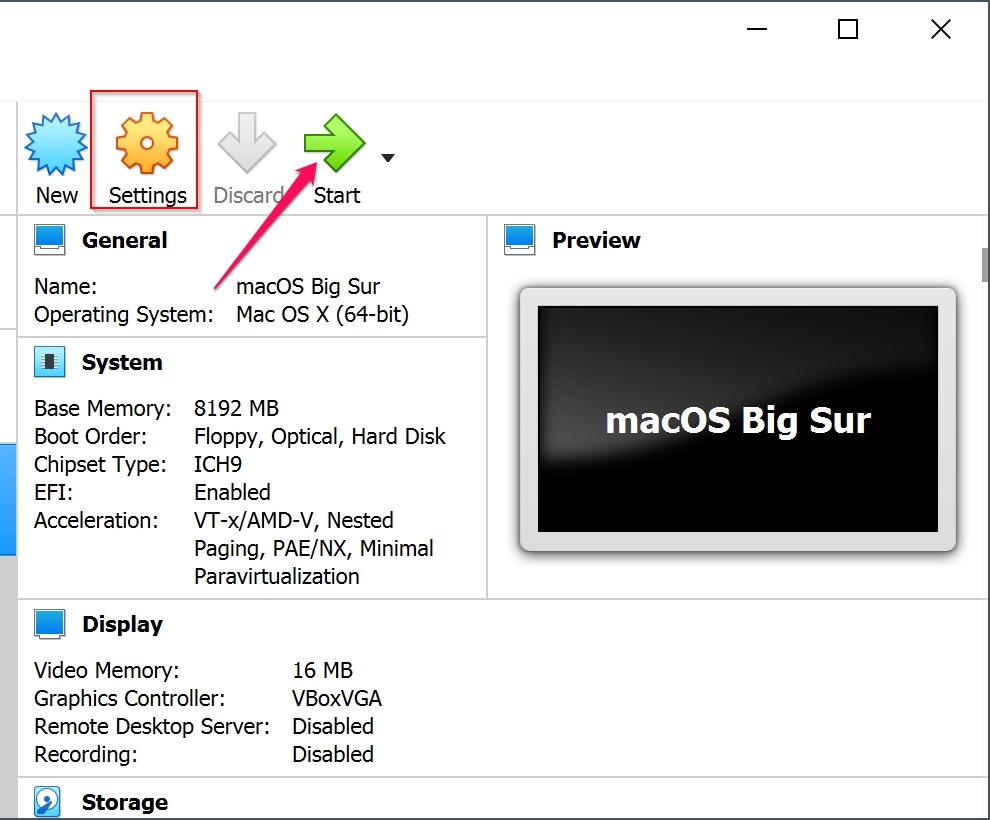
- Once all this is done, click on Settings.

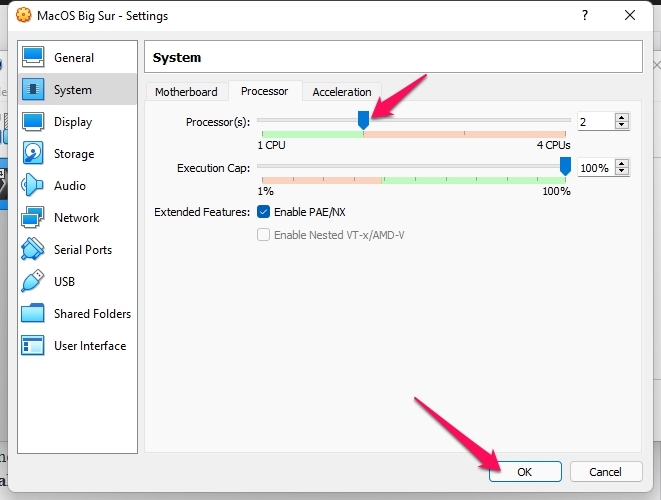
- Navigate to the System tab and click on the Processor option. Use this slider to adjust the processor allocation. We recommend allocating half of your processor’s core count for this procedure.

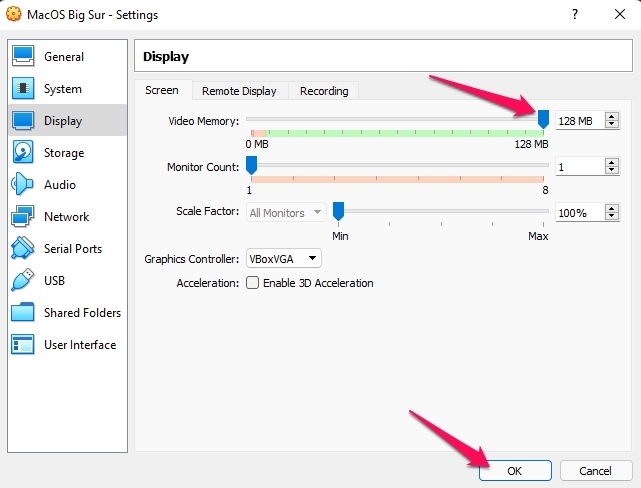
- Now Navigate to the Display tab. In the right pane, move the slider under the Screen tab of Video Memory.

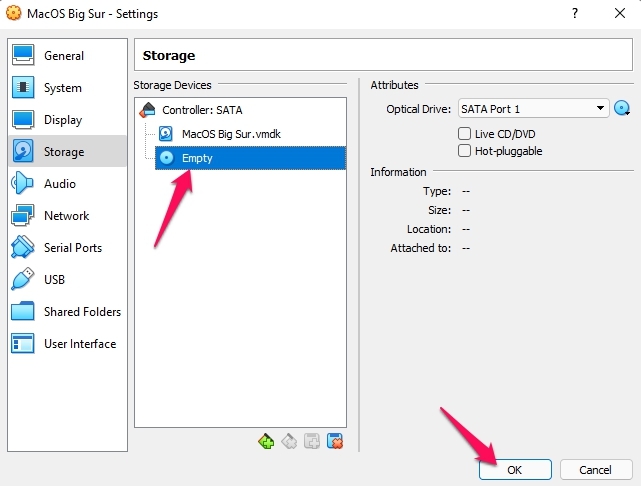
- Again navigate to the Storage tab and click on Empty under Storage Devices section.

- Click on the Optical disk icon on the right sidebar and select Create a Virtual Optical Disk in the drop-down menu.
- Then click the Add button to browse for the MacOS ISO file you have already downloaded.
- Select the ISO file in the File Explorer and click on the Open button.
- Click on Choose and then on Ok.
- Now close VirtualBox and open Command Prompt as an administrator.
- Copy and paste the following lines into the command prompt and hit Enter. Alternatively, you can also execute this one by one. Type your virtual machine name in place of MacOS Big Sur. You can also download these commands from here.
cd "C:\Program Files\Oracle\VirtualBox\"
VBoxManage.exe modifyvm "MacOS Big Sur" --cpuidset 00000001 000106e5 00100800 0098e3fd bfebfbff
VBoxManage setextradata "MacOS Big Sur" "VBoxInternal/Devices/efi/0/Config/DmiSystemProduct" "iMac11,3"
VBoxManage setextradata "MacOS Big Sur" "VBoxInternal/Devices/efi/0/Config/DmiSystemVersion" "1.0"
VBoxManage setextradata "MacOS Big Sur" "VBoxInternal/Devices/efi/0/Config/DmiBoardProduct" "Iloveapple"
VBoxManage setextradata "MacOS Big Sur" "VBoxInternal/Devices/smc/0/Config/DeviceKey" "ourhardworkbythesewordsguardedpleasedontsteal(c)AppleComputerInc"
VBoxManage setextradata "MacOS Big Sur" "VBoxInternal/Devices/smc/0/Config/GetKeyFromRealSMC" 1
- Again open VirtualBox and click on Start.

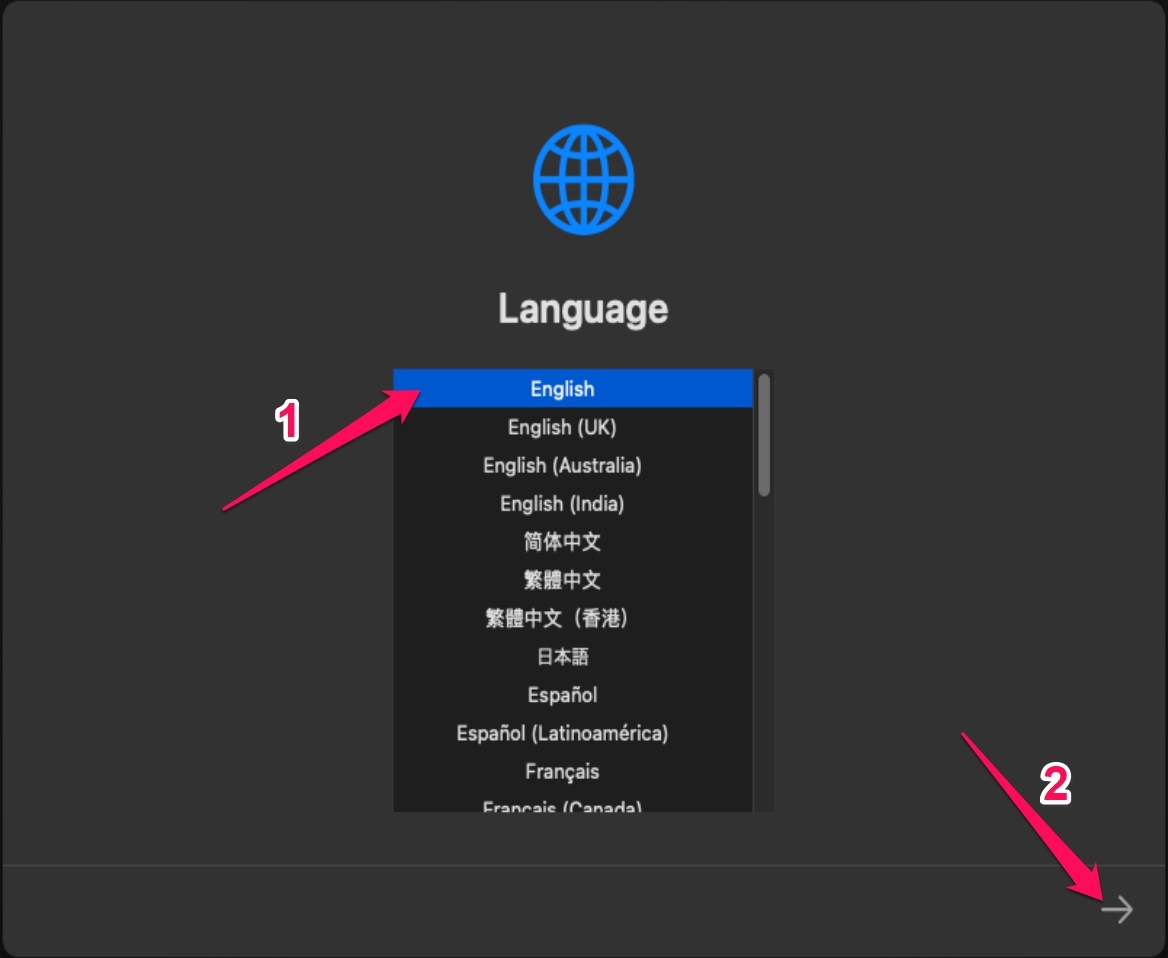
- Select language on the Next screen.

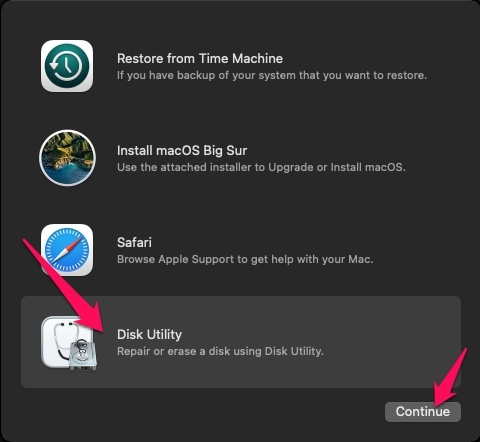
- Click on the right arrow button at the bottom right corner and select Disk Utility Option.

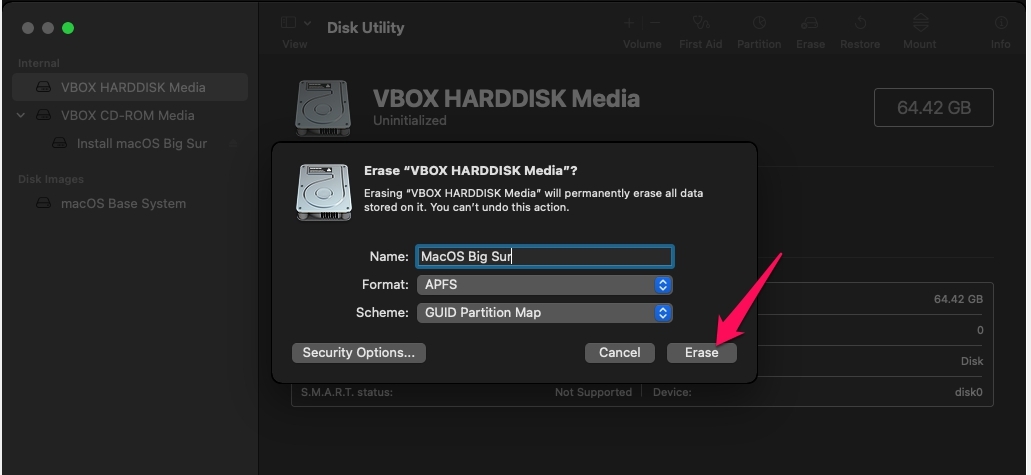
- Now select VBOX HARDDISK Media in the left pane and click on the Erase option.
- Now name the hard disc as Mac OS Big Sur, and click on the Erase button.

- Once the hard disc is erased, click on the Done button.
- Click on Disk Utility from the menu and click the Quit Disk Utility option.
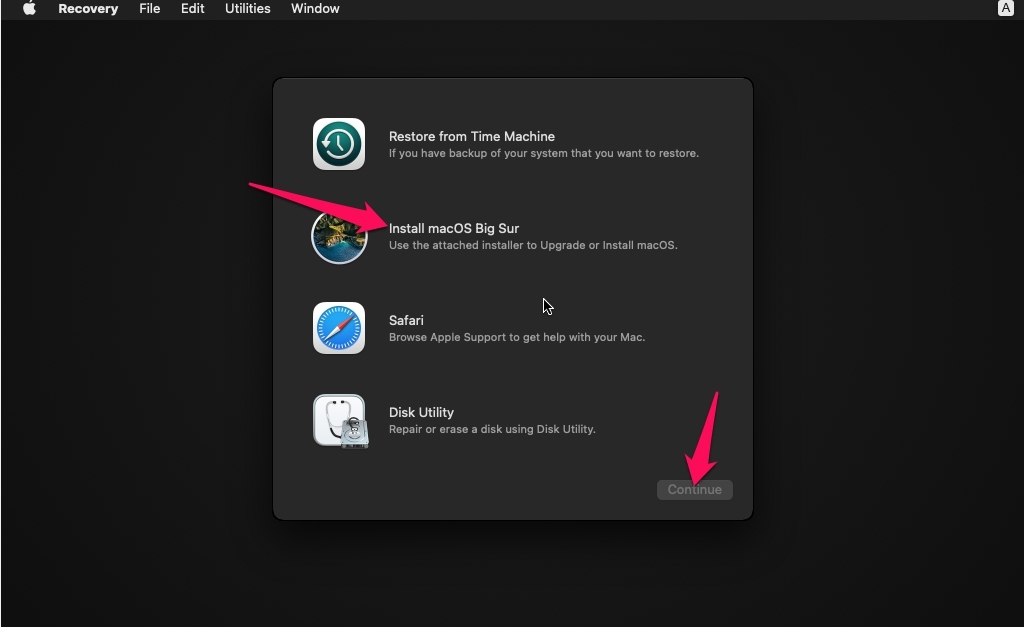
- Then select Install MacOS Big Sur option.

- Click on the Continue button.
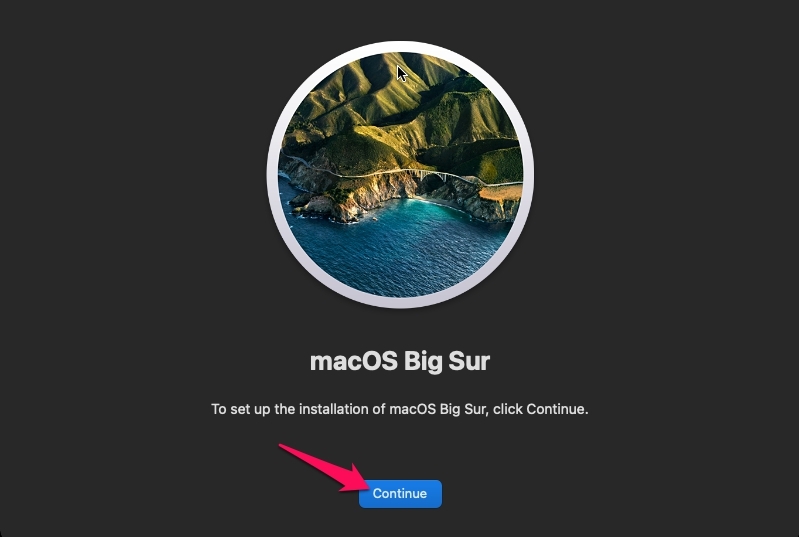
- On the next screen that appears, click on Continue again.

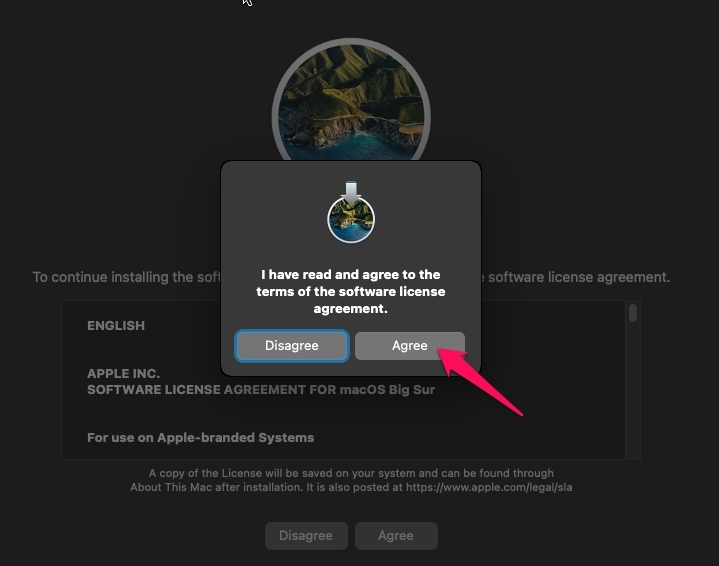
- On the Licence Agreement page, click on Agree.
- Click on Agree again in the pop-up window.

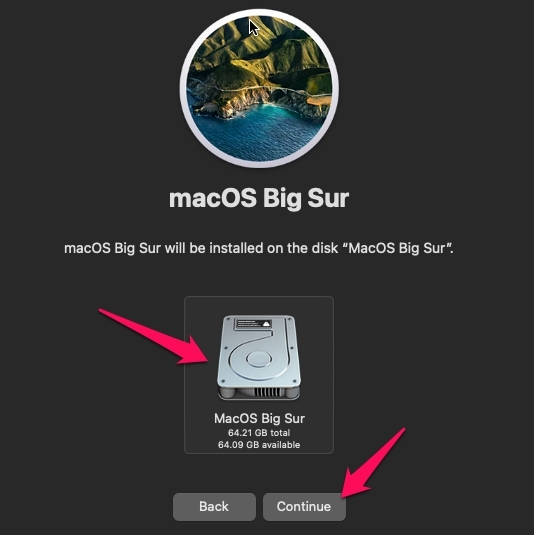
- Select the hard disk and click on Continue.

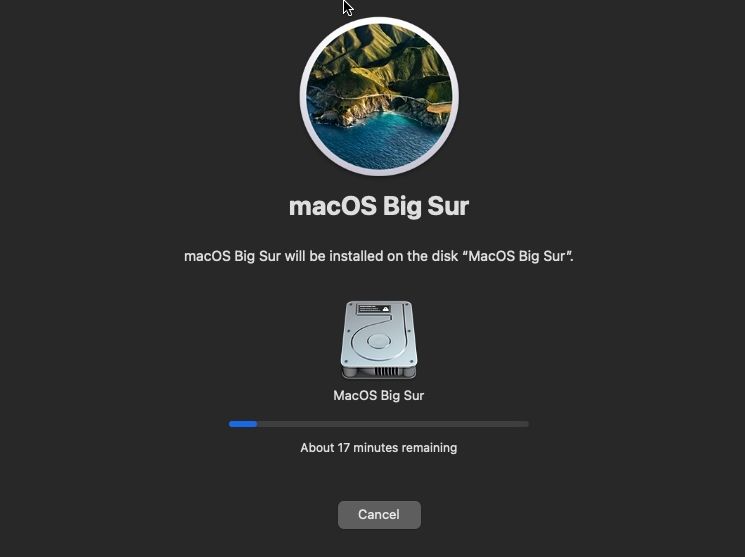
- Mac OS will now start installing on your Windows 11 device. It will take some time, depending on the resources provided in the virtual box. However, while the installation procedure is running virtual machine may restart several times.

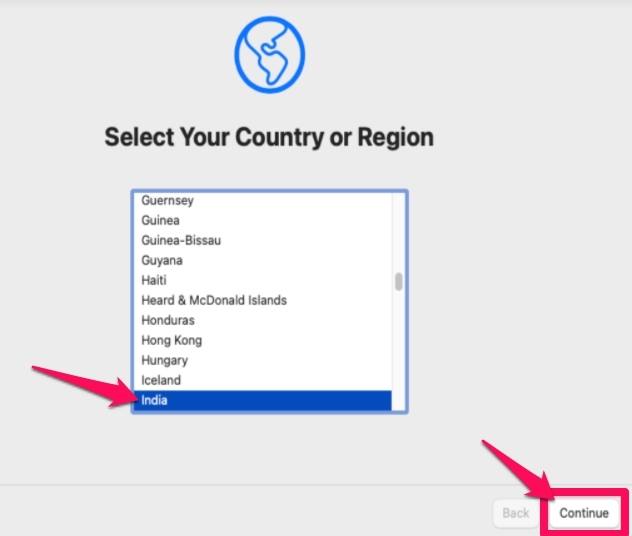
- Once installed, a Select your country or region page will appear to select the required ones and click on Continue.

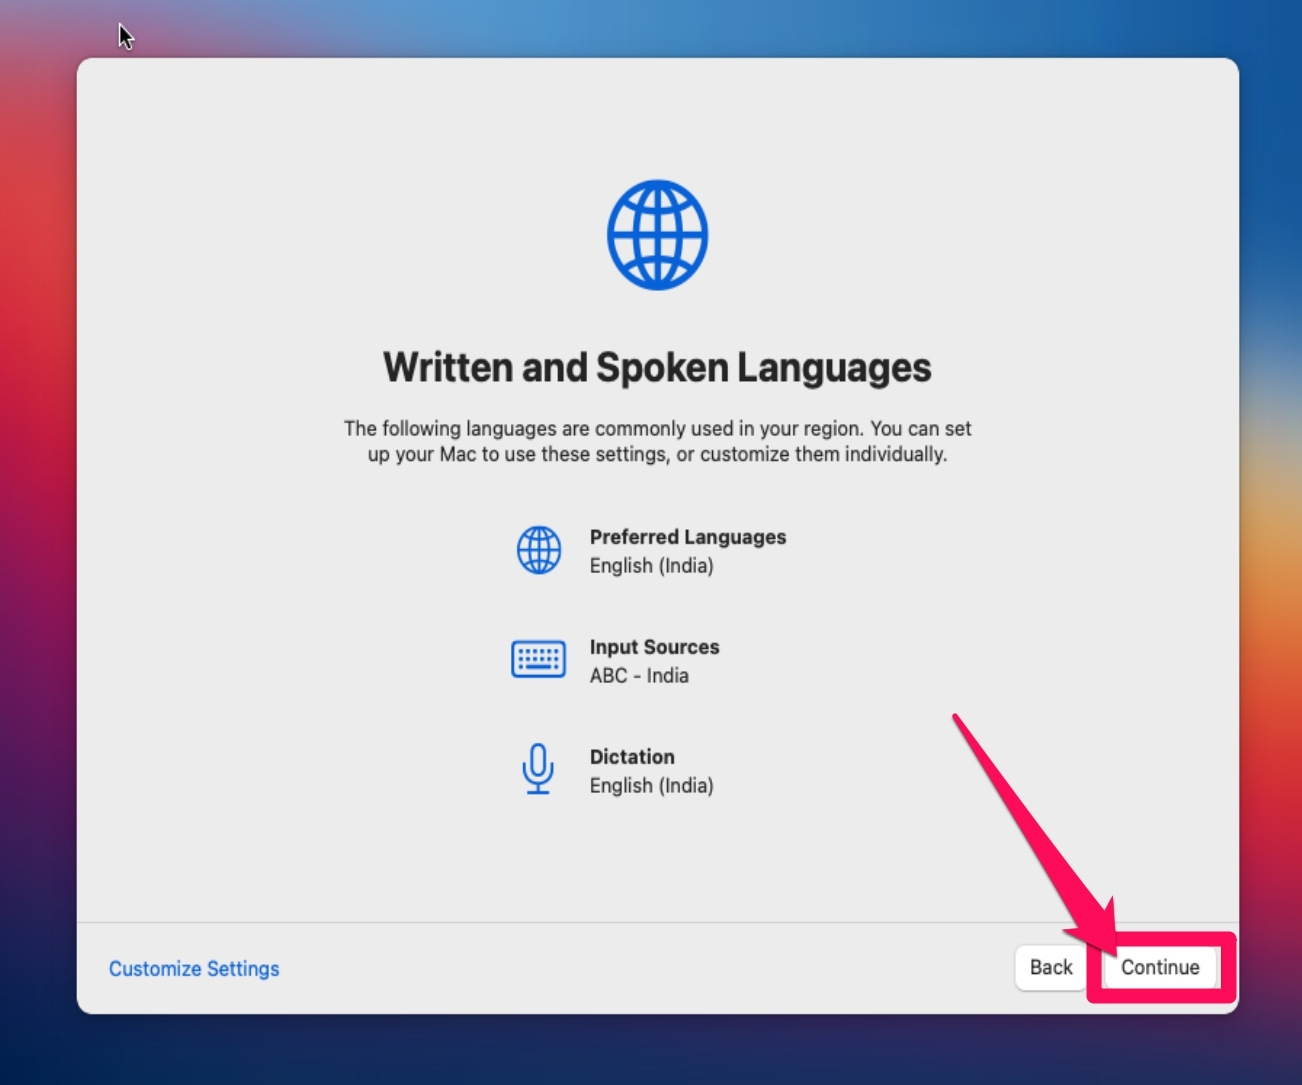
- Again click on Continue in the written and spoken languages tab.

- Next is the Accessibility page; click on Not Now.
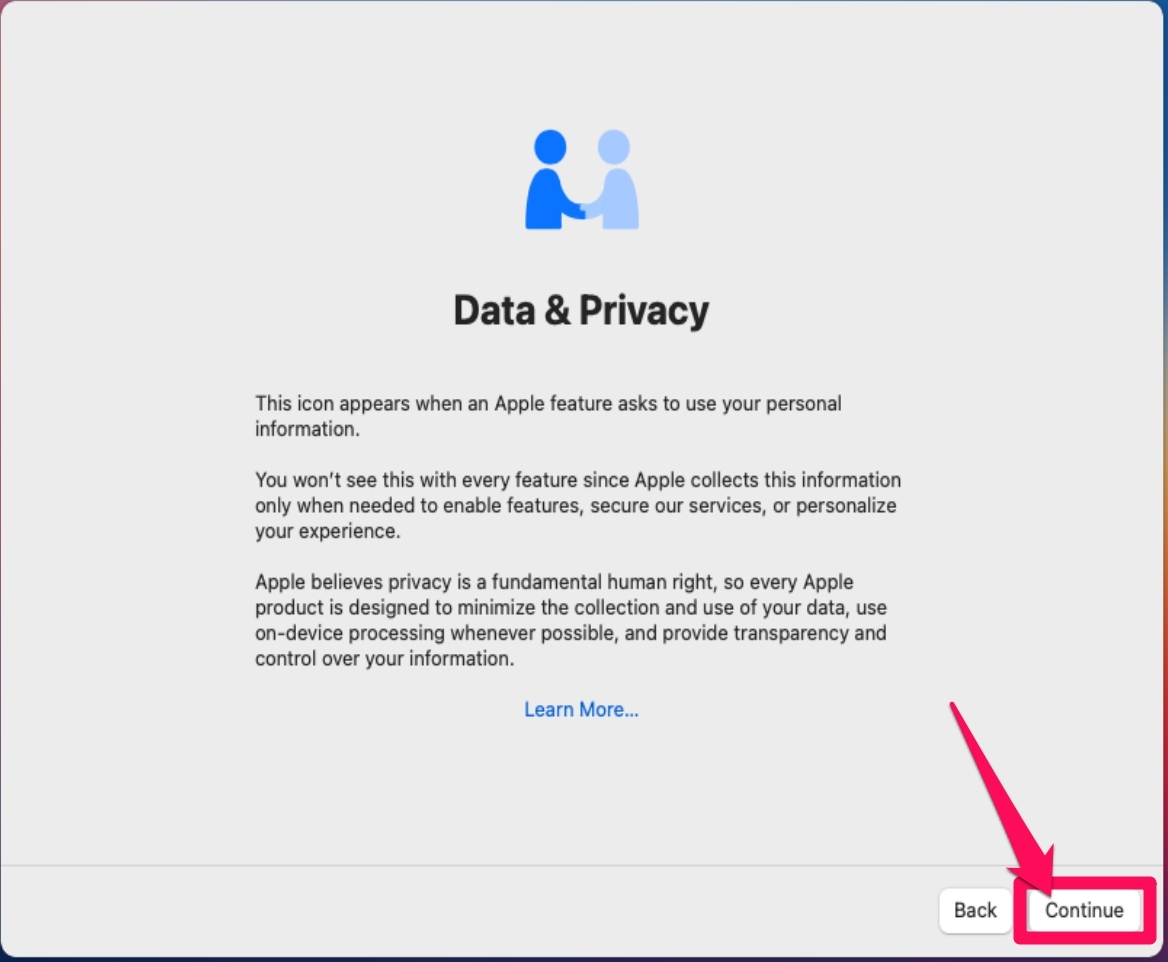
- In the Data and Privacy window, click on Continue.

- In the Migration Assistant window, click on Not Now.
- You’ll then be asked to log in via your Apple ID. Click on Set Up Later, then on Skip.
- Click Agree in the Terms and Conditions window.
- A pop-up window will appear; click on Agree.
- You will now have to create a computer account by filling out some information. Fill out your full name, account name, and password. Once done, click on the Continue button.
- Click on Continue again in the Express setup window.
- Click Continue on Analytics and on the Screen Time window.
- Click Continue under Siri.
- Select the appearance of MacOS from dark, light, and auto options. Once done, click on Continue.
- Click Continue under the Keyboard Setup Assistant window and follow the instructions on the screen to calibrate the keyboard.
- You have now successfully installed MacOS on your Windows 11 device.

Frequently Asked Questions (FAQ)
Is it possible to install MacOS on Windows PC?
Although Apple doesn’t allow the installation of MacOS on Windows devices, there are various tools available on the internet that will enable you to do so. Using these tools, you can install MacOS from snow leopard onwards into a non-apple PC. The process of installing MacOS on Windows 11 is known as Hackintosh.
Does MacOS need a license?
If you are still using the OS on the device it was intended for and want to update the OS, then you will need a new license.
How can I Install MacOS on Windows?
Running Mac on Windows 11 is possible by using VirtualBox. Read the methods mentioned above to do so.
Wrapping Up
That’s all about how to install MacOS on Windows 11. We hope you were able to do so using the steps mentioned above. Still, if you have any issues, feel free to drop a comment below.
If you've any thoughts on How to Install and Run Mac on Windows 11?, then feel free to drop in below comment box. Also, please subscribe to our DigitBin YouTube channel for videos tutorials. Cheers!



i havre this error while installing the VirtualBox Extension Pack and macos link does not open
VBoxExtPackRegister returned VERR_VERSION_MISMATCH, pReg=0000000000000000 ErrInfo=’Helper version mismatch – expected 0x3 got 0x30000′.
Result Code:
E_FAIL (0x80004005)
Component:
ExtPackManagerWrap
Interface:
IExtPackManager {70401eef-c8e9-466b-9660-45cb3e9979e4}
ERROR, please fix this issue
Failed to open a session for the virtual machine MacOS Big Sur.
Failed to query SMC value from the host (VERR_INVALID_HANDLE).
Result Code: E_FAIL (0x80004005)
Component: ConsoleWrap
Interface: IConsole {872da645-4a9b-1727-bee2-5585105b9eed}
i like it
After step 35 I cannot continue: it says the installer is damaged. Of course, it isn’t, but that’s what it informs. Big Sur is the ONLY iso image that can even get to that point. All the other images fail and reboot themselves again and again and again.