If you are looking to personalize your Windows 11 PC, then let us discuss how to change the default system font on Windows 11. This guide also covers how to restore the default system font and tweak the font size on Windows 11. If you are a user who prefers improving the aesthetics of the on-screen content, then this guide will help you out.
To change default system font on Windows 11, you have to make changes using the Windows registry settings. It cannot be changed from the Windows 11 settings. I have explained the detailed steps ahead in this guide. In brief, you have to create a registry file that contains some code fragments to change default system font on Windows 11.
Steps to Change Default System Font on Windows 11
First, you have to select from any available font on your Windows PC by accessing the settings.
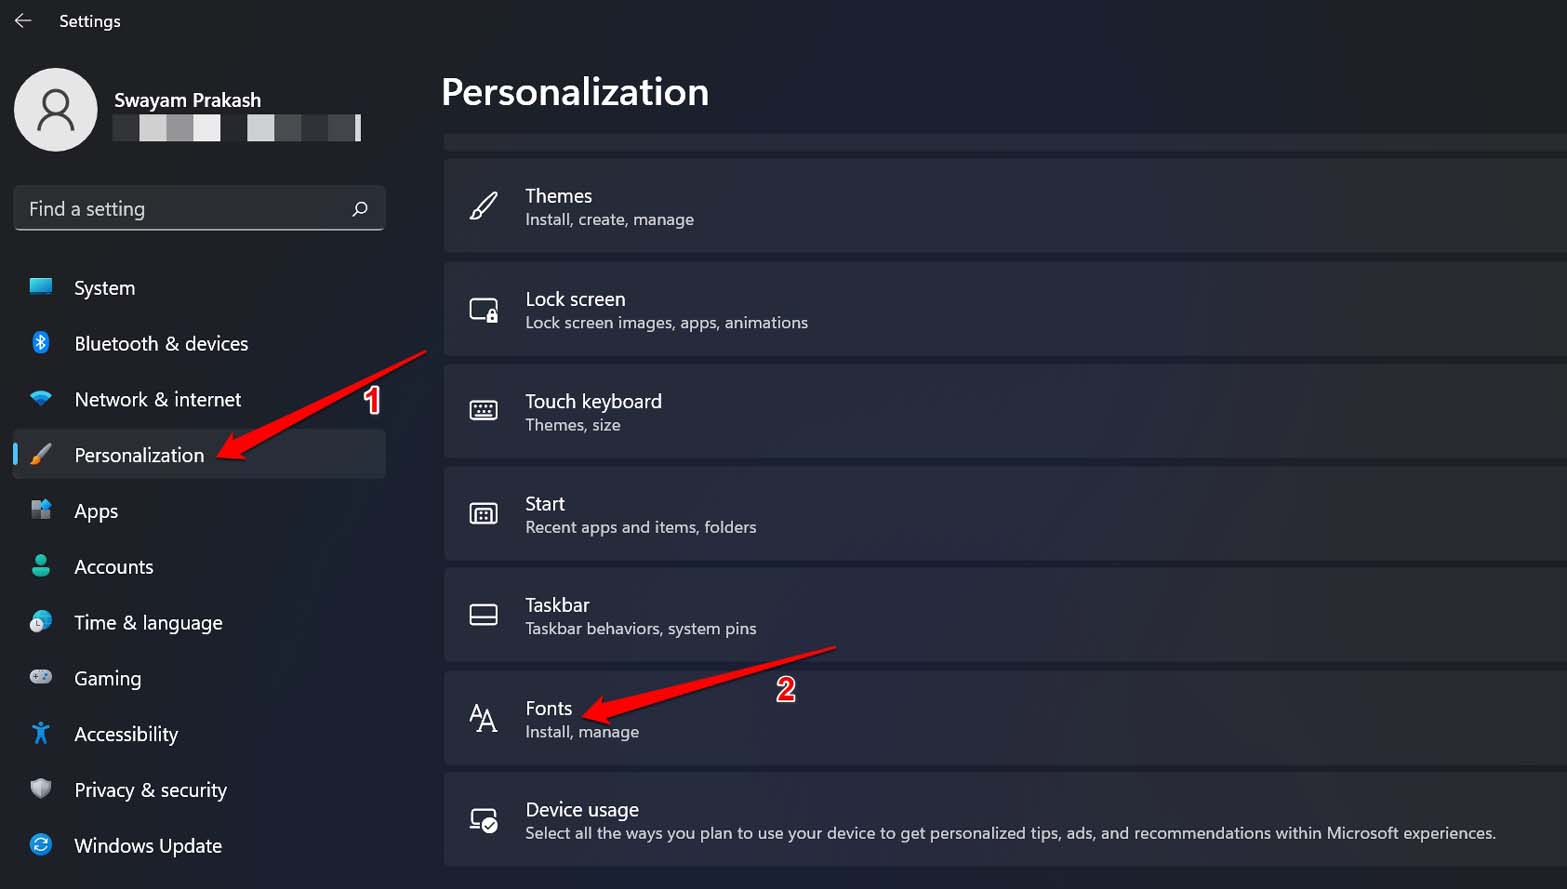
- Press Windows + I to go to the Settings section.
- On the left-hand panel, click on Personalization.
- Click on Fonts.

- Navigate to the tab Available Fonts. All the installed fonts on your PC will show up on the list.
- Otherwise, you may also grab more fonts from Microsoft Store if you want.
- Select any font from the available ones and write down its name.

Creating a Registry File for the Selected Font
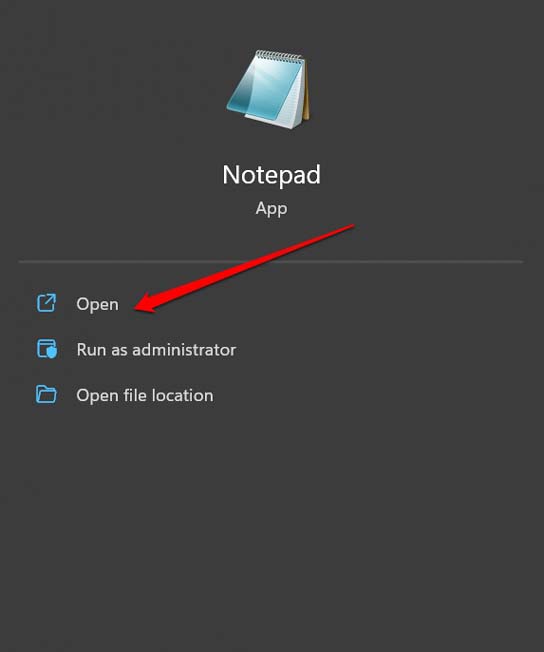
- Open Notepad on your Windows computer. Create a new file.

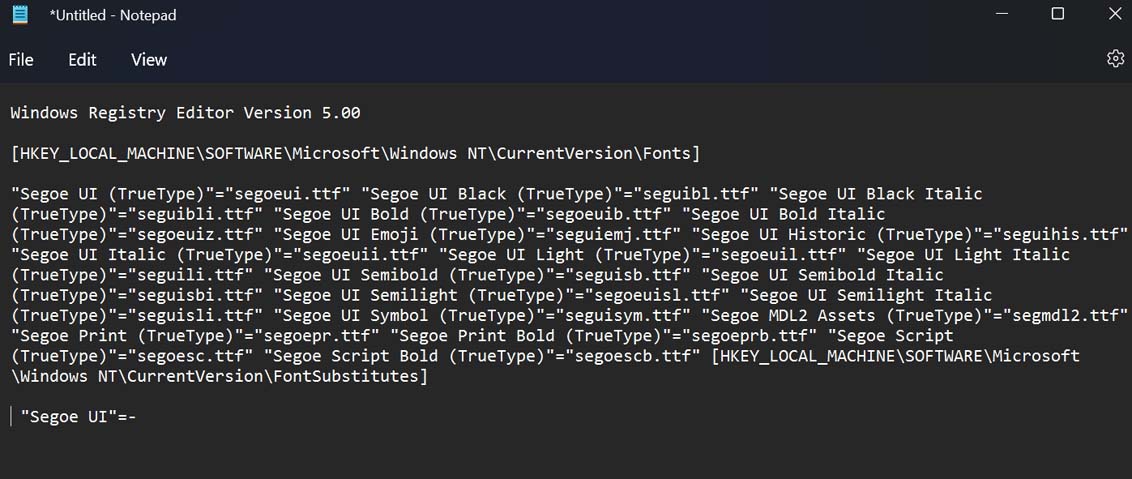
- Now, copy and paste the following code fragment into the text field.
Windows Registry Editor Version 5.00

[HKEY_LOCAL_MACHINE\SOFTWARE\Microsoft\Windows NT\CurrentVersion\Fonts]
"Segoe UI (TrueType)"=""
"Segoe UI Bold (TrueType)"=""
"Segoe UI Bold Italic (TrueType)"=""
"Segoe UI Italic (TrueType)"=""
"Segoe UI Light (TrueType)"=""
"Segoe UI Semibold (TrueType)"=""
"Segoe UI Symbol (TrueType)"=""

[HKEY_LOCAL_MACHINE\SOFTWARE\Microsoft\Windows NT\CurrentVersion\FontSubstitutes]

"Segoe UI"="FONT-NAME"
- In the above code fragment, replace Font Name with the actual name of the font you selected in the previous section. Check out the screenshot below to understand this.

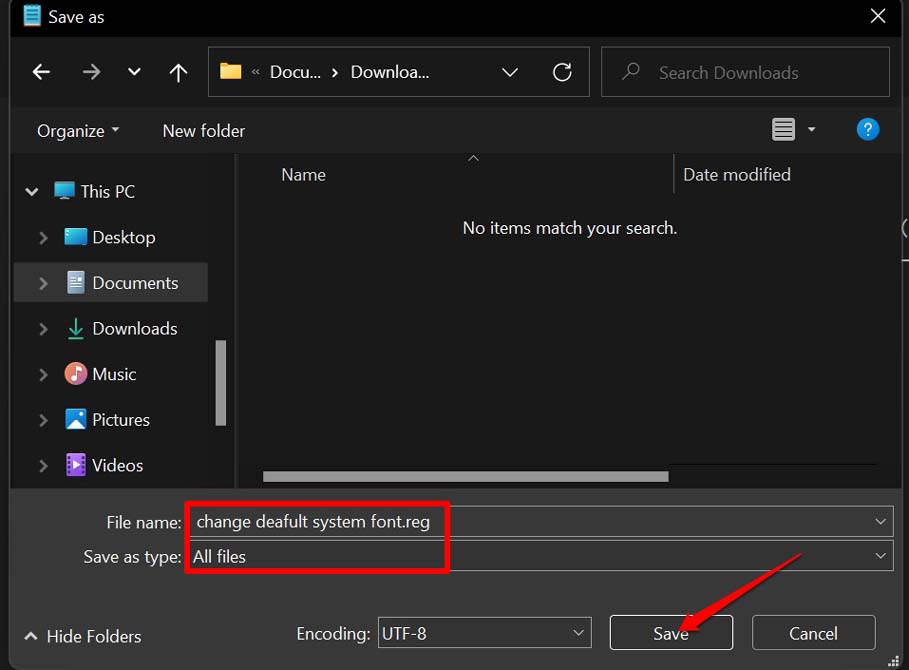
- Click on File and from the menu select Save As. Alternatively, you can press Ctrl + Shift + S to save the file.
- Set a file name but use the .reg filename extension(for example, xyz.reg) and change Save As Type to All Files.
- Once done, click on Save.

- Now, browse to the location where you saved the registry file.
- Right-click on the file and select Open.
- A prompt will pop up asking you to confirm opening this registry file. Click on Yes.
That’s it. You have successfully changed the default system font on Windows 11.
Restore Default System Font on Windows 11
If you want to go back to the default system font on your Windows 11 PC, then here are the steps for that. This process is the same as the previous where you have to create a new registry file and execute it.
- Open a new file for editing on the Notepad.

- Enter the following code as and it is.
Windows Registry Editor Version 5.00

[HKEY_LOCAL_MACHINE\SOFTWARE\Microsoft\Windows NT\CurrentVersion\Fonts]
"Segoe UI (TrueType)"="segoeui.ttf"
"Segoe UI Black (TrueType)"="seguibl.ttf"
"Segoe UI Black Italic (TrueType)"="seguibli.ttf"
"Segoe UI Bold (TrueType)"="segoeuib.ttf"
"Segoe UI Bold Italic (TrueType)"="segoeuiz.ttf"
"Segoe UI Emoji (TrueType)"="seguiemj.ttf"
"Segoe UI Historic (TrueType)"="seguihis.ttf"
"Segoe UI Italic (TrueType)"="segoeuii.ttf"
"Segoe UI Light (TrueType)"="segoeuil.ttf"
"Segoe UI Light Italic (TrueType)"="seguili.ttf"
"Segoe UI Semibold (TrueType)"="seguisb.ttf"
"Segoe UI Semibold Italic (TrueType)"="seguisbi.ttf"
"Segoe UI Semilight (TrueType)"="segoeuisl.ttf"
"Segoe UI Semilight Italic (TrueType)"="seguisli.ttf"
"Segoe UI Symbol (TrueType)"="seguisym.ttf"
"Segoe MDL2 Assets (TrueType)"="segmdl2.ttf"
"Segoe Print (TrueType)"="segoepr.ttf"
"Segoe Print Bold (TrueType)"="segoeprb.ttf"
"Segoe Script (TrueType)"="segoesc.ttf"
"Segoe Script Bold (TrueType)"="segoescb.ttf"

[HKEY_LOCAL_MACHINE\SOFTWARE\Microsoft\Windows NT\CurrentVersion\FontSubstitutes]

"Segoe UI"=-

- Click on File and from the menu select Save As. Otherwise, you may press Ctrl + Shift + S to save the file.
- Set a file name but use the .reg filename extension(for example, abc.reg) and change Save As Type to All Files.
- Once done, click on Save.
- Now, go to the location where you saved the registry file.
- Right-click on the file and select Open.
- A prompt will show up, and you have to confirm opening this registry file. Click on Yes.
Note that, in the above two methods, when you create a new registry file, you are modifying the existing registry of Windows. Carefully, copy the code fragments and make sure not to alter them in any way. Doing so may cause Windows OS to behave erratically. As the methods involve tweaking the registry, do so at your risk.
How to Change the Font Size on Windows 11?
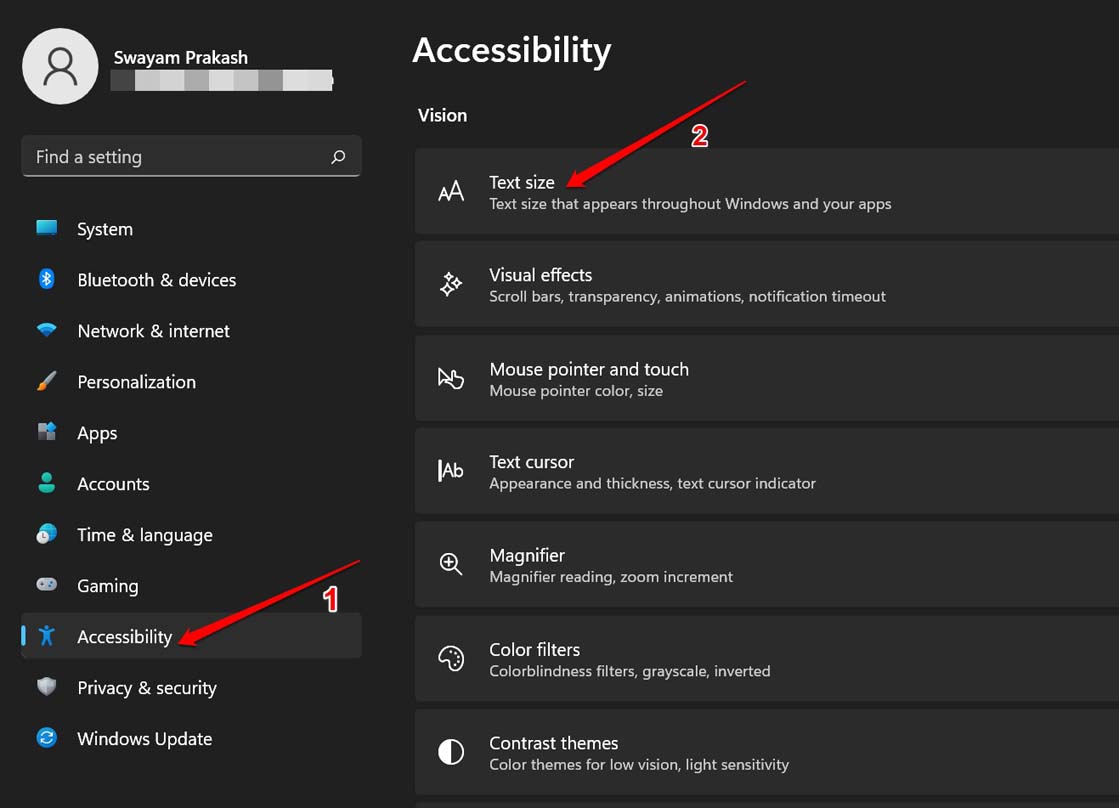
After setting your choice of default system theme font, you may also want to change its size. Here is how you can go about it. This doesn’t require creating any registry files.
- Open the Windows settings by pressing Windows + I hotkeys.
- On the left-hand panel of settings, click on Accessibility.
- Then click on Text Size.

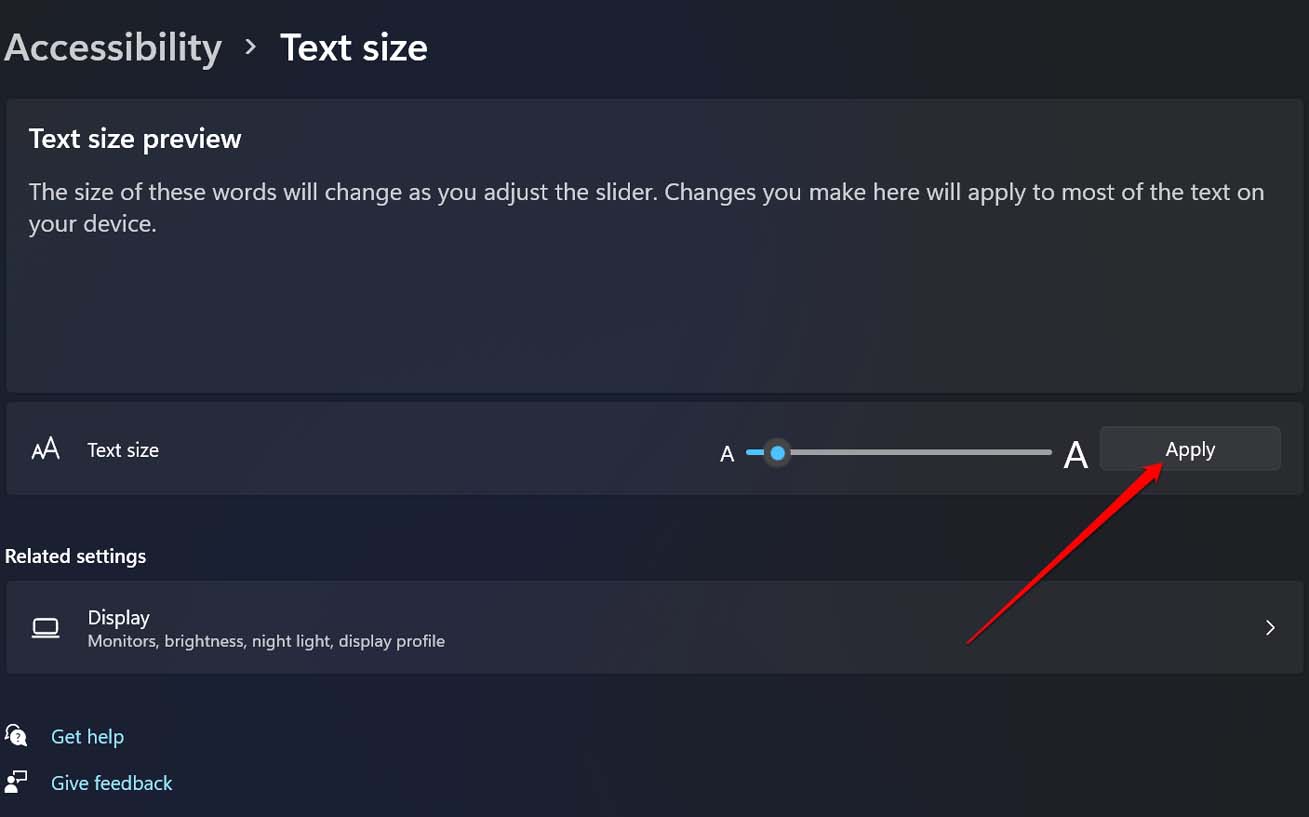
- Adjust the slider and check in the preview how the resulting font size will look.
- Once you are satisfied with the font size, click on Apply.

The change to the font size will reflect immediately on the system font.
Conclusion
If you are one of those enthusiasts who love tweaking fonts and themes on their devices, try this out. The process for changing the default system font on Windows 11 is quite simple. Personalizing Windows OS is always so much fun.
If you've any thoughts on How to Change Default System Font on Windows 11?, then feel free to drop in below comment box. Also, please subscribe to our DigitBin YouTube channel for videos tutorials. Cheers!

