Formatting your drive correctly is essential for your Mac to work well. It helps prevent various system issues and makes your Mac more stable overall.
While Mac supports various partitioning schemes, GUID offers more modern and versatile features compared to other options. It is also essential for newer Macs and supports larger drives, giving you optimal compatibility and flexibility.
This guide will dive deep into how to format a drive with GUID on macOS. That said, let’s roll in.
Why GUID Matters for macOS Installation

GUID (full form Globally Unique Identifier) is a partitioning scheme that helps in the installation and functioning of macOS operating systems. It is a more advanced storage space than the traditional MBR (Master Boot Record) system as it can handle larger hard drives.
The older partitioning system used in macOS, called MBR, was limited in its capacity. It allows only up to 2TB of storage on a hard disk and a maximum of four partitions.
With the increase in demand for more extensive storage solutions, macOS users find GUID to be a better option than the traditional MBR. GUID offers support for massive hard drives, especially for macOS installations where larger storage spaces are required.
Because GUID can easily handle these extensive storage requirements, users take full advantage of the latest and larger hard drives available in the market. They also get a well-organized and segmented storage structure for various purposes, such as data organization, system backups, and application installations.
How to Format a Drive With GUID on macOS?
Formatting a drive with GUID on macOS ensures it works well with larger storage and supports more partitions. The process is easy, but there are a few things to keep in mind before you start formatting:
- Back up all your data somewhere to avoid losing it.
- Keep your macOS updated for compatibility with new formatting protocols.
- Make sure your Mac has enough battery to complete the formatting without interruptions.
- Use a stable power source and avoid sudden power cuts during the formatting process.
- Confirm there’s enough space for the formatting so you don’t overload your drive.
Once everything is set, follow these steps to format a drive with GUID on macOS:
- Connect your external drive to your Mac.
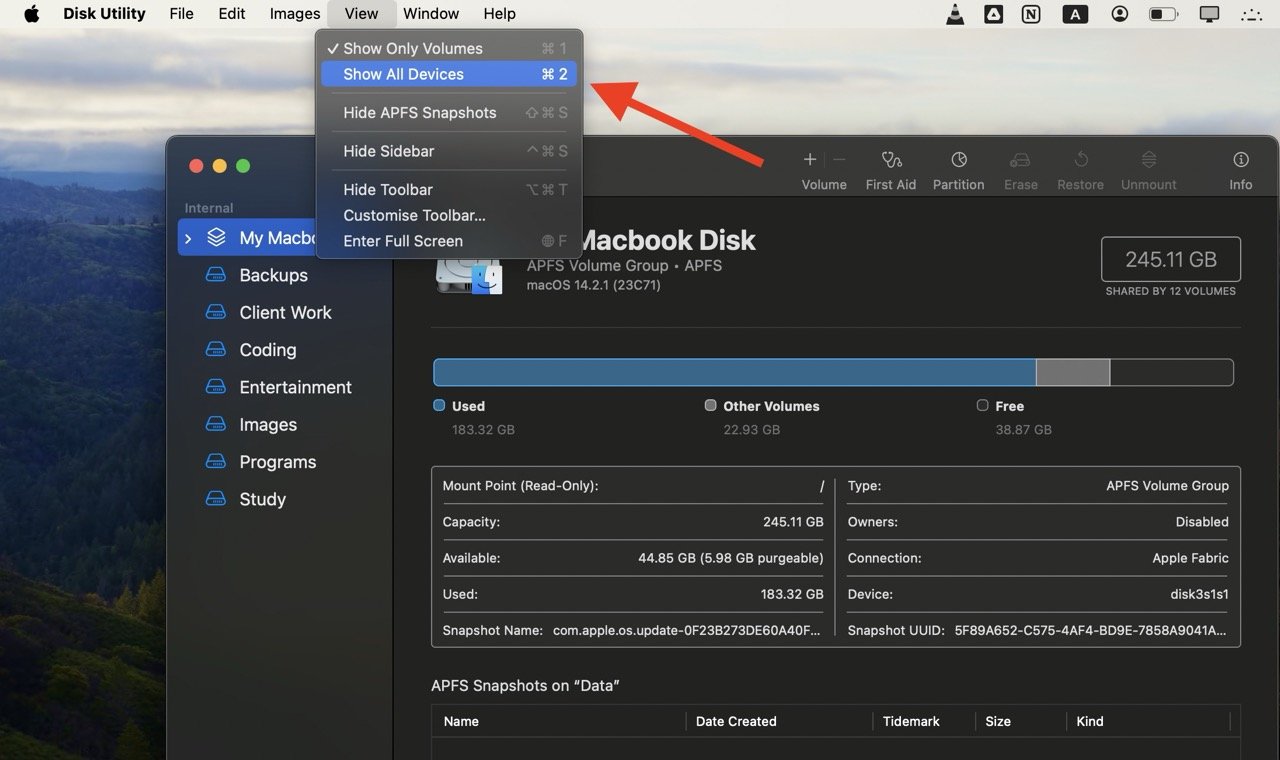
- Open “Disk Utility.”
- Click on “View” in the top-left corner and select “Show all devices” from the drop-down menu.

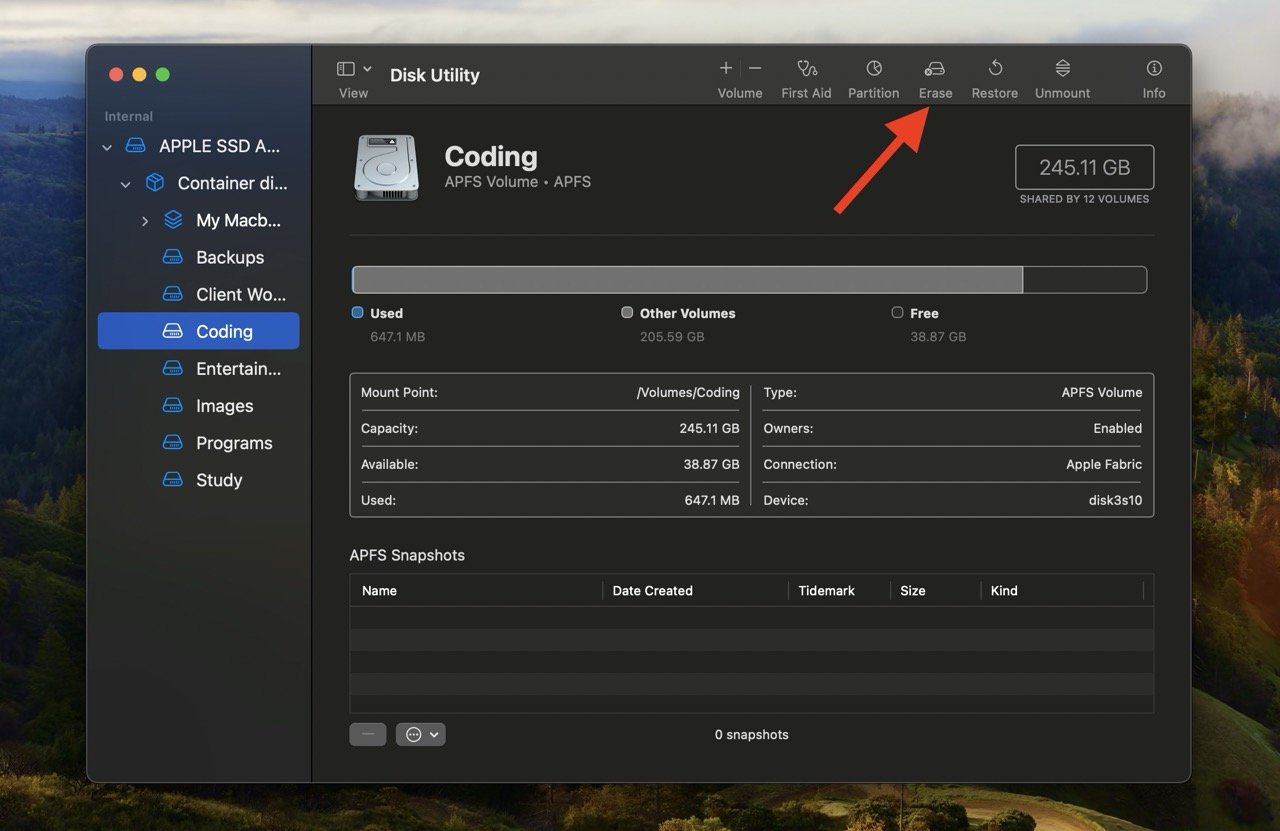
- Select the drive you want to format.
- Click on “Erase” at the top of the window.

- Assign a name to the drive, choose the format (exFAT or APFS), and under “Schemes,” select “GUID Partition Map.”
- Press the “Erase” button.
That’s it. Your drive is now successfully formatted with the GUID partition map scheme.
Should You Go For “exFAT” or “APFS” Format?

“exFAT” and “APFS” are two different file system formats used to format macOS drives.
If you want cross-platform compatibility, where the drive will be used on both Mac and Windows systems, “exFAT” is the go-to option. It acts like a universal language, ensuring smooth data exchange between different operating systems.
On the other hand, if your drive only interacts within the macOS environment, especially on newer Macs, then go for “APFS.” This system is developed by Apple specifically for macOS and offers enhanced performance and features like space sharing and an improved file system.
In simple terms, if your drive will interact with Windows, pick “exFAT”; if it’s to be used with Mac, go for “APFS” for a better experience.
What to Do If You Get the Error “Erase Process Has Failed”
Sometimes, the process of formatting a drive with GUID on macOS gets interrupted by an “Erase Process Has Failed” error. It means there are issues with the drive itself; drive corruption, physical damage, or even poor connections can cause this error.
If you receive this error, follow these quick solutions to troubleshoot and fix the issue:
- Retry Formatting: The error may be a temporary glitch, so try formatting again. Make sure you choose the correct format and partition scheme during the process.
- Change Partition Scheme: If formatting with a specific scheme like GUID fails repeatedly, try an alternative scheme like Master Boot Record (MBR). After formatting with the alternative scheme, you can switch back to the original one.
- Test with a Different Drive: If the error appears frequently, it could mean a failing drive. To confirm it, test the formatting process with another drive. If the error doesn’t occur with the new drive, it means the original drive may be damaged and in need of replacement.
Frequently Asked Questions
When Should I Format a Disk Using GUID Partition Map Scheme?
You should format a disk using the GUID partition map scheme for macOS installations, especially if you have a newer Mac or plan to use larger hard drives. It supports large storage capacities and is essential for compatibility with modern macOS systems.
Should I use an Apple partition or GUID?
While the Apple partition is functional, its capacity is limited. In contrast, the GUID partition is the more contemporary and versatile option. It is compatible with both Intel and Apple Silicon Macs, supports larger drives, and offers better flexibility for various use cases.
How do I fix GUID errors?
If you have problems with GUID errors, try formatting again and make sure you pick the proper partition scheme. If it still doesn’t work, switch to another scheme like Master Boot Record (MBR) and then switch back. If the problem continues, check with a different drive to see if the original drive is causing the issue, which means there’s something wrong with it.
Final Words
Formatting a drive with GUID on macOS is better than using the old system (MBR). It is compatible with newer Macs and supports larger storage space. But besides that, the GUID partitioning scheme is also good at keeping your data safe.
Recovering a crashing or failed drive is safer with GUID as it records changes. This reduces the risk of data corruption when unexpected events like power outages or system crashes occur. So, your information remains safe and recoverable even if your drive fails.
If you've any thoughts on How to Format a Drive With GUID on Mac, then feel free to drop in below comment box. Also, please subscribe to our DigitBin YouTube channel for videos tutorials. Cheers!


