If you are using an Android phone then you might be tempted to flash a custom recovery or TWRP to make it easier to flash modules, Magisk, custom ROMs, boot images, and more. TWRP is a very popular custom recovery in the Android world and rightfully so.
If you are wondering how you can flash the TWRP recovery on your Android device without root, then you are in the right place.
Whether you have an Android device from Xiaomi, Redmi, Samsung, OnePlus, or any other brand, we’ve got you covered. So, without any further ado, let’s jump into it.
What you Need
Before we get started, here are a few things that you will need to flash the TWRP recovery on your Android phone.
- A phone with an unlocked bootloader.
- The TWRP image or recovery file for your phone.
- A PC with ADB drivers installed and Platforms Tools / Minimal ADB.
Disclaimer: Flashing TWRP recovery on your Android device carries risks and may void your warranty. Proceed at your own risk and ensure you understand the process before attempting it. We are not responsible for any damage to your device.
Step 1: Unlock the Bootloader
If you don’t have your Android phone’s bootloader unlocked, then you must do that first. Unlocking the bootloader will open doors to custom ROMs, custom recoveries, kernels, rooting, and a plethora of other things. If you have already unlocked the bootloader, you can skip to the next step.
Now, to unlock the bootloader of your Android device, you have to follow the steps outlined by your device manufacturer. Different devices have different methods of unlocking the bootloader.
Note: The steps outlined below may be applicable to unlocked devices only. If you have a carrier-locked device, contact your manufacturer or carrier for assistance with bootloader unlocking.
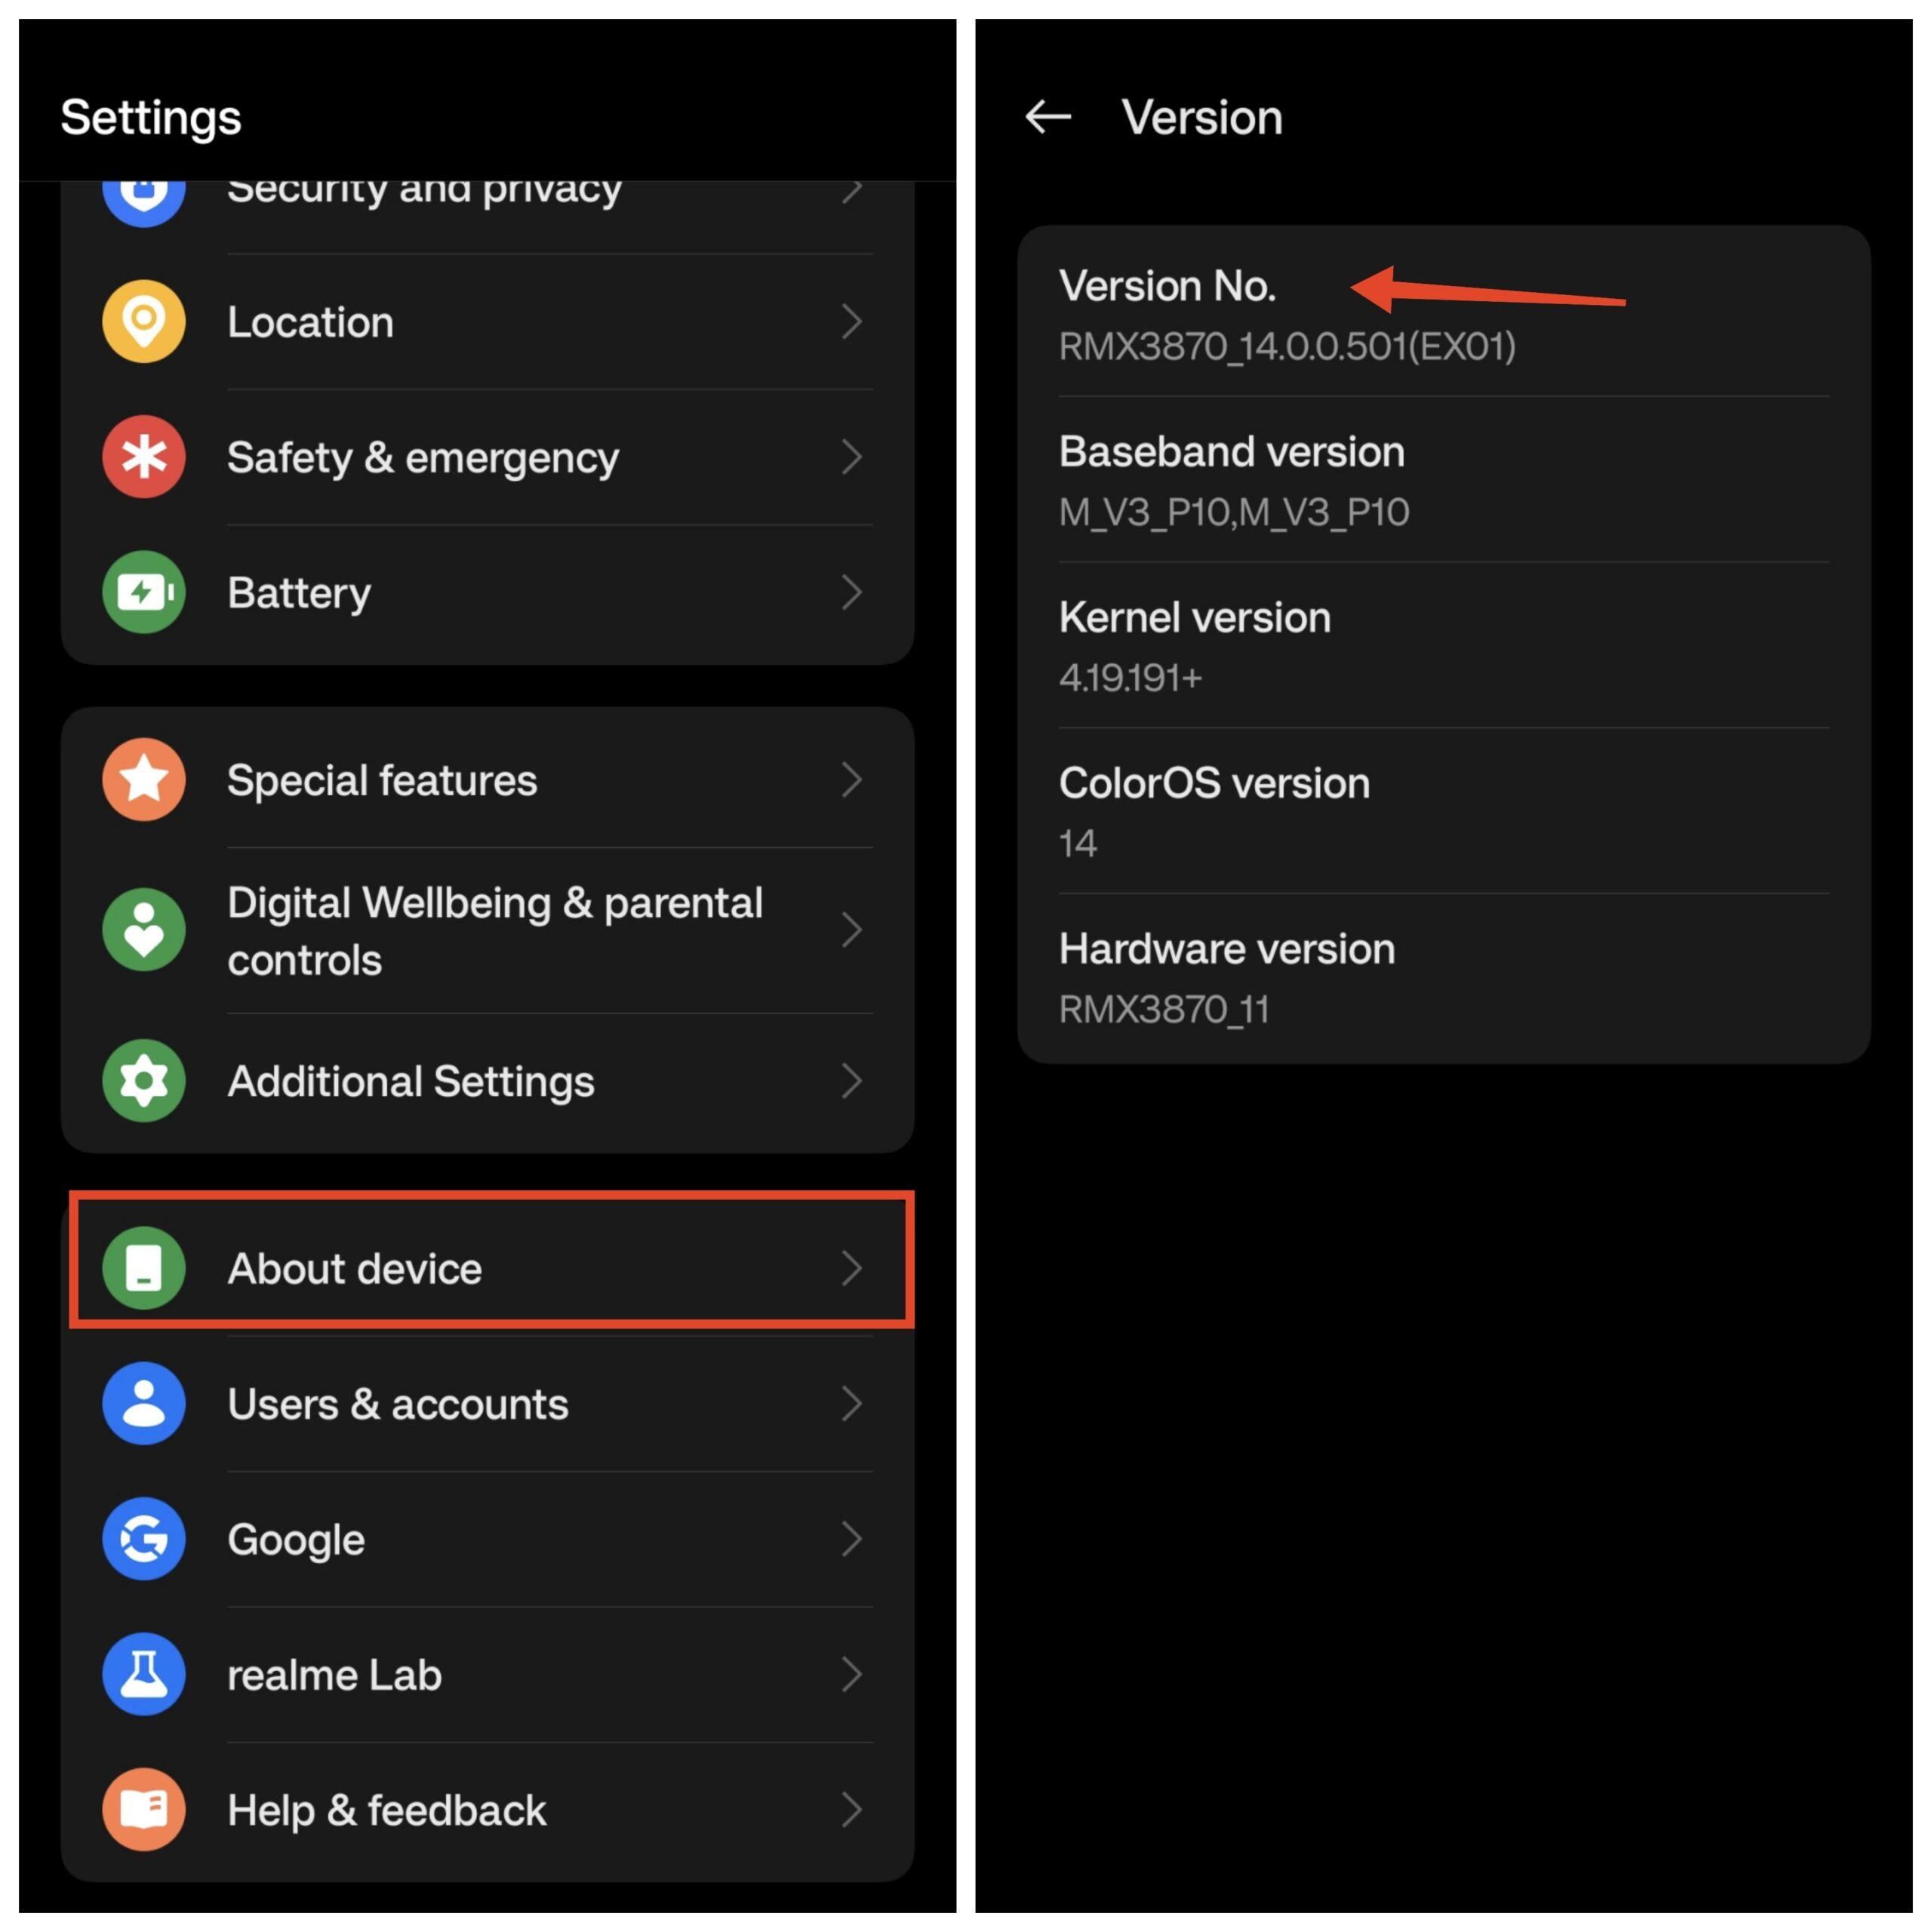
- Open the Settings app on your phone.
- Go to System.
- Tap on About phone or About device.
- Then, tap on the Build number or the Software version several times until you see a message saying, “You’re now a developer!”

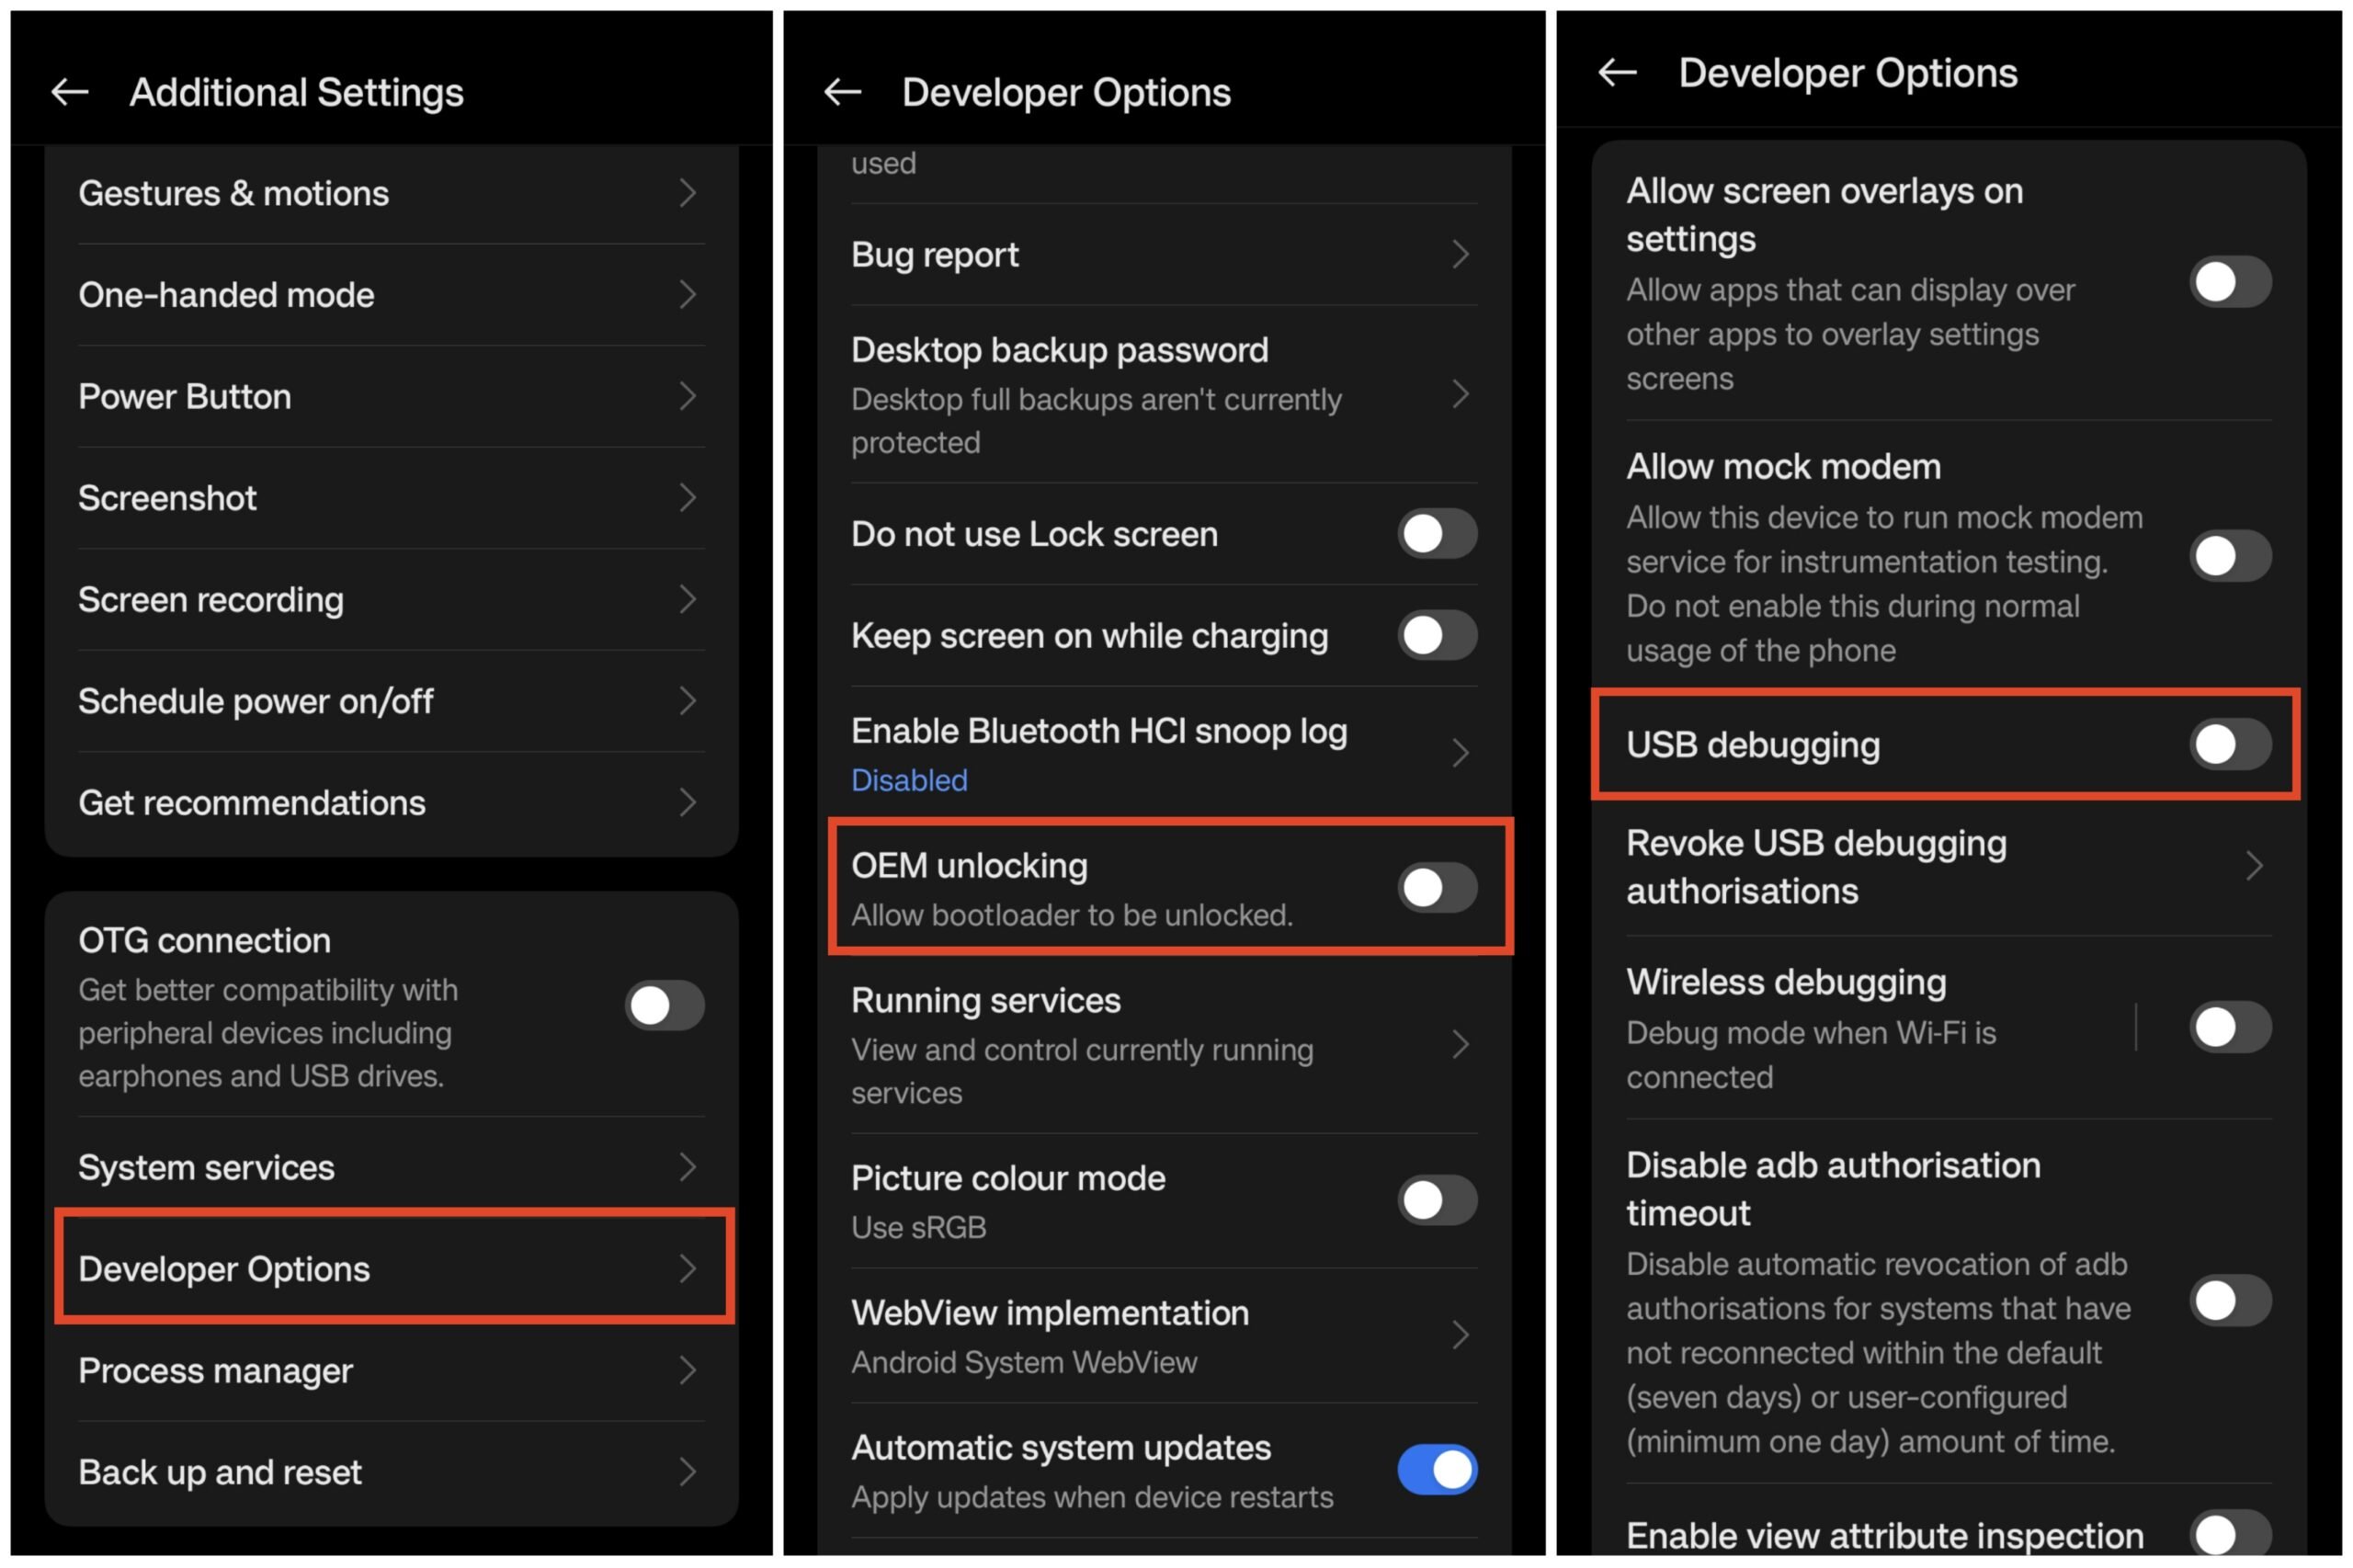
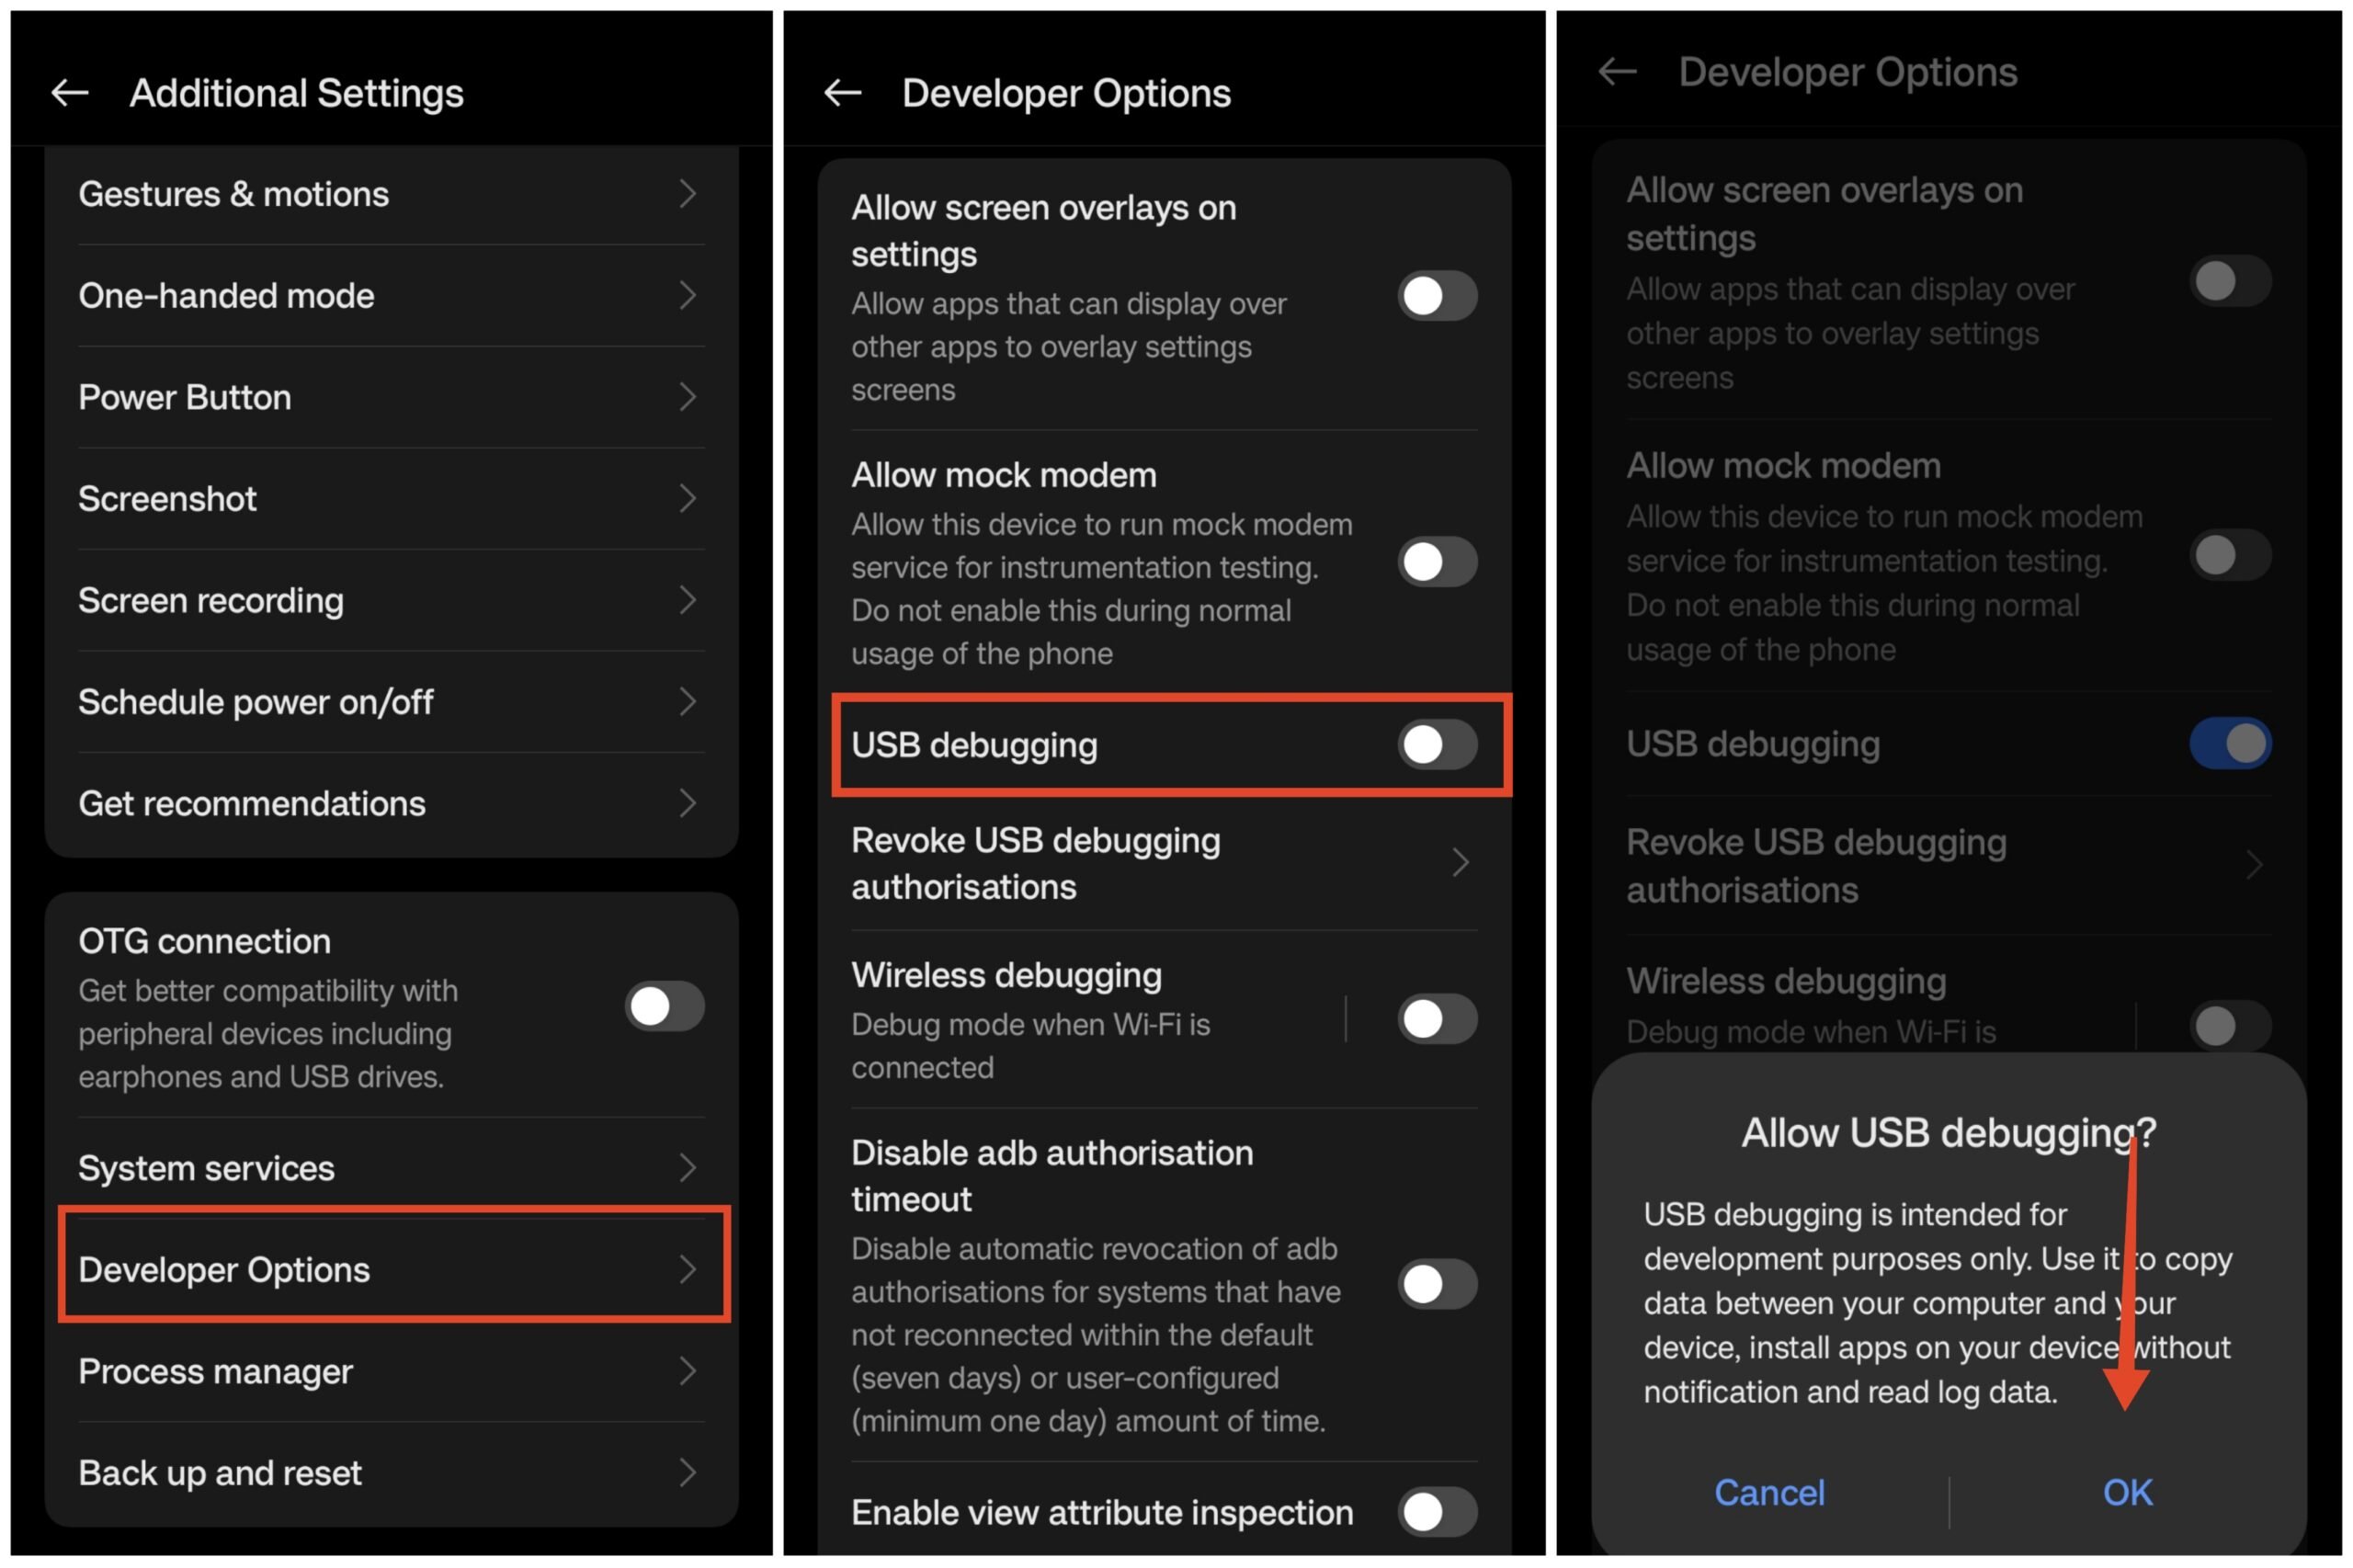
- Now, go to Developer options and turn on OEM Unlocking and USB debugging.

- Connect your phone to a PC using a USB cable.
- Now, open a CMD window in the Platform Tools folder or launch the Minimal ADB program.
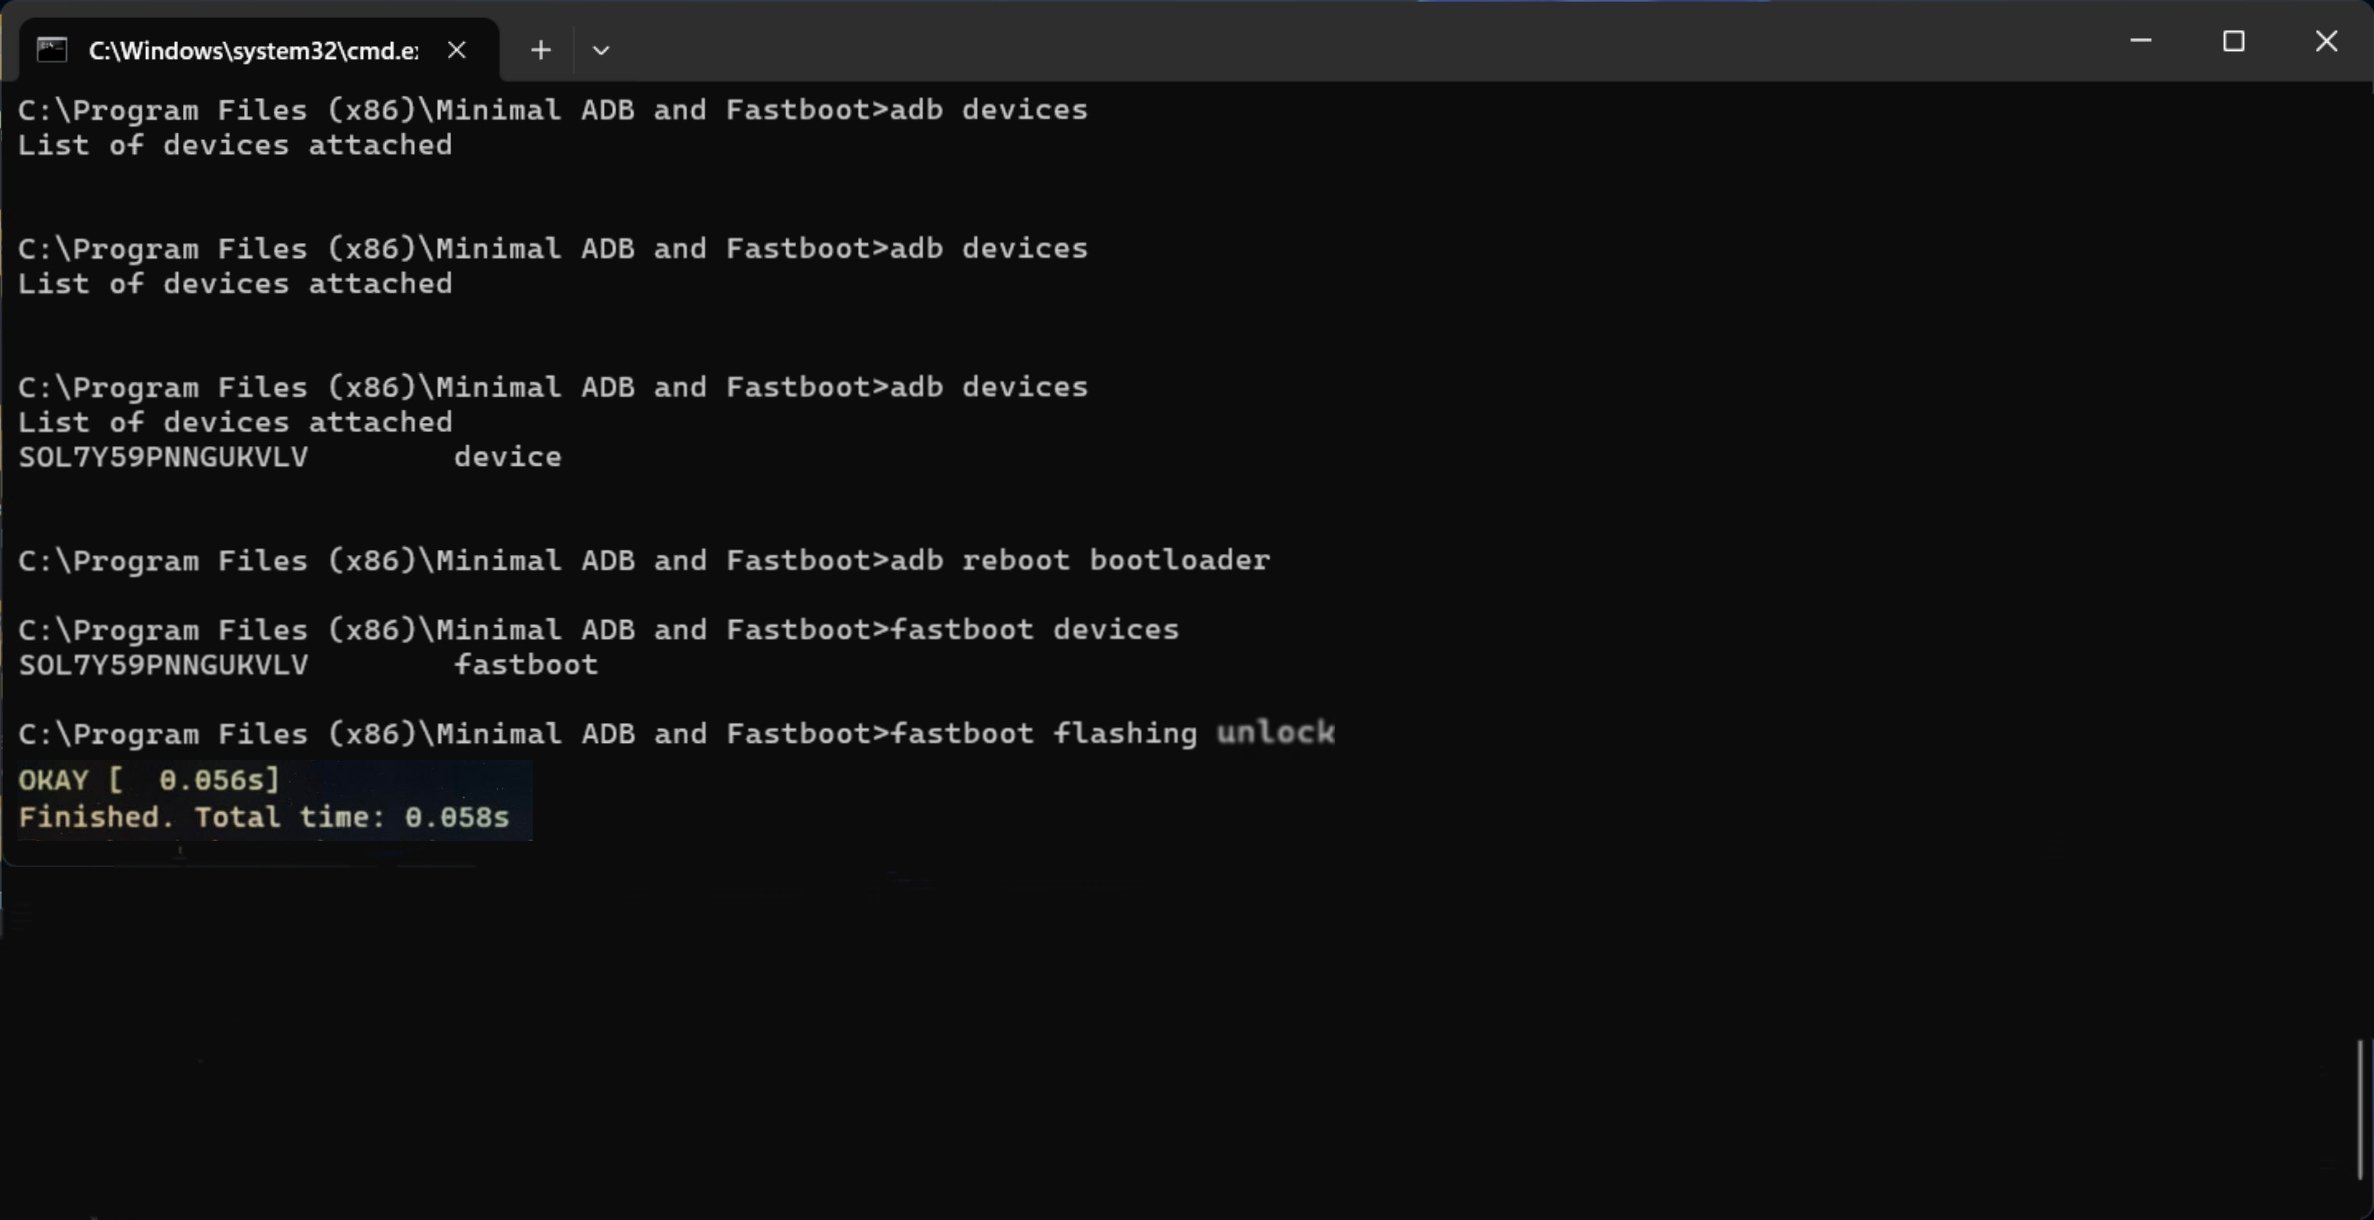
- Enter the following command and press Enter: “adb devices.”
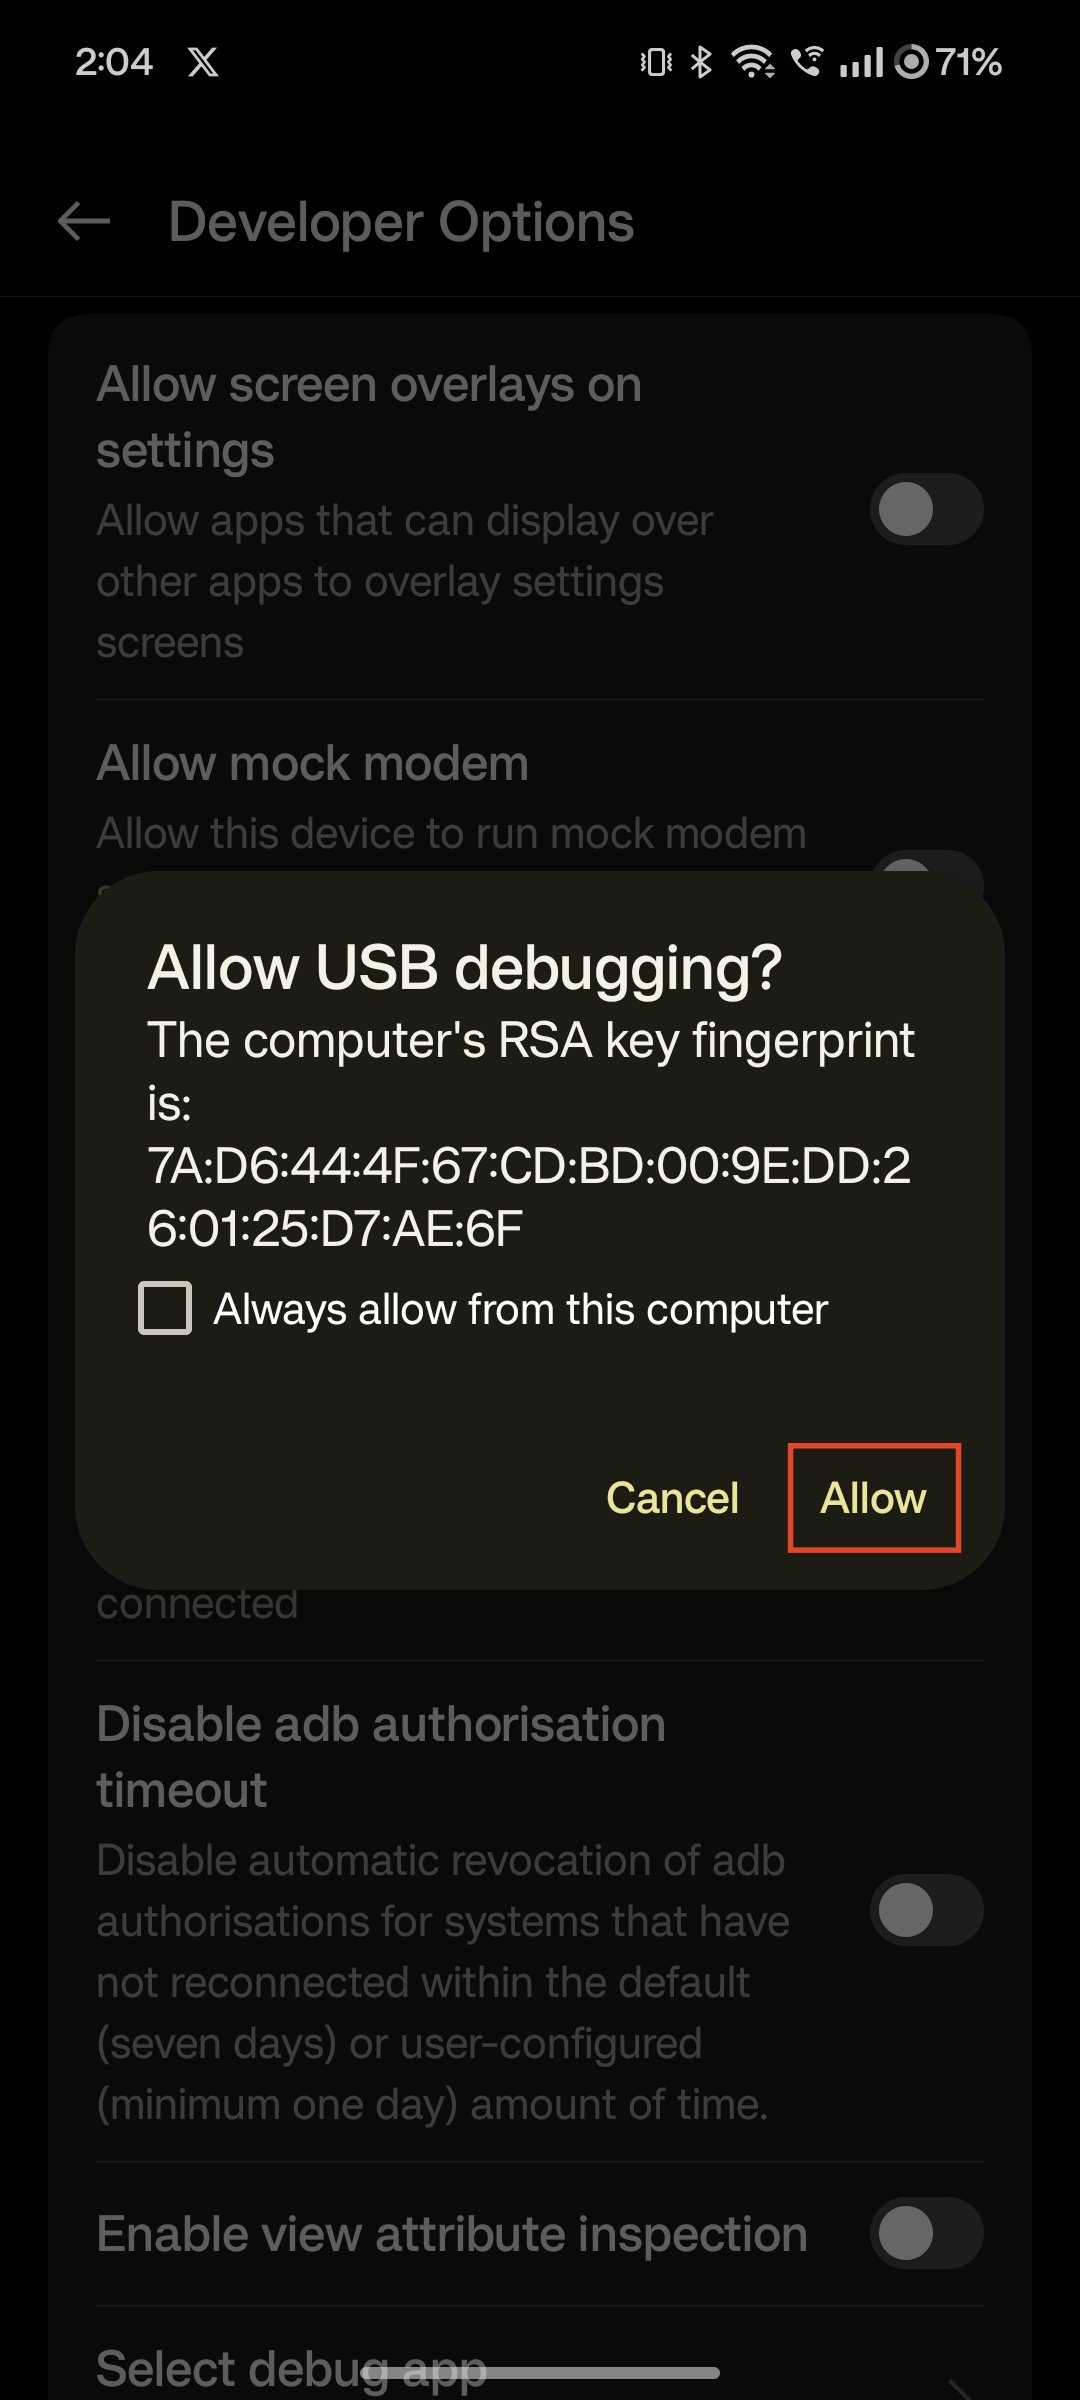
- On your phone, tap Allow.

- Enter the following command to boot your phone into fastboot or bootloader mode: “adb reboot bootloader.”
- Now, check if the device is still connected: “fastboot devices.” You should receive a response with fastboot and an alphanumeric code.
- Finally, enter the following command to unlock the bootloader: “fastboot flashing unlock.”

Warning: Unlocking the bootloader will delete all your data. Take a backup before proceeding.
The method discussed above works on Pixel, OnePlus, Nothing, Infinix, and Tecno devices. For Xiaomi, Motorola, and realme, you will have to apply for bootloader unlocking before you can unlock the bootloader.
If you don’t find your smartphone brand on the list, don’t worry; just do a simple Google search on how to unlock the bootloader on your smartphone and you should be good to go.
Step 2: Download the TWRP Image
Now that you have unlocked the bootloader of your phone, you can proceed with flashing TWRP on your phone. But before that, let’s find the right TWRP image for your phone:
Method 1: Download From TWRP’s Official Site
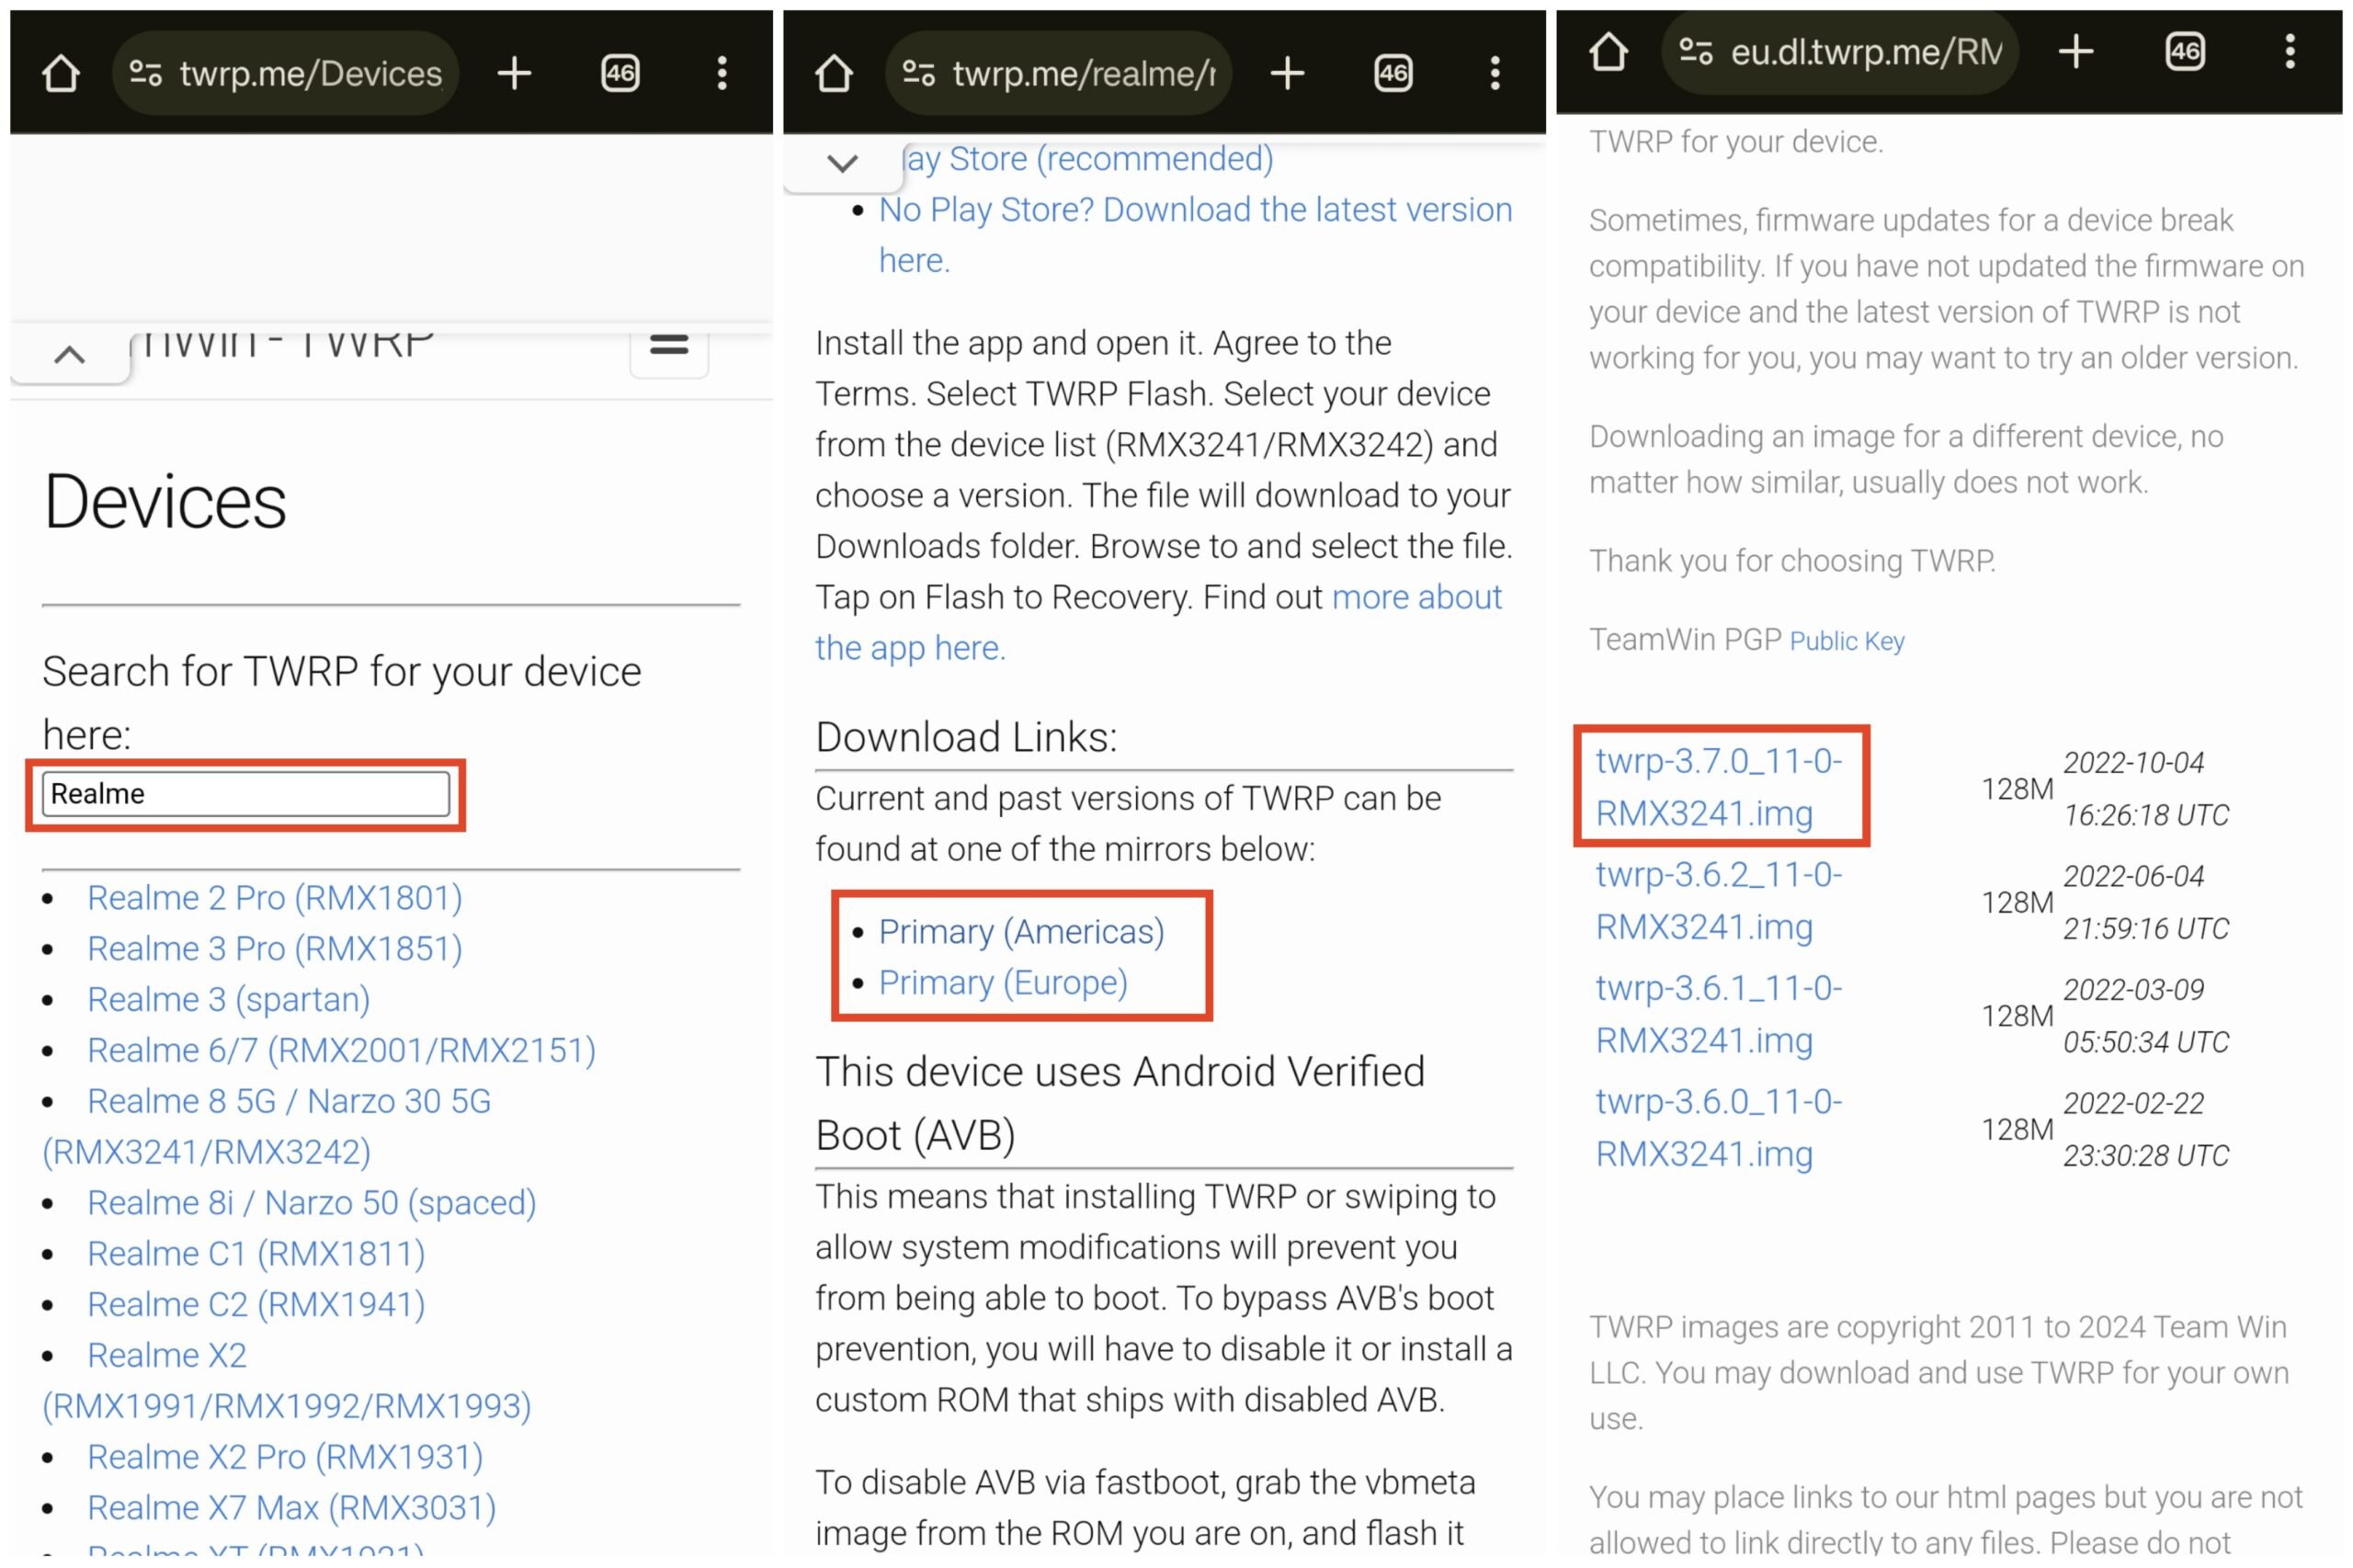
- Go to twrp.me/Devices/ and search for your device name or its codename.
- Scroll down to the Download Links section and click on any of the relevant links.
- Now, download the latest TWRP image on your device.

Note: Your device may not appear on the list if it isn’t officially supported. Thankfully, a community of developers usually builds unofficial TWRP recovery for many unsupported devices that work just as good.
Method 2: Download From the Official Telegram Group
If your device isn’t officially supported, you can follow the steps below to get the right TWRP image for it. This method also works for officially supported devices.
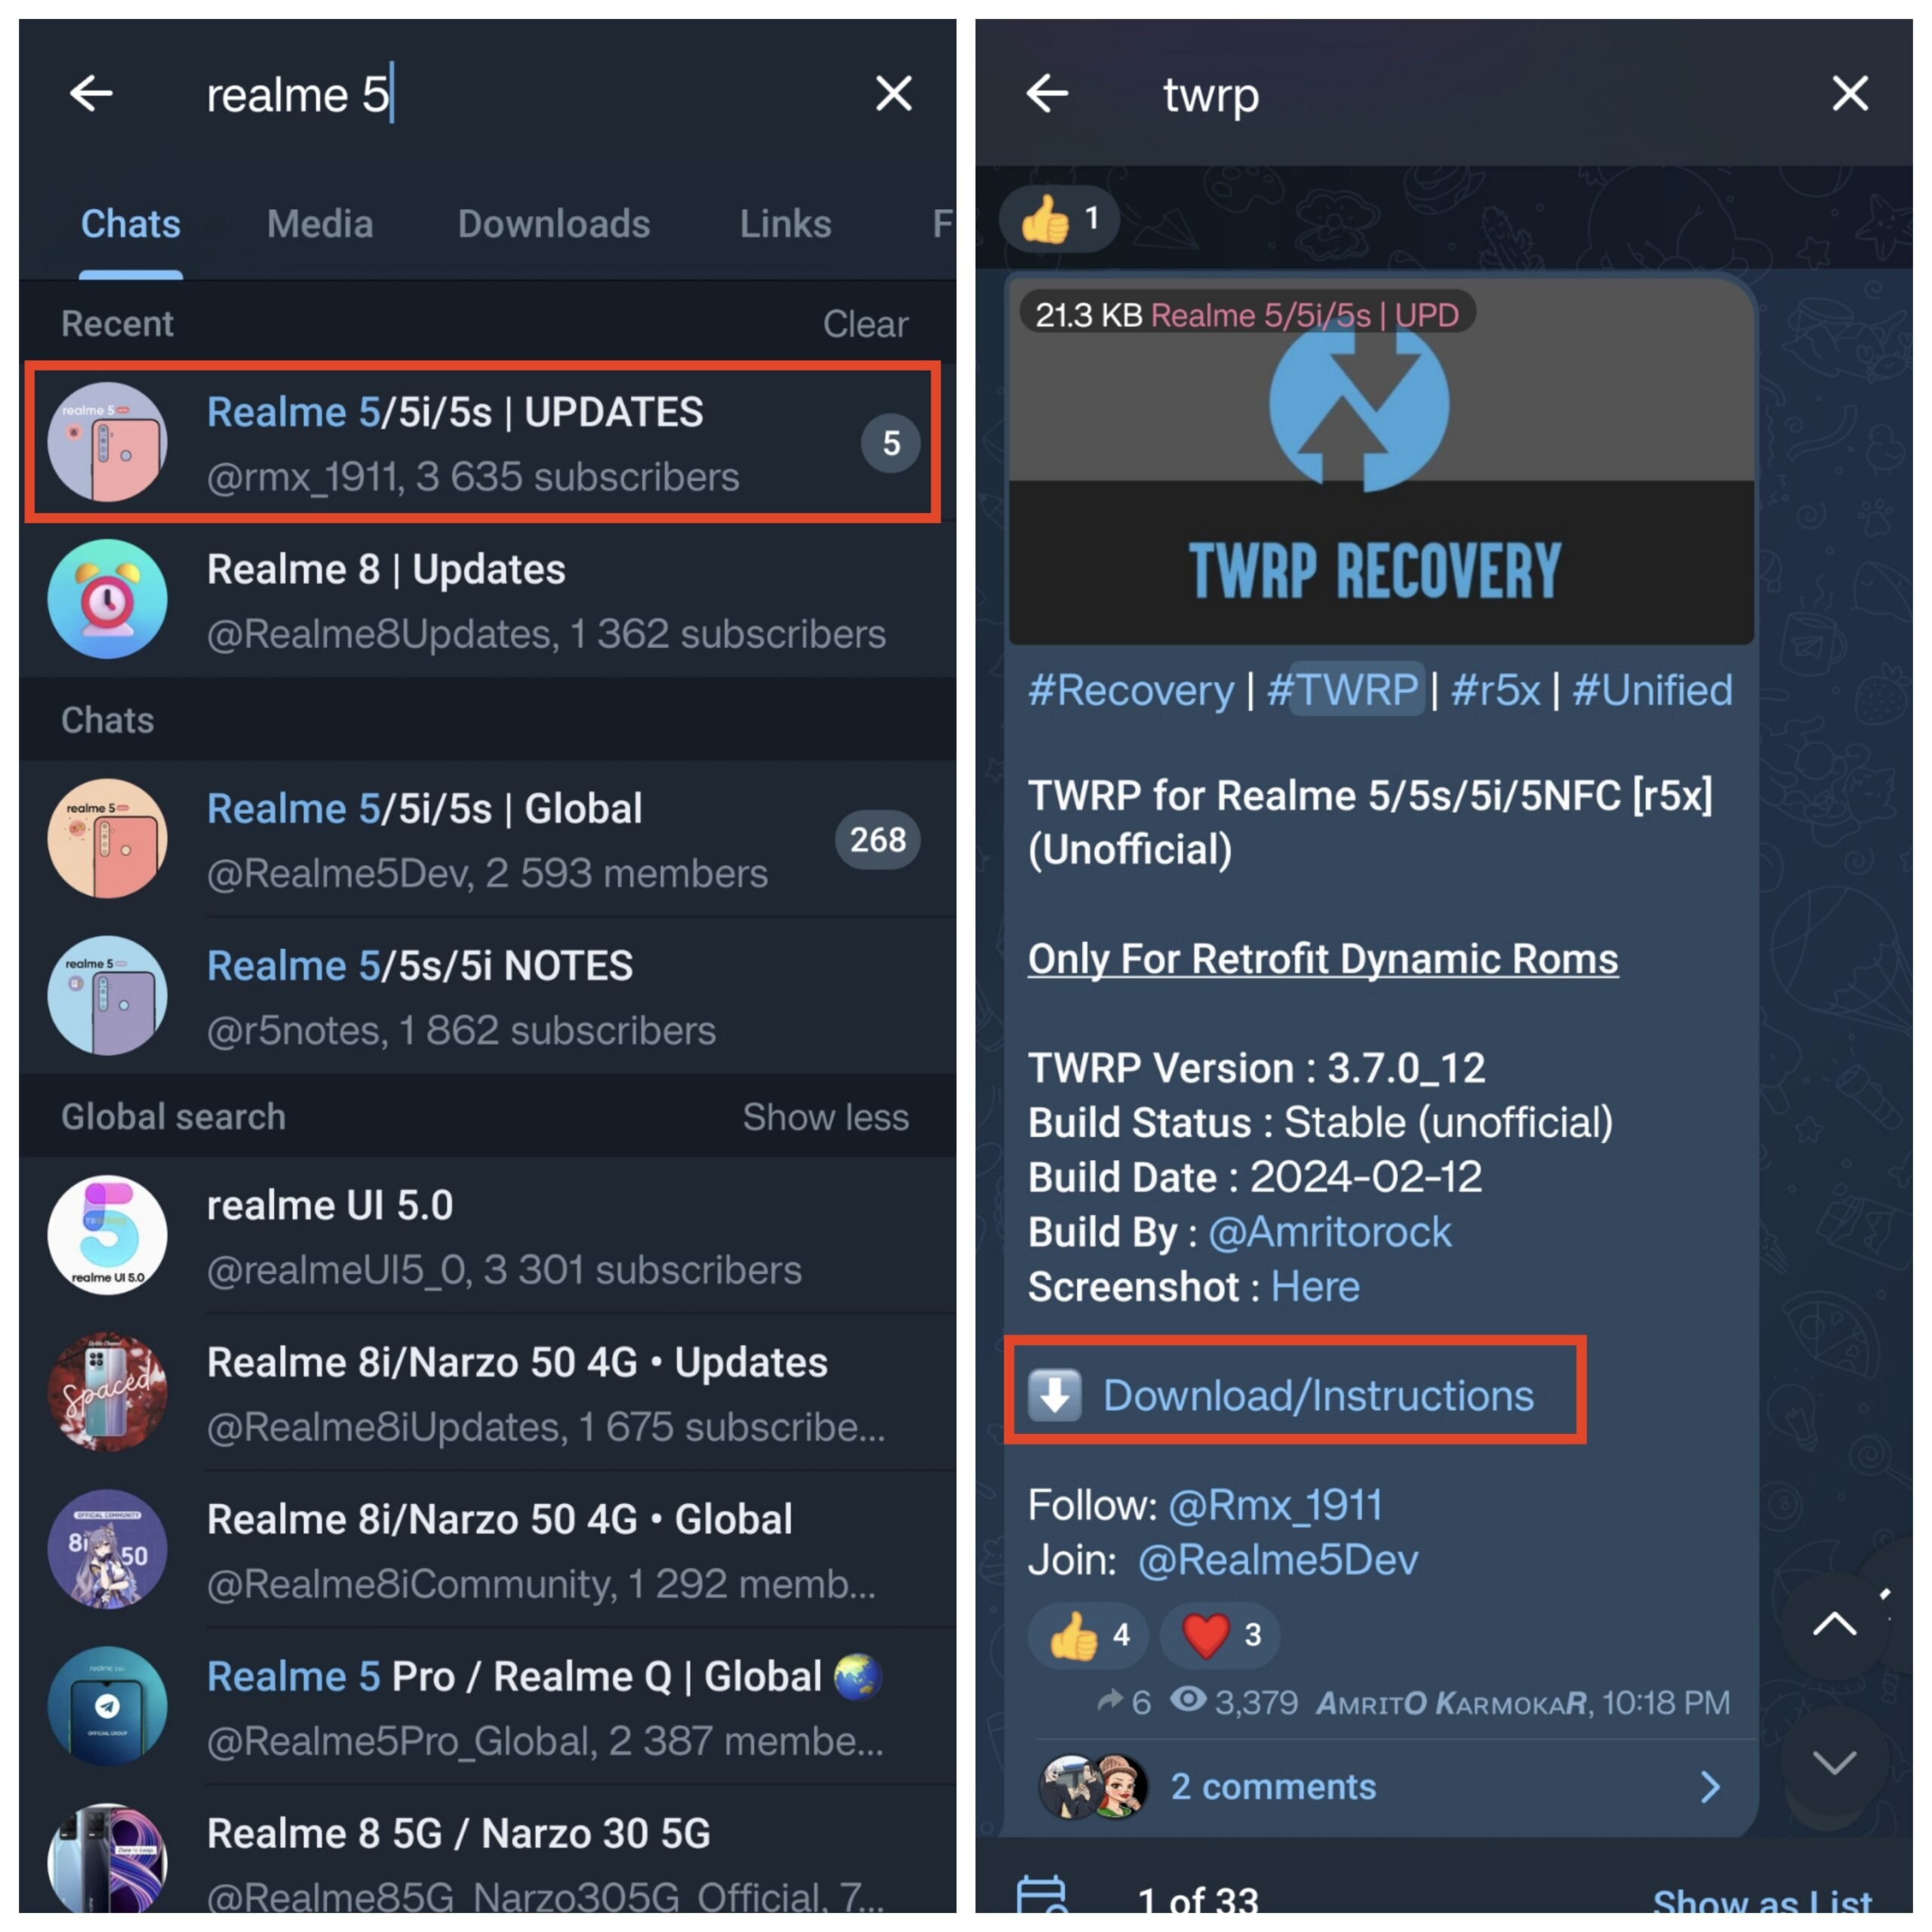
- Go to Telegram and search for your phone’s name.
- Then, find the “Releases” or “Updates” group for your phone and tap on it.
- Search for TWRP using the search bar at the top.
- Once found, tap on the Download button or the download link to download the recovery. If there are any other specific instructions for your device, adhere to them.

Step 3: Flash TWRP
Now, if your device was rooted, you could flash the TWRP recovery using the TWRP app. But, not everybody wants to root their devices. So, you can simply enter fast boot and execute a few commands to flash TWRP on your device. Follow the steps below.
Flash vbmeta (AVB Devices Only)
If your device uses Android Verified Boot or AVB (do a Google search to find if your device uses it or not), you need to flash the stock vbmeta before flashing TWRP. If your device doesn’t use AVB, you can skip this step (Step 8).
You can get the stock vbmeta by extracting it from your ROM’s ZIP file. Search for your phone’s ROM on Google and download the ZIP. Make sure to download the one that you are currently using. Then, extract the ZIP file and copy the vbmeta image to your PC.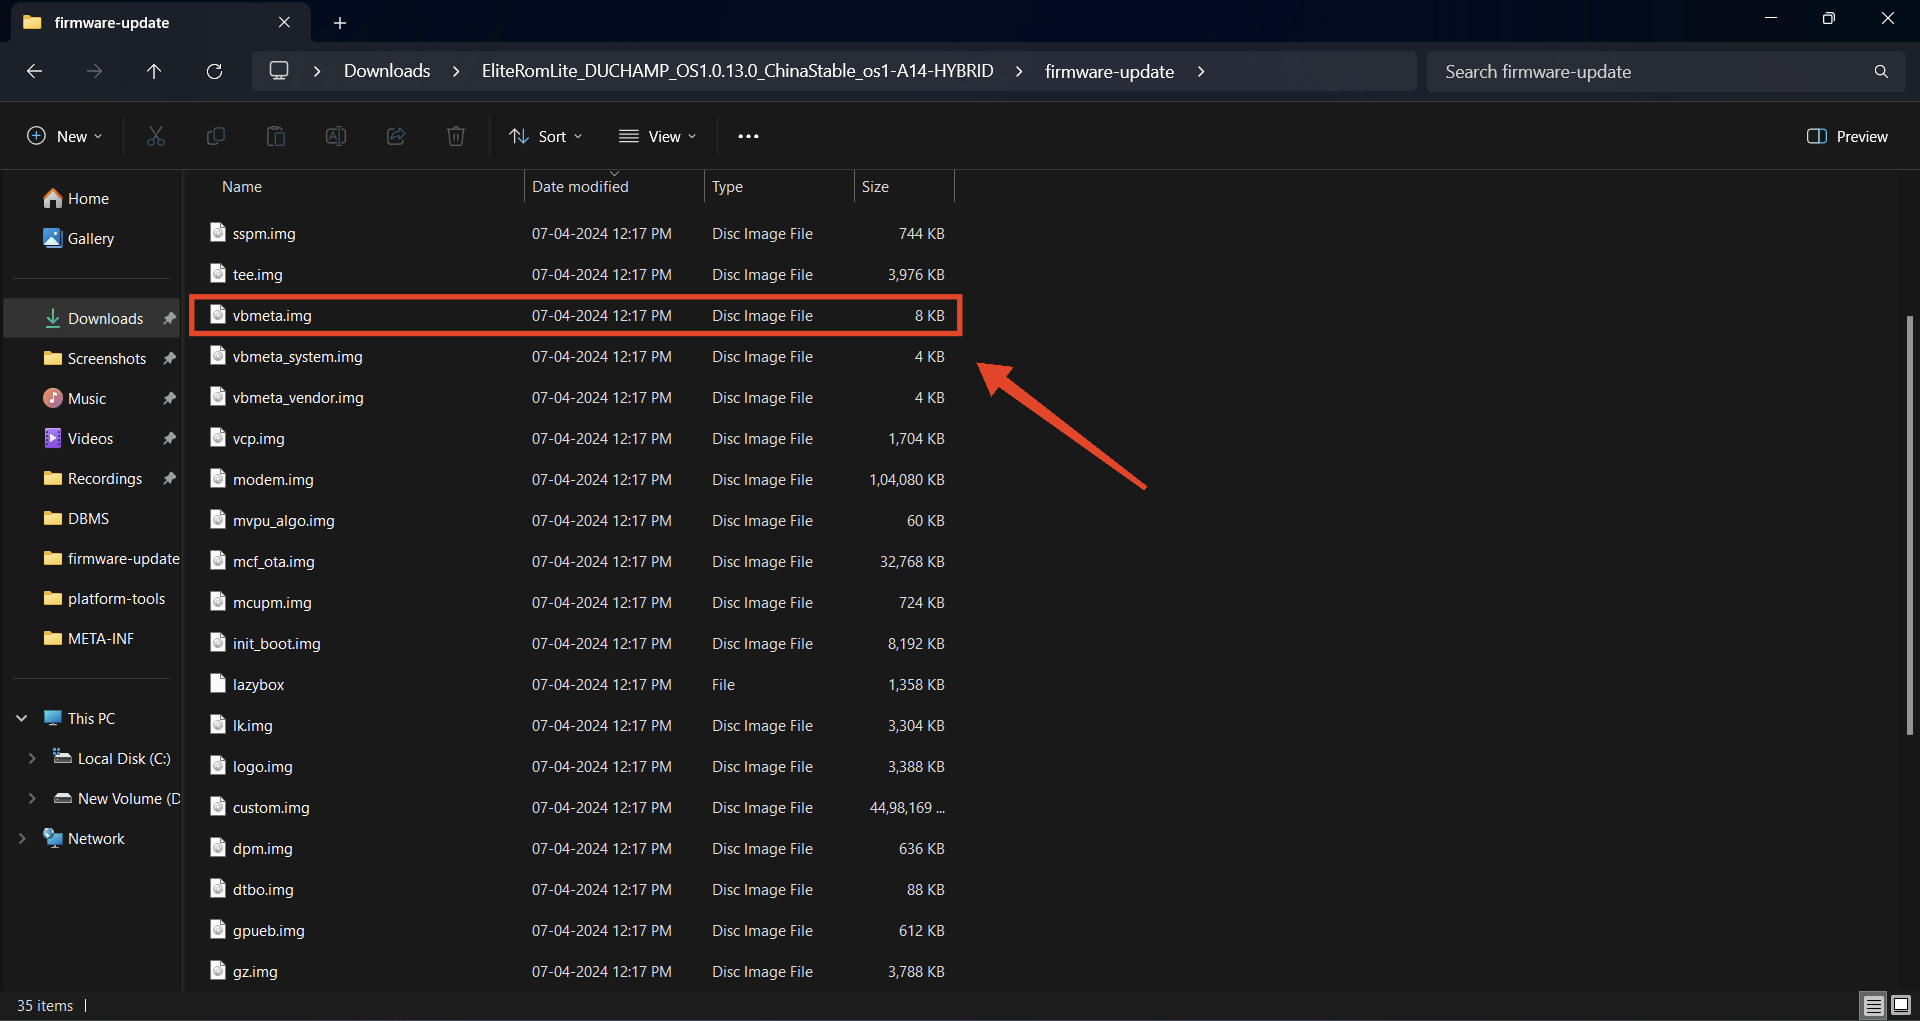
- Connect your phone to your PC using a USB cable.
- On your phone, go to Settings > Developer Options and turn on USB Debugging.

- Transfer the TWRP image file to your PC. If you are using Platform Tools, move the file to the Platform Tools folder.
- Now, open a terminal or a CMD window in the Platform Tools folder. You can also use minimal ADB if you want.
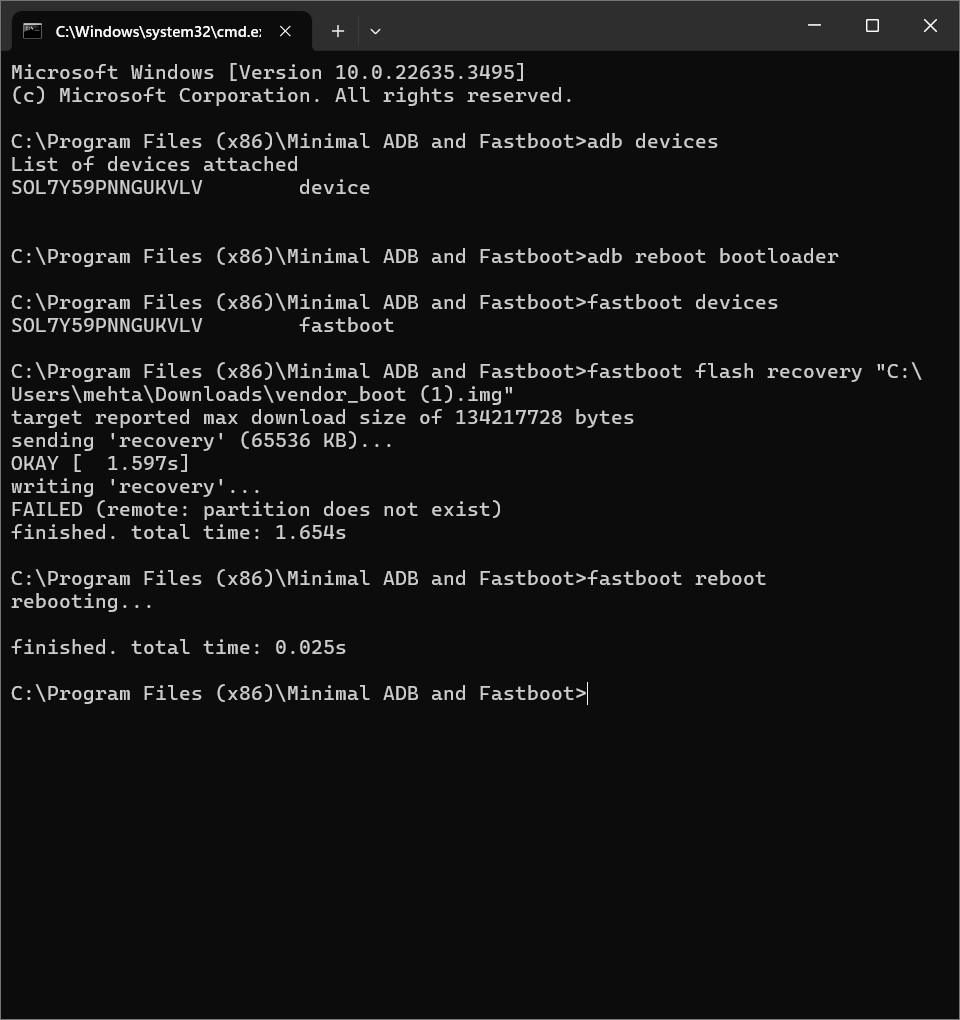
- Enter the following command and press Enter: “adb devices.”
- On your phone, tap Allow when promoted.

- Enter the following command and press Enter: “adb reboot bootloader.”
- Now, check if your device is connected. Enter the command: “fastboot devices.” You should see a response with fastboot followed by an alphanumeric code.
- If applicable, flash the stock vbmeta using the following command: “fastboot –disable-verity –disable-verification flash vbmeta vbmeta.img.”
- Next, make sure you have the correct image file. Replace “<twrp image path>” with the actual TWRP image or drag and drop it into the terminal. Enter the following command: “fastboot flash recovery <twrp image path>.”
- Finally, enter the following command to reboot your device: “fastboot reboot.”
- Viola! You have successfully flashed TWRP recovery on your Android.

Warning: Flashing the incorrect image file can brick your phone. Proceed at your own risk.
If your device doesn’t reboot with the fastboot command, try rebooting it manually by holding the power button. If that doesn’t work, go to fast boot mode again and flash the TWRP again.
If your device gets stuck in a boot loop or is bricked because you flashed the wrong image, you can recover it by flashing the boot image followed by the stock firmware of your device.
How to Boot into TWRP Recovery
If you want to boot into recovery, you can use any one of the following methods:
Without PC
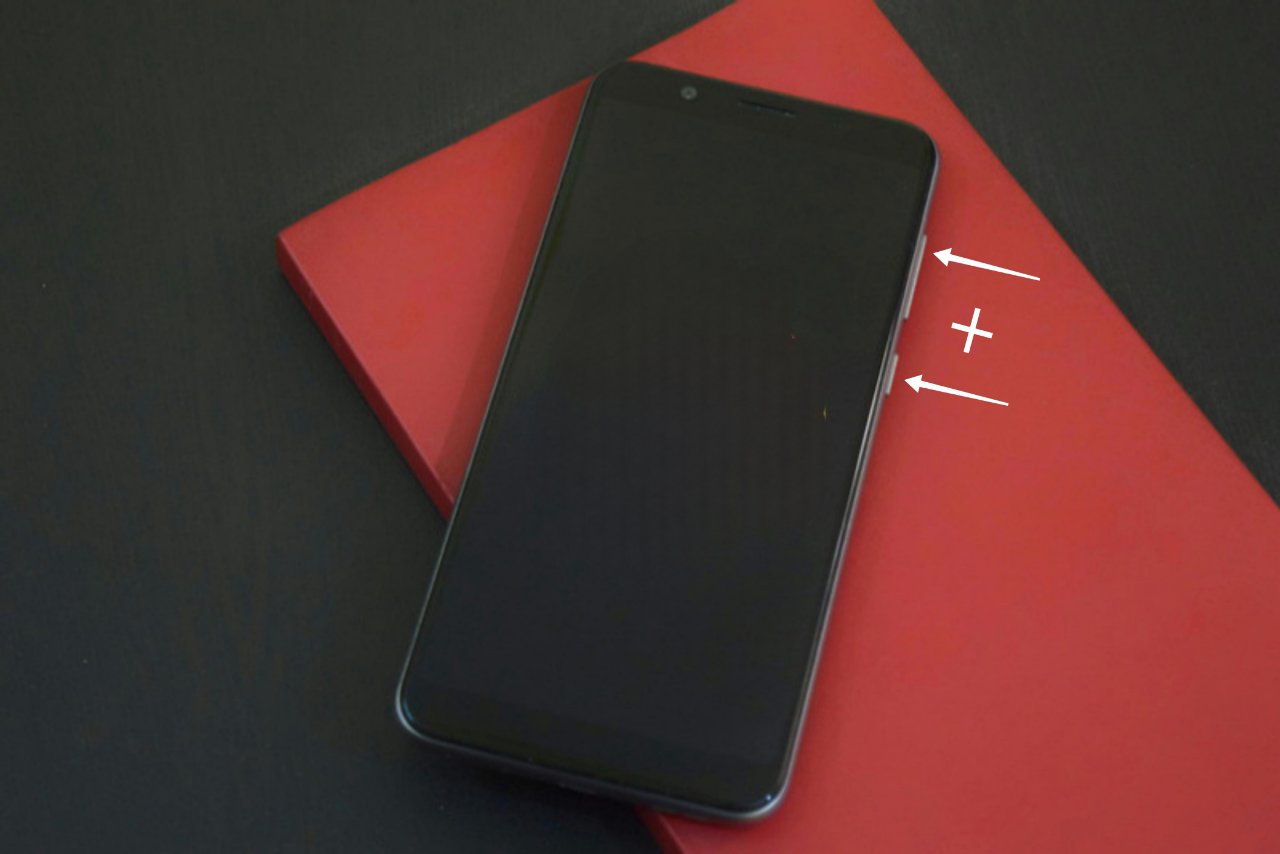
- Power off your phone.
- Then, press and hold the Power button and the Volume up button simultaneously for a few seconds.
- Release the buttons once you see a logo or feel a vibration.

With PC
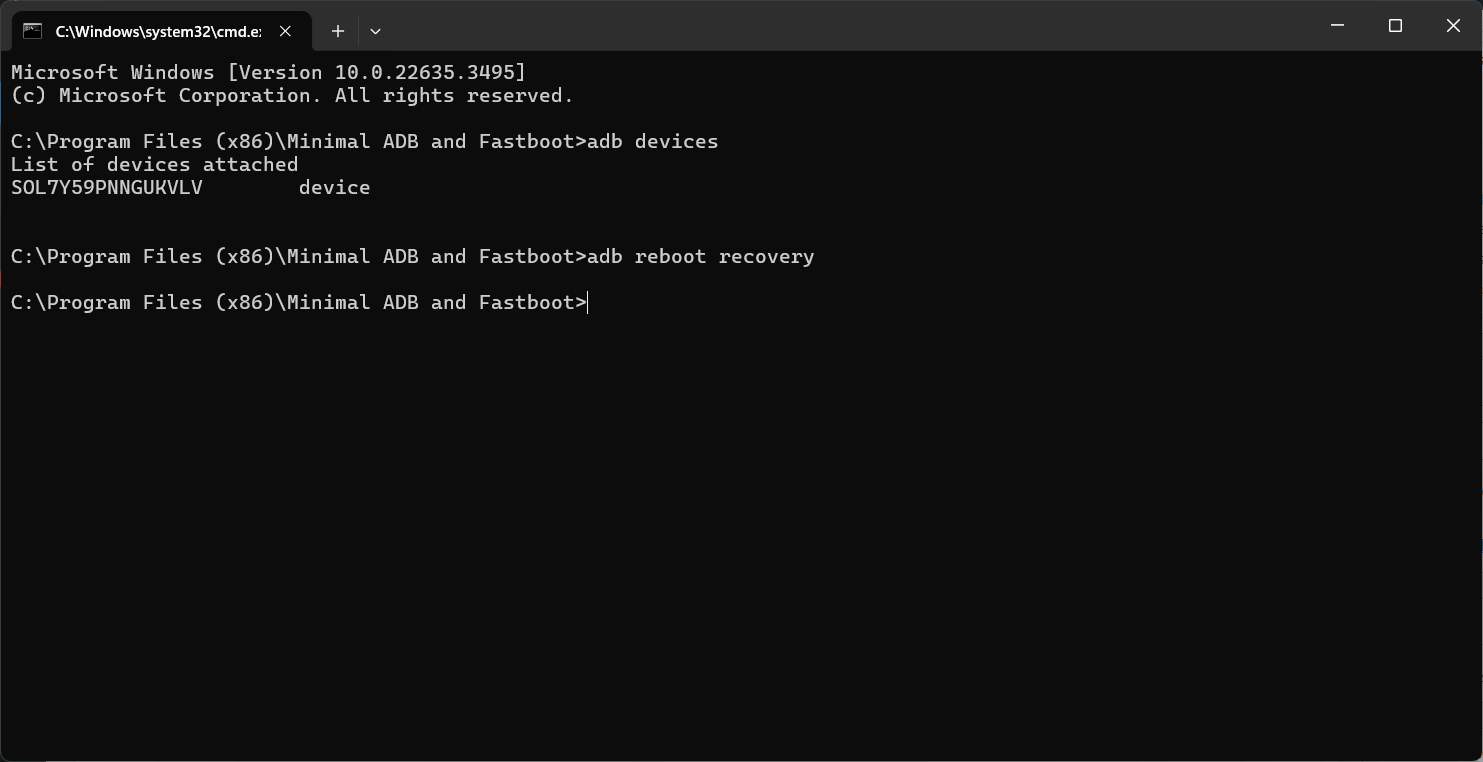
- Open a terminal or a CMD window in the Platform Tools folder. You can also use minimal ADB if you want.
- Now, check if your device is connected. Enter the command: “adb devices.” You should see a response with an alphanumeric code followed by device.
- Enter the following command to enter the recovery: “adb reboot recovery.”

How to Get Out of TWRP Recovery
Once you are done with TWRP, you can boot into the system. Follow the steps below.
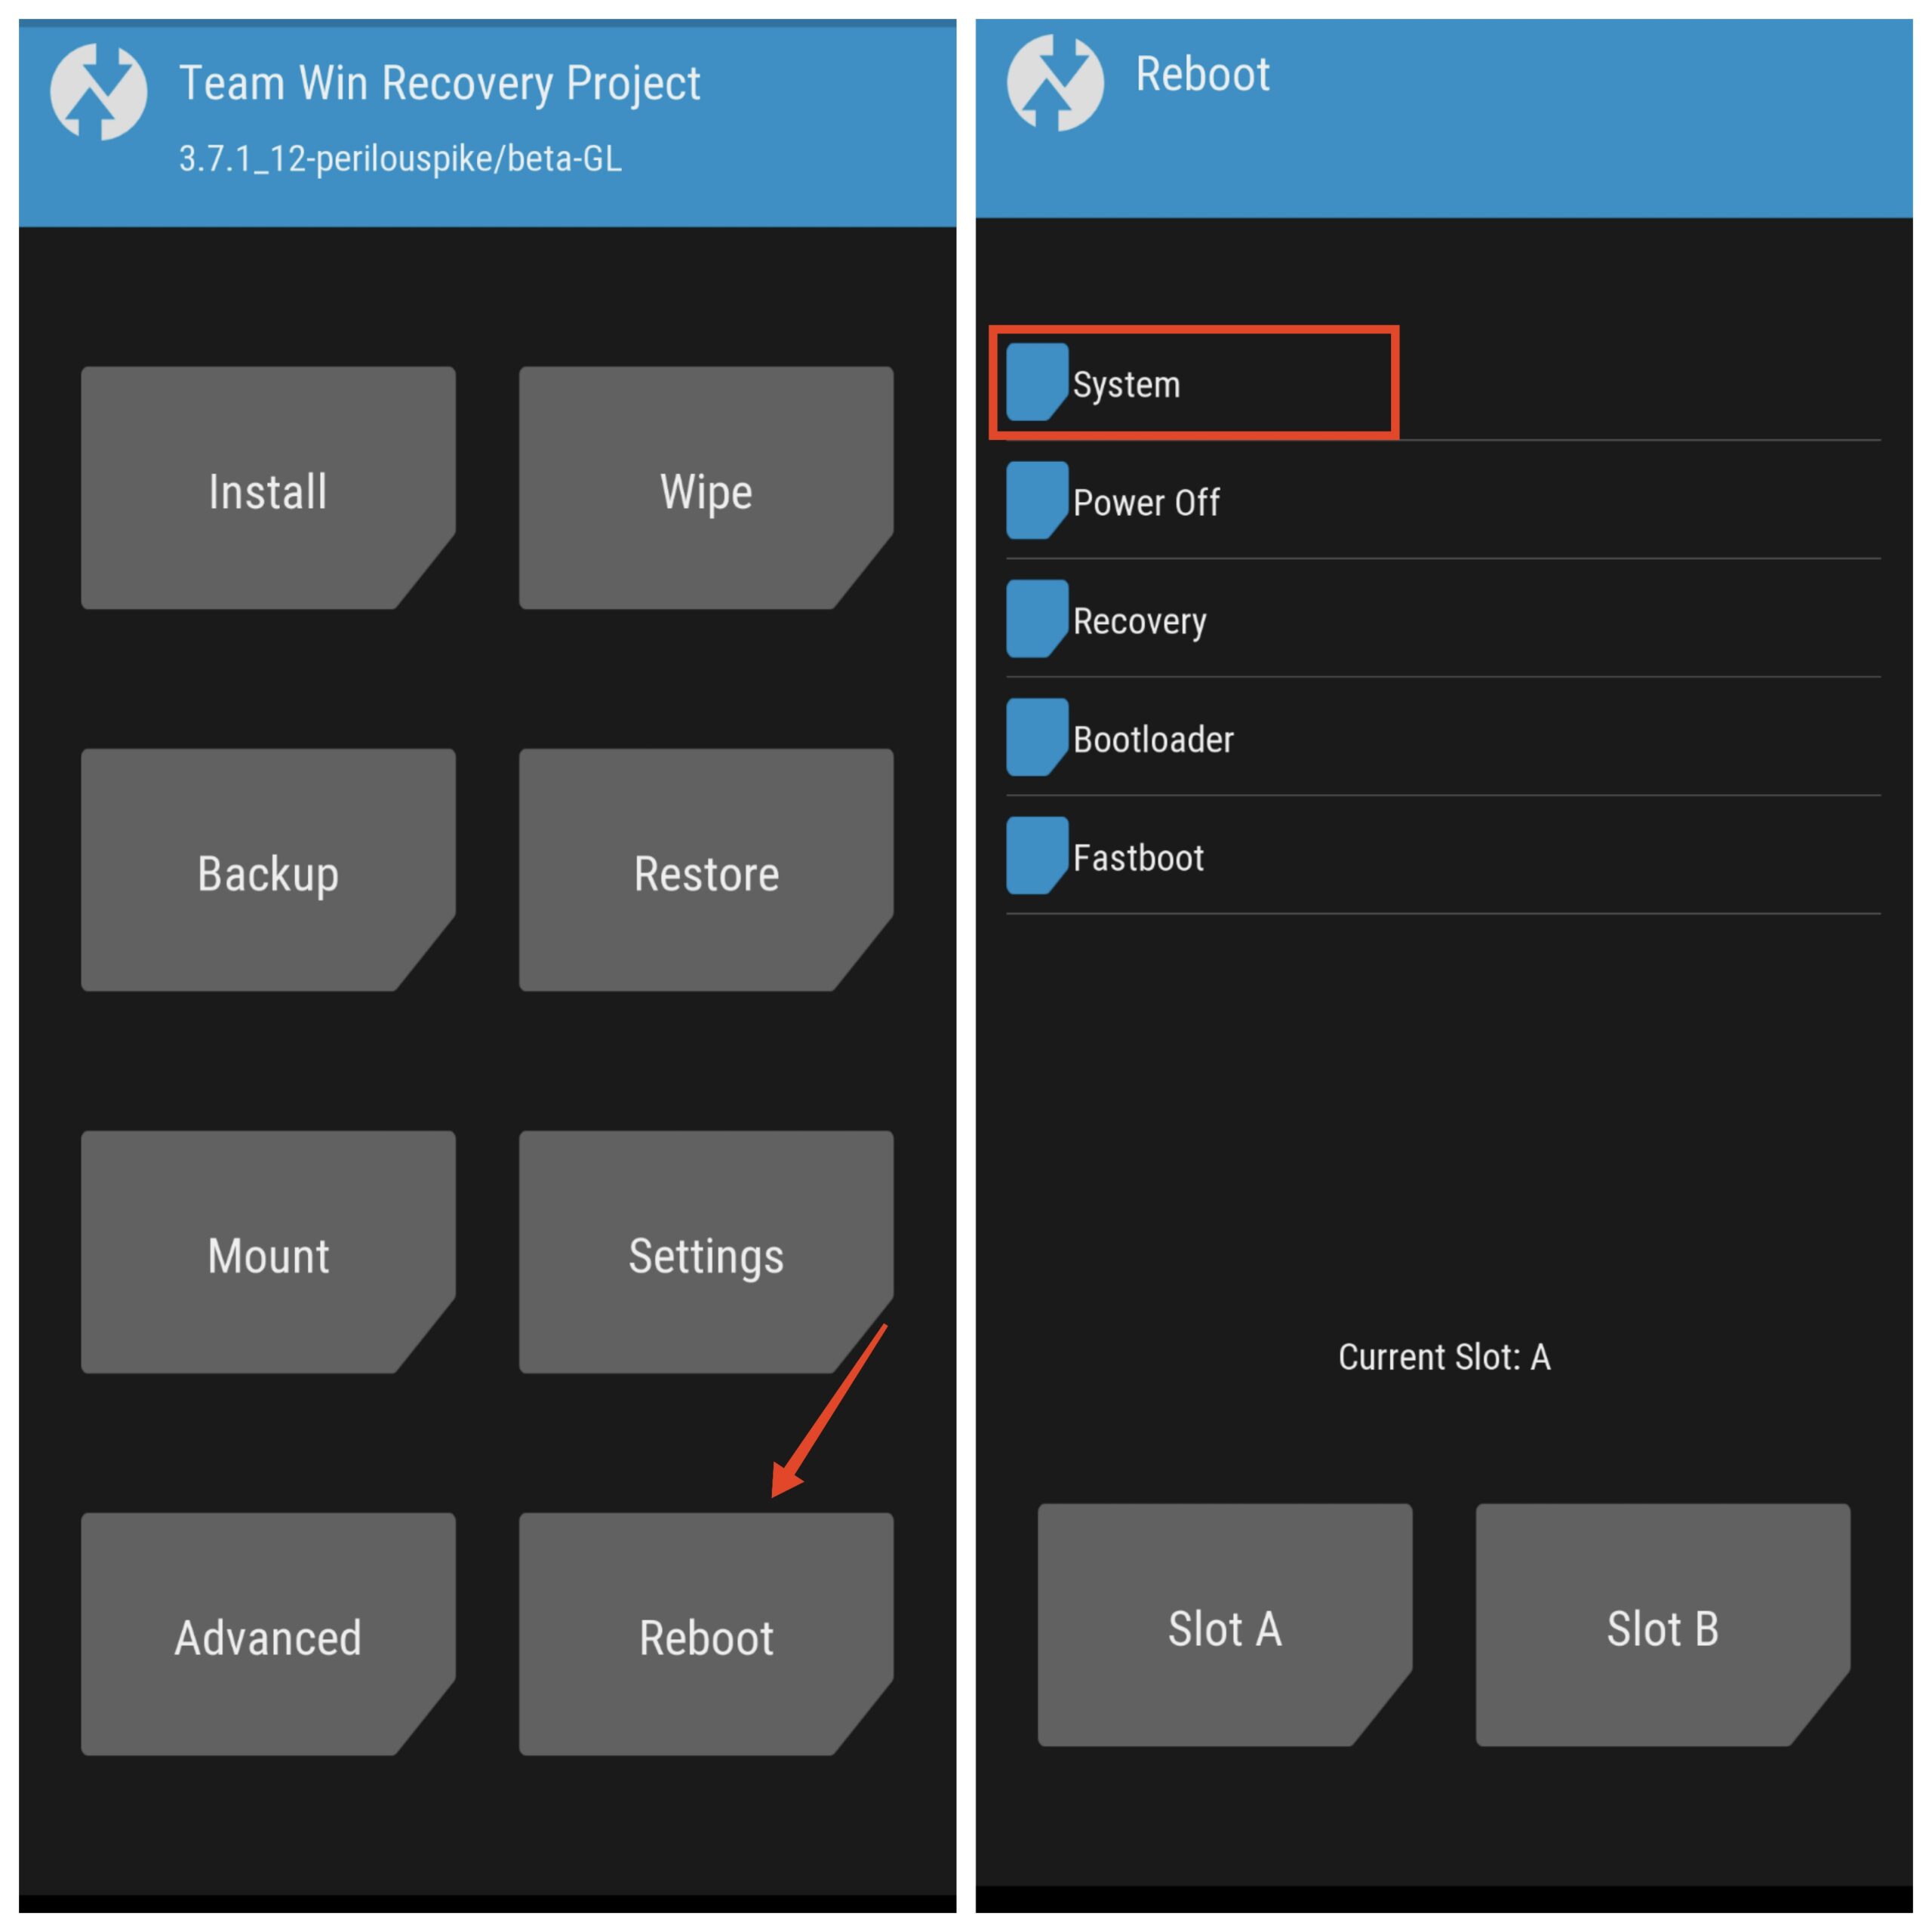
- Press the home button at the bottom of the screen.
- Once you are at the homepage, tap on Reboot.
- Finally, select System.

How to Change Brightness in TWRP
If you think the default brightness in TWRP is not enough for you to use it properly, you can set the brightness to the maximum or increase it as you need.
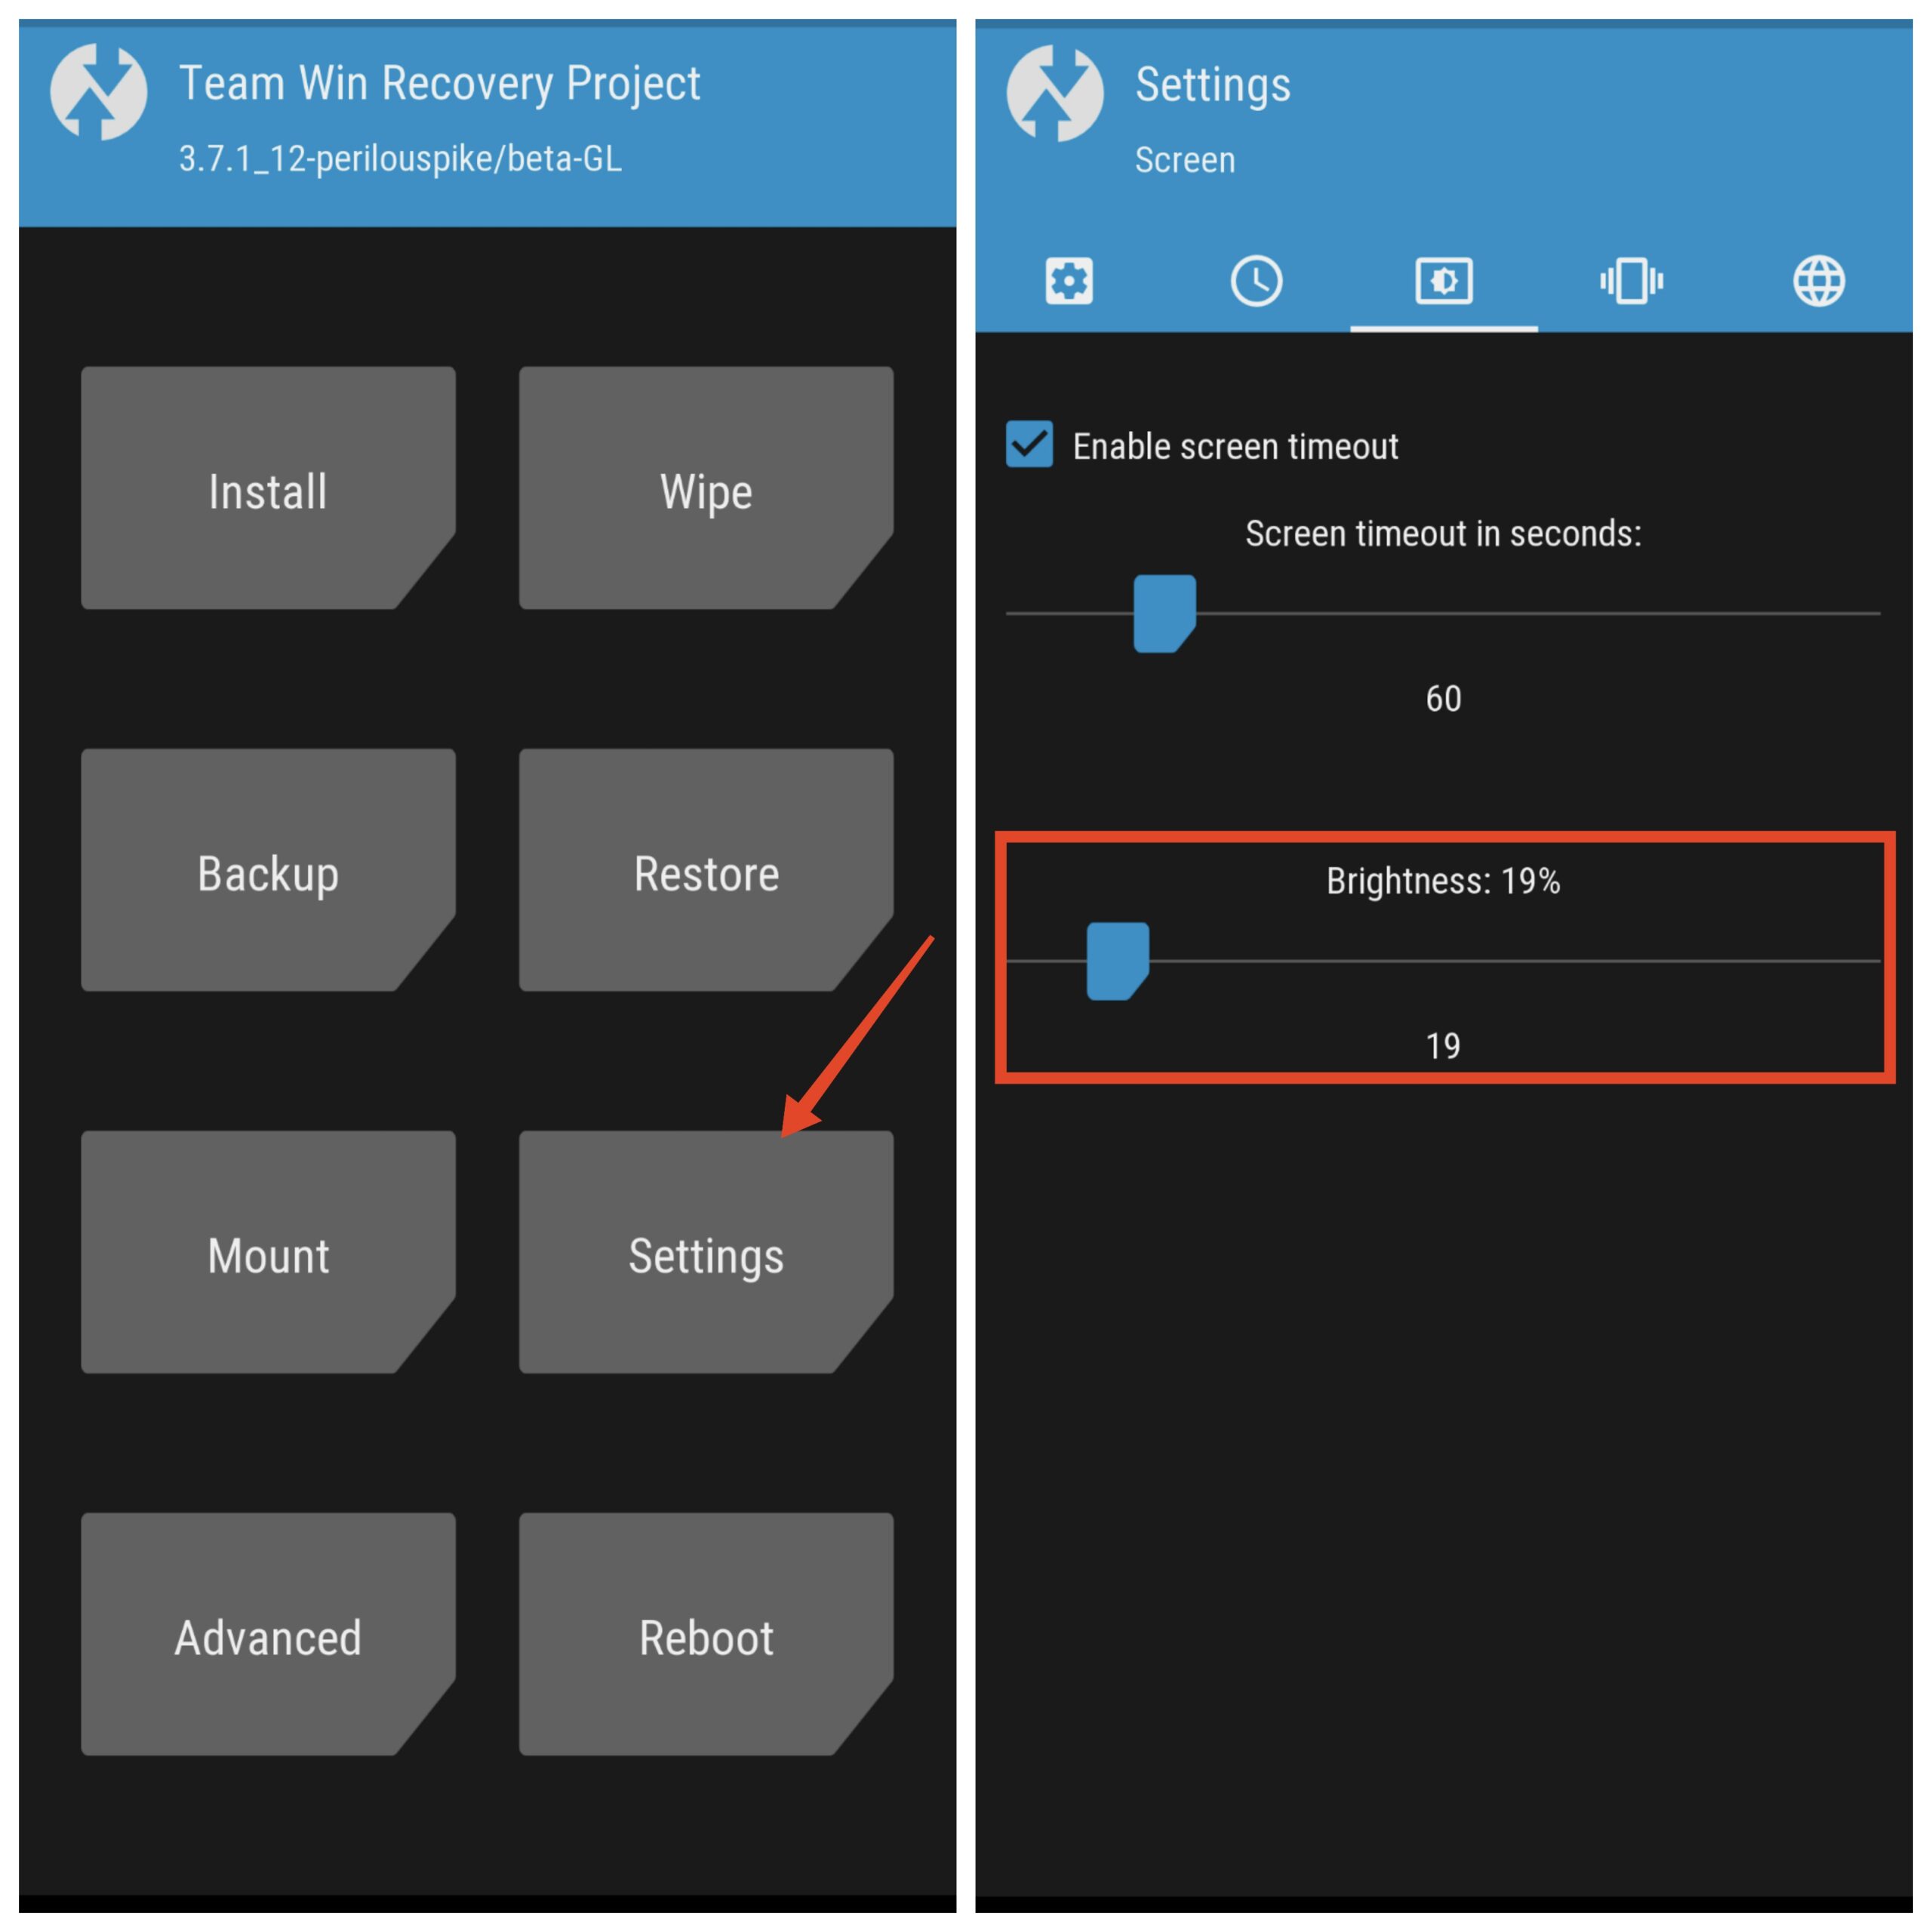
- Press the home button at the bottom of the screen.
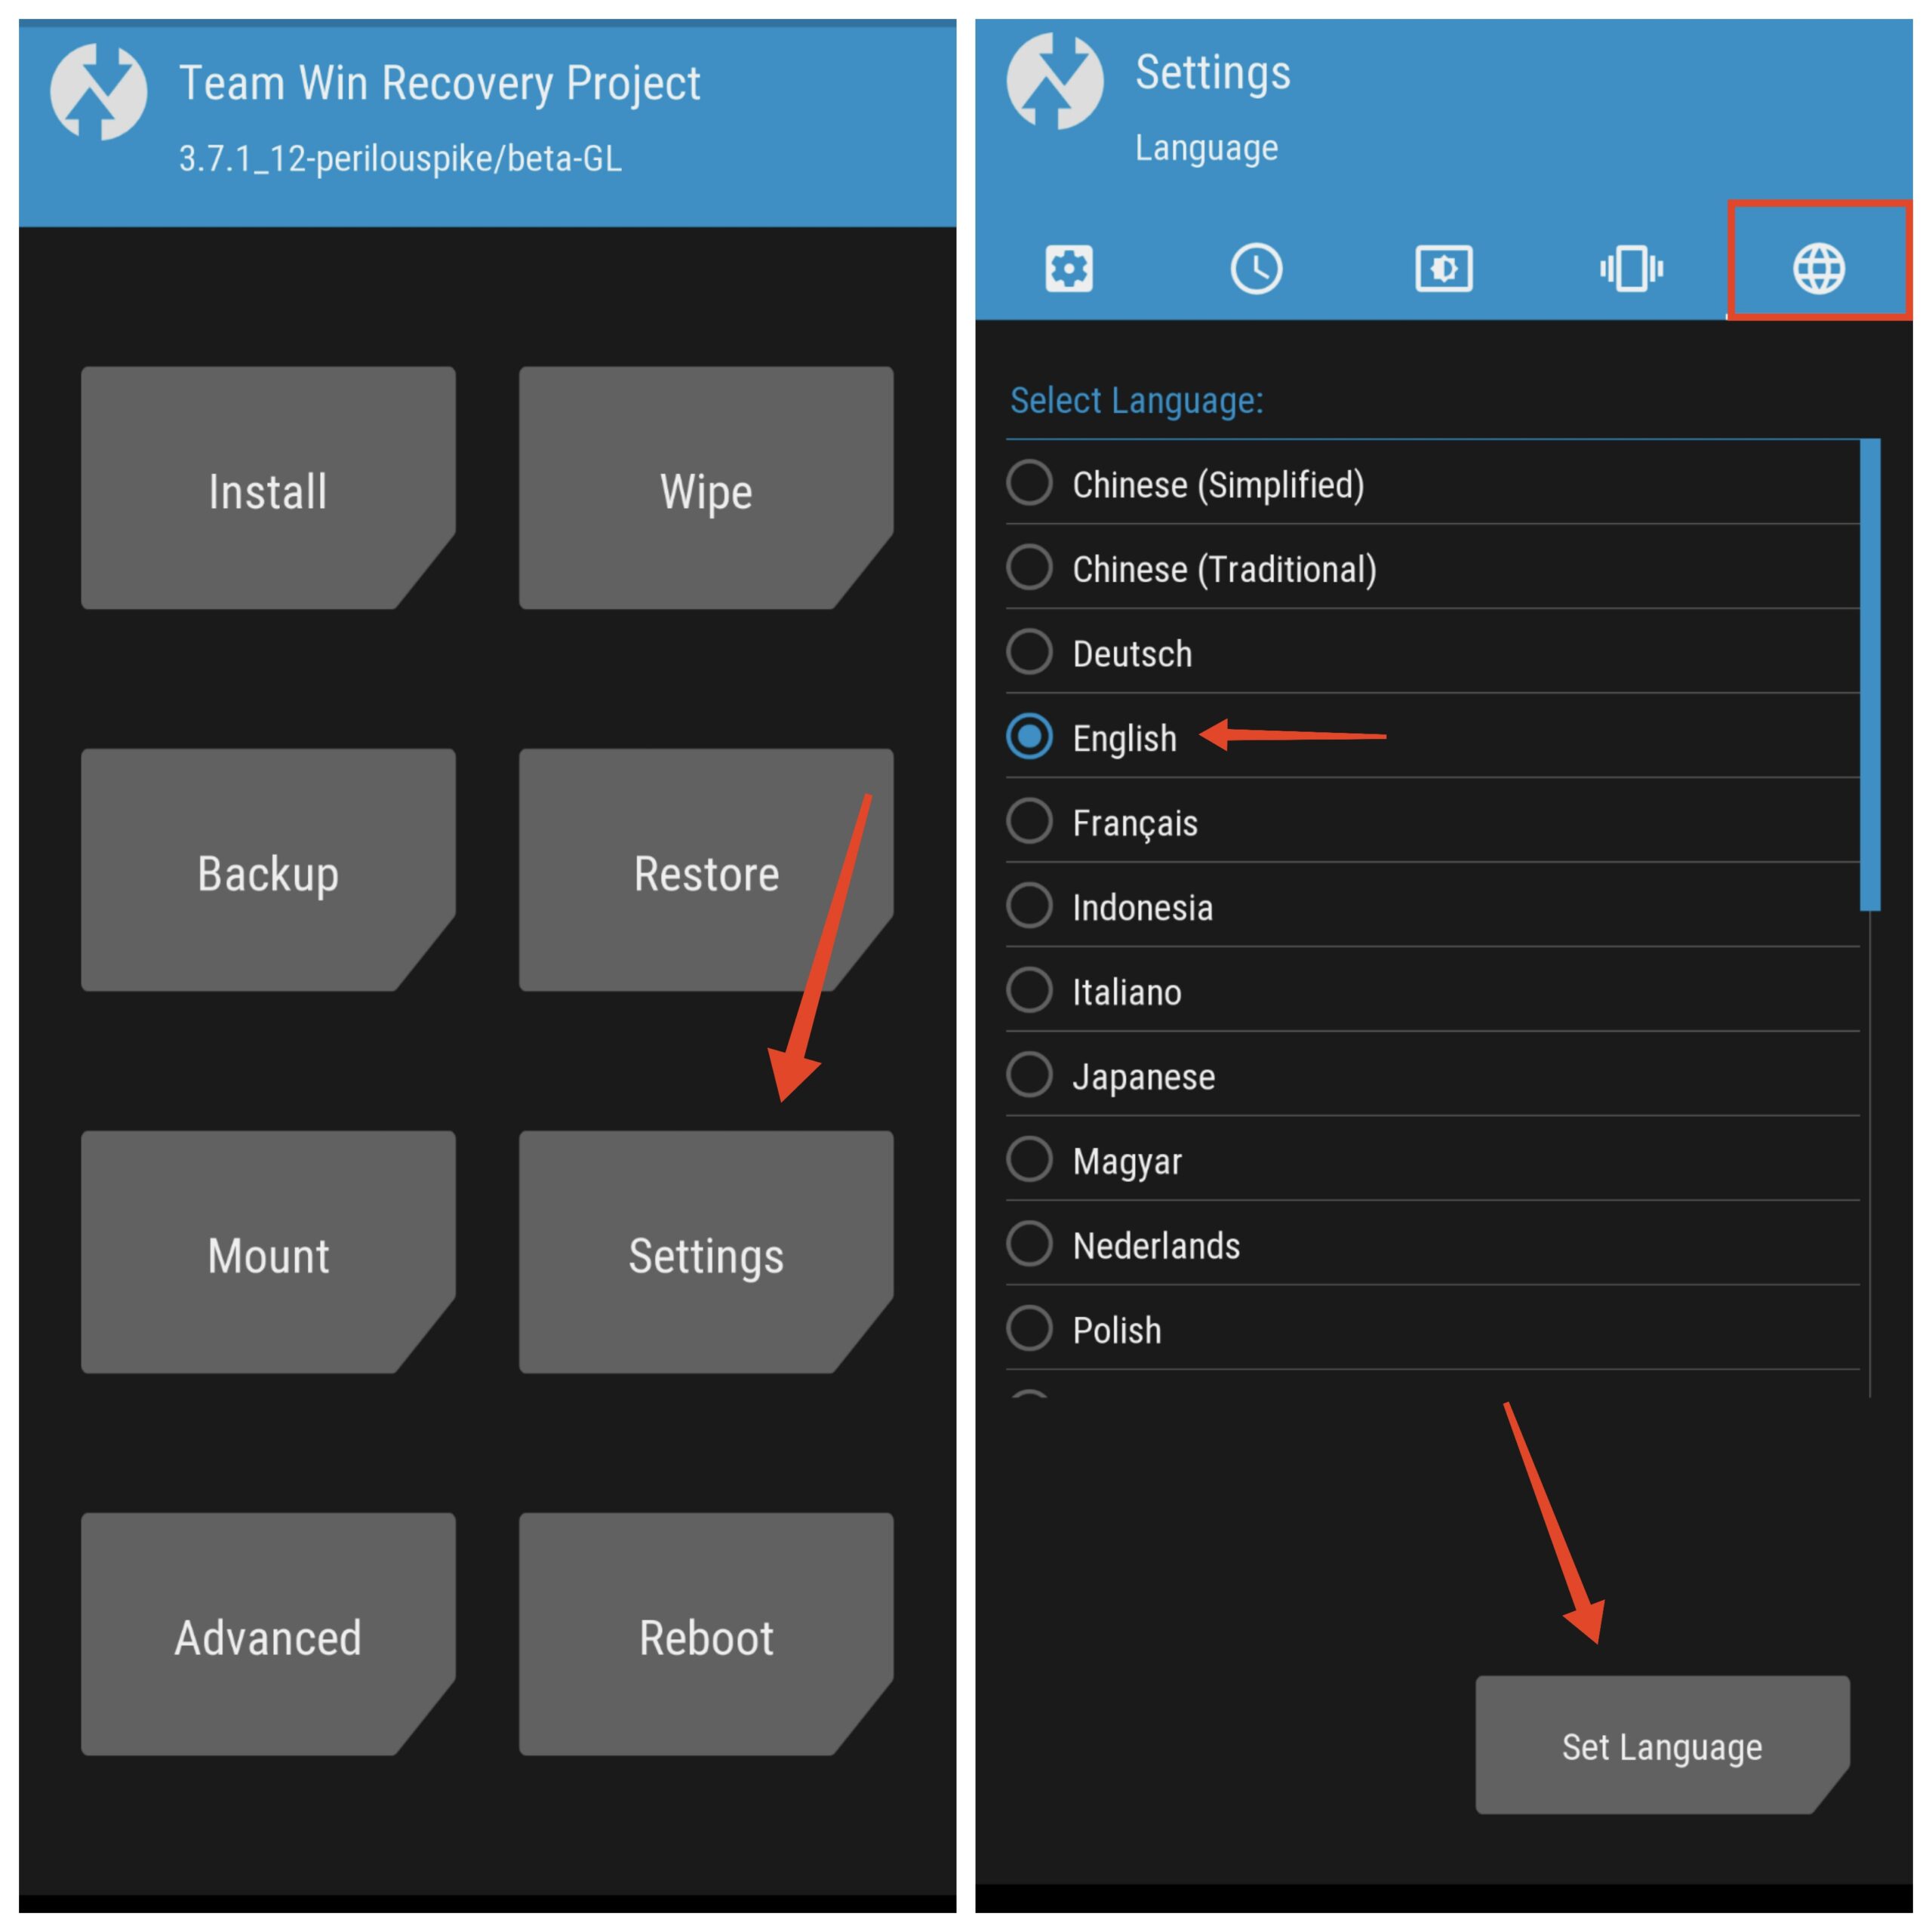
- Once you are at the homepage, tap on Settings.
- Go to the Display section (third option) and adjust the brightness.

How to Change Language in TWRP
There are chances that you might have flashed a Chinese TWRP on your device, especially if you are using a rebranded phone that’s launched in China under a different name. You can simply change the language by following the steps below.
- Press the home button at the bottom of the screen.
- Once you are at the homepage, tap on Settings. It is on the 3rd row and second column.
- Go to the Language section (last option).
- Select your preferred language and tap on Set Language.

FAQs
1. Can I flash TWRP recovery on any Android device?
While TWRP is available for a wide range of Android devices, not all devices are supported. You should check the official TWRP website or community forums and Telegram groups to see if there is a compatible version for your device.
2. Will flashing TWRP void my device’s warranty?
Yes, flashing a custom recovery like TWRP usually voids the warranty of your device. However, you can often restore the original recovery and unroot your device to regain warranty status.
3. Can I use TWRP to back up my Android device?
Yes, TWRP allows you to create a full backup of your device, including the operating system, apps, and data. This backup can be used to restore your device to a previous state if something goes wrong.
4. Can I use TWRP to install custom ROMs on my Android device?
Yes, one of the main purposes of TWRP is to install custom ROMs. After flashing TWRP, you can use it to flash custom ROMs, kernels, and other modifications.
5. Will flashing TWRP erase my data?
No, flashing TWRP recovery will not erase any data on your device. However, it is still better to back up your data before proceeding with the flashing process.
6. Can I flash TWRP recovery on my Android device without a PC?
Yes, you can flash TWRP recovery on some devices without a PC using apps like Flashify or Rashr.
If you've any thoughts on How to Flash TWRP Recovery on Android: Complete Guide, then feel free to drop in below comment box. Also, please subscribe to our DigitBin YouTube channel for videos tutorials. Cheers!

