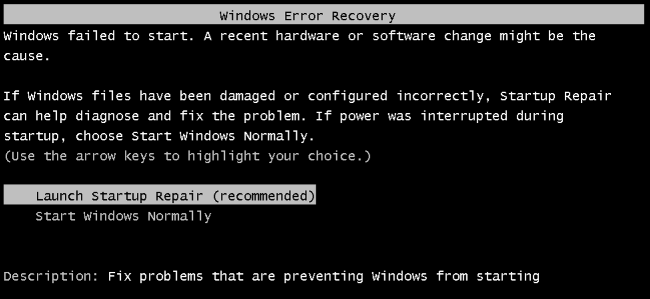
Windows failed to start. A recent hardware or software change might have caused the issue after you install Windows
Here is the complete tutorial to fix the issue of Windows recovery Error: Windows failed to start. A recent hardware or software change might have caused the issue after you install Windows Updates. Along with the error message, the computer provides you with two options.
I believe that you are reading this post because you tried the option “Start Windows Normally” but you got no success apart from boot loop. Also when you clicked on “Launch Startup Repair” it gave no useful output. So, in this post, I will provide you with a complete process to fix the Startup error on the Windows OS.
Automatic Repair will launch an attempt to fix any issues that prevent Windows from loading.
Advanced Boot Options Windows 7
Step 1.
Click on “Launch Startup Repair”. For Windows 7 it may prompt you with two options
Step 2.
Click on “Manually input the key”. Now hit on Cancel option.
Step 3.
You will see the message Startup Repair is checking your system for problems.
Let it load.
Step 4.
You will see a box with message ‘Windows cannot repair this computer automatically’.
At the bottom click on the option ‘View advanced options for system recovery and support’.
Step 5.
System Recovery Option (Can also use with Recovery Disc)
Follow the instructions on the screen and you will see the ‘System recovery options’.
You will see multiple options, choose the one which you find preferable to start the PC.
Step 1.
Insert the System Repair Disc or Recovery Drive (CD/DVD or USB Drive) on your PC.
Step 2.
Restart your computer and press a specific key at the start of the boot process to enter BIOS. This key is generally displayed on-screen during the boot process. For example, for Windows 7 you need to press F2 to enter BIOS.
On a PC with UEFI firmware (Newer PC with 8 & 10) — The UEFI boot menu will automatically appear if your PC is having trouble booting properly.
Step 3.
Once you’re in the BIOS or UEFI firmware menu, look for some sort of “Boot” option.
BIOS Boot Priority
Step 4.
Here select the option of the inserted drive (DVD or Harddrive).
To save your settings, locate the Save & Exit screen. Select the “Save Changes and Reset” to restart your computer.
Step 5.
Here you’ll see the same tools you could normally access from the boot menu. Select “Startup Repair” to run a startup repair operation. To fix the issue.
On Windows 8 or 10, click the “Repair your computer” option instead of “Install now” on the installer screen. Then select Troubleshoot > Startup Repair to run startup repair.
Windows Advanced Settings
If You have a Windows Media disc or recovery disc/drive use it to repair your device computer.
You can also create a recovery disc from a working PC and repair your boot issues. If you do not have a Windows media repair discs, you can download a Windows 7, 8, or 10 ISO from Microsoft and either burn it to disc or copy it to a USB drive.
I have given complete steps to boot create a system recovery data to repair your computer.
⇒ Start by downloading either the Windows 10 Media Creation Tool or the Windows 8.1 Media Creation Tool.
Follow the instructions on the screen and either burn it on DVD or save it to an empty Drive. (Make sure it matches your PC configuration)
⇒ Now Windows 7 download page, enter your product key and click “Verify” to start the download process.
Download it on Burn DVD or USB Drive.
You can insert this into your PC and repair it as given in steps above. Make sure you click on “Repair your Computer” option and not on install now.
If you have a working windows 7 then you can use it to create a System Recovery Disc.
You can create a System Recovery if you have another working Windows 8 or 10 PC.
Note & Conclusion: Make sure you take a recovery backup from a Windows with same Bit version and Windows OS.
I hope the post was helpful. Do comment below for any assistance or support. Also, help us improve our post with your valuable suggestions. Cheers!