Have you been experiencing that the WiFi keeps disconnecting on your Windows 11 PC? I have come up with some troubleshooting tips that will help you fix the issue on your computer. Internet is a basic necessity these days. Everyone prefers to have a high speed and stable connectivity which generally most WiFi offers.
The latest Windows 11 update probably brings along some bugs. Lately, I have been noticing a lot of software updates from Windows which are rolled out regularly to fix certain bugs arising on Windows 11. Apart from bugs, there may be some other technical reasons that can cause the WiFi to not work as intended. I have listed some common reasons due which your PC running on Windows 11 WiFi Keeps Disconnecting.
Reasons Why Windows 11 Keeps Disconnecting from WiFi
- The issue may happen due to some system software bug.
- The ISP that provides the WiFi may be down for maintenance.
- Flight Mode may be enabled on the computer.
- The router you use to create a WiFi network may be having technical difficulties.
- The network adapter drivers may be outdated causing trouble for the WiFi.
Let us start the troubleshooting process now.
1. Check with the ISP
First, you need to get in touch with your ISP and ask them if they have taken down the network in the location for any maintenance work. If they affirm about maintenance then you need to wait until they reinstate the network.
If there is no issue at the ISP’s end maybe the router connectivity at your place may have some issue. You may reset the connections. Otherwise, if you have no idea how to rest the cables or other connections, again you can seek help from the ISP support team.
2. Update Windows OS
With Windows OS bug fixing is always the preferred way of dealing with technical snags. If you have been experiencing your PC disconnecting from the WiFi at times, then try to update the Windows OS build to the latest one.
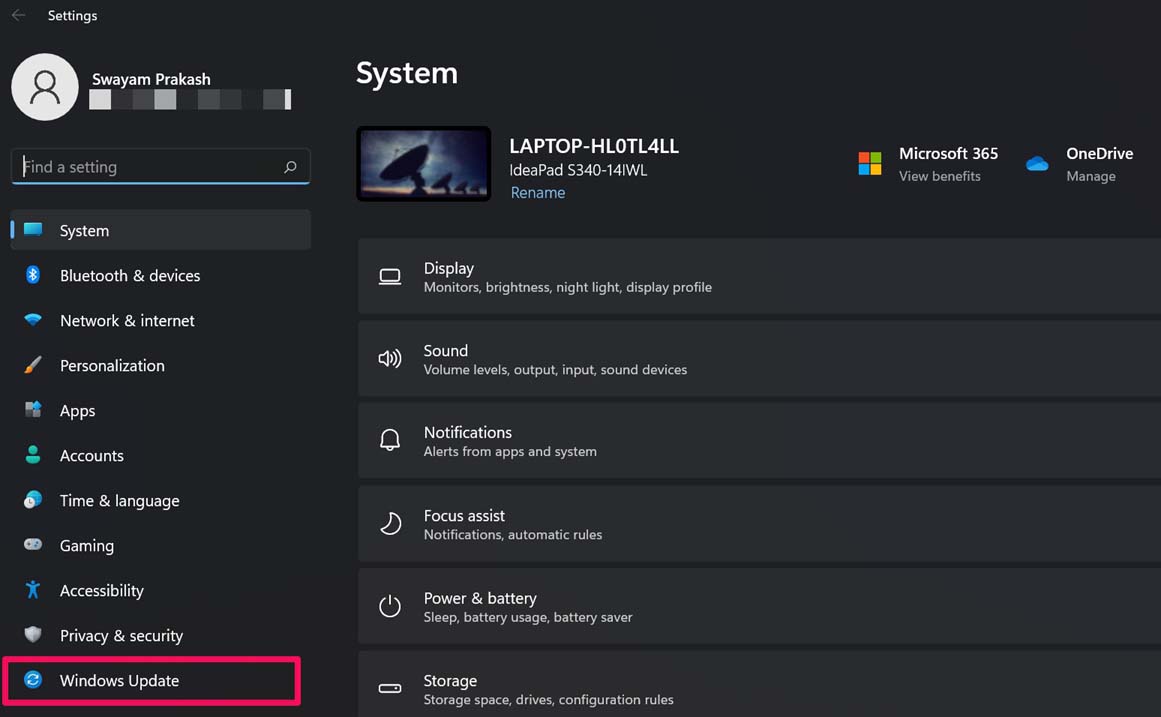
- Press Windows + I keys to open the Settings page.
- Click on the Windows Update.

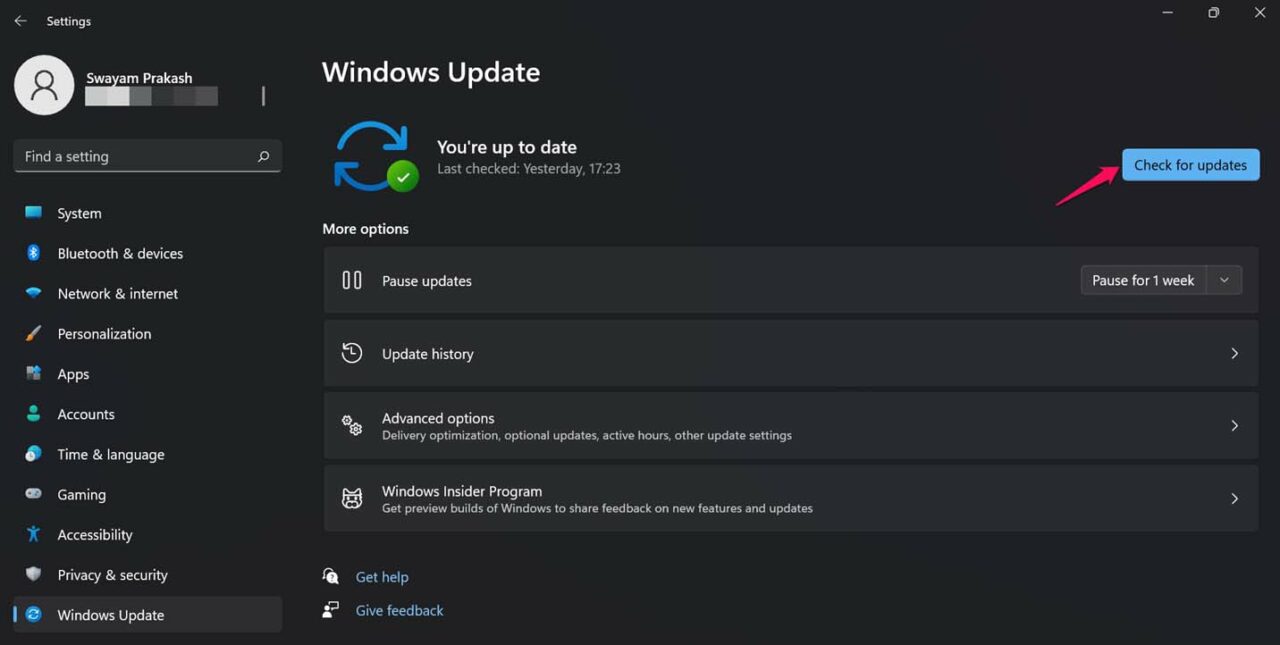
- Then click on Check for Updates.

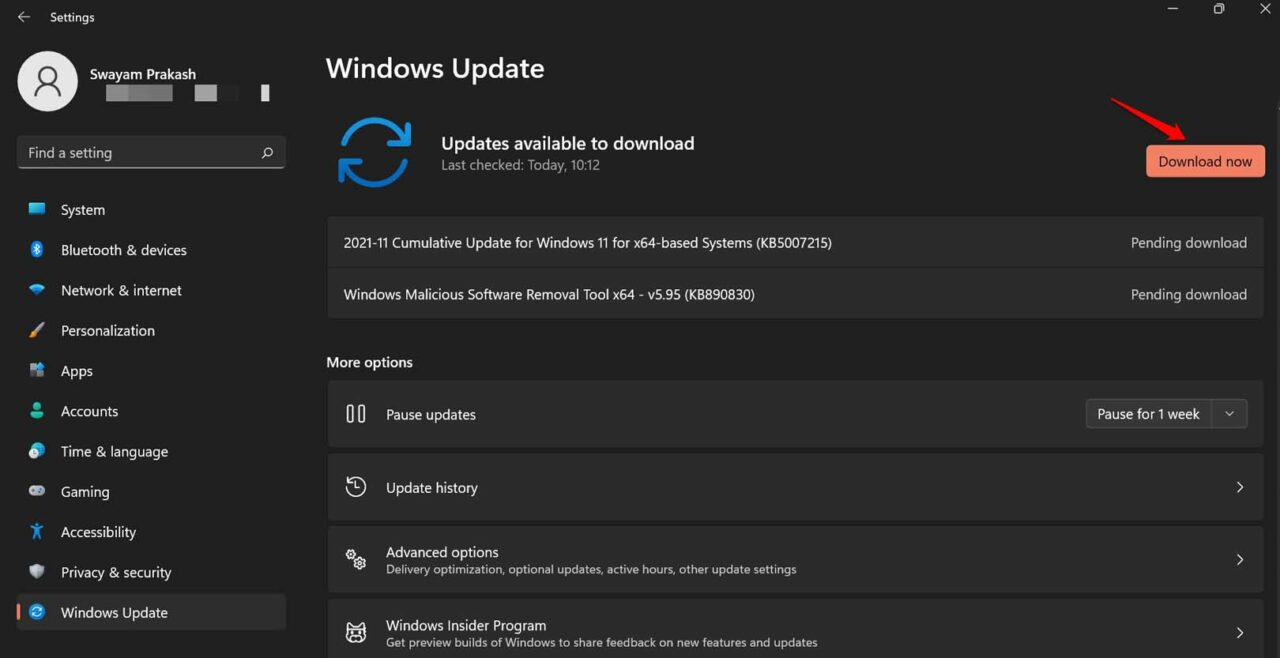
- If an update is an available click on Download Now.

After upgrading to the new version of the Windows 11 build check if your computer can connect to all WiFi networks and run smoothly.
3. Is the Computer on Flight Mode?
Modern-day computer keyboards come with a flight mode key. Often while typing on the keyboard we do tend to press the flight mode key. So, ensure that you have not clicked on the flight mode key by mistake.
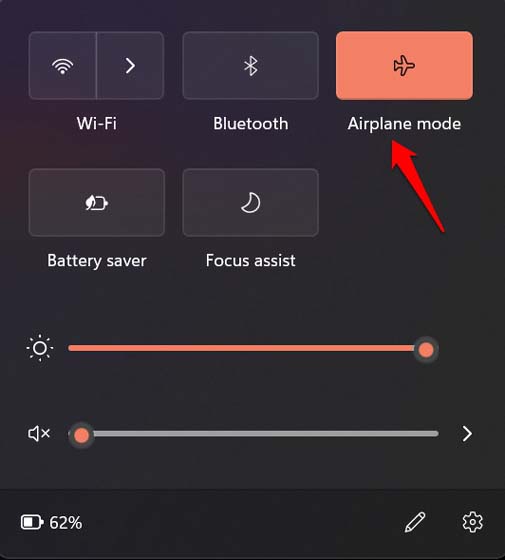
You can tap the key that has the airplane symbol to immediately deactivate the flight mode. Otherwise,
- Click on the taskbar section that displays the airplane icon.
- From the menu click on the Airplane Mode option to disengage it.

- Then try to connect to your desired WiFi network to fix Windows 11 WiFi Keeps Disconnecting.
4. Switch the Network Profile to Private
You may try to change the network profile and see if it makes any difference.
- Click on the desktop taskbar where the WiFi/internet icon is present.
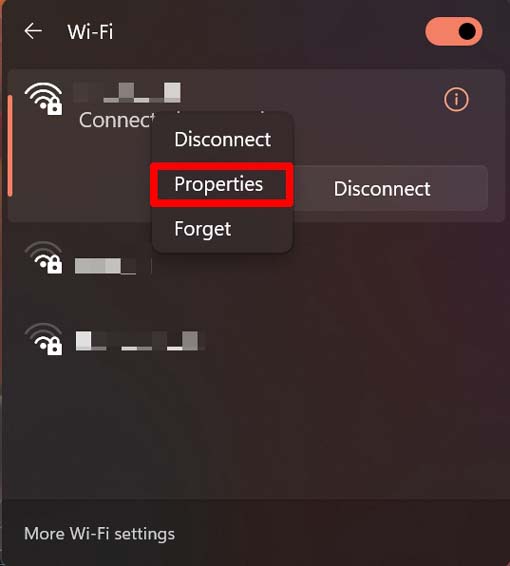
- Next, click on WiFi to see the list of saved networks.
- Right-click on the network that you are trying to connect to.
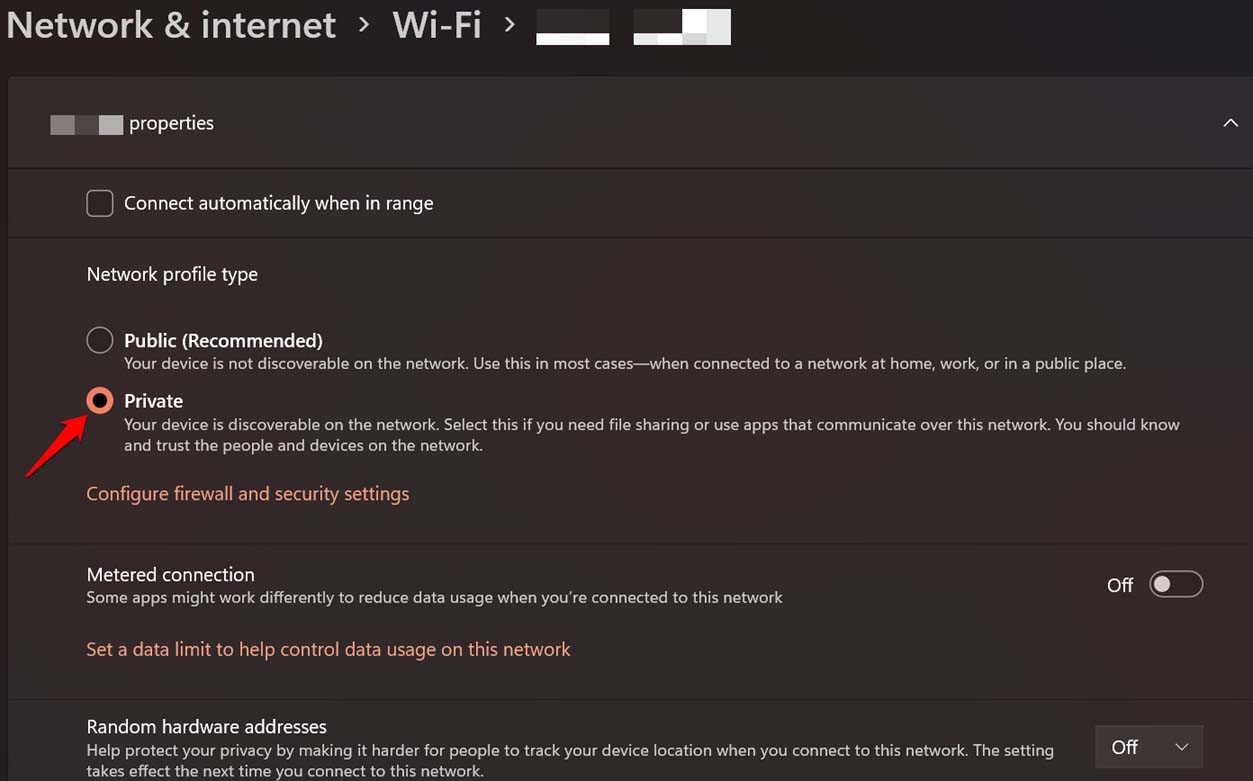
- Select Properties.

- Under Network Profile Type, click on Private.

- Now, check if you can connect and use that WiFi network.
5. Manually Update the Network Adapter Driver
While drivers are updated automatically, it is important to check if a network adapter driver requires a manual update.
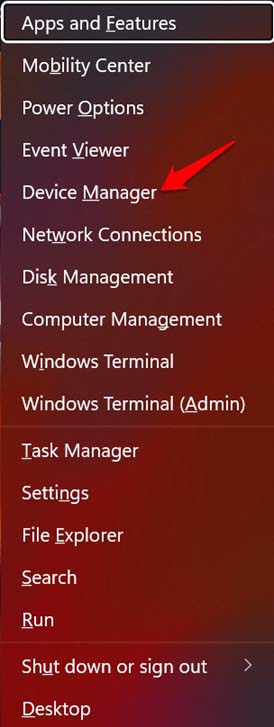
- Press Windows + X key combinations.
- From the menu, select the option Device Manager.

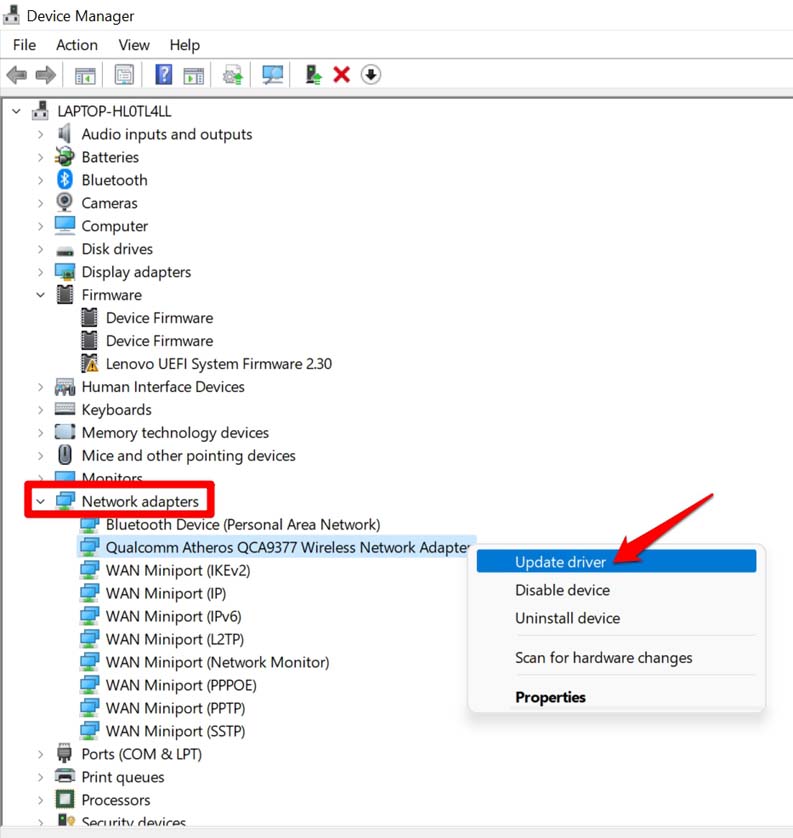
- Navigate to Network Adapters.
- Right-click on the Network Adapter on your device.
- Select Update Drivers.

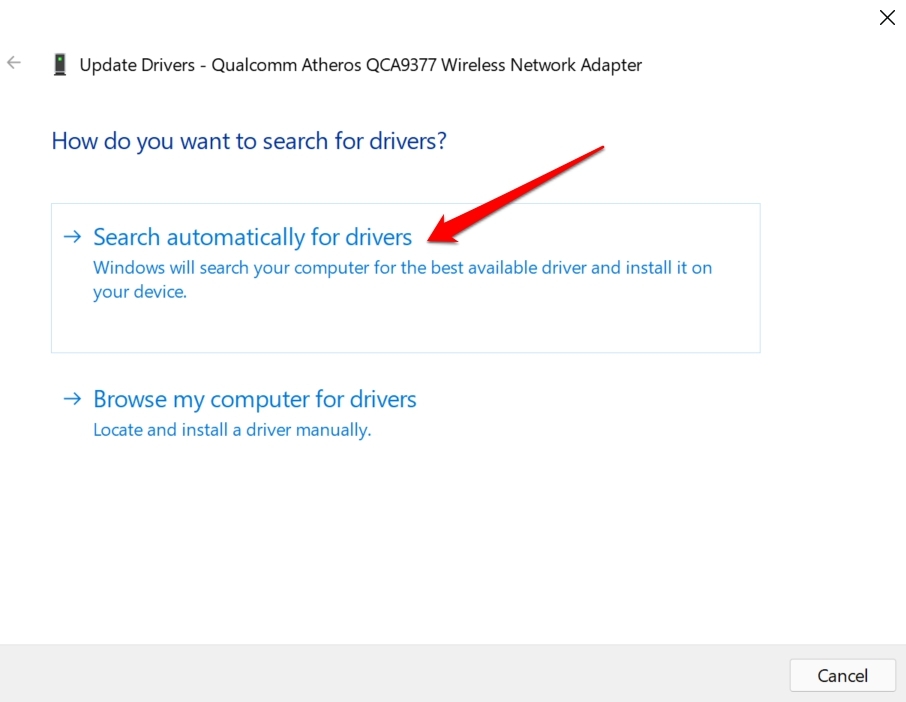
- Then from the next dialog box that appears select Search Automatically for Drivers.

The system will search for available updates on the web and install the same.
6. Make Changes to the Network Adapter Properties
You can also tweak the Network Adapter properties to see if it makes any difference in fixing the issue of disconnecting WiFi on your Windows 11 PC.
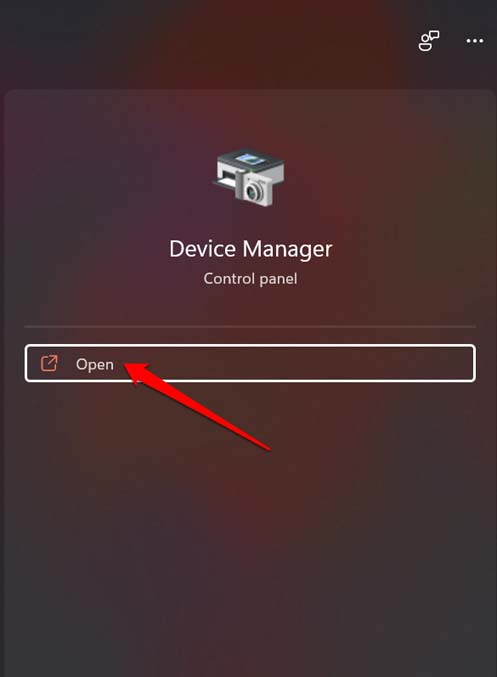
- In the Windows search field, type Device Manager.
- Click Open when the relevant search result shows up.

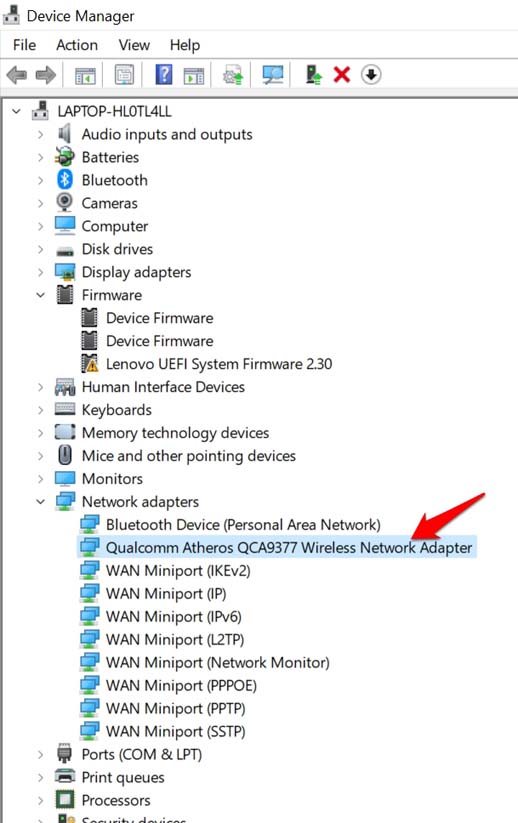
- Go to Network Adapters and expand it by clicking on it.
- Double-click on the concerned network adapter your computer has.

- The properties dialog box of the network adapter will open up.
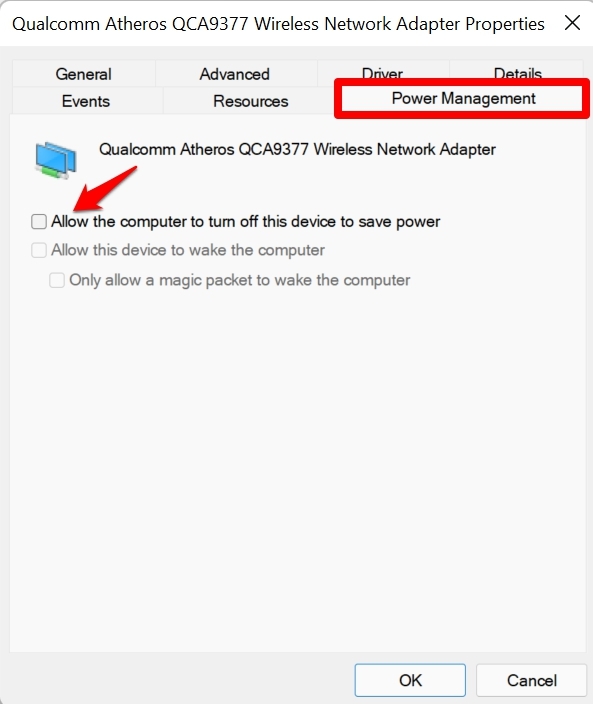
- Click on the tab Power Management.
- Uncheck the option Allow the computer to turn off this device to save power.

7. Remove the Older Networks in the Profile
Normally, when you use any WiFi network it is saved on your computer WiFi action center. It is good to remove some of these connections that you use no more. There is a forget option that you need to use.
- Click Windows + A and it will open the action center.
- Now, click on WiFi. You will see the list of networks.
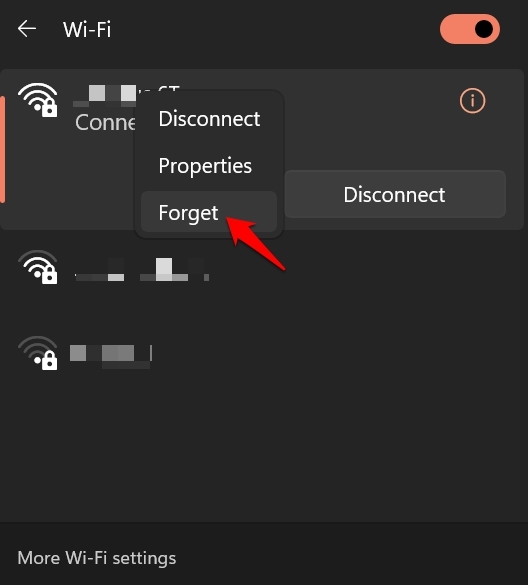
- Right-click on the network and click on Forget.

- You can repeat the above steps for other older networks that you do not require.
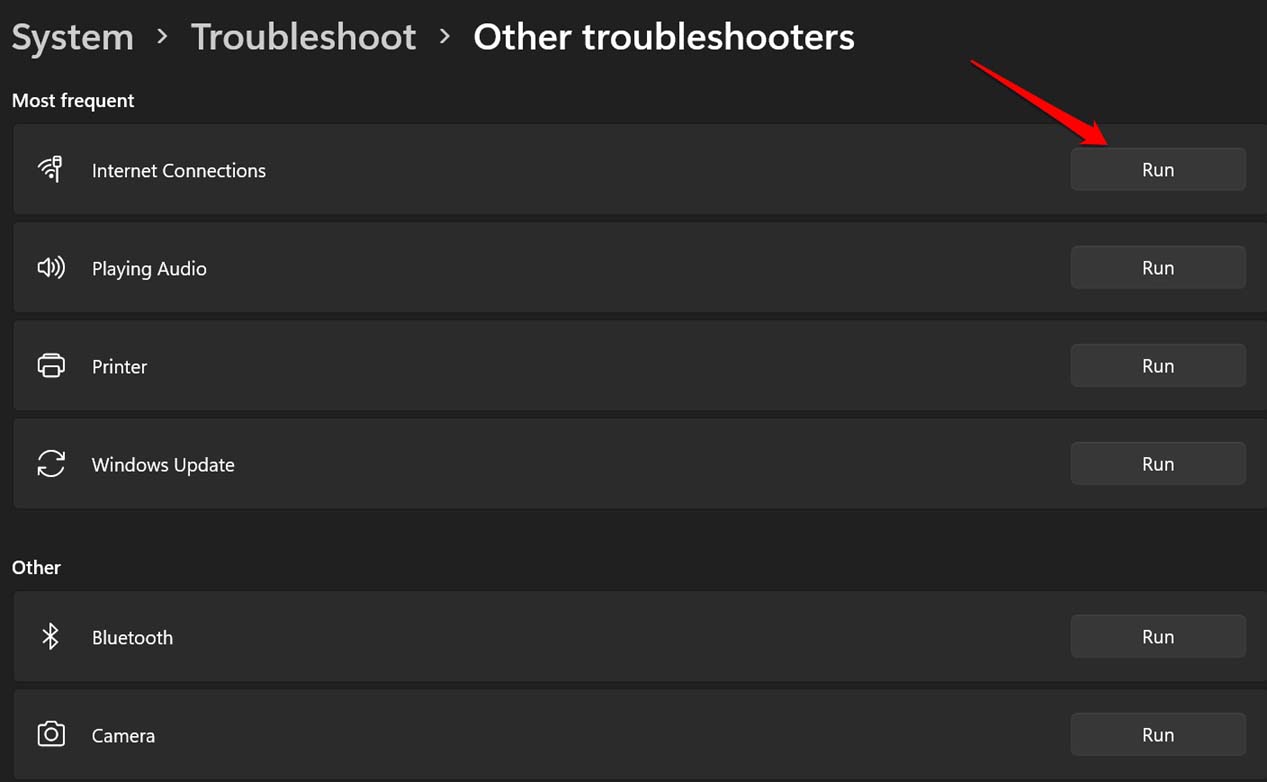
8. Use the Windows Troubleshooter
Windows OS has an inbuilt troubleshooting tool that can help fix various system apps and services. You can use it to fix network issues as well.
- Open the Windows Settings.
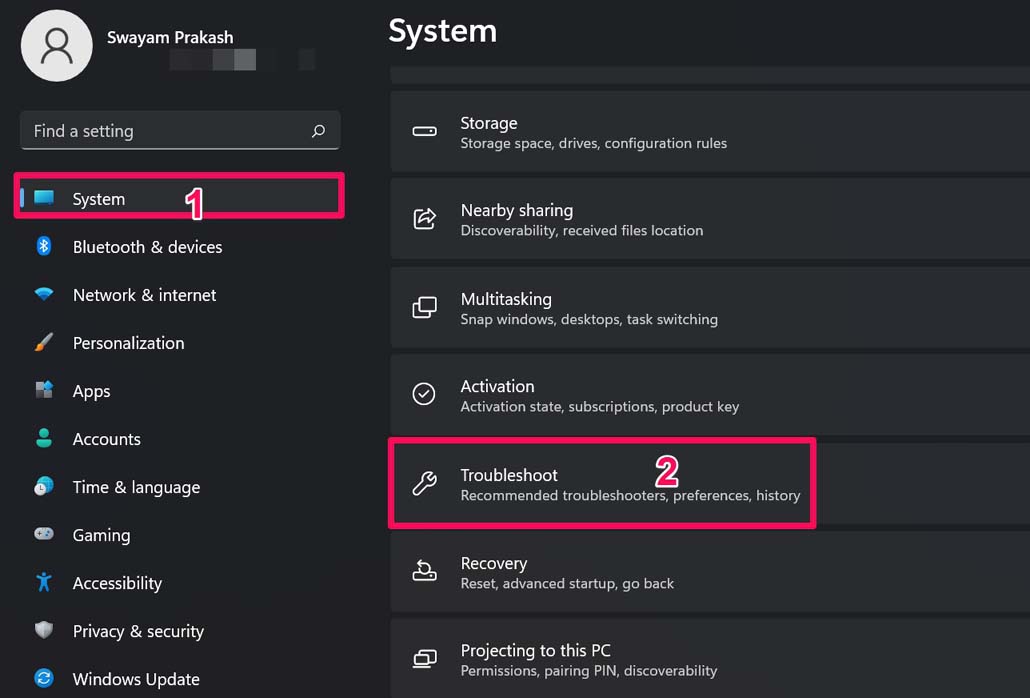
- Click on System.
- Next, click on Troubleshoot.

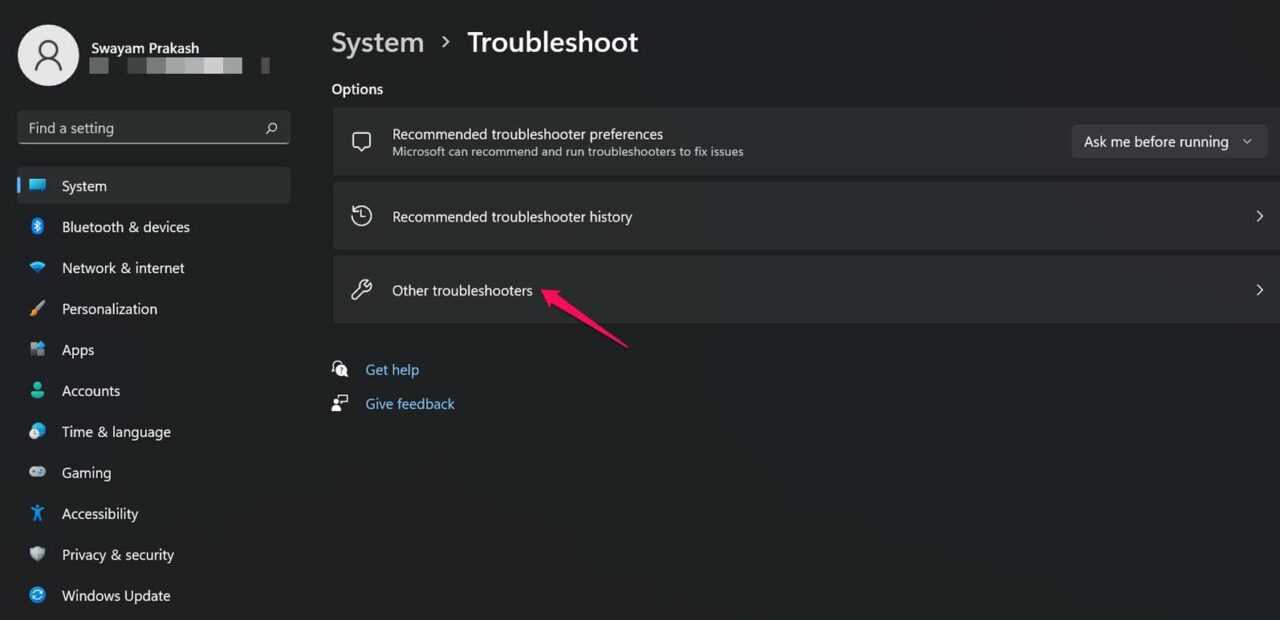
- Under that click on Other Troubleshooters.

- Then you will see the Internet Connections tab. Click on the option Run beside it.

The tool will look for problems and fix them. Give it some time. Once it’s done, reboot your PC and then try to connect to the WiFi network.
9. Change the DNS of the Device
You can manually try to tweak the DNS of the computer to improve the WiFi network connectivity.
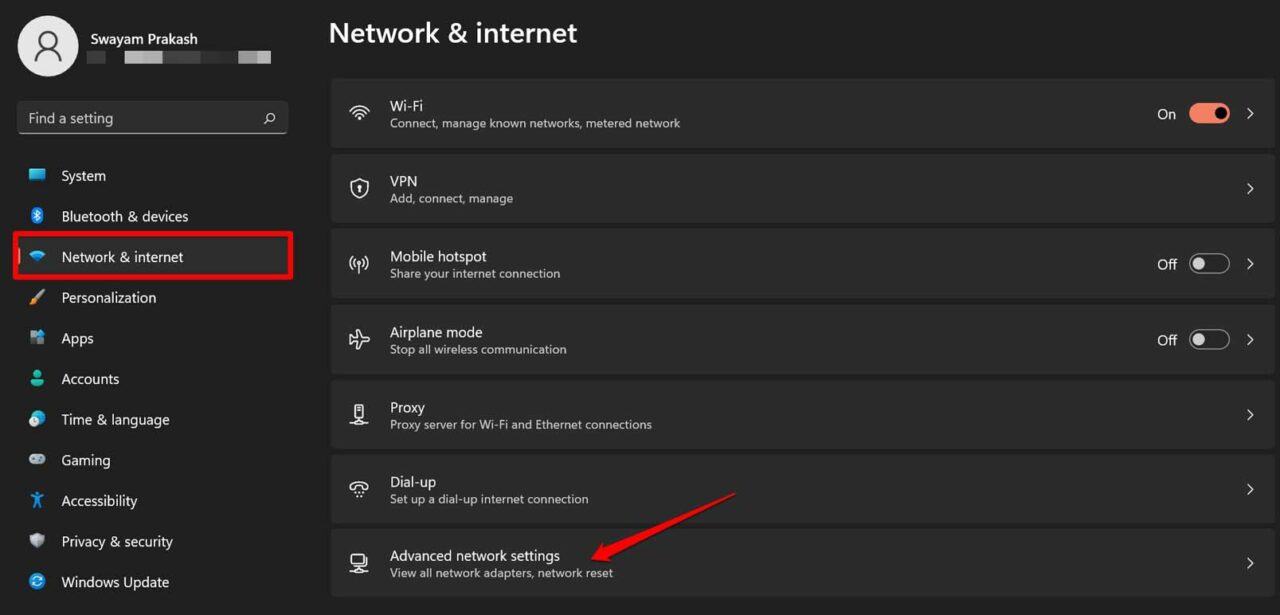
- Open Windows settings by pressing Windows + I.
- On the left-hand panel, click on Network and Internet.
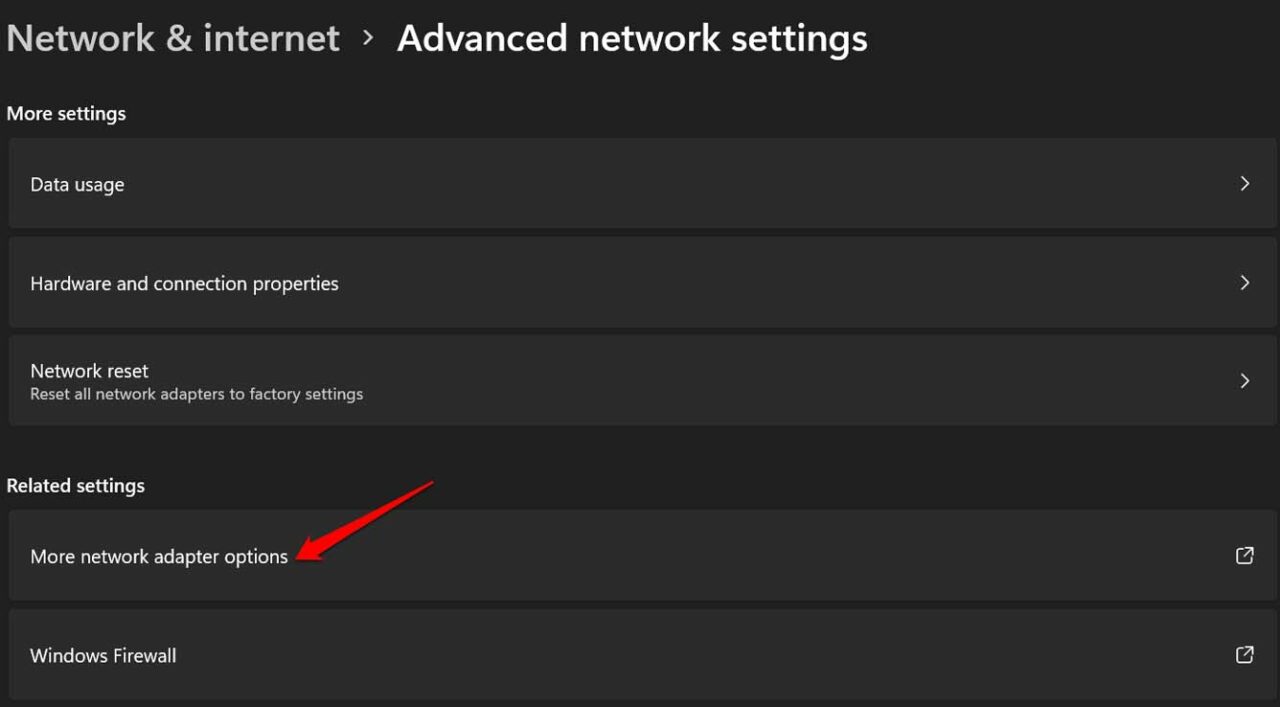
- Then click on Advanced Network Settings.

- Click on More Network Adapter Options.

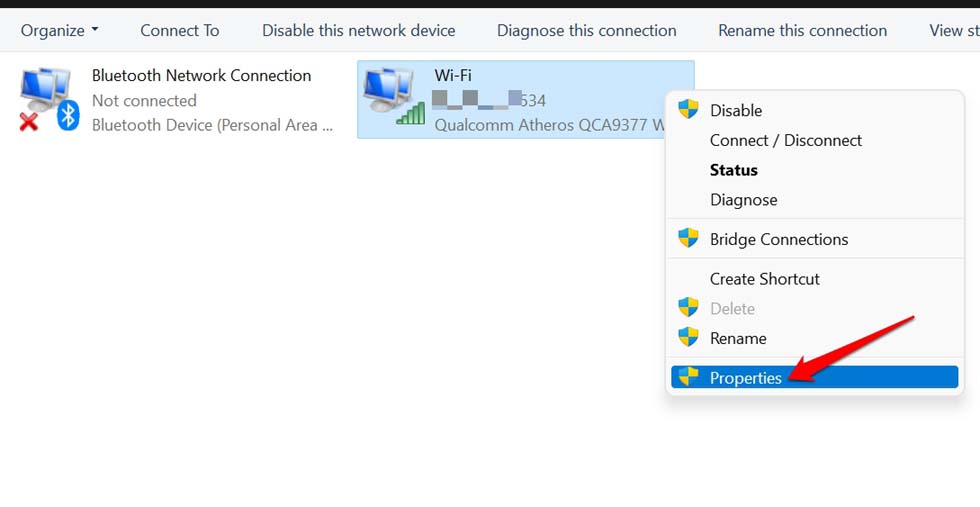
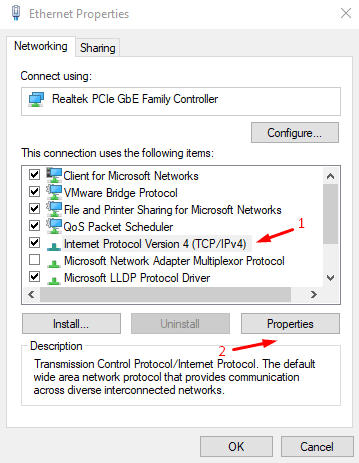
- Right-click on the WiFi network for which you want to change the DNS.
- Select Properties.

- Now, double-click on Internet Protocol Version 4.

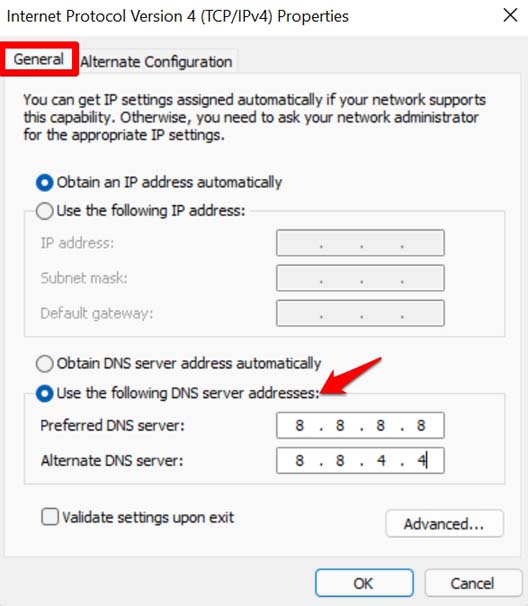
- Under the General tab, click on Use the Following DNS Server Addresses.
- In the Preferred DNS Server, enter 8.8.8.8
- Then in the Alternate DNS server, enter 8.8.4.4

- Finally, click on OK to confirm.
So, these are the troubleshooting methods you need to follow the fix the issue of WiFi disconnecting on Windows 11.
If you've any thoughts on How to Fix Windows 11 Keeps Disconnecting from WiFi?, then feel free to drop in below comment box. Also, please subscribe to our DigitBin YouTube channel for videos tutorials. Cheers!
