Have you experienced the Green Screen of Death in Windows 11? You are using the PC and suddenly a screen with several error messages and codes pops up with a green background. The computer then proceeds to crash and reboot. This guide explains the green screen of death in Windows 11, why it happens, and how to fix it.
A green screen of death signifies that you are running an insider build of Windows 11. This version of Windows consists of features yet to be released in the stable channel. When you use an unstable Windows build, bugs related to the system or other incompatible apps cause the green screen of death.
Reasons for Windows 11 Green Screen of Death
Apart from the buggy Windows 11 insider build, corrupt system files may cause the GSOD issue. If a Windows process abruptly terminates, you may encounter the green screen of death.
If there are compatibility issues between an app and the unstable version of Windows 11, that may crash the PC showing a green screen and a corresponding error code.
Problematic drivers that have not been updated may cause conflict with Windows OS. That may lead to the green screen of death and an eventual crash.
Tips to Fix Windows Green Screen of Death
Interestingly, the Blue Screen of Death and Green Screen of Death share the same error codes. The only difference between them is the version of Windows OS.
The users on the stable Windows channel encounter the BSOD while the Insider build users face the GSOD. This problem can be mitigated by following a few troubleshooting tips mentioned in the guide.
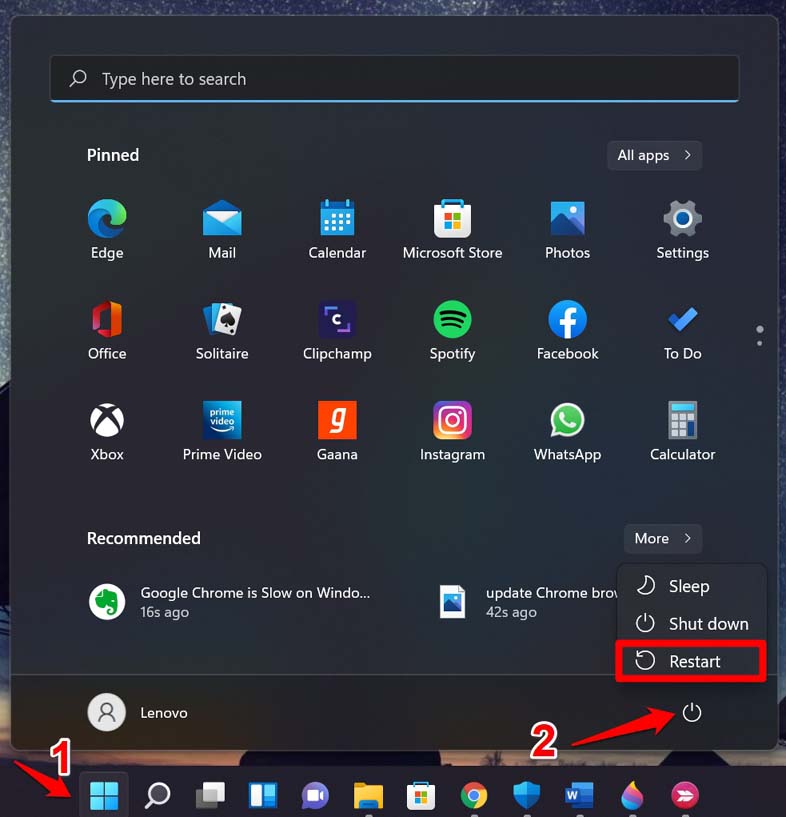
1. Restart the Computer
The green screen of death usually causes your PC to reboot automatically. In any case, if the computer doesn’t reboot, you can manually turn it on using the power switch of the CPU/laptop.
2. Disconnect External Hardware from the PC
Remove the external hardware connected to your PC in the event of a green screen of death. If the device driver is not installed properly, it may cause the system to crash. First, disconnect the external hardware and reconnect them one by one.
After reconnecting each device check if the green screen of death occurs. If you notice GSOD occurring after you connect a specific external device, remove it immediately. Also, restart the PC and update the system version to a new build.
3. Install the Latest Windows 11 Update
In most of the green screen of death instances, the culprit is usually the Windows Insider build that may consist of one or several bugs. Watch out for a new Windows update rolled out by Microsoft that can patch the issues on the predecessor build.
- Press Windows + I to go to Settings.
- Click on Windows Update.
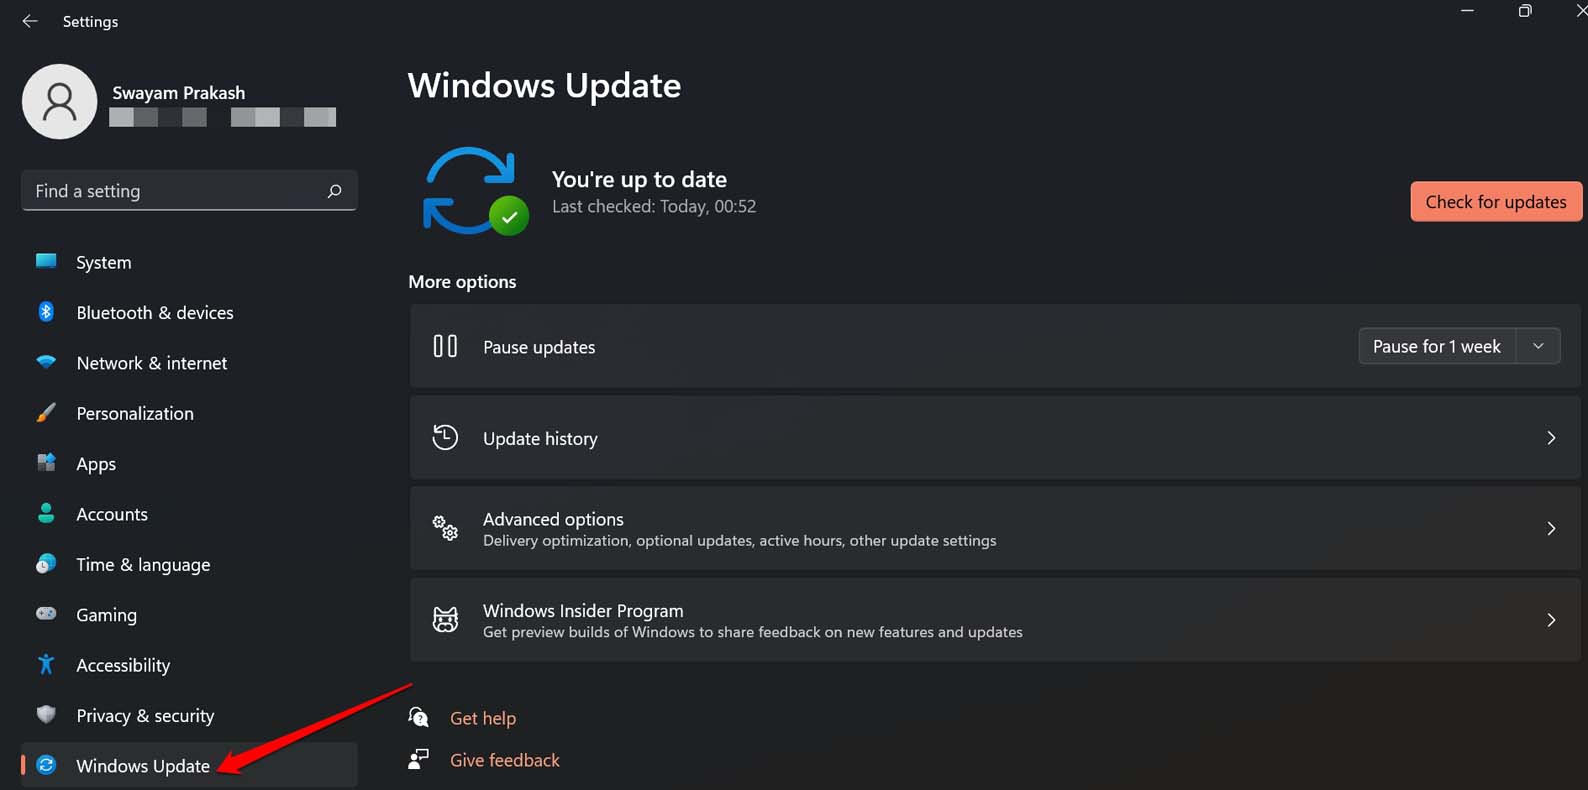

- Press Check for Updates to search for new Windows builds.
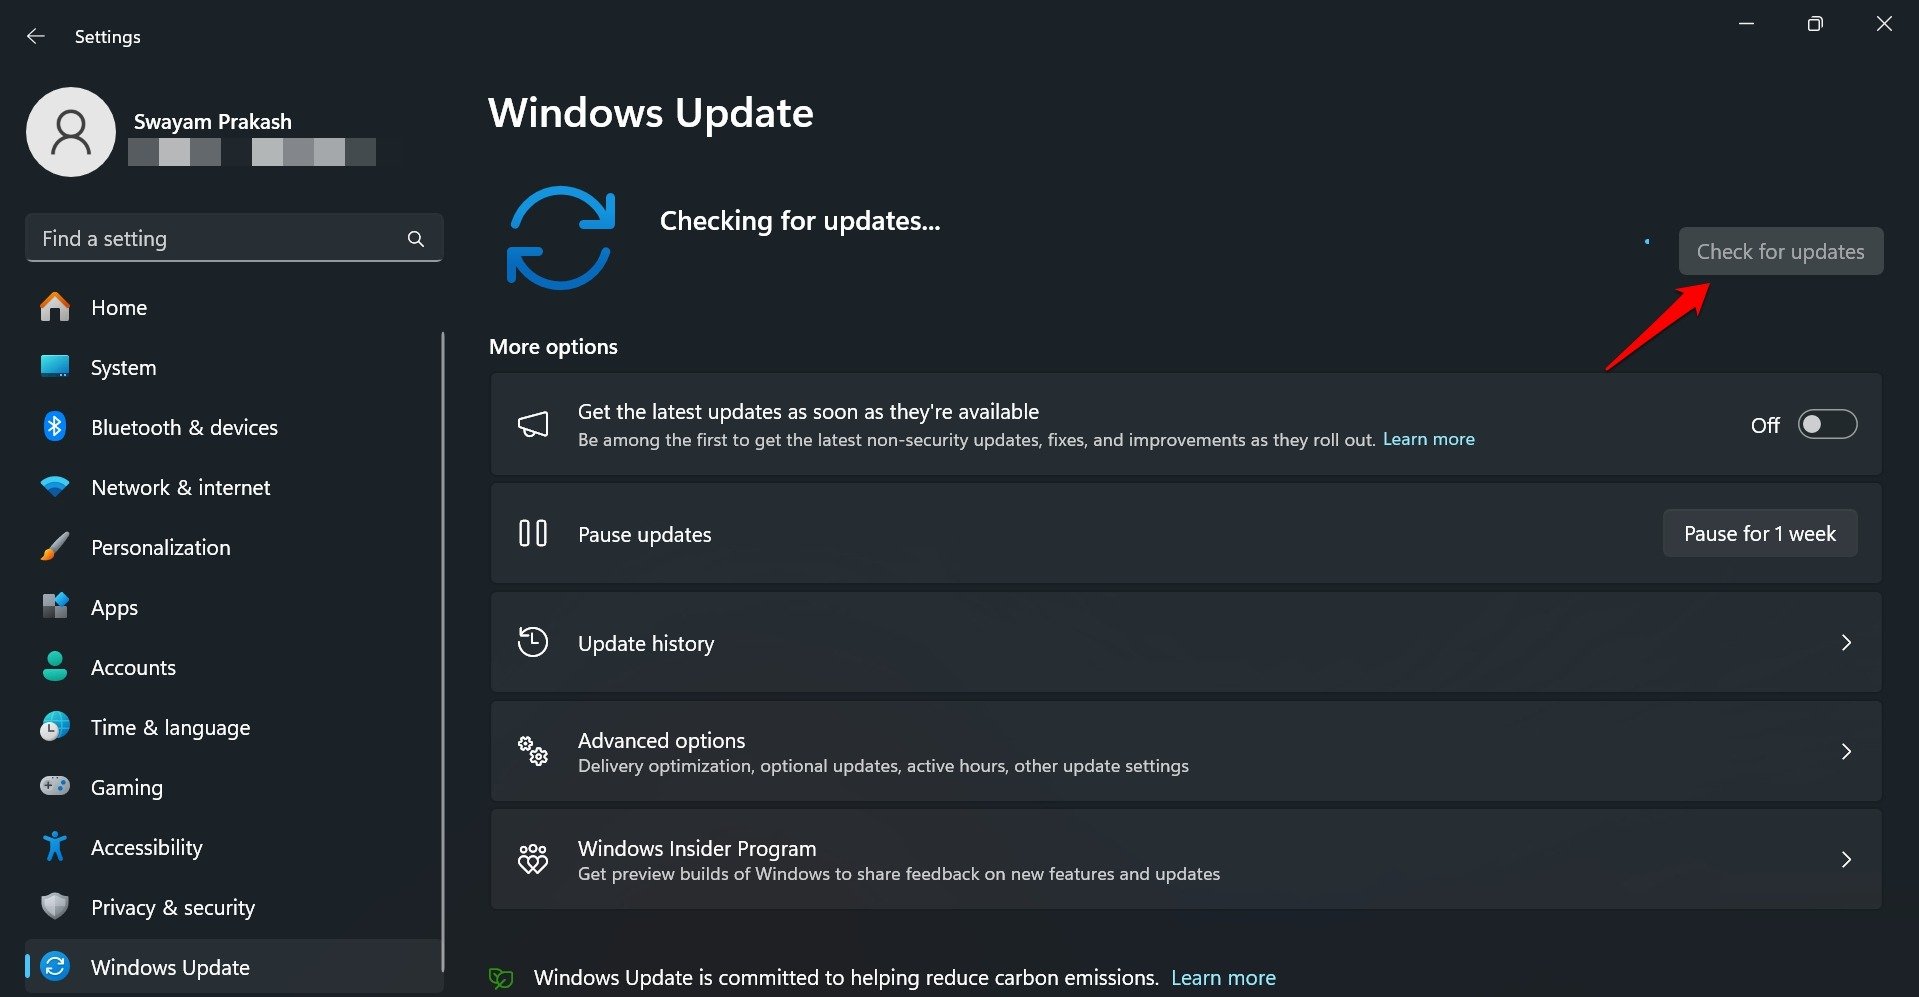

- Restart the PC to install the downloaded update.

4. Uninstall the Current Software Version
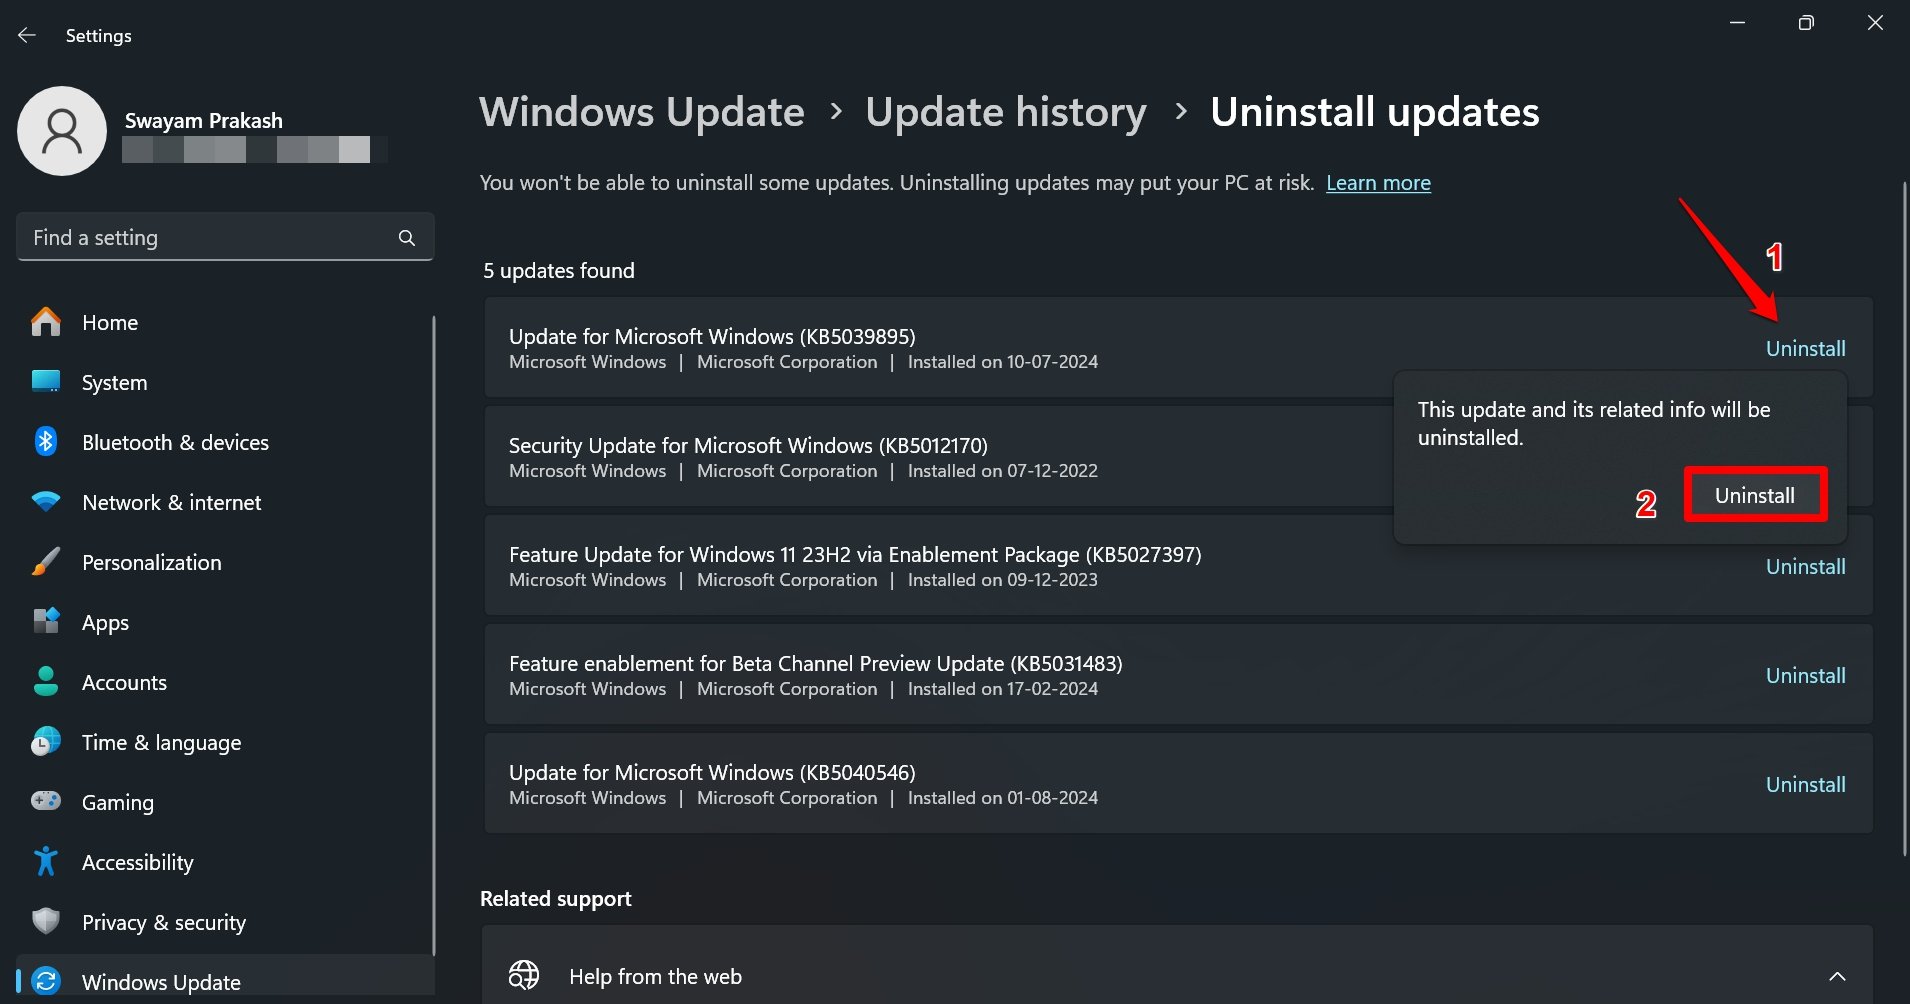
If you suspect the currently installed build of Windows 11 is causing the frequent green screen for death on your PC, uninstall it. It will take your computer back to the previous build of Windows 11 software which was perhaps working fine and did not trigger the GSOD.
- Press Windows + I to access the settings.
- Click on Windows Update.
- Access the Update History.
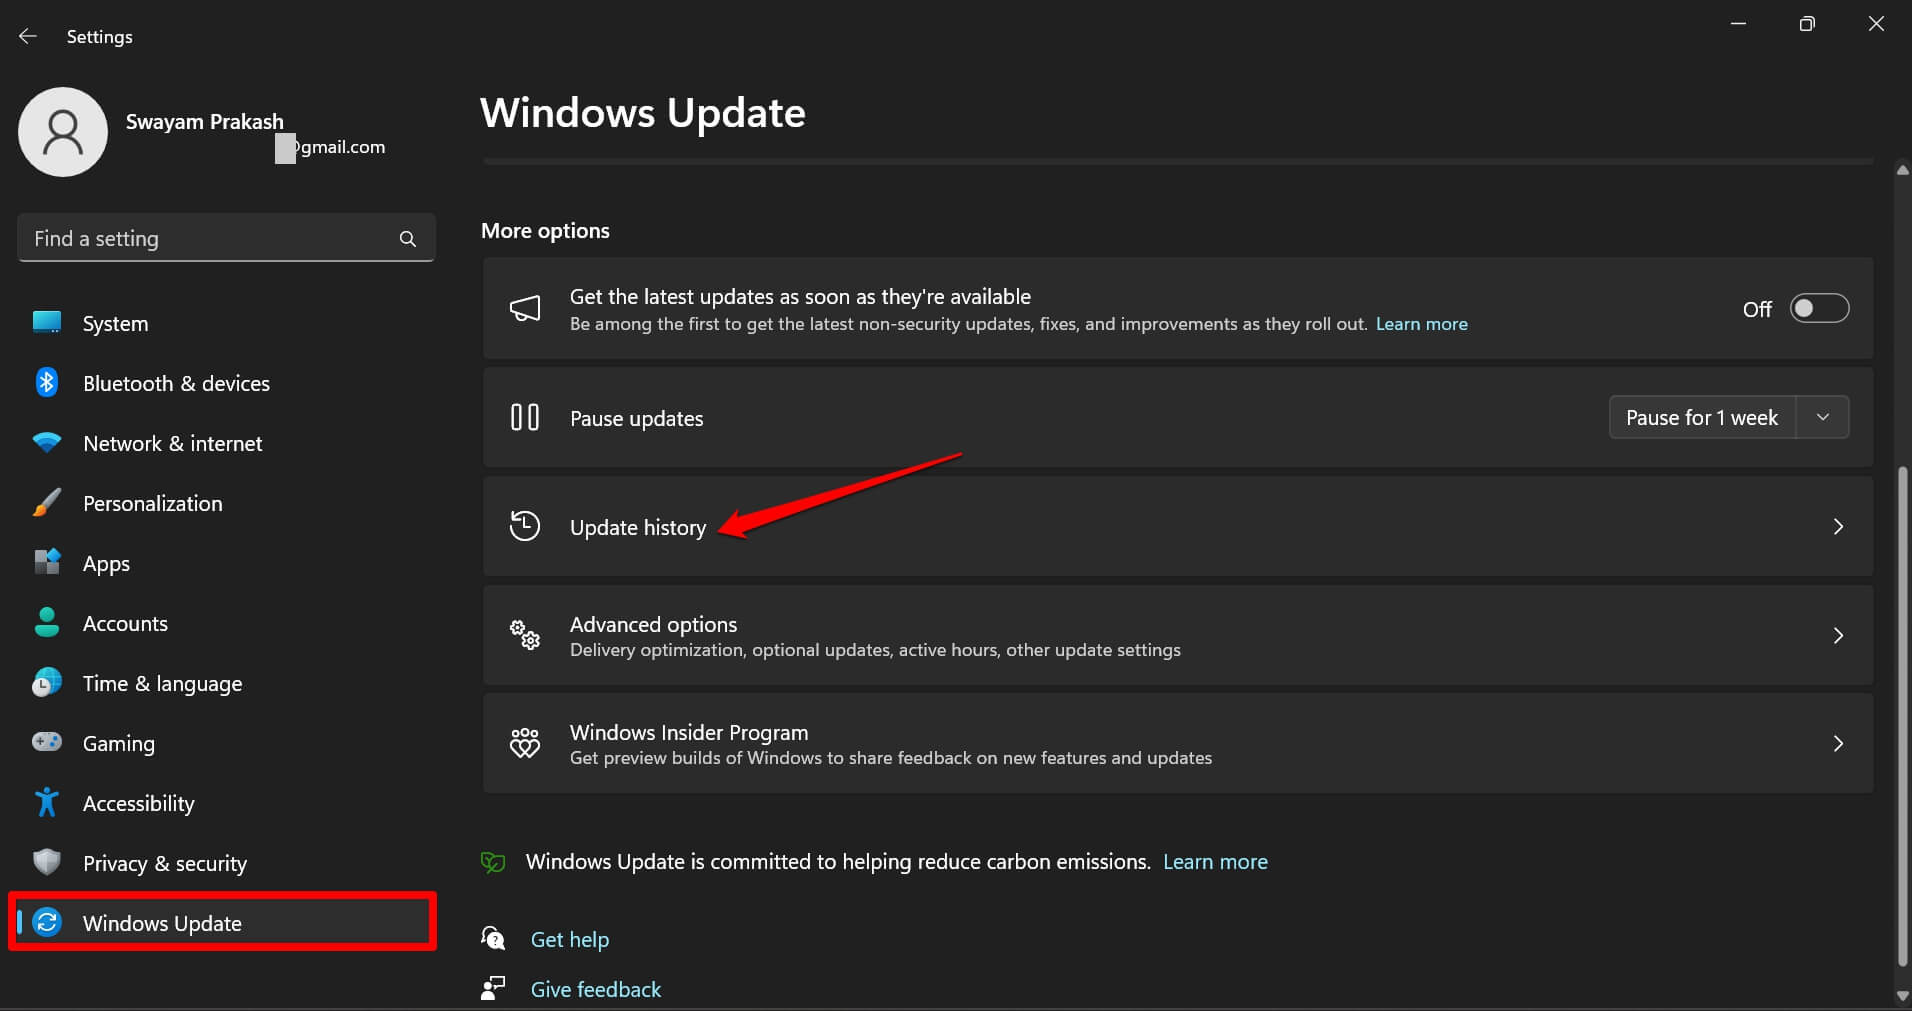

- Go to Uninstall Updates.
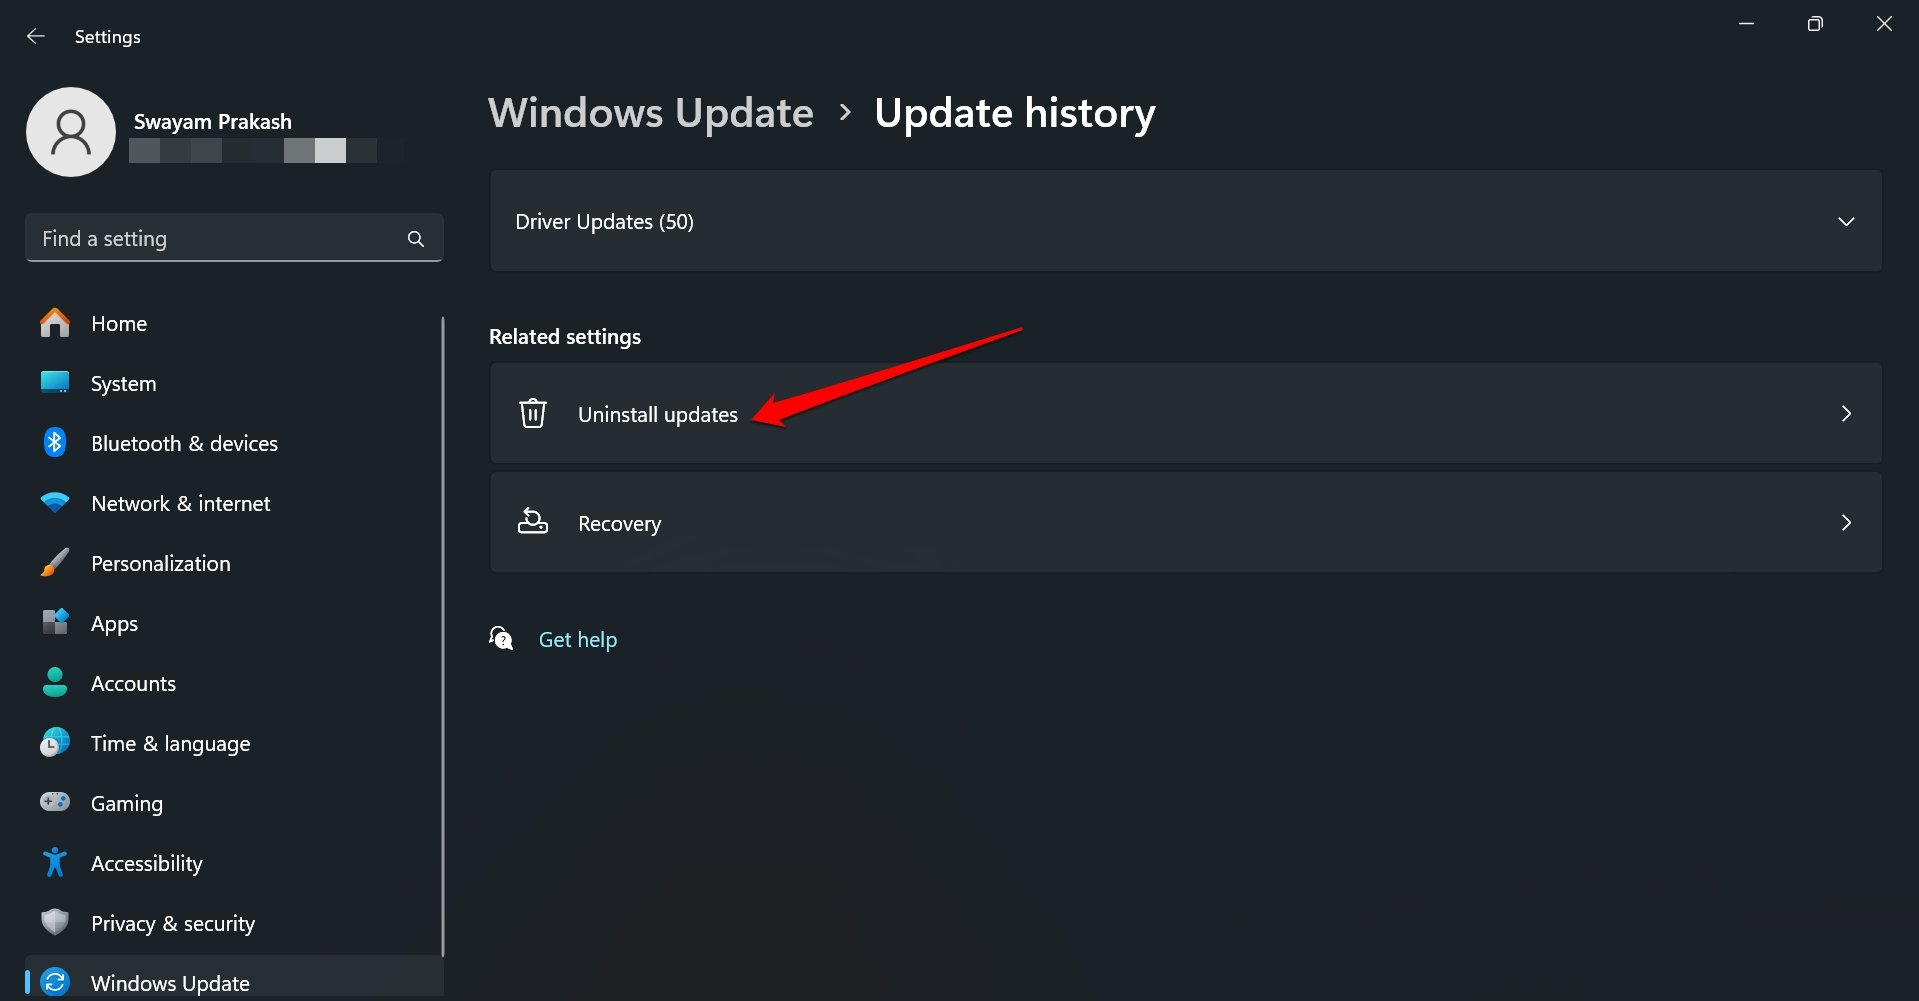

- Check the recently installed software update and press Uninstall to remove the software version you think is responsible for GSOD.
- Again press Uninstall on the confirmation prompt to proceed.

5. Step Down from Receiving Insider Build Updates
By now you must have understood that the Windows Insider build could be the primary reason for the green screen of death. You can opt out of receiving future updates on the Insider channel and switch to stable updates. However, it is not that straightforward.
Even though you step down as an Insider member, Microsoft will continue to send Insider build updates on the PC. Until a major version update is released for the stable channel (to which you switched from Insider view) you have no choice but to install the Windows 11 Insider builds.
To stop receiving Insider builds,
- Open the PC settings by pressing Windows + I hotkeys.
- Click Windows Update.
- Access Windows Insider Program.
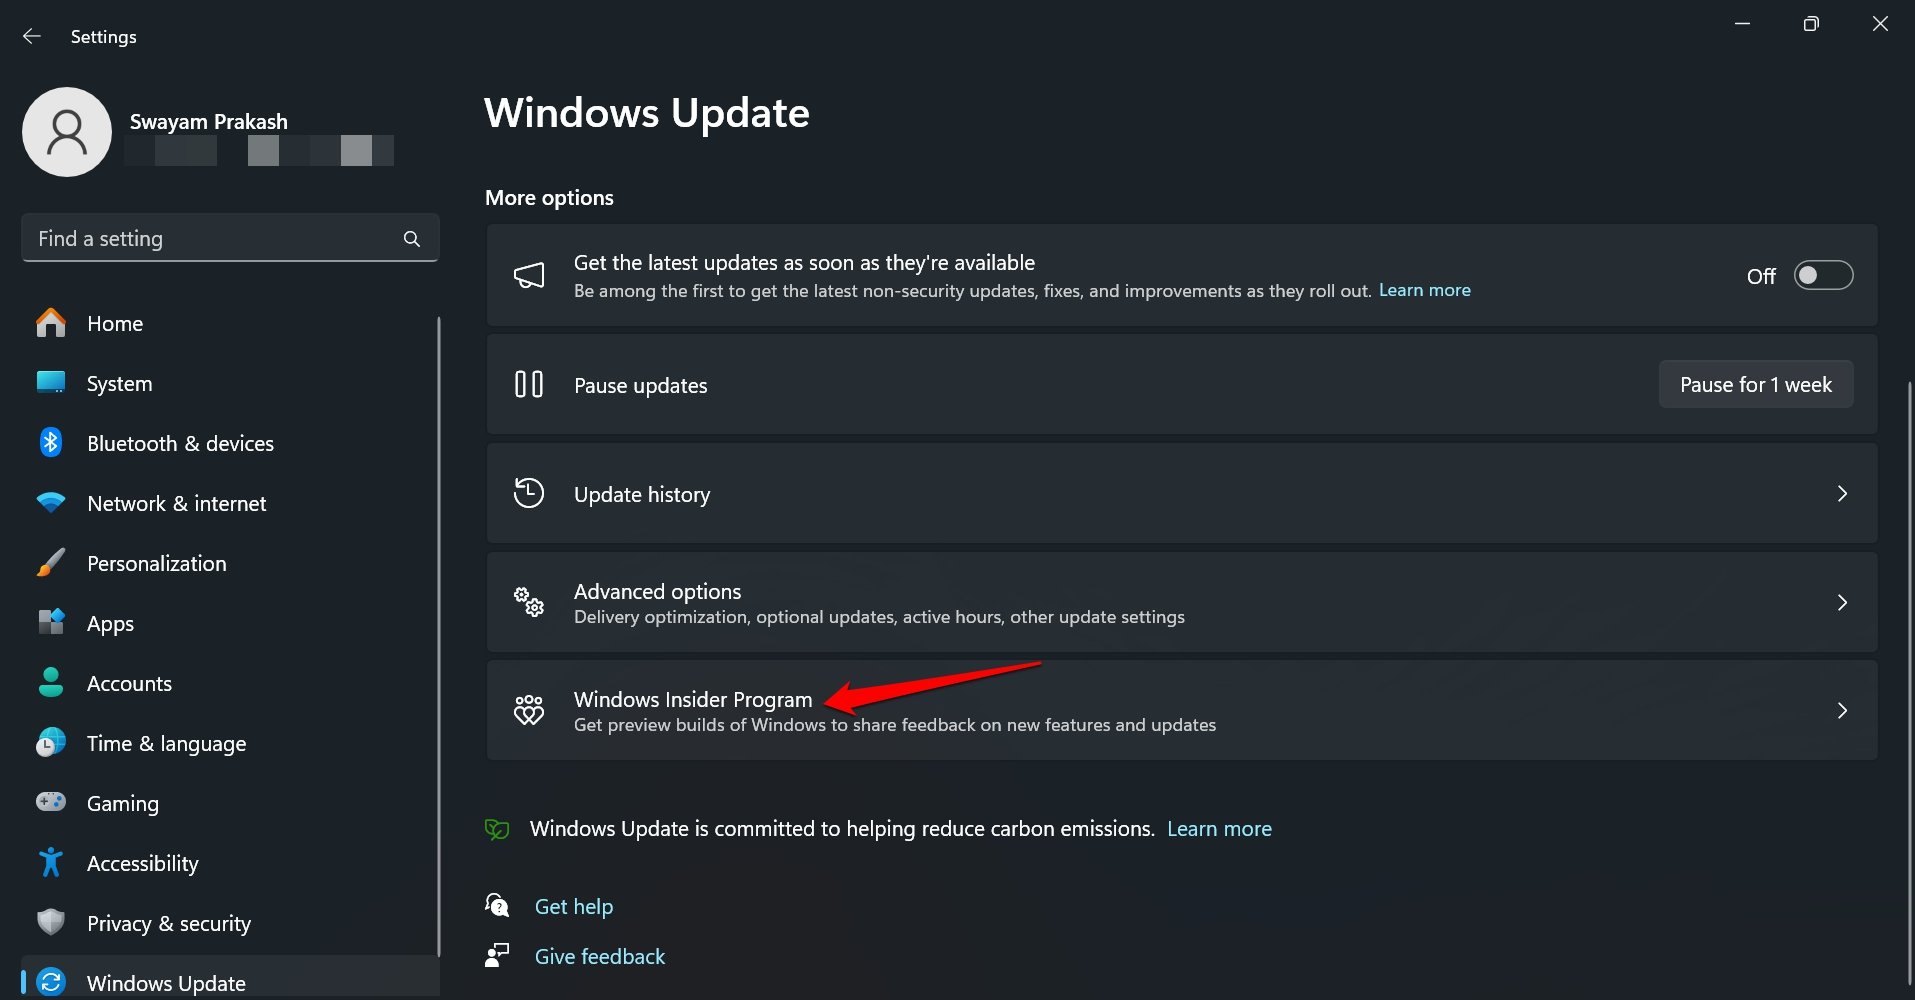

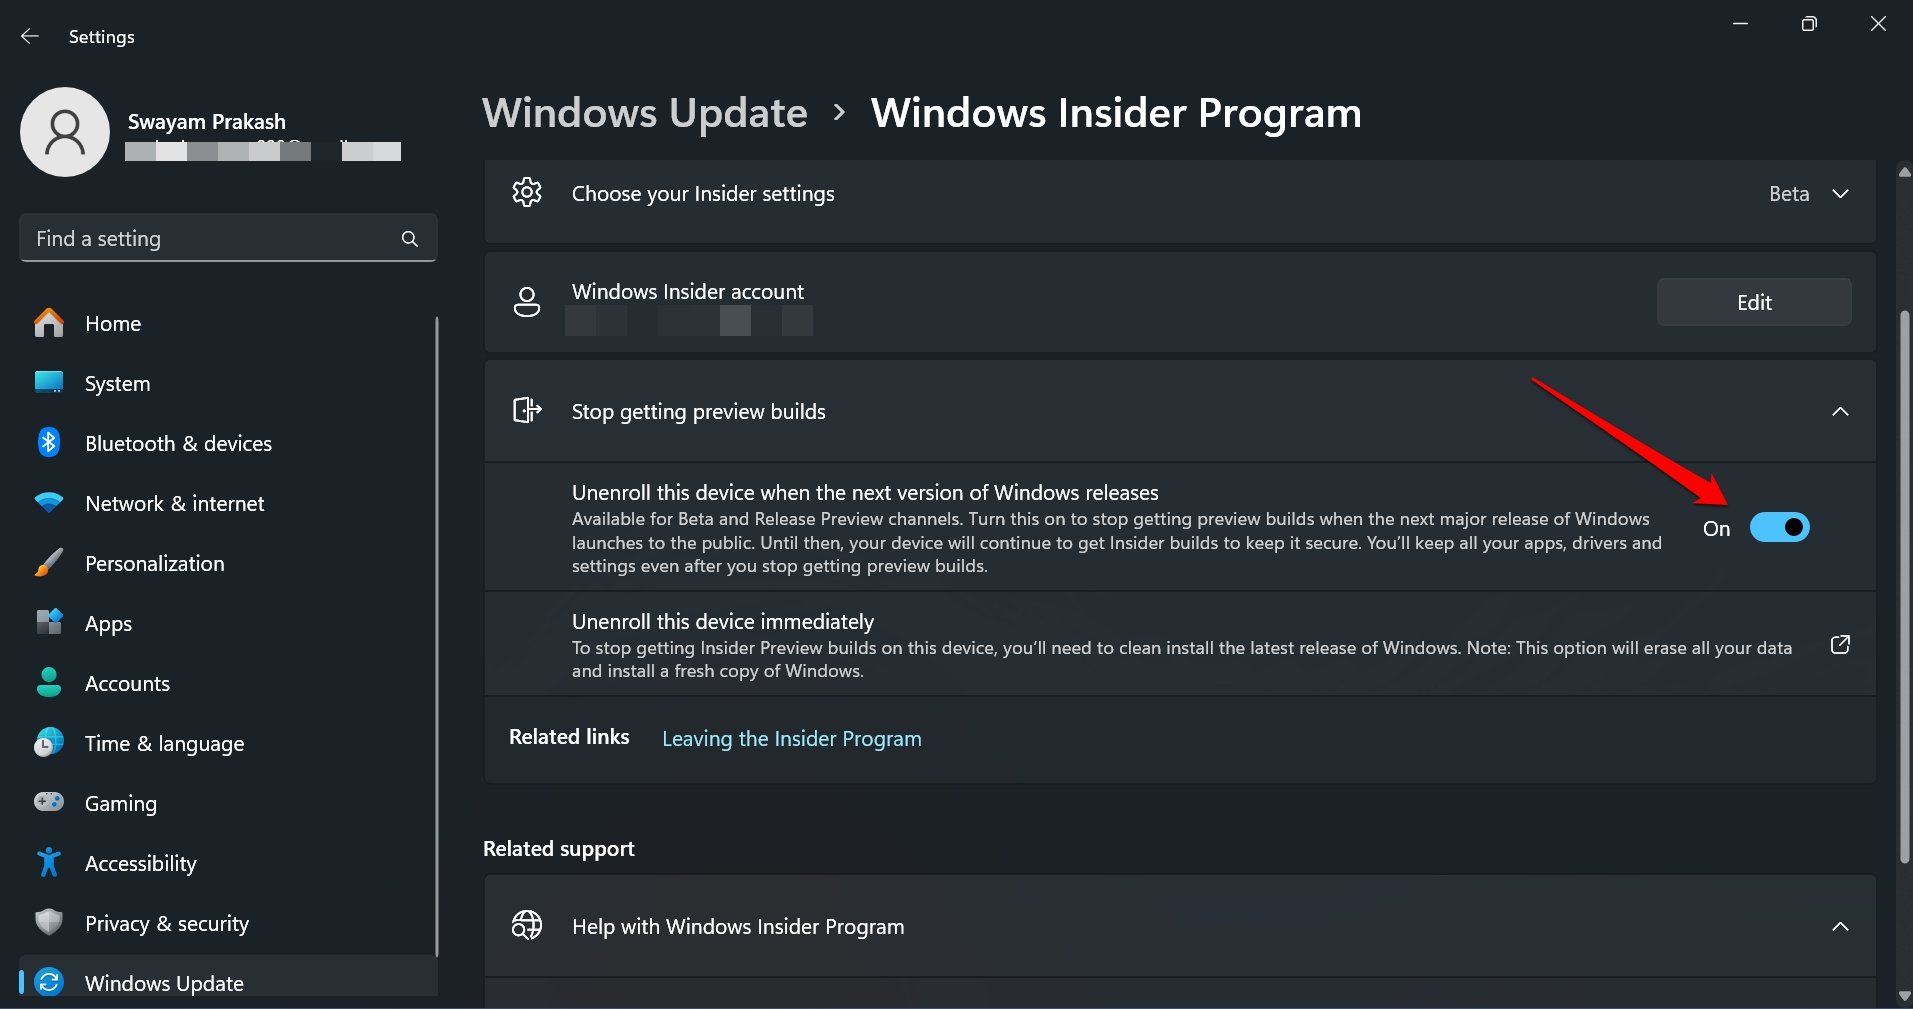
- Expand the tab Stop Getting Preview Builds.
- Press the toggle beside “Unenroll this device when the next version of Windows releases“.

6. Update the PC Drivers
Access the Device Manager in Windows 11 and check if a specific device driver needs an update.
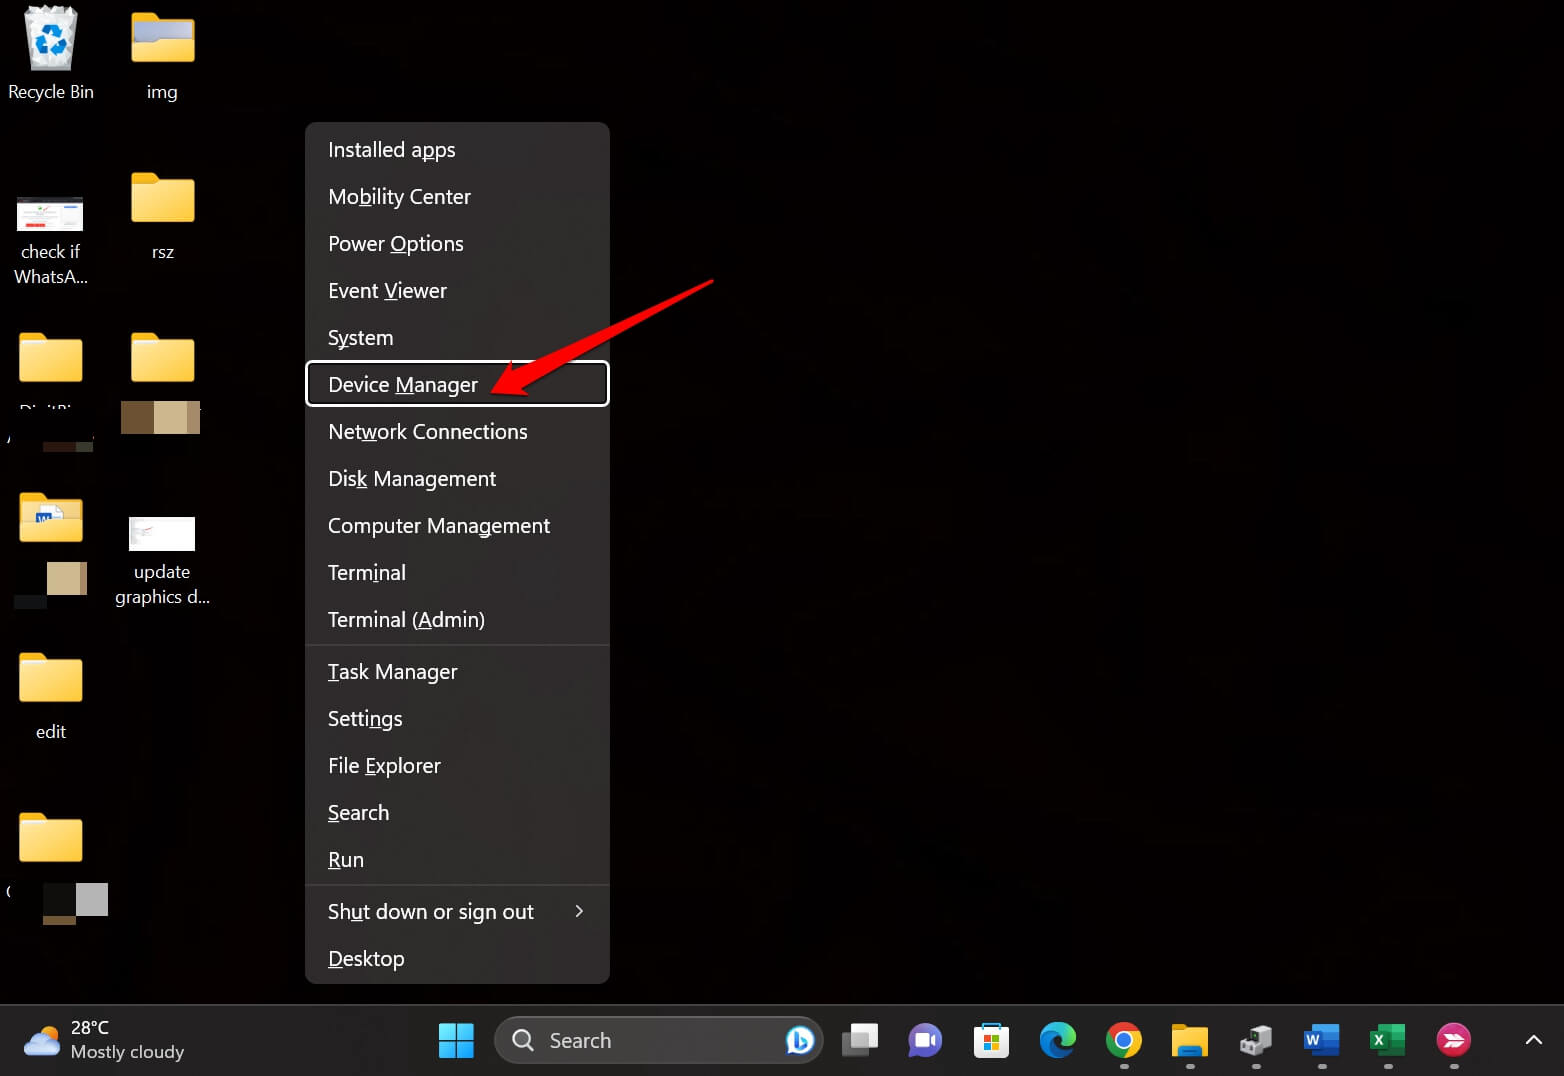
- Press Windows + X to bring up the power user menu.
- Select Device Manager.

- Scroll to the primary device drivers and click the chevron to expand the sub-menu.
- Right-click on the corresponding devices and select Update Driver.


- You may search for drivers automatically or manually install drivers by downloading them from the third-party vendor.
If a device is using the latest driver, you don’t need to reinstall it. While installing the Windows update, the system also installs important device drivers.
With problematic device drivers updated, you should not encounter the Green screen of Death while using Windows 11.
7. Remove Recently Installed Apps
Any recently installed apps may cause conflict with the Windows Insider build running on your PC. To fix that, completely uninstall the apps from the Control Panel. Observe if doing so prevents the green screen of death from occurring randomly.
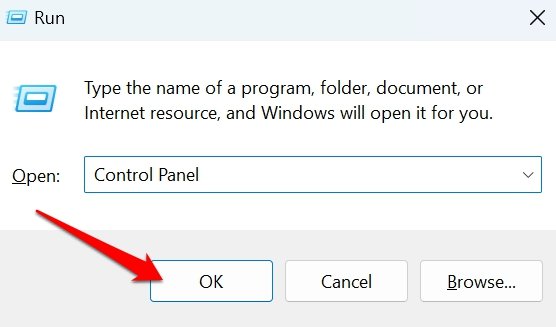
- Press Windows + R to launch the Run box.
- Type Control Panel and click OK.

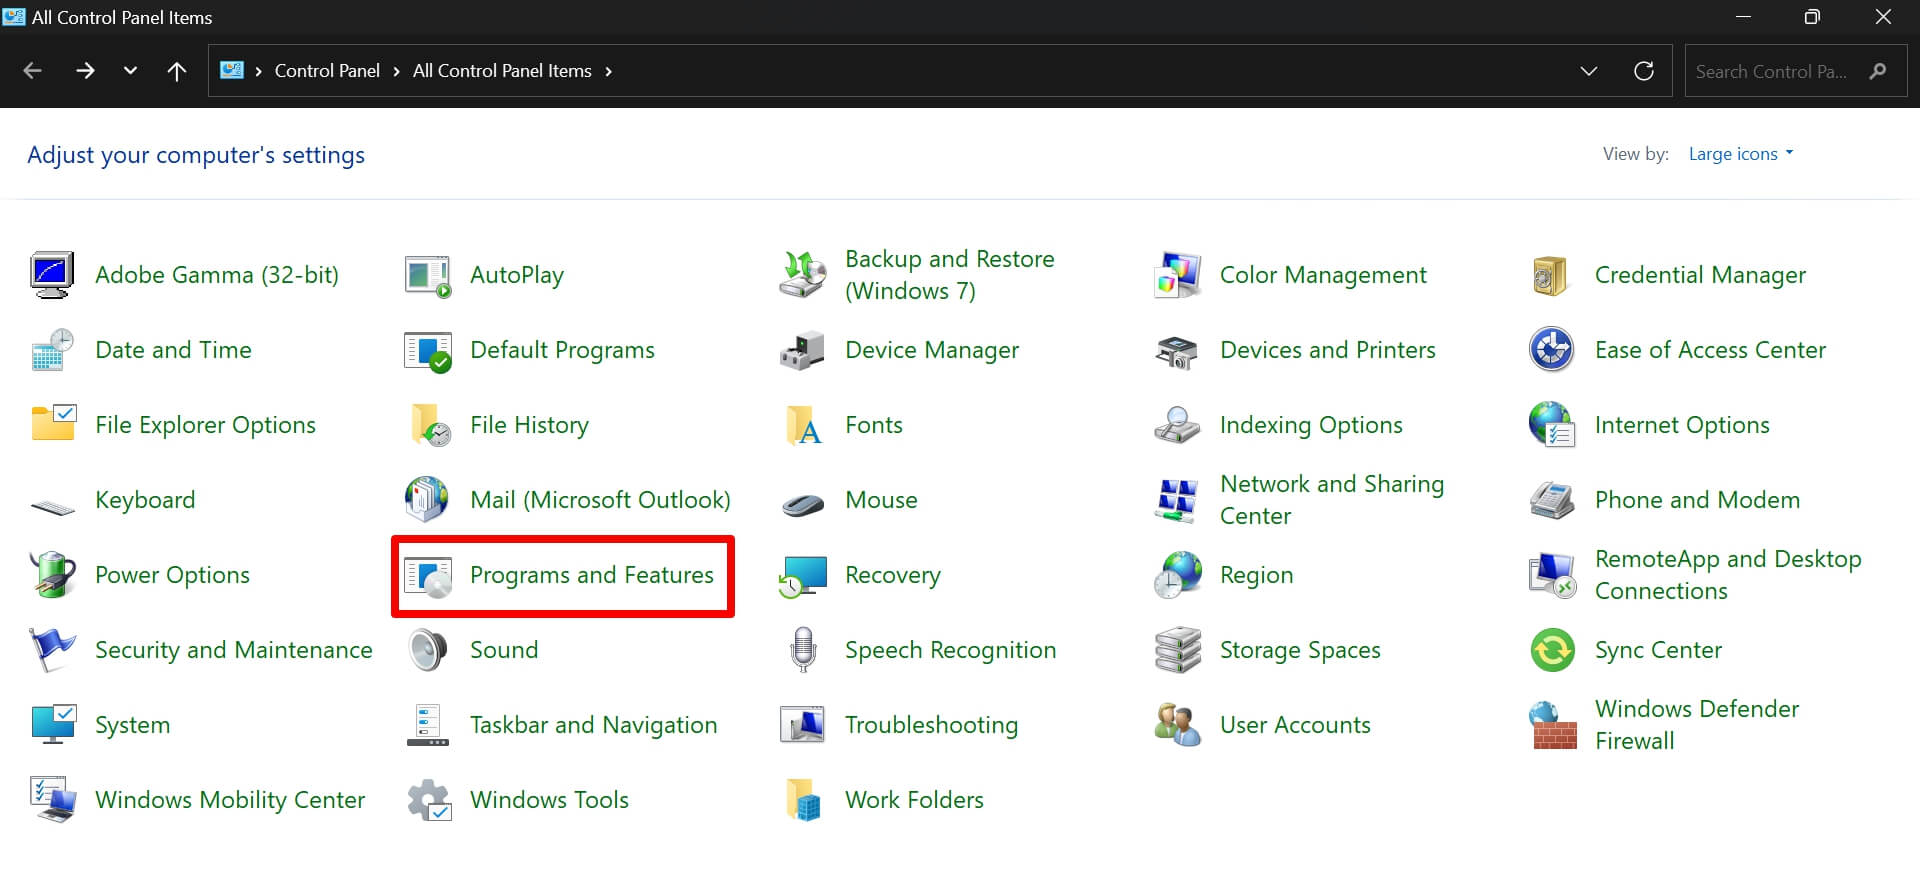
- On the Control panel home page, go to Programs and Features.

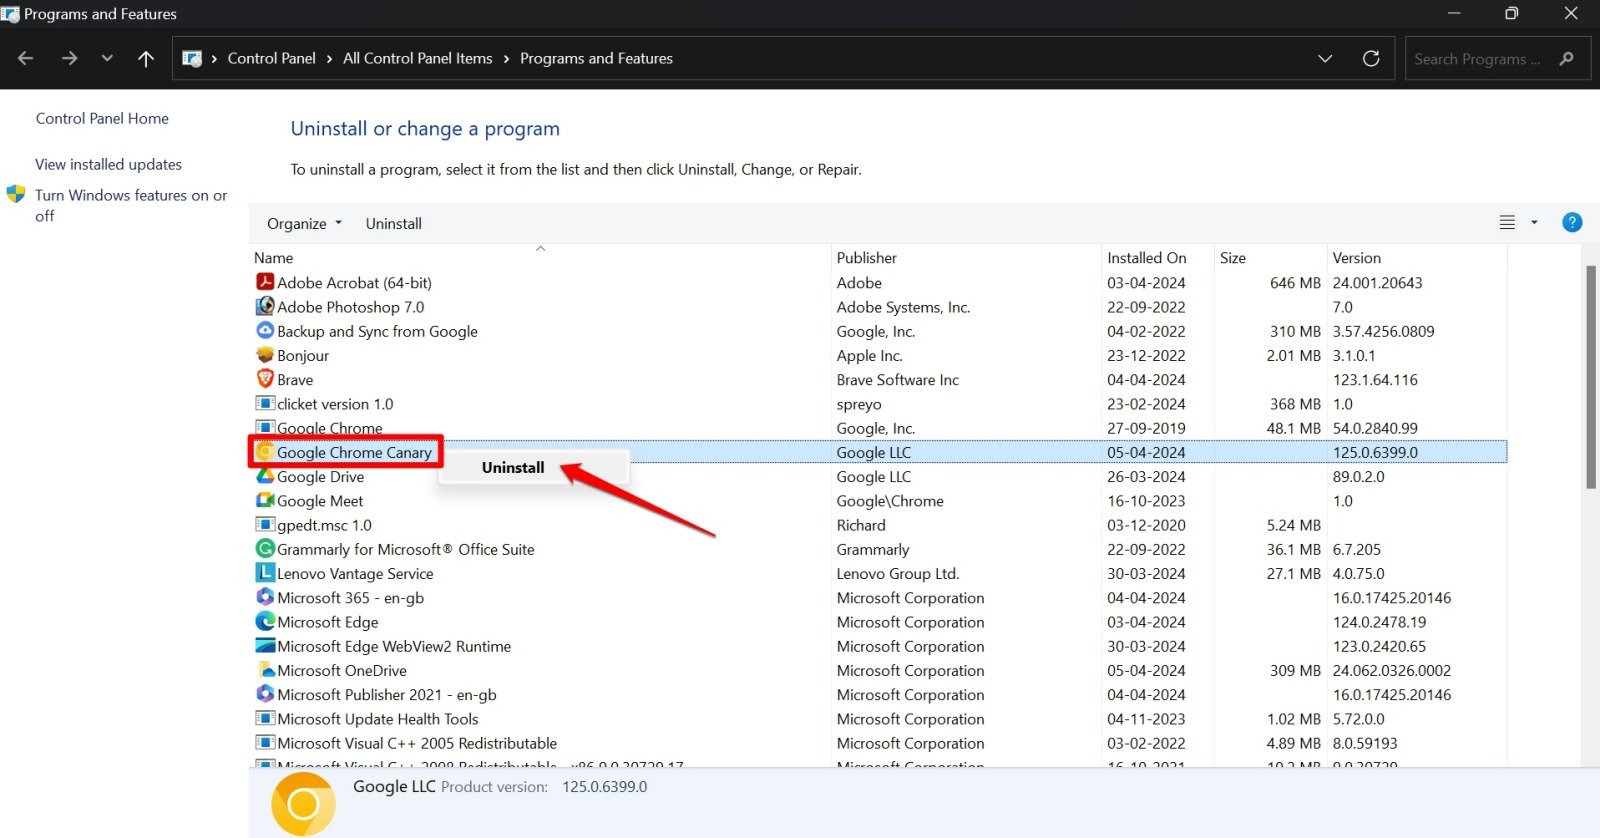
- Right-click on the apps you had installed recently and select Uninstall.

8. Run SFC Scan to Fix Corrupt System Files
Remove corrupt system files from your PC by running the SFC command through the Command Prompt. With the replacement of corrupt system files the GSOD problem should be resolved.
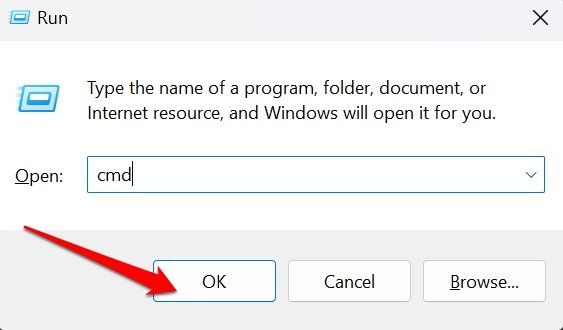
- Press the Windows + R hotkeys to launch the run box.
- Type cmd and press Enter.

- On the Command Prompt, type the following command
sfc/scannow
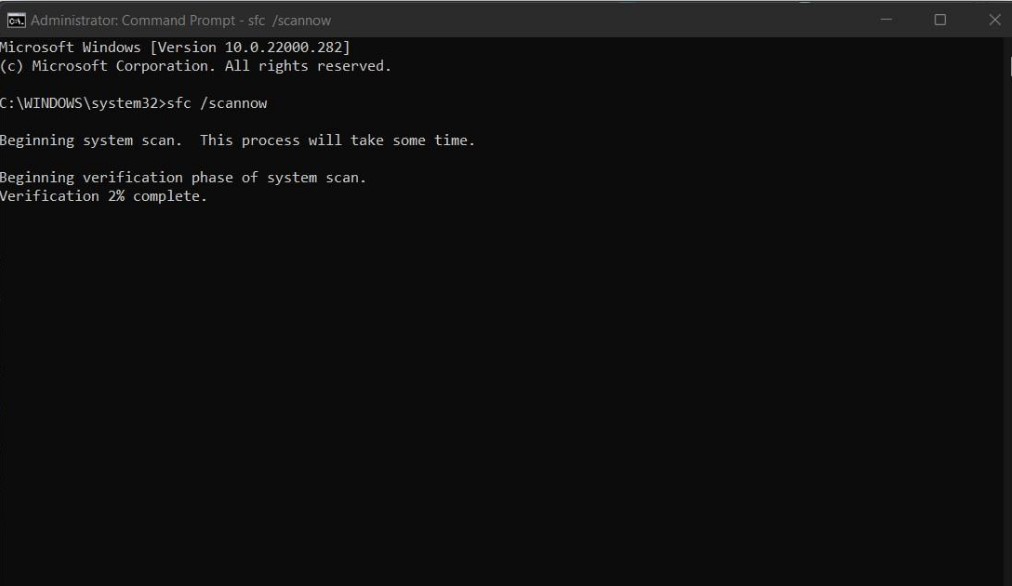

- Press the Enter key.
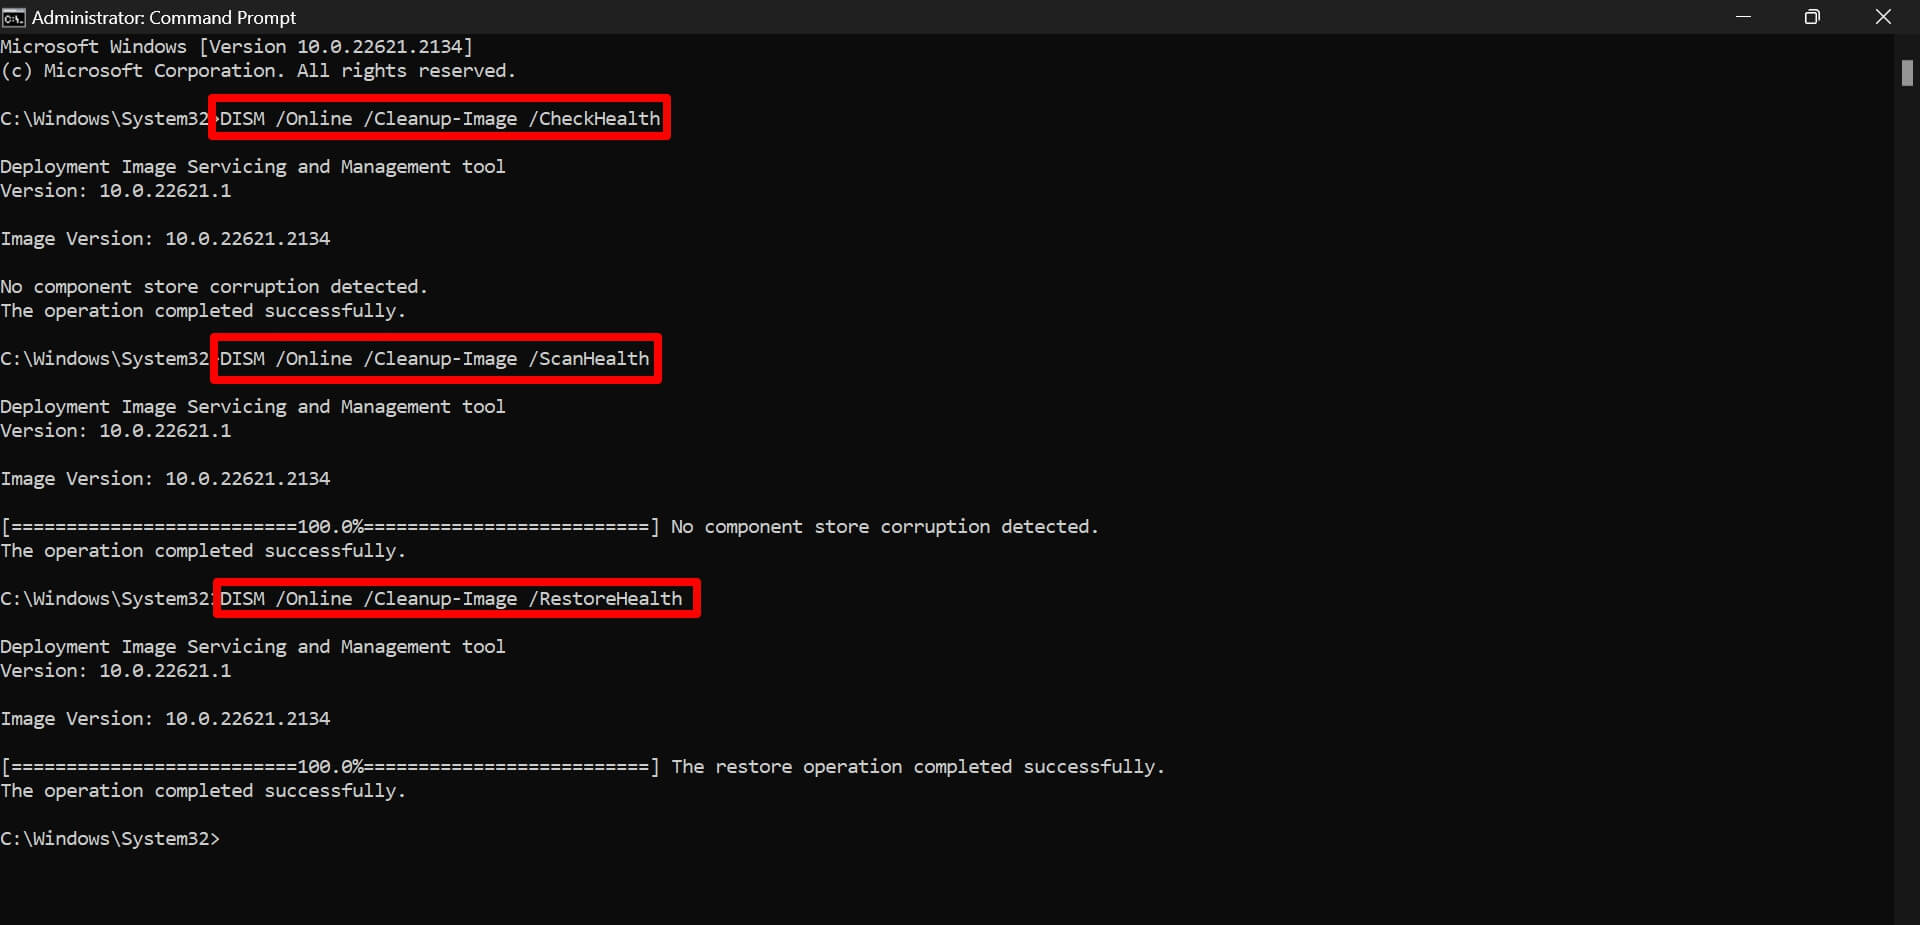
- You may also run the DISM scan by executing these commands in the same order as mentioned.
DISM.exe /Online /Cleanup-image /CheckHealth

DISM.exe /Online /Cleanup-image /ScanHealth

DISM.exe /Online /Cleanup-image /RestoreHealth

9. Check for Malware
Often malware on the Windows system can act as a catalyst to the already buggy Windows Insider build leading to system crashes, GSOD, and several other errors. Run a malware scan to check for possible malware activity on your PC.
- Press Windows + S to launch the search.
- Type Virus and Threat Protection. Click Open.


- Click Scan Options.
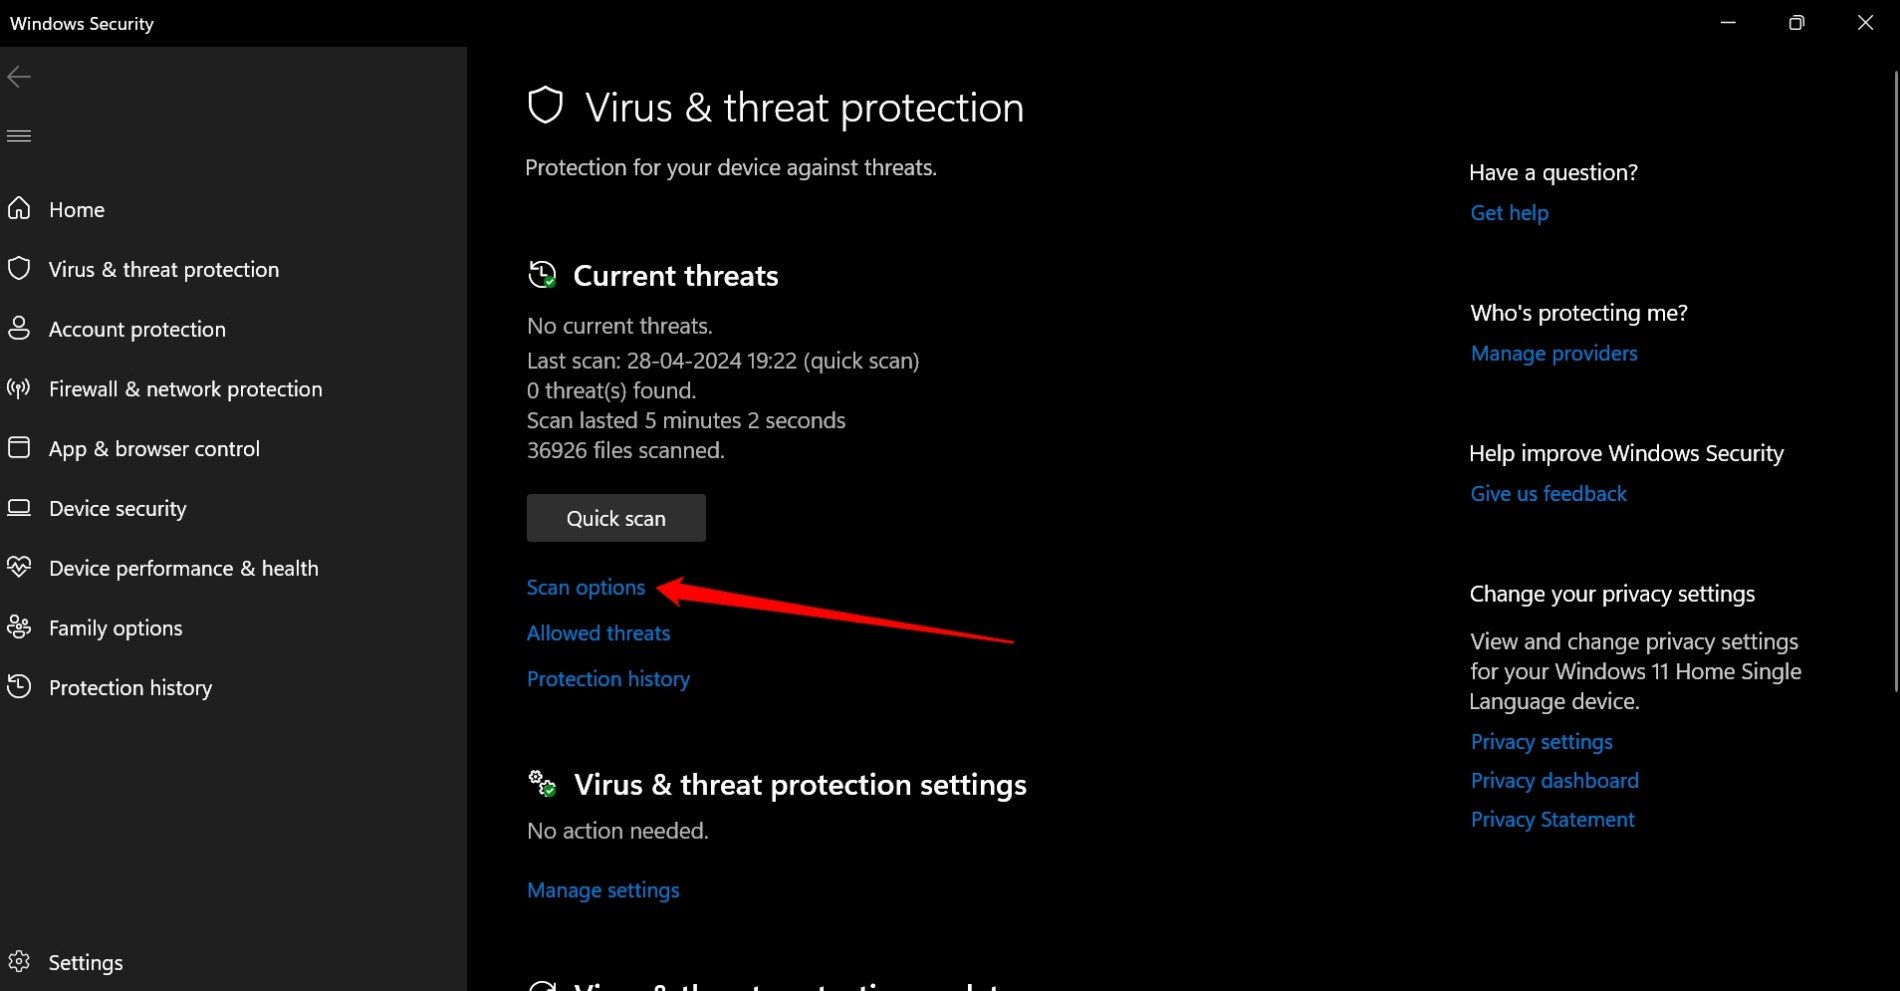

- Select Full Scan and press Scan Now.
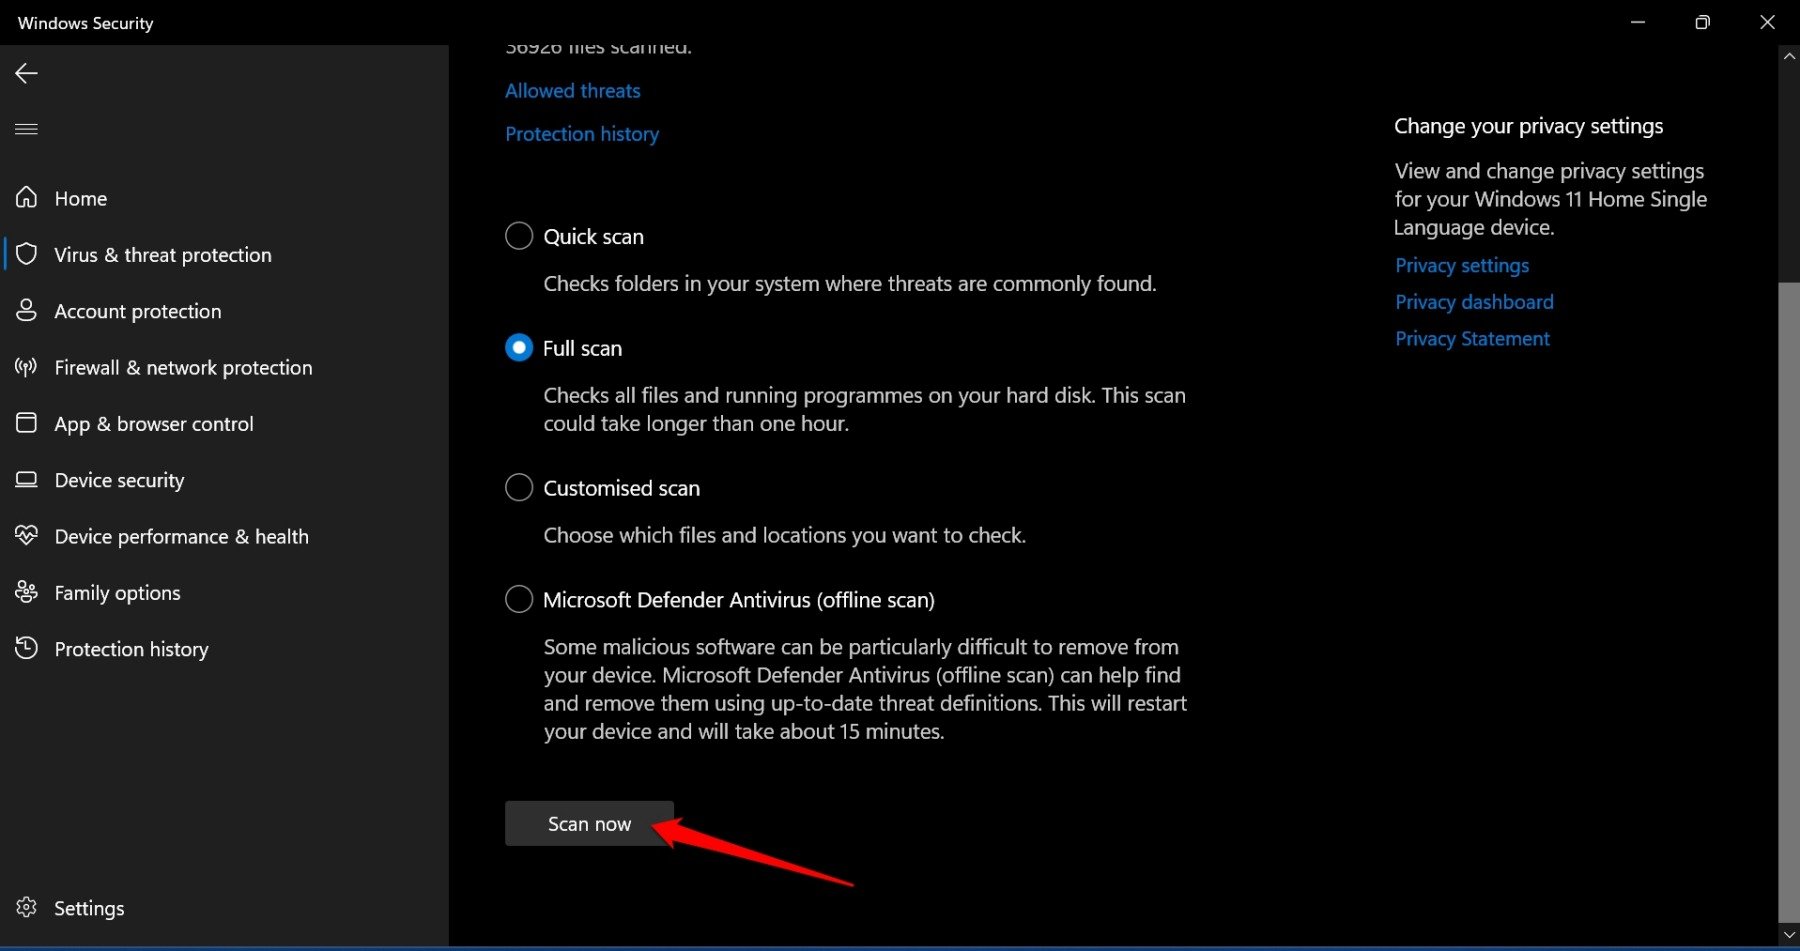

Upon finding any malware, follow the instructions from the Windows Defender program and remove it from your PC.
10. Reset the Windows PC
Completely reset Windows 11 if other fixes cannot stop the GSOD from occurring repeatedly. Before the factory reset, backup your computer data and personal files to the cloud or external storage devices.
To reset your Windows PC,
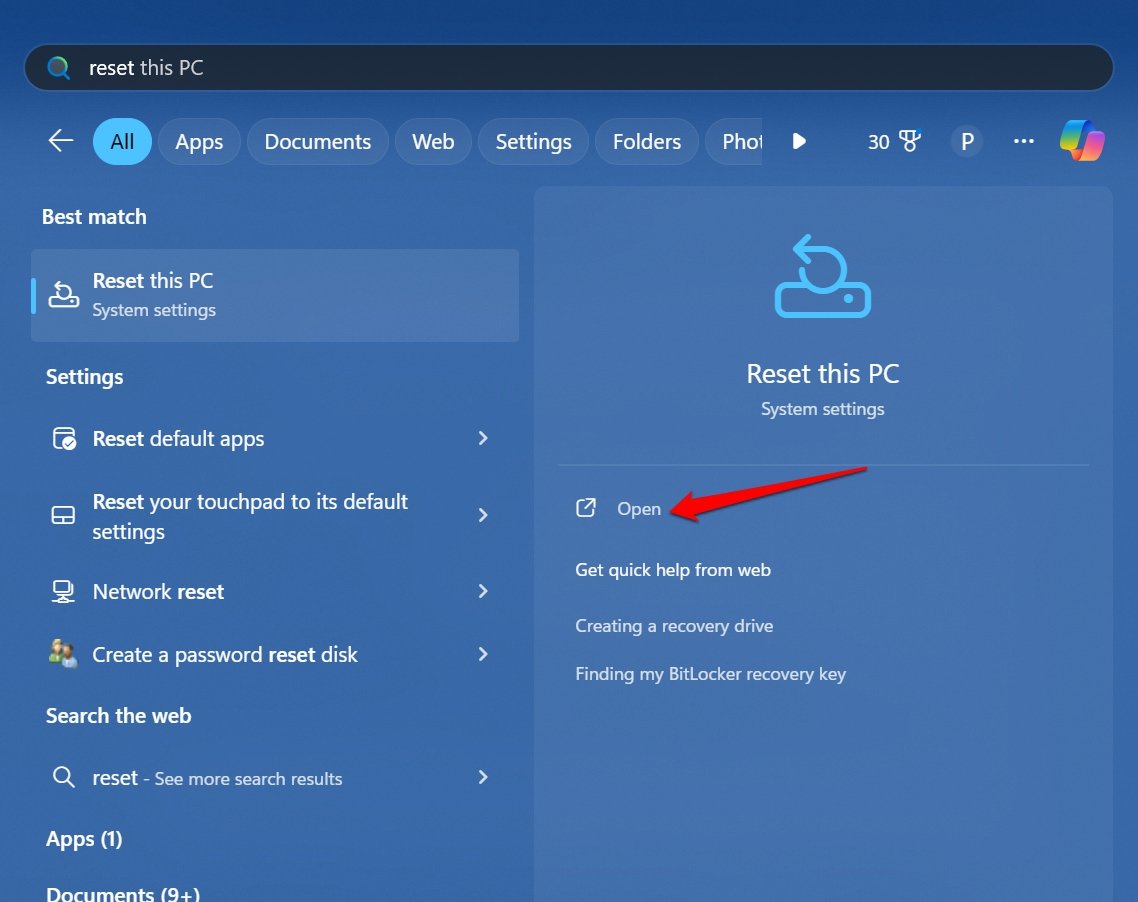
- Press the Windows key to launch the search panel.
- Type Reset this PC and click Open when the search result appears.

- Go to Recovery Options and click Reset PC.
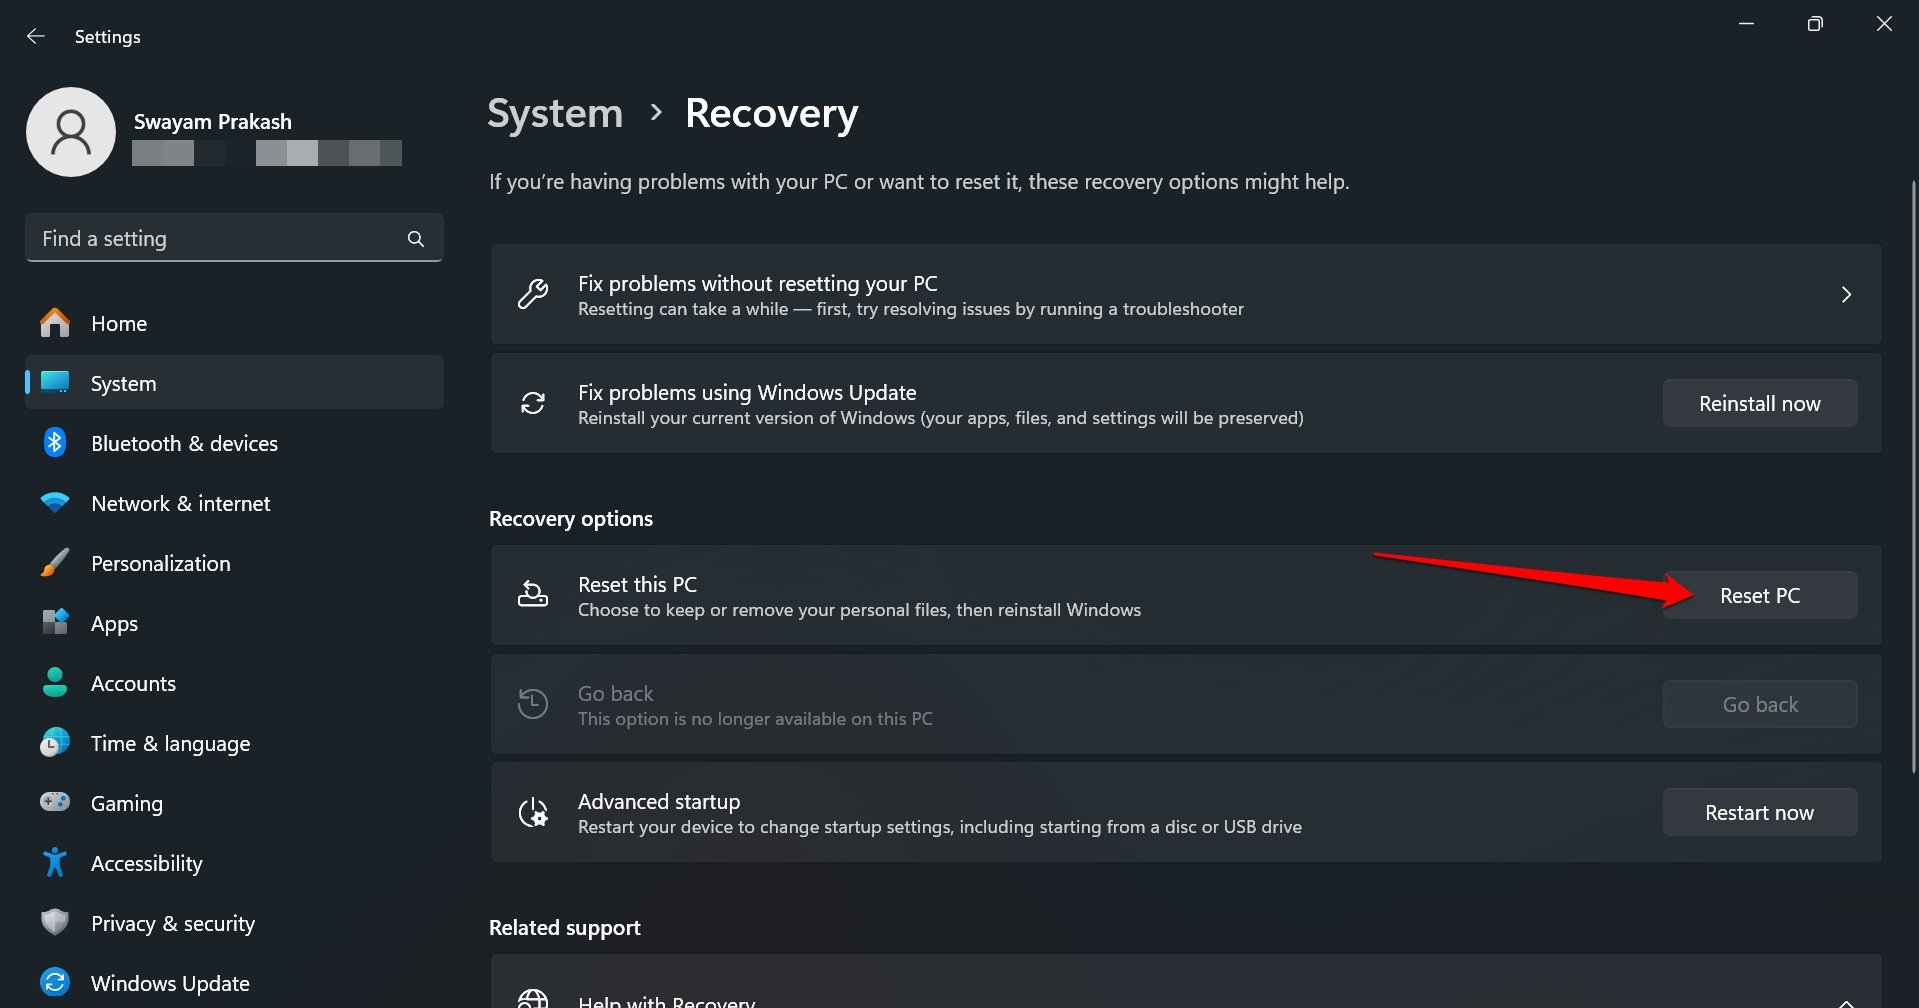

- Follow the instructions on the screen to proceed with the reset.
11. Perform a Clean Installation of Windows 11
Unenrollment from the Windows Insider program will continue to provide you with an Insider build until a major stable build is released for the public. You cannot step down from the Insider program immediately unless you reinstall Windows 11 through a clean install.
After the clean installation of Windows 11 on your PC, you can start afresh with a stable Windows build. Be mindful that it will erase all the data on your PC. Backup your data to a secure platform and perform a clean installation of Windows 11 by following the steps mentioned here.
Bottom Line
Regularly installing Windows updates, upgrading the drivers, or switching to a stable Windows build through clean installation is a sure way to evade the system crash and green screen of death. Let me know in the comments which troubleshooting method worked for you.
If you've any thoughts on How to Fix Windows 11 Green Screen of Death, then feel free to drop in below comment box. Also, please subscribe to our DigitBin YouTube channel for videos tutorials. Cheers!