Most modern PCs come with a built-in Camera. You can grant Camera access to certain apps like video calling apps. But many times, the Windows 11 Web Camera may not work; the underlying issues may be many, from faulty setup to denied access.
Apart from Camera’s usage in professional meetings, they are also increasingly used by users who wish to become a part of virtual family functions, webinars, and the like. If you face issues with your Windows 11 Webcam, then the guide below will help you fix any Windows 11 Problems with the Camera.
Top Ways to Fix Windows 11 Web Camera Not Working
Here are the Best Methods to Fix Windows 11 Web Camera Not Working Issues for PC.
Fix 1. Make Sure the Camera is Connected
If you are using an external camera, make sure the external camera device is connected to Windows 11. To so so;
- Open the Settings menu on your PC.
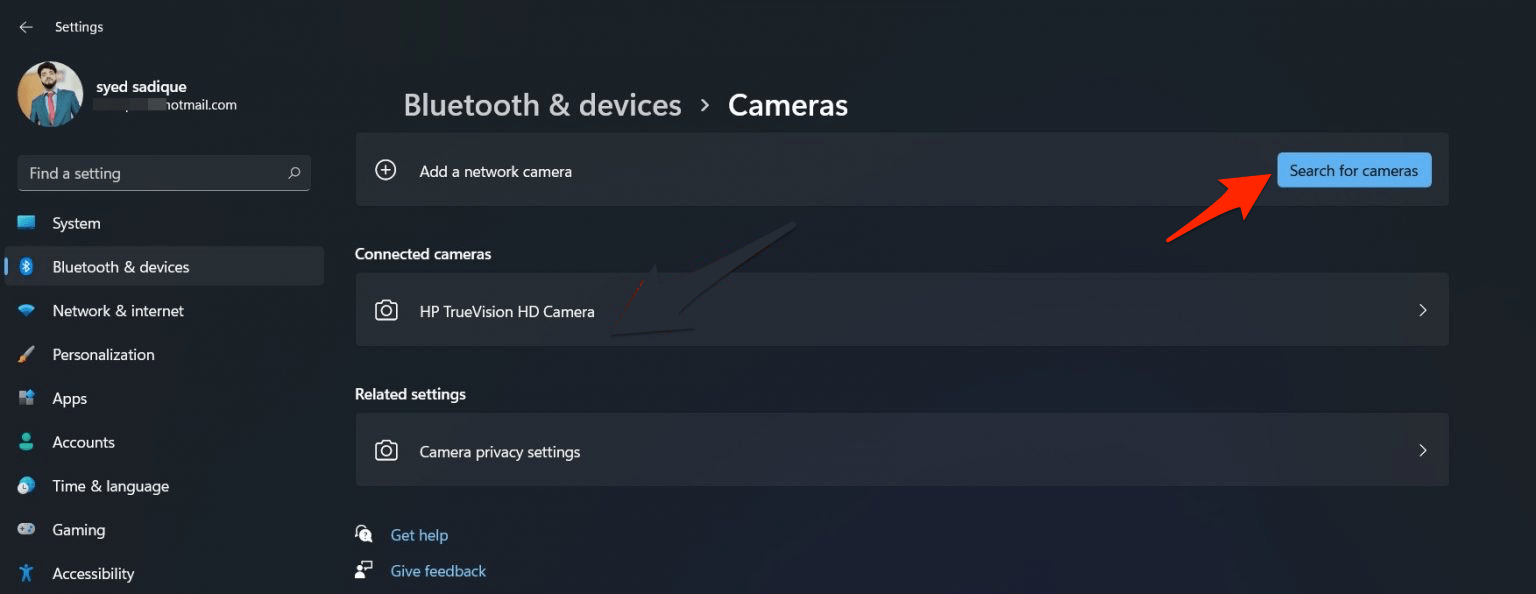
- Then go to the Bluetooth and Devices section from the left menu bar.
- Please scroll to the Camera section and click on it.
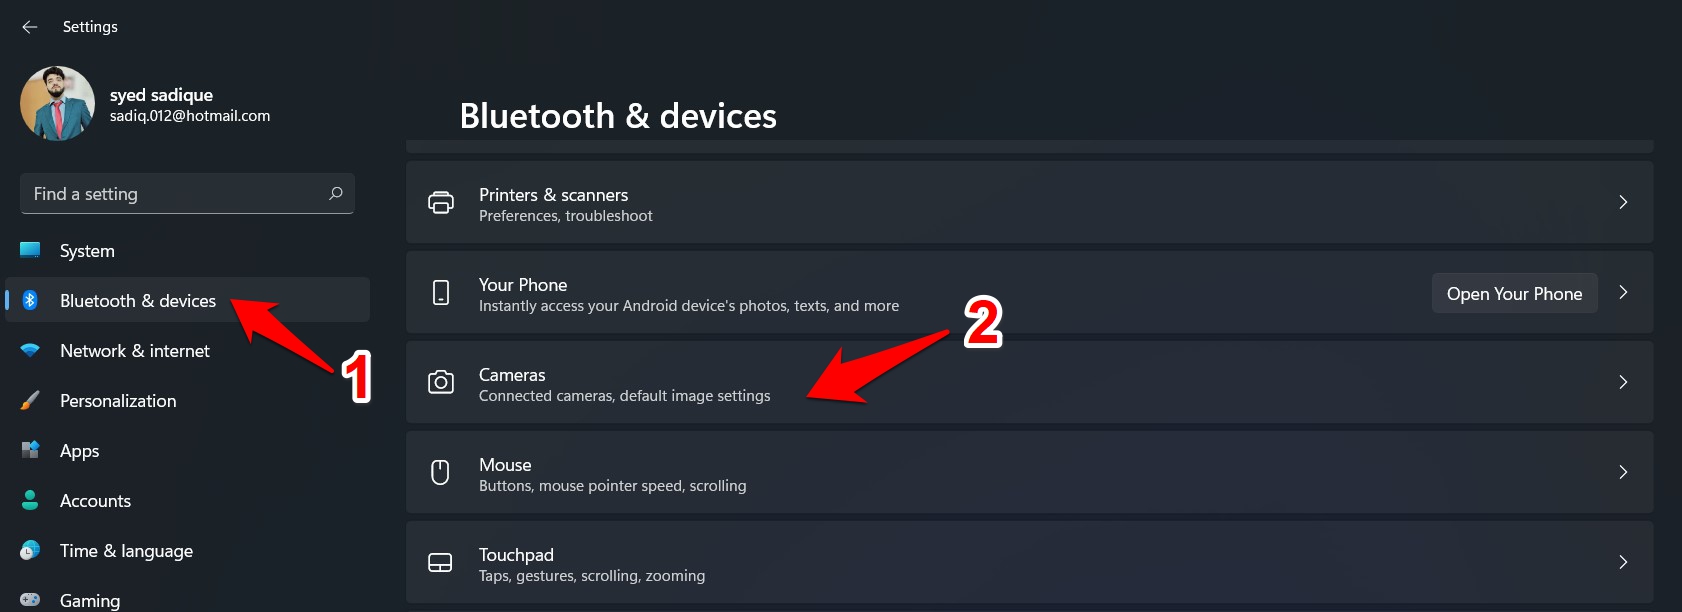
- Now click on Search for Camera to pair the camera to your PC and follow the on-screen process. Once paired, your camera will be available to use.

Fix 2. Enable Cam or Disable, Secondary Cam
If your Camera is completely disabled, then it would be impossible for you to access the Webcam. Along the same lines, if you have more than one camera connected to your PC, it is best to disable the secondary camera, as it may interfere with normal functioning of some apps.
- Open the Settings menu on your PC.
- Then go to the Bluetooth and Devices section from the left menu bar.
- Please scroll to the Camera section and click on it.

- Now go to the Connected Camera section and select your webcam from the list.
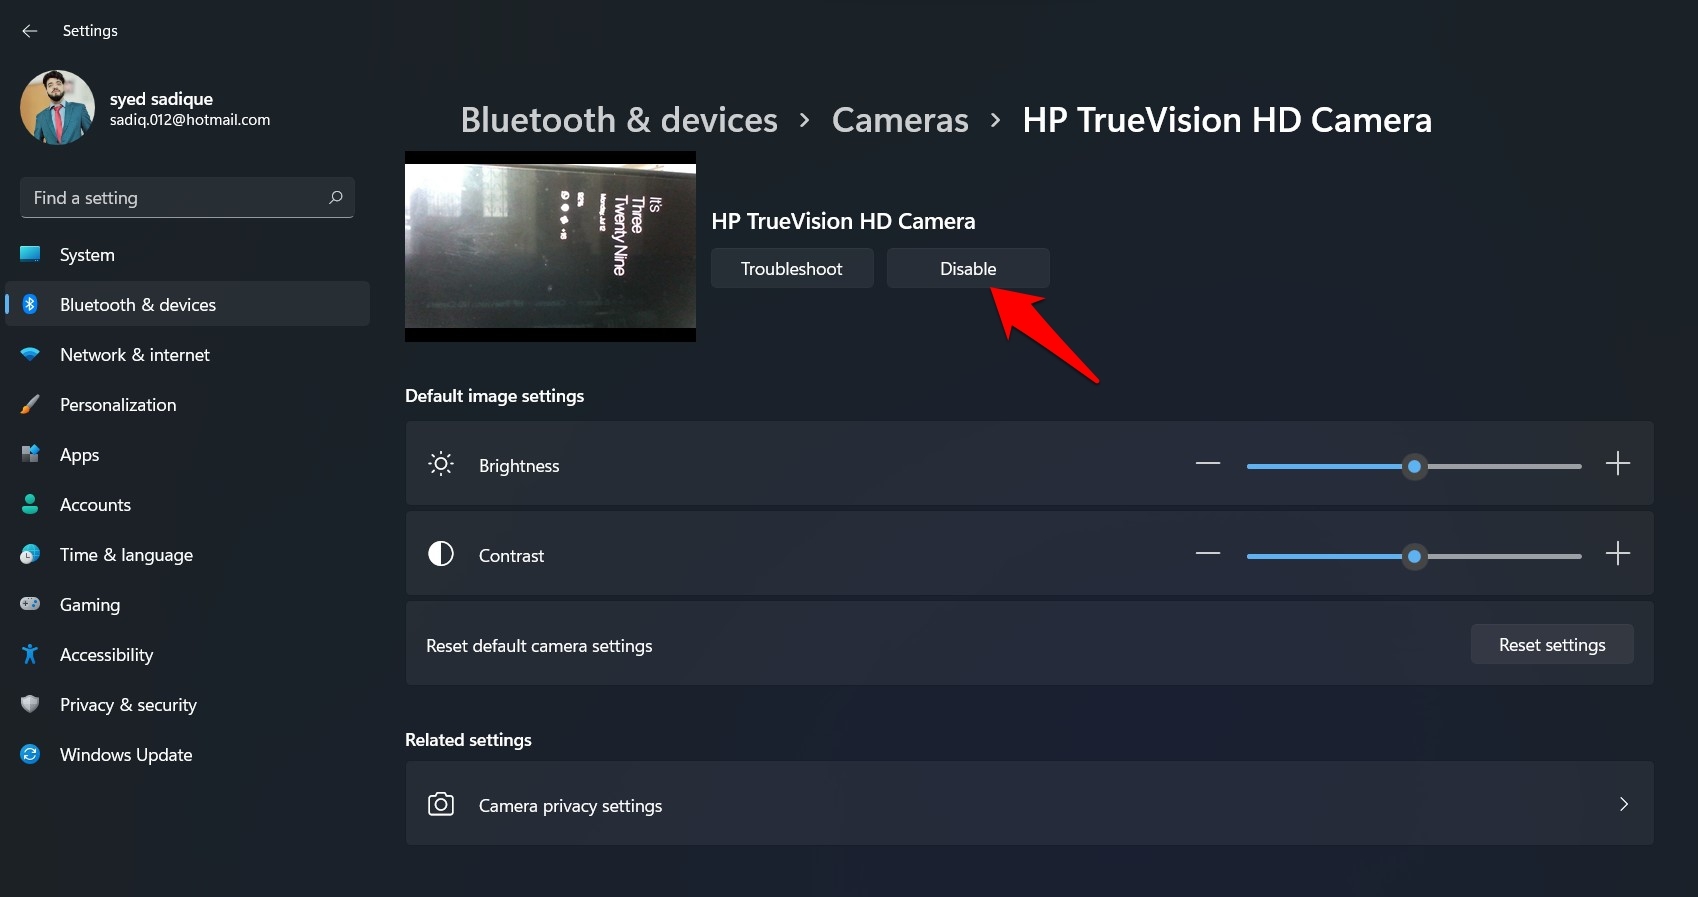
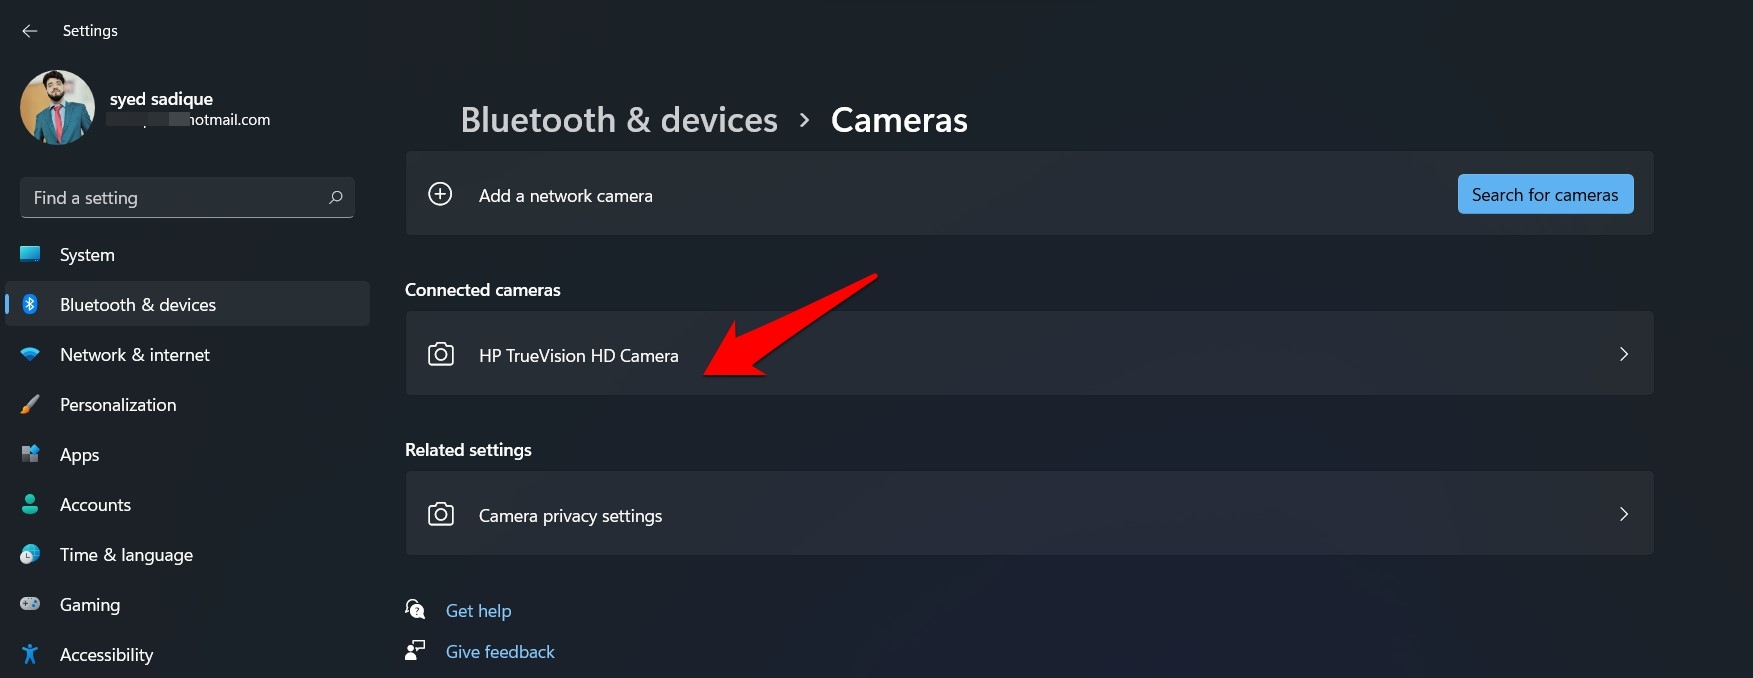 Finally, Hit Enable button if the Camera is disabled or Disable any secondary Camera.
Fix 3. Enable Camera Access to Apps
Even if the Camera is Enabled, it is important to enabling Camera access for apps. Windows offers privacy settings to control camera access for individual apps. If the app does not have access, then Camera will not work for that app.
- Bring up the Settings page via the Windows+I shortcut key combinations.
- Within that, select the Privacy and Security option from the left menu bar.
- Scroll to the App Permissions section and click on Camera.
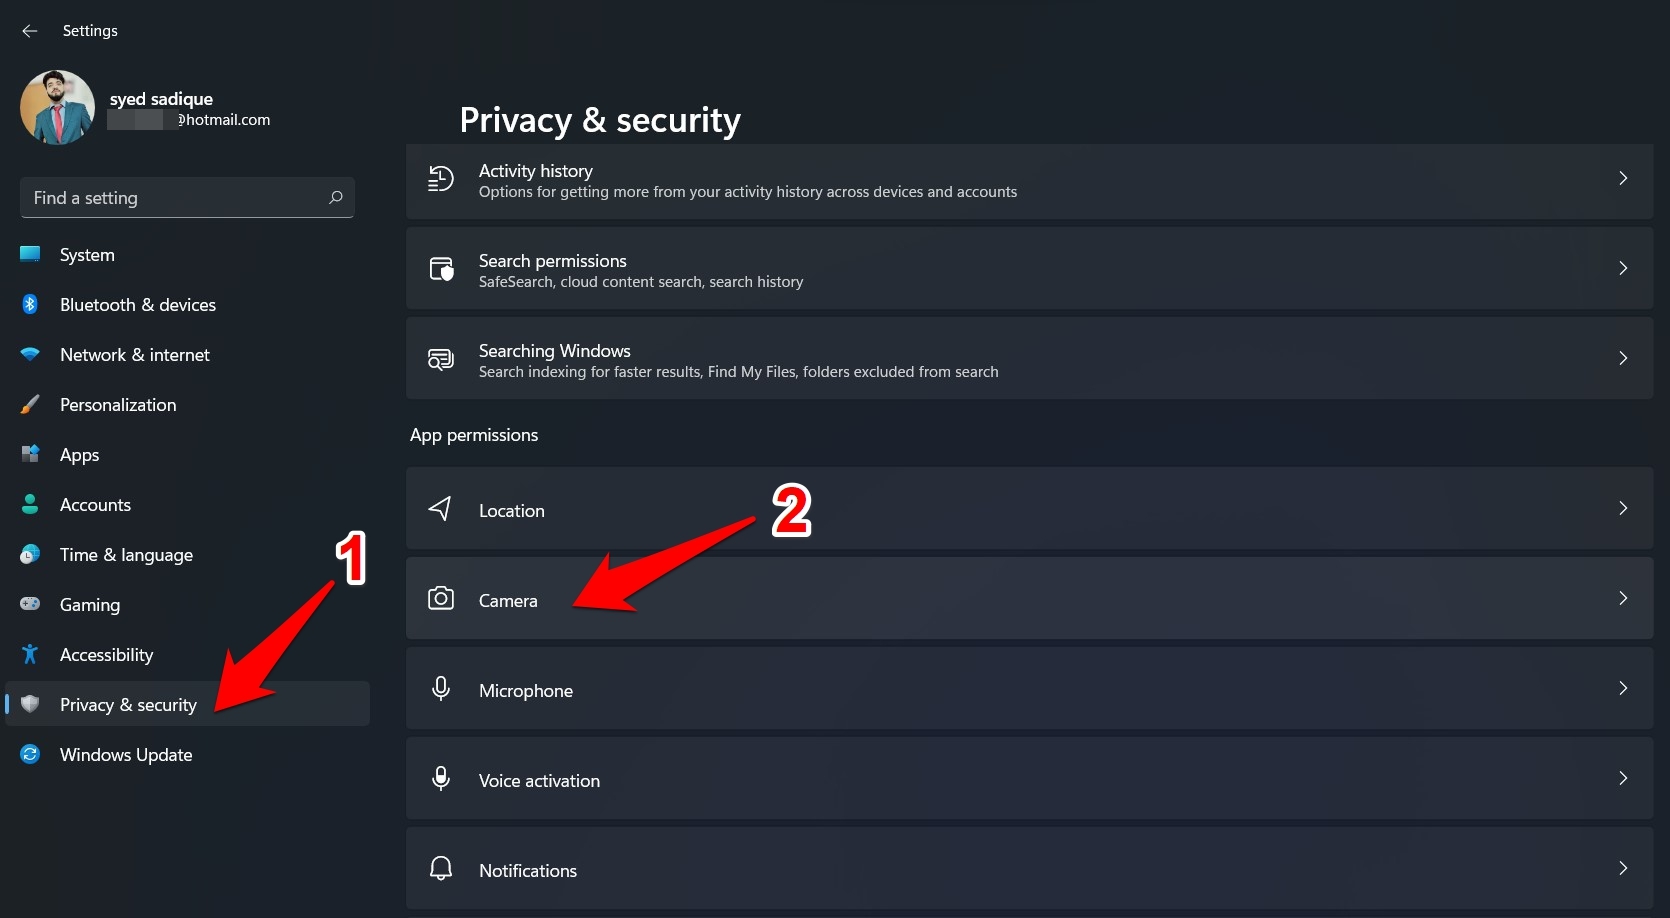
- Now enable/disable the Camera Access toggle to turn on or off the system-wide webcam access on your Windows 11 PC.
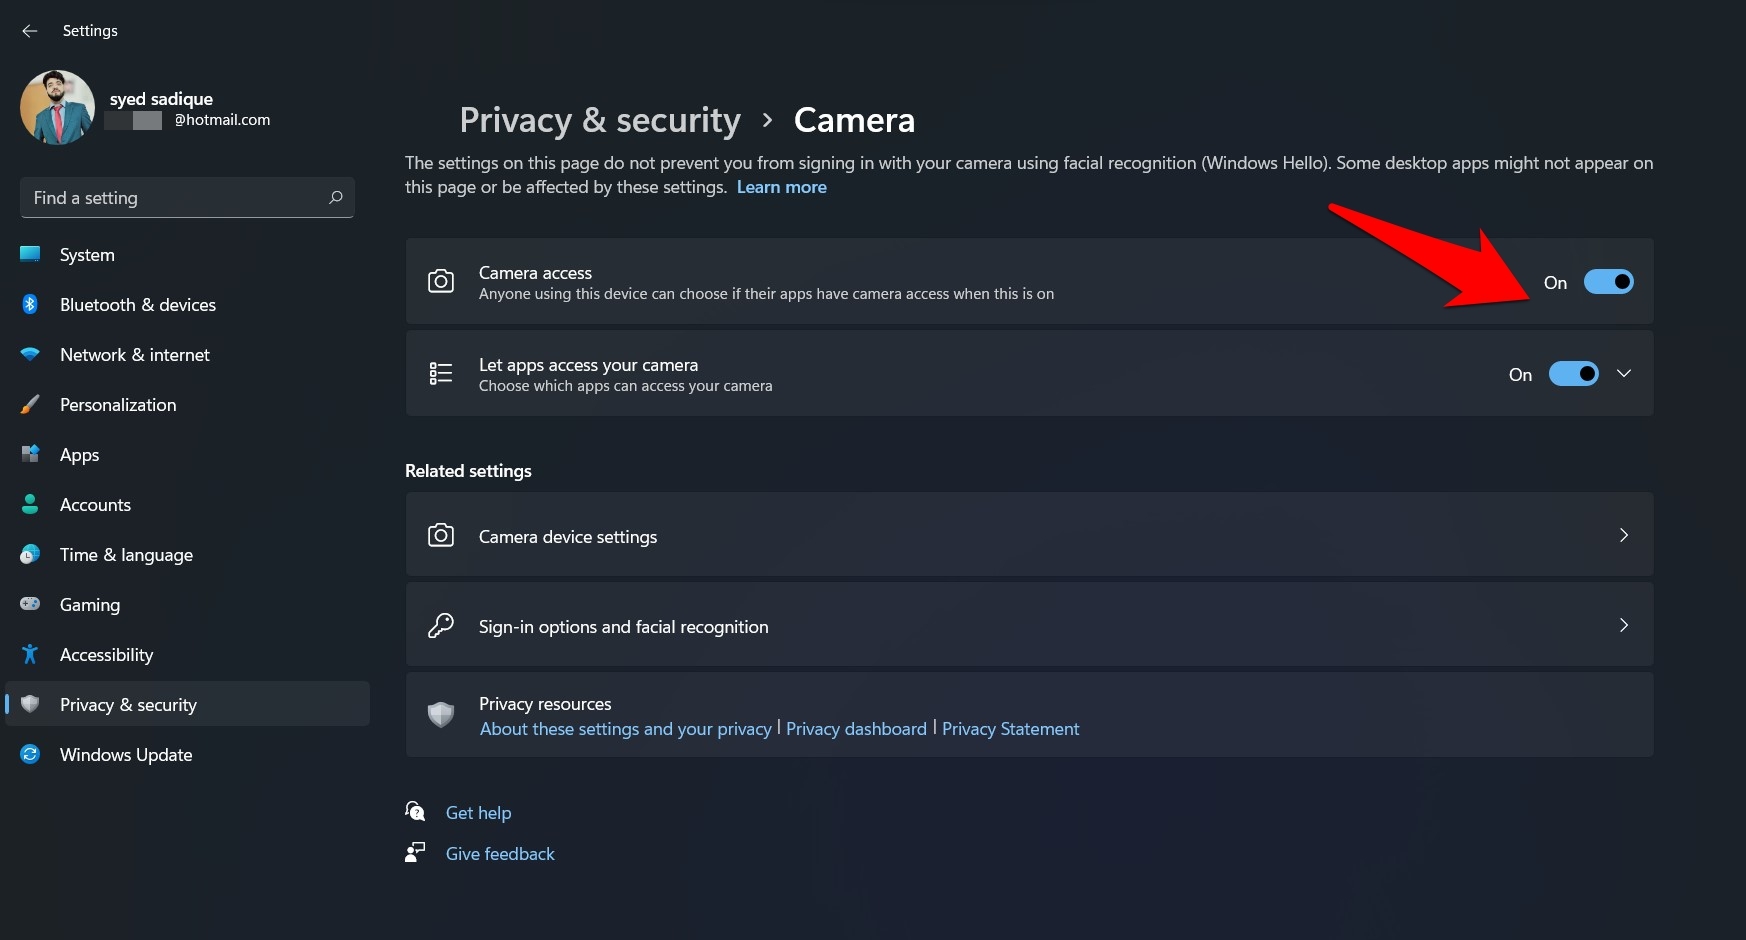
- Now, if you want all the third-party apps on your PC to have access to the camera, then just enable the toggle next to the ‘Let apps access to your camera’ option.

- However, to tweak these camera settings on an individual app basis, click on the ‘Let apps access to your camera’ menu to expand it further.
- Windows will now display the list of all the apps that have access to the camera and those that don’t.
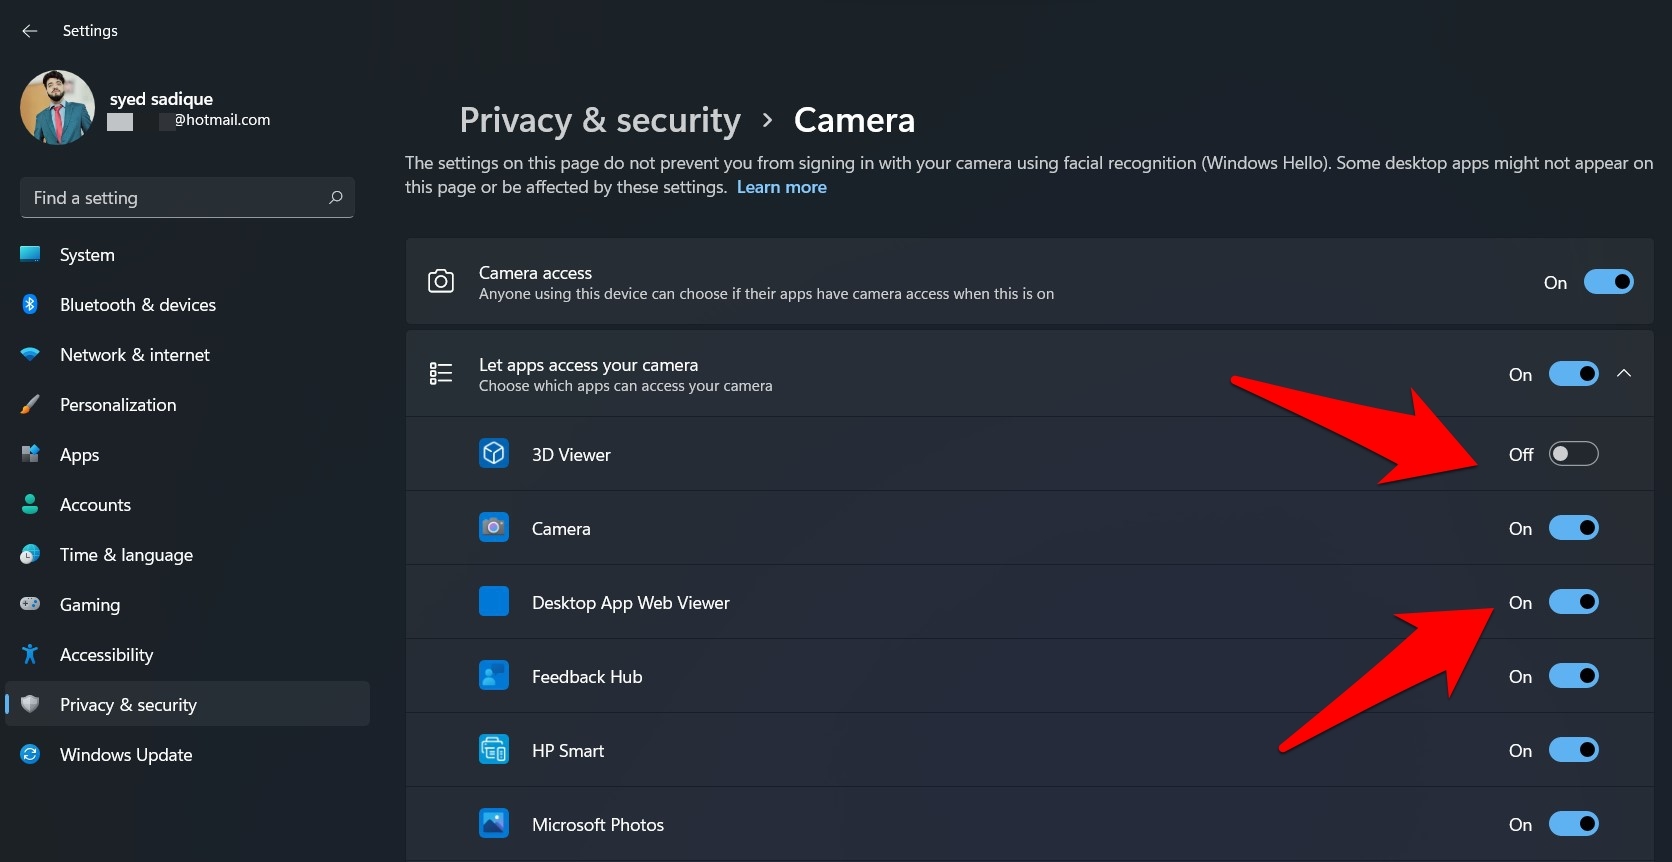
- To disable the camera permission of any app, just disable the toggle next to it.
- Likewise, enable the toggle next to an app to grant the required camera access.
Fix 4. Reset Camera App
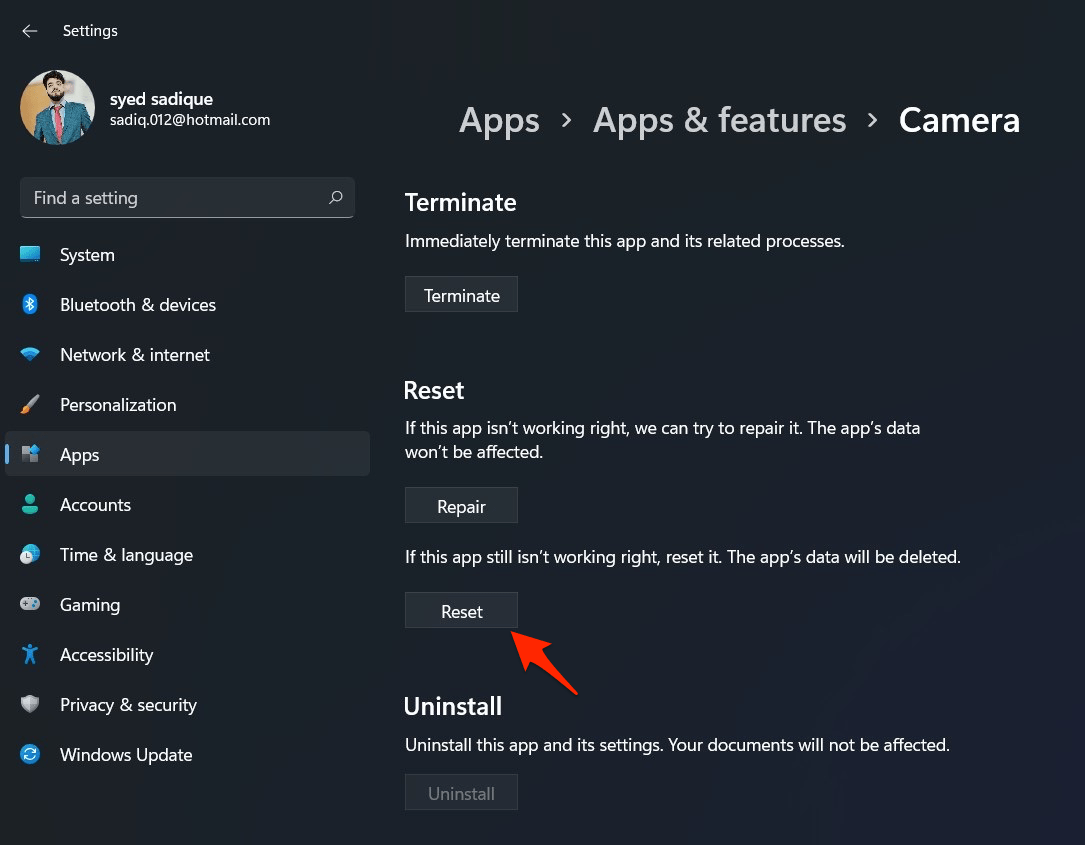
If you will, all the camera permissions are correct and still facing issues with Windows 11 Webcam. Then it is best to Reset the Camera App for Windows 11. This method is effective in fixing any kind of issue within the camera application integrated with PC.
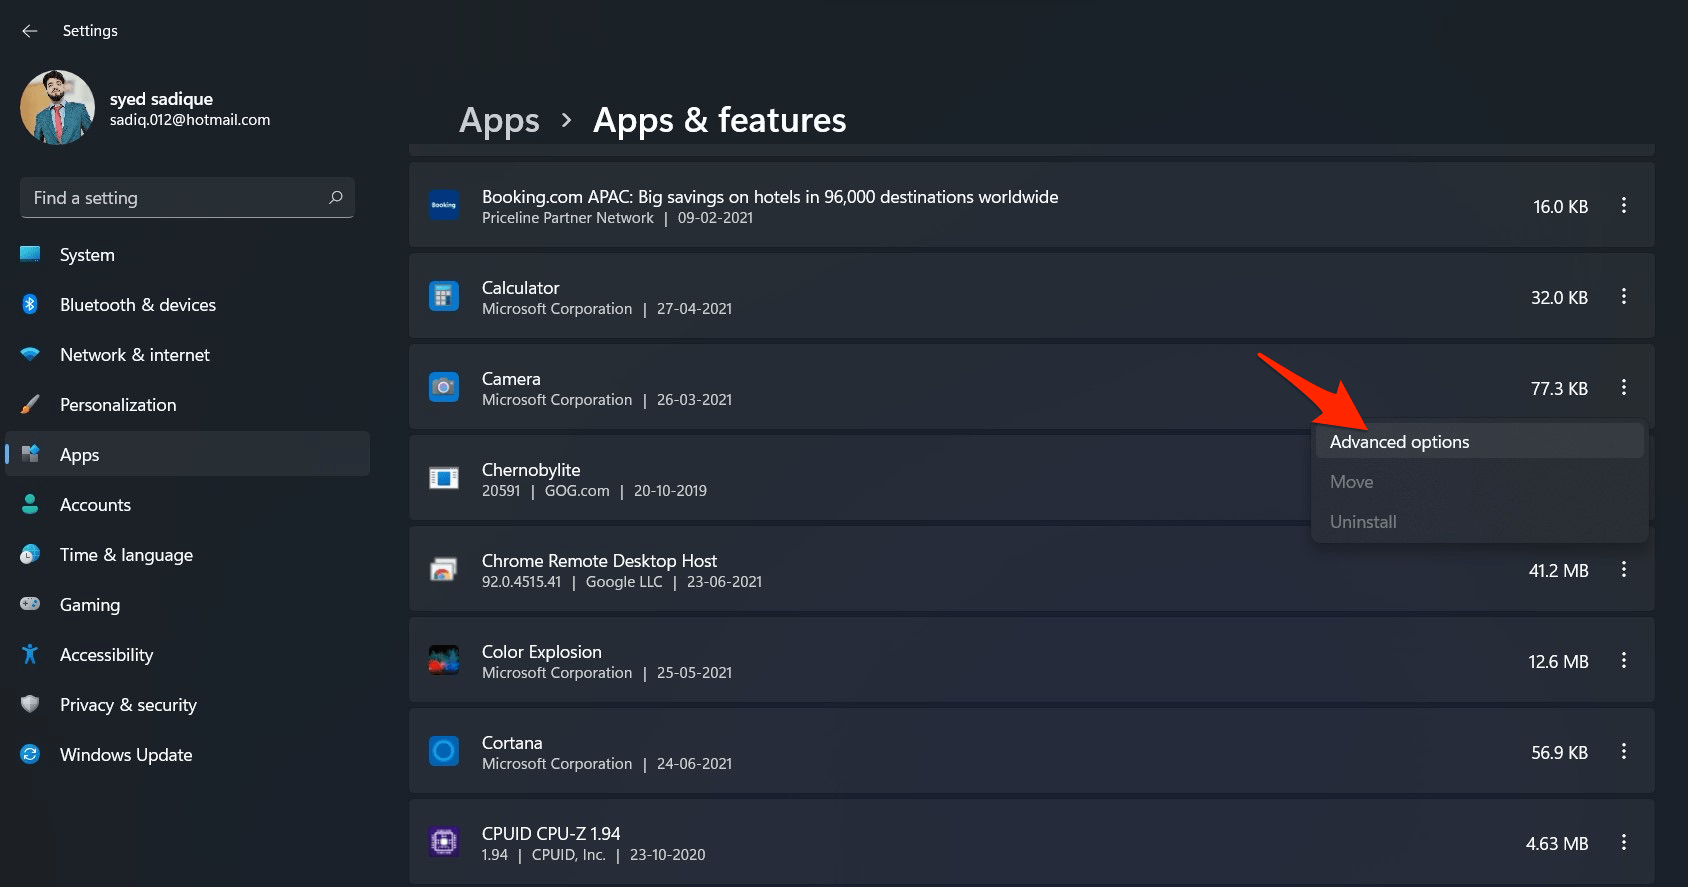
- Open Advanced Option Camera for Windows 11.

- Here click on Reset.

Fix 5. Restart Device in Device Manager
Sometimes a simple device manager reboot will fix most of the complex PC issues. You can use Windows 11 Device manager to disable and then again enable the device to check if the issue is resolved.
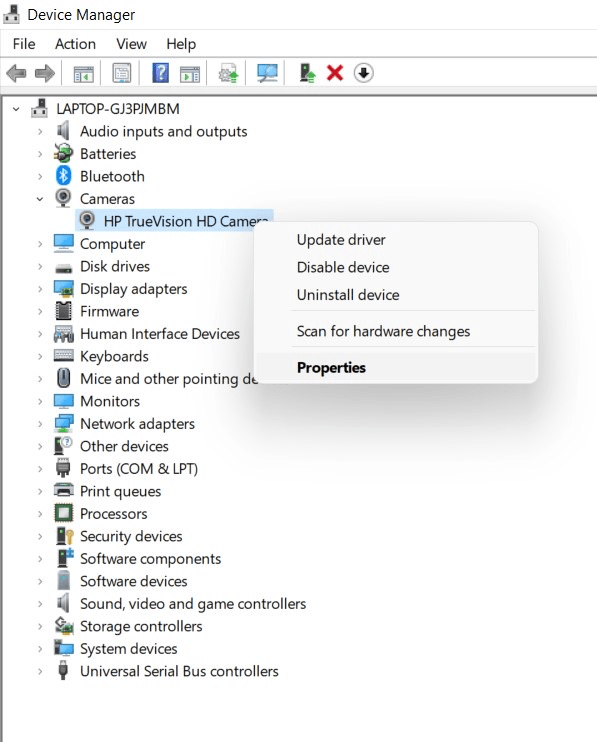
- Right-click the Start menu and select the Device Manager option.
- Find your camera device listed under the Cameras category. If you’re using a Bluetooth camera, you may find it listed under the Bluetooth category instead.

- Right-click it, then select the Properties option.
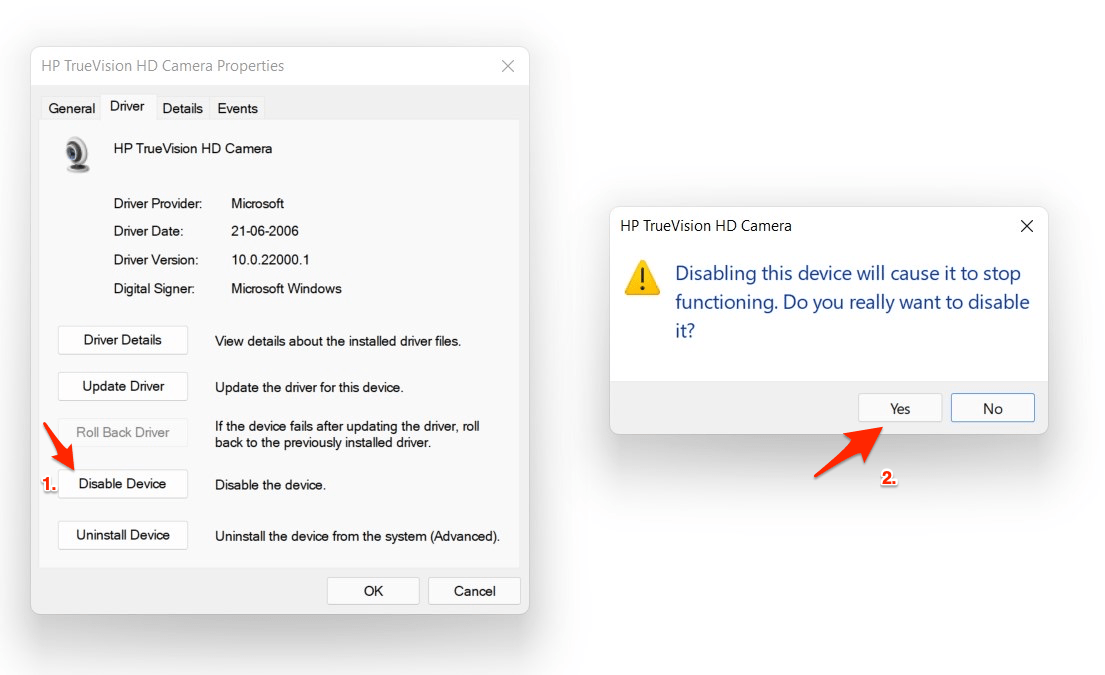
- Select the Driver tab, then select the Disable Device option. Windows will ask you to confirm, so select Yes to do so.

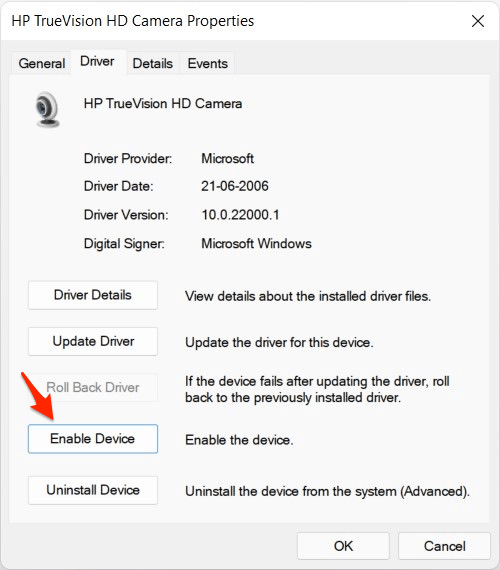
- Once disabled, select the Enable Device option in the same menu to re-enable your camera.

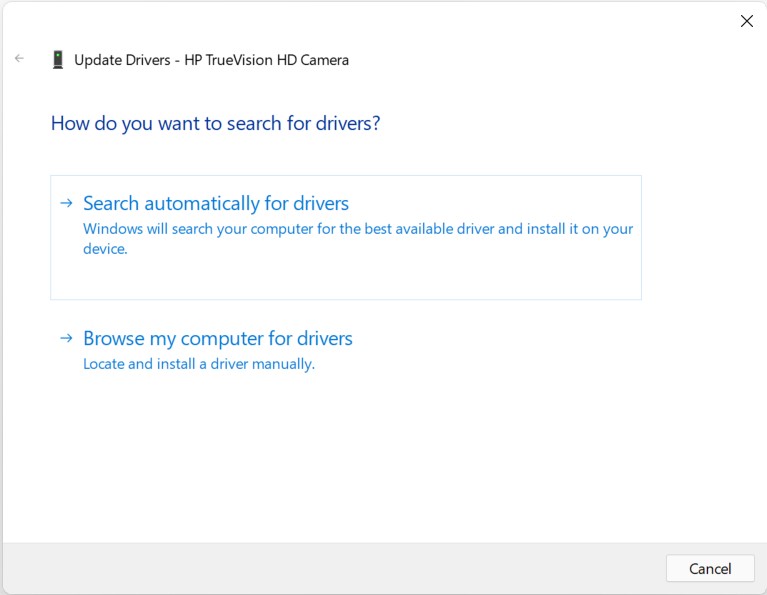
Fix 6. Update Camera Drivers
If your Camera has outdated drivers, then it will obviously not function the way it is intended to. Updating Windows 11 will also update drivers, but it is not always the case. You can use the integrated Windows 11 feature to update drivers on your PC and enjoy the Webcam without any problems.
- Right-click the Start menu and select the Device Manager option.
- Find your camera device listed under the Cameras category.

- Update Drivers for Windows 11 Camera Application.

Fix 7. Run Hardware and Device Troubleshooter
It is one of the primary and essential methods to fix all hardware issues on all OS versions of Windows. This method will identify and diagnose the operational and technical issues of hardware. Follow the below steps to run the troubleshooter.
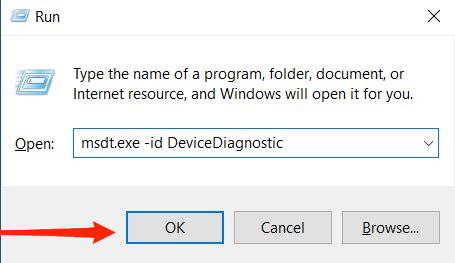
- Press Windows + R key to open the Run tool on the system.

- Paste the below command in the text box and press the Enter key.
msdt.exe -id DeviceDiagnostic
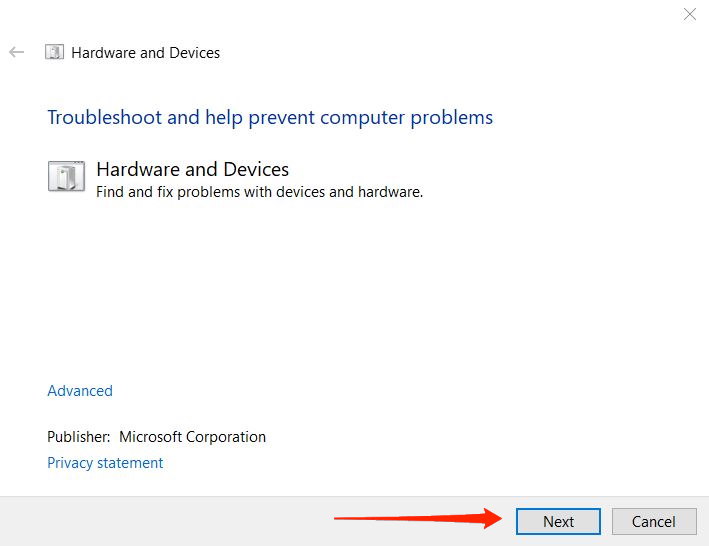
- A new window of Hardware and Device Troubleshooter will open.

- Click on Next & wait till it deducts the issue, and then apply the fix and click on Next.
- Restart the system to apply the changes in the camera.
Conclusion
This is how you can easily fix the issue of the camera not working on your Windows 11 laptop or computer. Laptop cameras are very delicate pieces of hardware and may get damaged with a small shock to the laptop chassis. There is a chance that the camera connecting cables or flex cables are misaligned or not working properly.
It is also possible that the camera hardware is malfunctioning and needs a replacement. If the issue of the camera app not working on Windows 11 is still due after the above methods, then there is a high chance that the issue is with the hardware itself.
If you've any thoughts on How to Fix Windows 11 Web Cam Problems?, then feel free to drop in below comment box. Also, please subscribe to our DigitBin YouTube channel for videos tutorials. Cheers!




Disable the camera access.How to Change Web Camera Permissions in Windows 11?
Dear, thanks but the solution you brief here is not working in my case please do help me