There is no better way to interact with people than through VRChat. VRChat was developed as a nonprofit by a small team of indie devs that quickly expanded into a huge player base. VRChat is home to some of the most helpful people. Rather than a game, VRChat is an ongoing study to see how shut-in nerds handle social interactions in an environment that demands 100% social interaction and communication.
Apparently, many people have been reporting that VRChat stopped working and stays stuck on the same screen for hours on Windows 11. Although you have few options, these methods may still help you fix this problem. Let’s examine them.
Methods to Fix VRChat Not Loading Issue In Windows 11 PC
Since I am at home taking online classes, COVID-19 has made it difficult for me to meet other people, especially on college campuses. But VRChat helps me a lot to keep myself in touch with my gang. But what are the best ways to fix VRChat does not load? This guide will help you resolve the VRChat stop-working problem on Windows 11 PCs.
Fix 1: Clear Your VRChat Temp Files
This method is very helpful in fixing VRChat’s stop-working issues for many players. If you have not used it before, we recommend you do so. Therefore, you must perform the following files to clear VRChat’s temp files:
- Firstly, delete the files in %Username%AppDataLocalTempVRChat from Windows Directory.
- Restart your computer and run VRChat on your PC.
Byt performing this, the VRChat stop-working issue will definitely get resolved. But, still, in case there is no change appears, make sure to check out the other fixes mentioned in this article.
Fix 2: Use Special Launch Options
Have you heard of this before? It appears that not many Windows 11 users are aware of the special launch options available. Using the special launch option, here are the steps to launch VRChat.
- Right-click VRChat in the Stream Library section.Select Properties.
- On the next screen, click Set Launch Options.
- You can then add any of the following lines to it:
- vrchat://launch?id=wrld_1a6f881b-fdd0-4551-af2c-6ef8e16577f6 (For Zarniwoop’s Avatar Dungeon)
- vrchat://launch?id=wrld_d0b62423-fd59-48f7-9e4b-e6fece81b7ed (For Hyperdimension of OziCom)
- vrchat://launch?id=wrld_69ab9cdf-5436-46bd-98b5-714837a53b4f (For X1 Seisoken City)
- Enter a different world ID by changing the line accordingly.
Fix 3: Disable IPV6
It was previously found that disabling IPV6 fixes the VRChat not loading issue on Windows 11 PCs. Why don’t you give it a try? In order to accomplish this, you will need to perform the following steps:
- Firstly, right-click the network icon and select Open Network and Sharing Center from the menu that appears.
- Click on Change Adapter Settings. Right-click on the Internet Connection and select Properties.
- Navigate to the Networking tab and uncheck the IPv6 box.

- You’re done. Once you click the OK button and reboot your system, you should be able to resolve the issue.
Fix 4: Update GPU Driver
Updating your system drivers ensures that you will not experience performance-related problems with your PC. Therefore, we suggest you update your GPU driver by following the given steps:
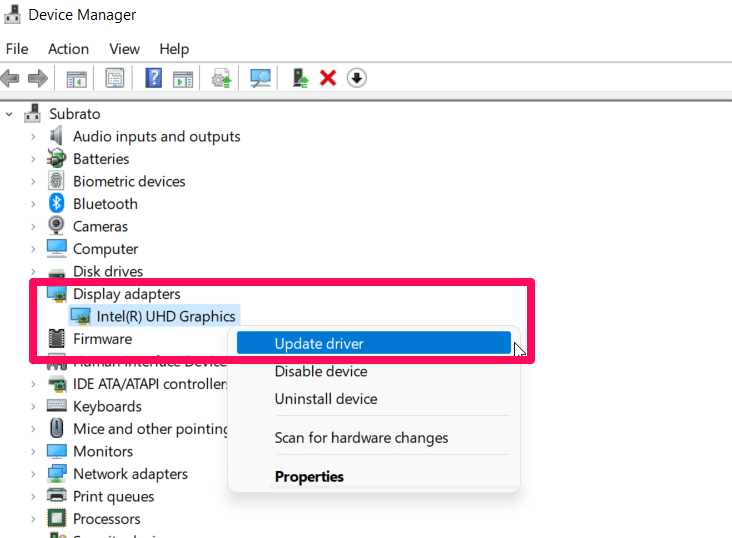
- Initially, go to the Device Manager.
- Afterward, click on the Display Adapter.
- Then, right-click on GPU Manufacturer Name and hit the Update Driver.
- Finally, select the Search Automatically For Drivers.

You’re done. Your device’s driver will be downloaded once it searches and finds it. Reboot your system and launch the VRChat to see if the software is now loaded.
Fix 5: Delete VRChat In The Windows 11 Registry
It may be possible to delete the VRChat file from the Windows Registry if you have some knowledge of Windows Registry files. For those without prior knowledge, here is what you need to do:
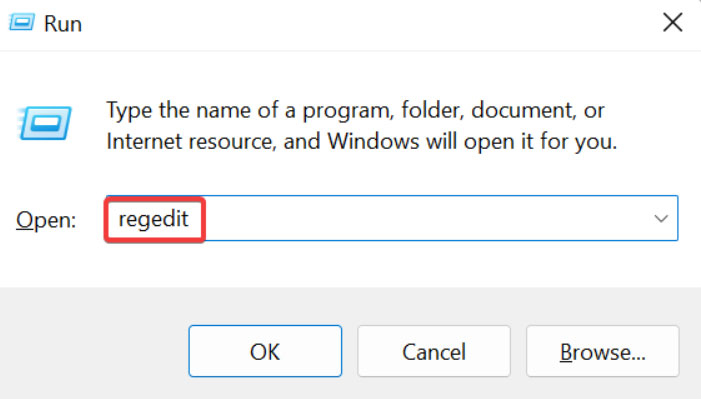
- Open the Run box by pressing Windows + R together and searching for regedit.

- Next, navigate to HKEY_CURRENT_USERSoftwareVRChatvrchat and delete all its files.
Fix 6: Run SFC on Your Windows 11 PC
In case you are still getting the VRChat stop working issue on your Windows 11 PC even after performing the above-mentioned methods, then you must try running an SFC scan on your device, as this help many users resolve the not VRChat issue. So, here are the instructions you have to follow in order to run SFC on your Windows 11 PC:
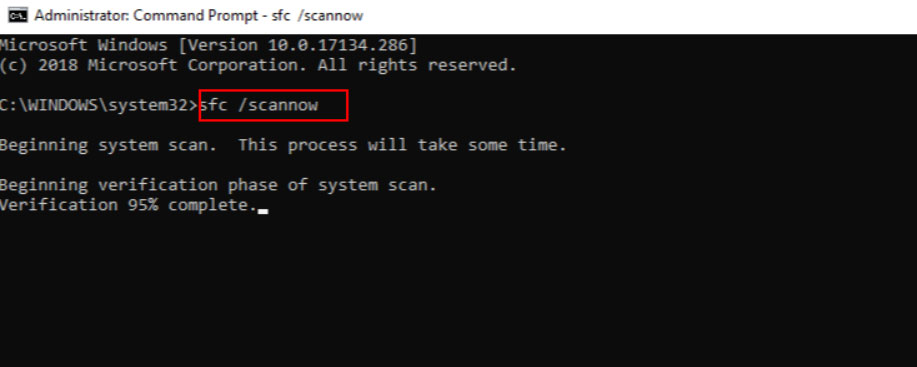
- To begin, go to the Windows Search bar and type CMD. Afterward, run it as an administrator.
- Then, execute the following command: sfc /scannow

Fix 7: Run Dism.exe on Your PC
It has been mentioned that some users have reported running the DISM.exe; they successfully resolved the VRChat stop-working issue.
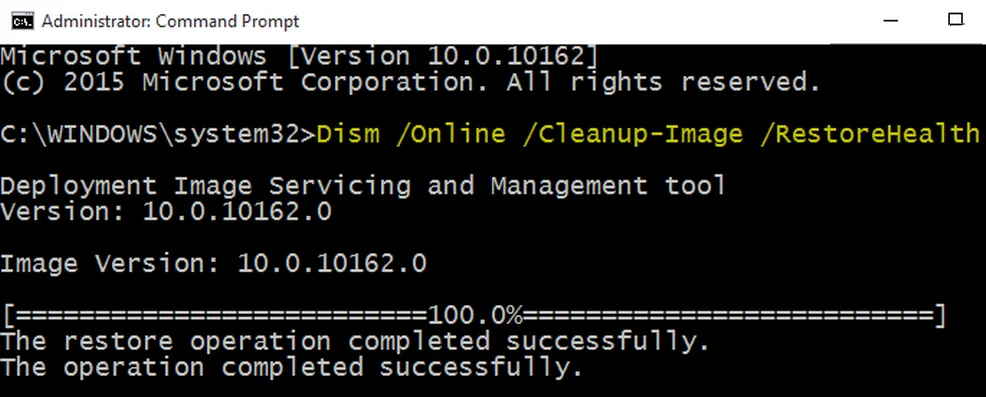
If you wish to run Dism.exe through the command prompt, you will want to follow the following steps:
- Initially, start the Command Prompt as an administrator, and then run the commands as follows:
- To scan the health of your Windows 11 PC:
dism.exe /online /cleanup-image /scanhealth

- To restore the health of your Windows 11 PC:
dism.exe /online /cleanup-image /restorehealth

- To scan the health of your Windows 11 PC:
- Afterward, if there is an error, run the following command:
dism /online /cleanup-image /startcomponentcleanup
- Suppose you receive the Error: 0x800F081F when running the restore health scan; simply reboot your PC and run the following command from the CMD window with admin privileges:
Dism.exe /Online /Cleanup-Image /AnalyzeComponentStore.
Fix 8: Check for The Server Problem
It is very vital to check if the server is currently down or under maintenance. The VRChat application will not work correctly if the server is down or experiencing some kind of glitch, so you can check if there has been any update about the server maintenance by checking the official Twitter page or the down detector website.
Fix 9: Whitelist VRChat
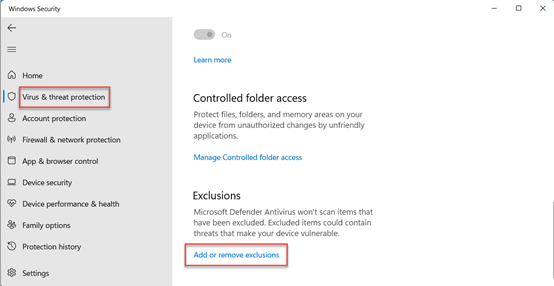
You should disable or whitelist VRChat from the antivirus settings if you have a third-party antivirus installed on your system. These steps will help you whitelist the VRChat on your device:
- Launch the antivirus and click on Settings.
- In settings, click the Virus & Threat Protection tab and go to Exclusions.
- On the next screen, click on add or remove exclusions.

- Select VRChat from the list and click the add button.
- To save the changes, click OK.
In most cases, the antivirus program is the culprit, preventing VRChat from loading or running properly.
If you've any thoughts on How to Fix VRChat Stopped Working?, then feel free to drop in below comment box. Also, please subscribe to our DigitBin YouTube channel for videos tutorials. Cheers!
