Are you not able to type on the Windows search bar of your Windows 11 computer? Then, stay tuned till the end of this guide to know about all the solutions that you can implement to fix the issue. When we use our computers, we always look for ways to minimize our task execution. So, instead of navigating from folder to folder or settings within settings one-by-one, you can use the search bar of Windows.
All you need to do is type out the concerned setting that you wish to tweak and in a split second, you will be there. You can even open any file by typing out the correct name on the search bar. Some users have reported that after upgrading to Windows 11, the search bar is unresponsive when they input text on it.
This issue may happen due to a bug caused by the current version of Windows 11 installed on your PC. Even having corrupt system files or malware on the PC may disable the Windows search bar and it won’t allow you to type any query. Otherwise, it could just be some random glitch popping out of nowhere.
1. Restart your PC
If it is a simple glitch, merely restarting the computer should solve the issue. Then you will be able to type your query on the search bar.
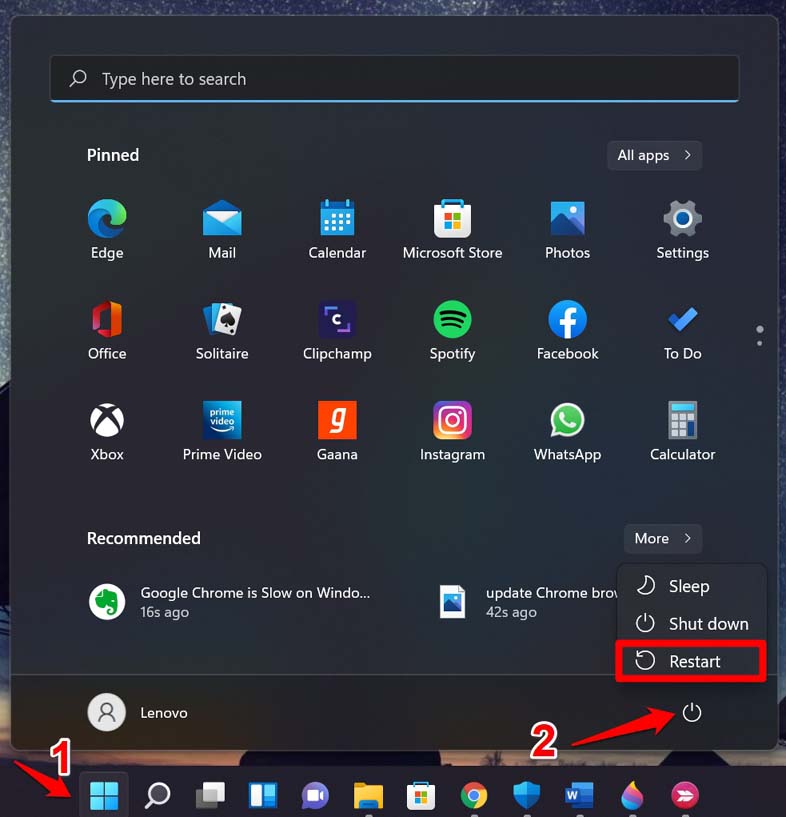
- Click the Windows button on the taskbar.
- When the console pops up at its bottom right corner, click on the Power icon.
- Then select the option Restart and wait for the PC to restart.

- Once it reboots and gets ready, click on the search button on the taskbar.
- Type your query and it should now work. If the search is still not responding to your keyboard input, then try the other troubleshooting methods out there.
2. Update Windows OS
Next, make sure that your PC is running on the latest build of Windows OS. You can manually search for available updates and install the same.
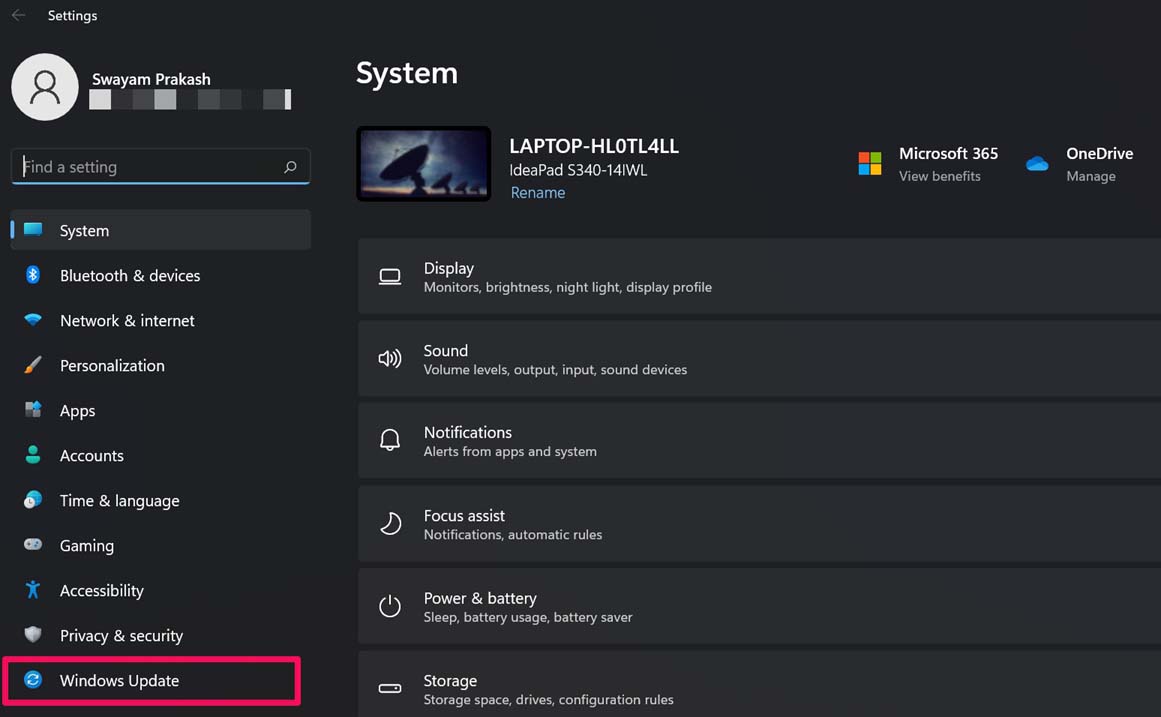
- On the keyboard press Windows + I.
- As the settings page opens, click on Windows Update at the bottom left panel.

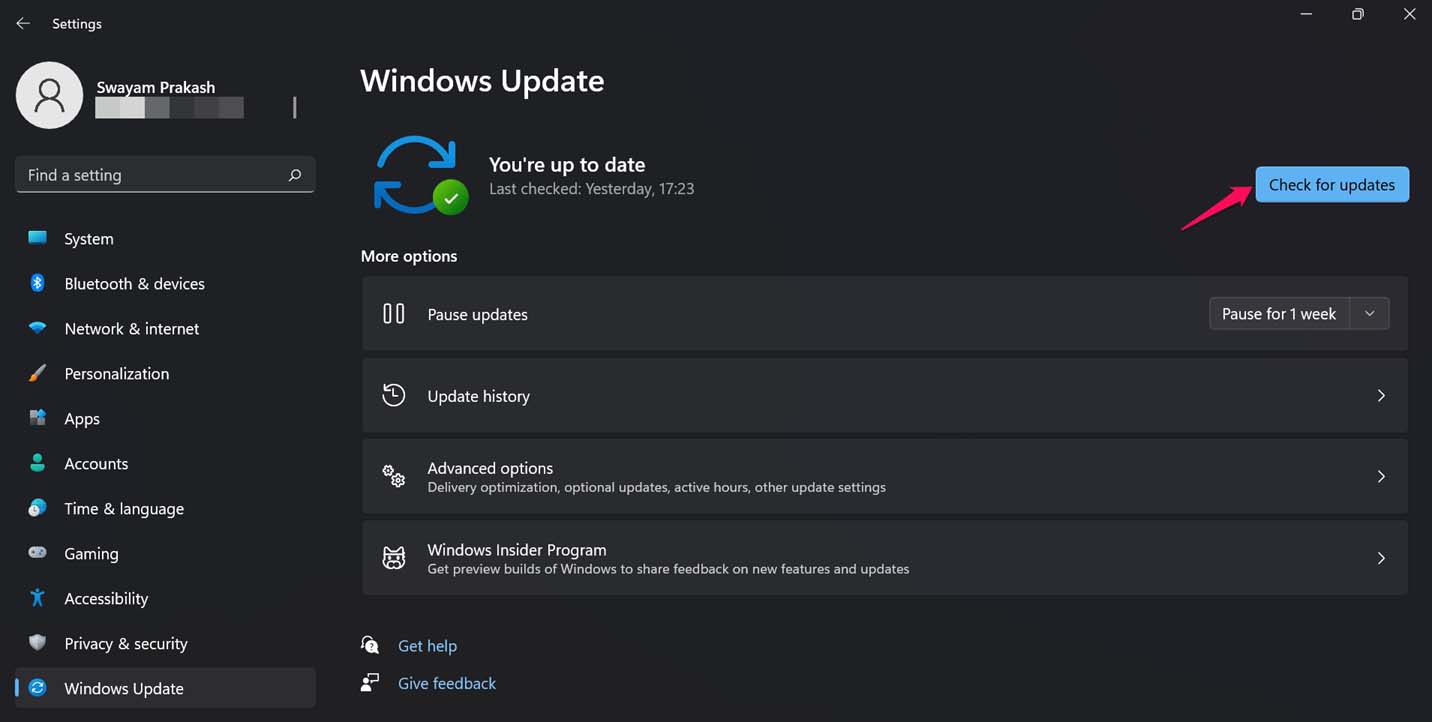
- Then click on the option Check for Updates.

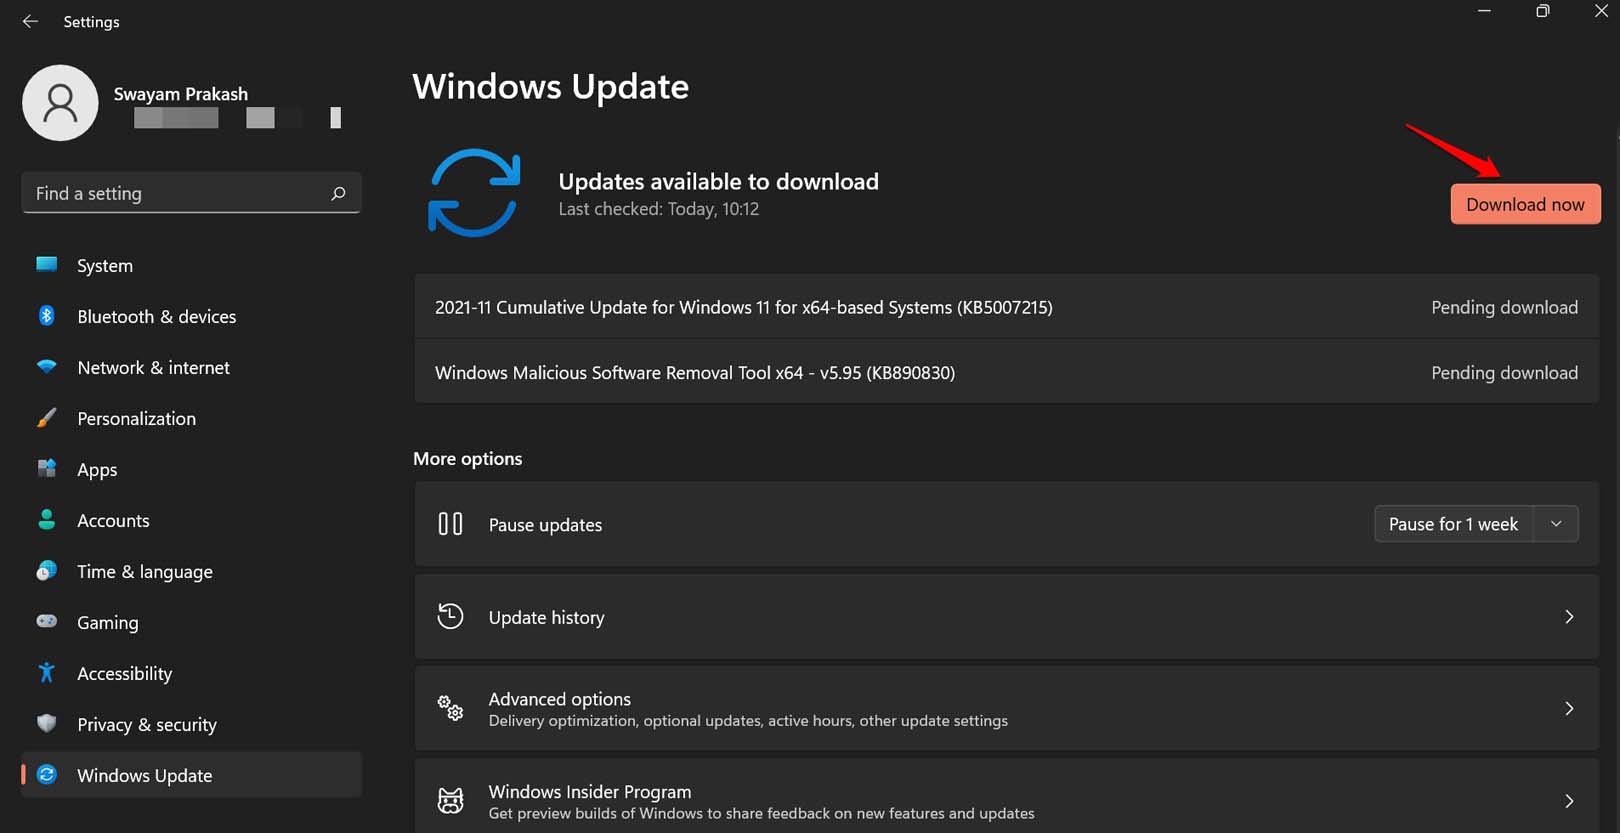
- Provided your computer is connected to WiFi, the system will start searching for updates and if a new build is available, you will be able to see a prompt that asks you to download the update.
- Click on Download Now and grab the update. It will install on its own and the computer reboot when installation is finished.

After updating the OS, try to type on the search bar and check if it is working.
3. Check for Corrupted System Files
Run a scan on Windows for the presence of corrupt system files using the command prompt. The Windows operating system may get corrupted if a system update in progress is suddenly interrupted. Also, if the computer crashes for some reason some active system functions get interrupted. As a result, the concerned system files get corrupted.
To check for such files,
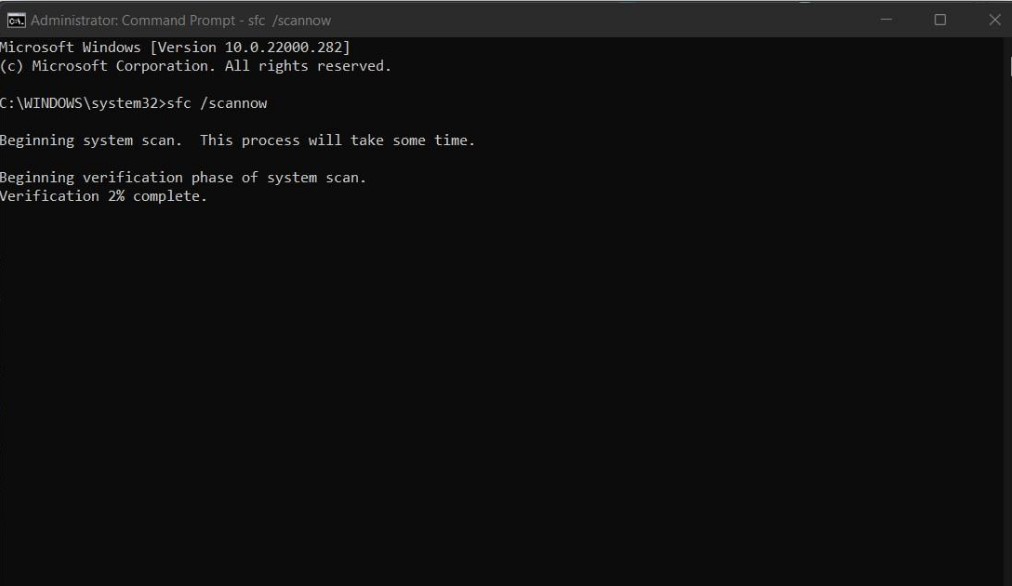
- Open Command Prompt.
- Enter the command sfc/scannow and press enter.

- The system will scan for defective files and fix the same.
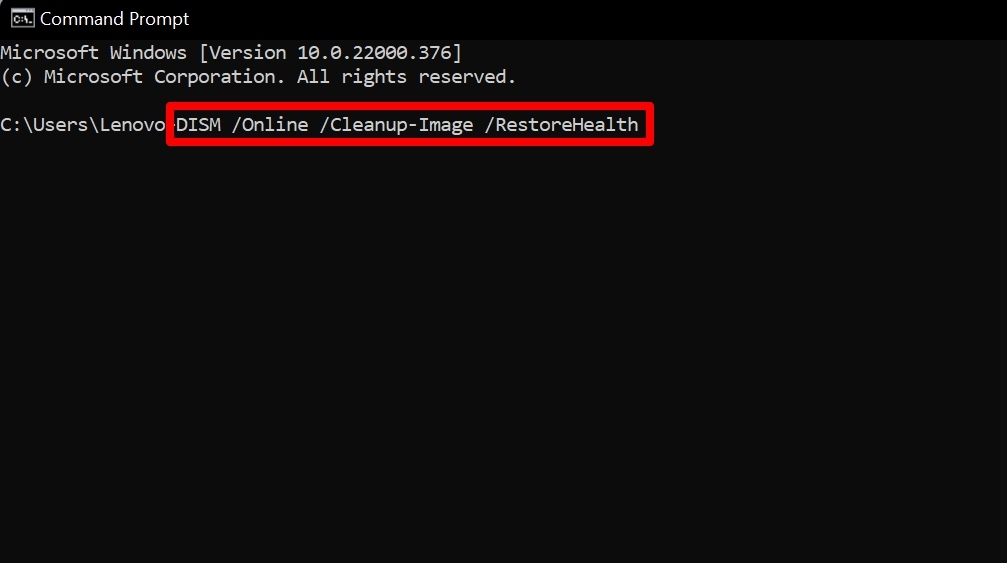
- On the other hand, you may also use the DISM command to fix the corrupted system files and replace or update the files by downloading the proper files from the Microsoft server.
- While the command prompt is open, enter the following commands one after the other.
DISM/Online/Cleanup-Image/CheckHealth

DISM/Online/Cleanup-Image/ScanHealth

DISM/Online/Cleanup-Image/ScanHealth
- Press the enter key.

4. Run Malware Scan
Windows Defender or any other Anti-virus that you use can immediately stop malware from being installed when they detect anything fishy has been downloaded on the computer. Still, you may manually run a scan for malware on your Windows computer. If malware or any other viruses are found by your Anti-virus program, then you can remove those files.
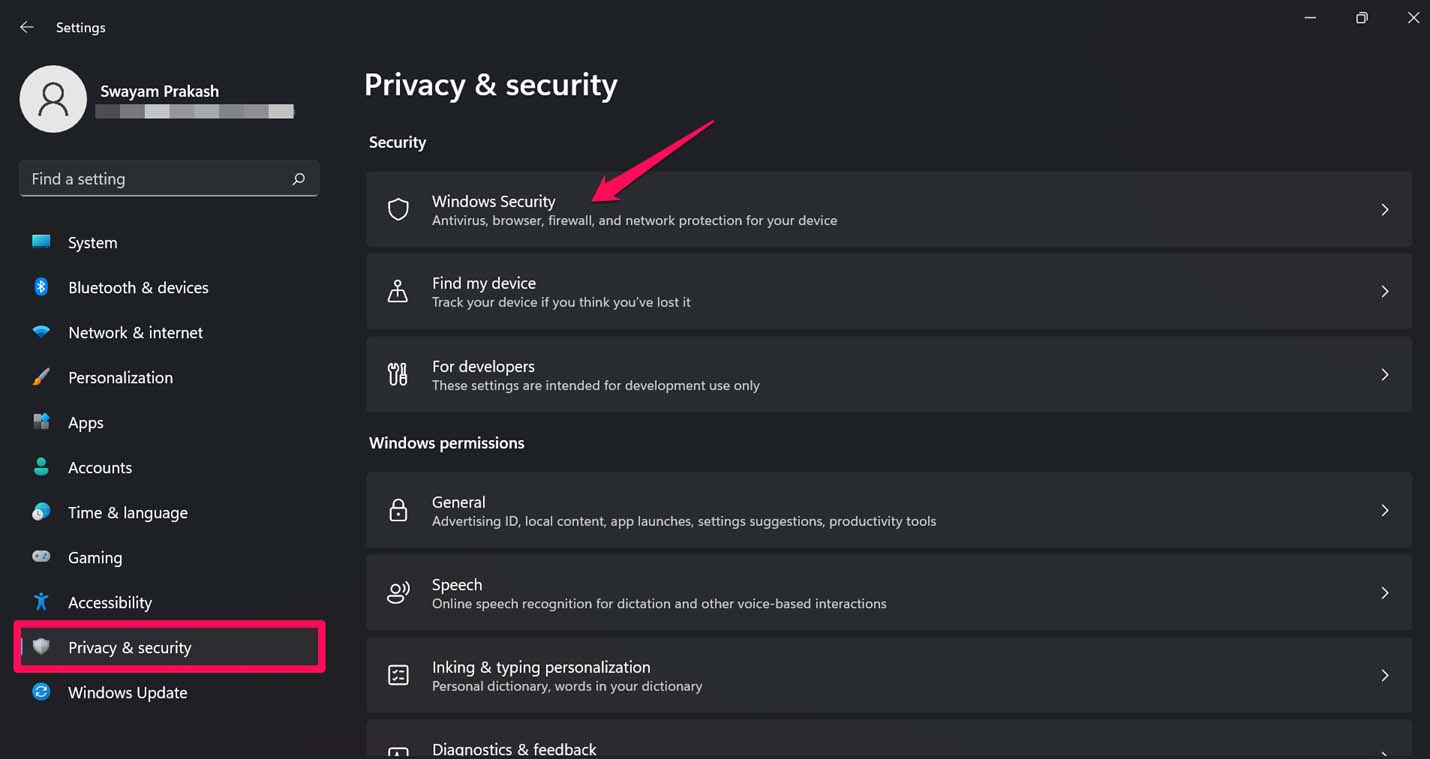
- Open the Windows Settings by pressing Windows + I keys.
- Then on the left-hand panel, click on Privacy & Security.
- On the right-hand side, click on Windows Security.

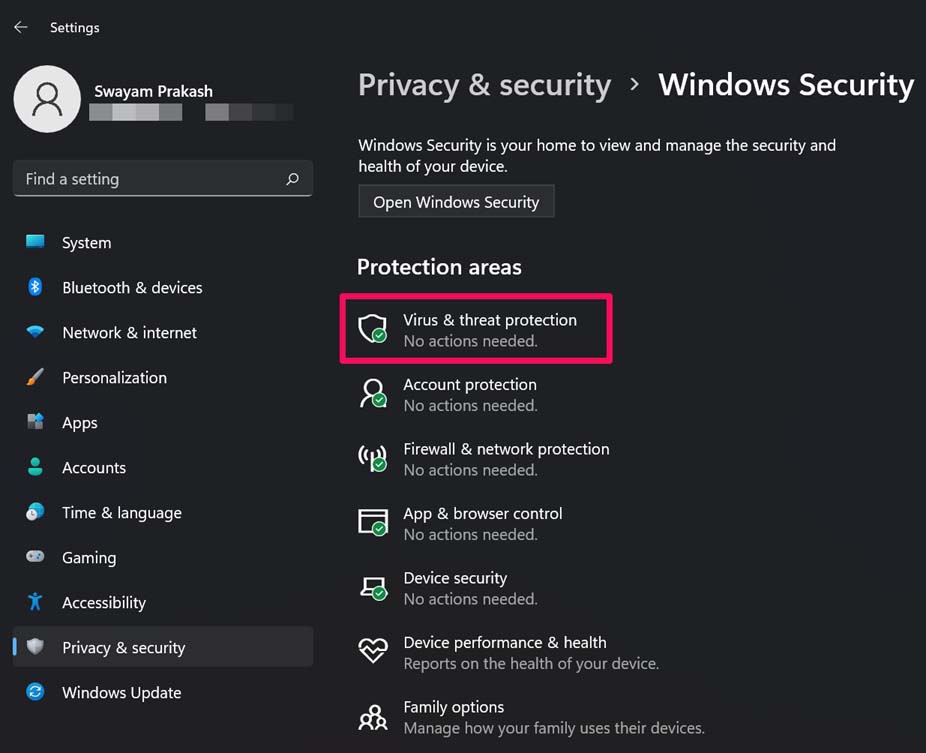
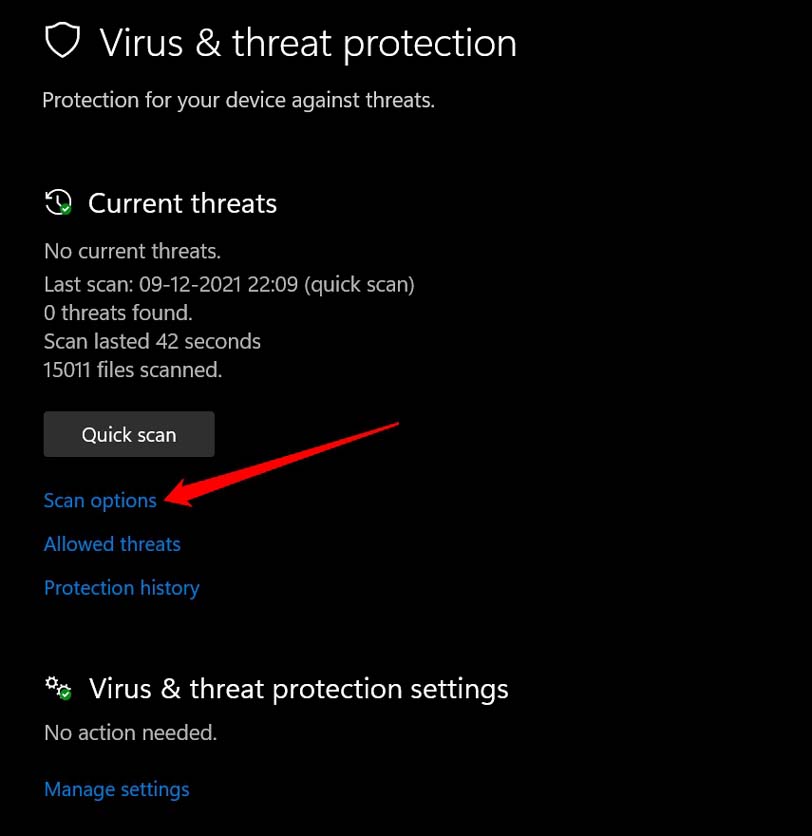
- Next, click on Virus & Threat Protection.

- Click on Scan Options and select what type of malware scan you wish to perform.

5. Restart Windows Search by Visiting the Services Settings
You can try to restore the Windows search service on your computer. Here are the steps to do that.
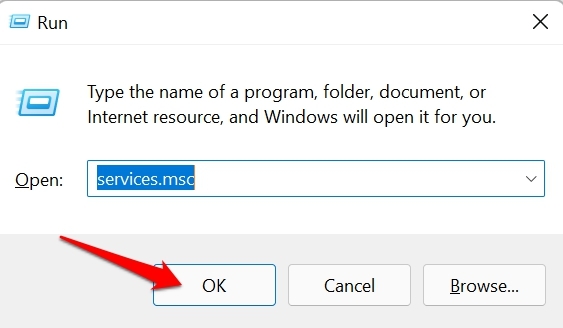
- Press Windows + R.
- The Run command dialog box will pop up.
- Type services.msc and press Enter.

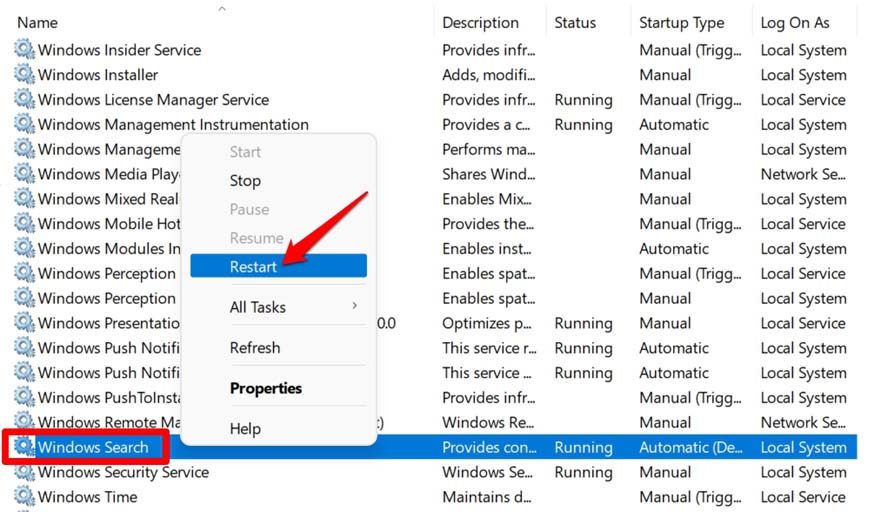
- All the Windows services will show up.
- Navigate to Windows search.
- Right-click on it and select Restart.

Enabling this service will ensure that whatever you are trying to search, the appropriate and related results are shown.
6. Use the Windows Troubleshooter Tool for Fixing Issues with Search
Try using the Windows troubleshooter tool to fix the problem in the Windows search. Make sure that your computer is connected to the internet.
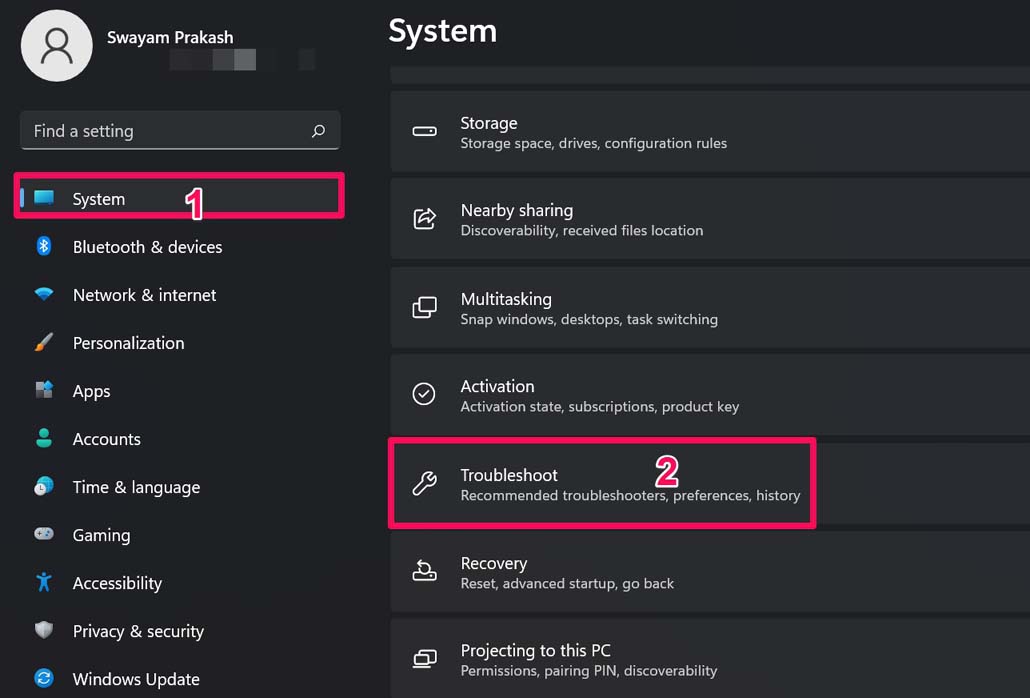
- Press Windows + I to get to the Settings section.
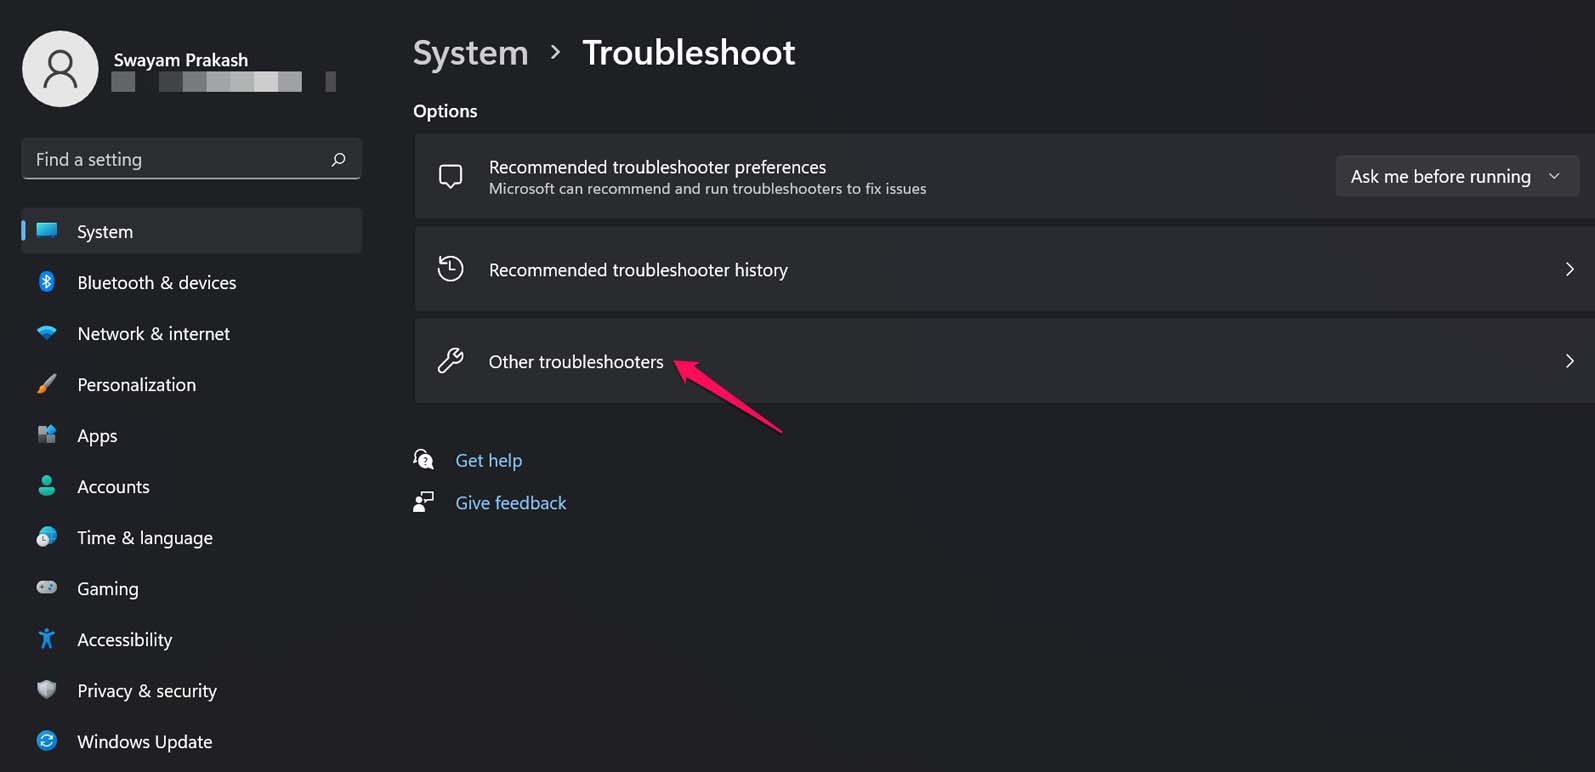
- On the left-hand panel, click on System.
- Under that navigate to the tab Troubleshoot and click on it.

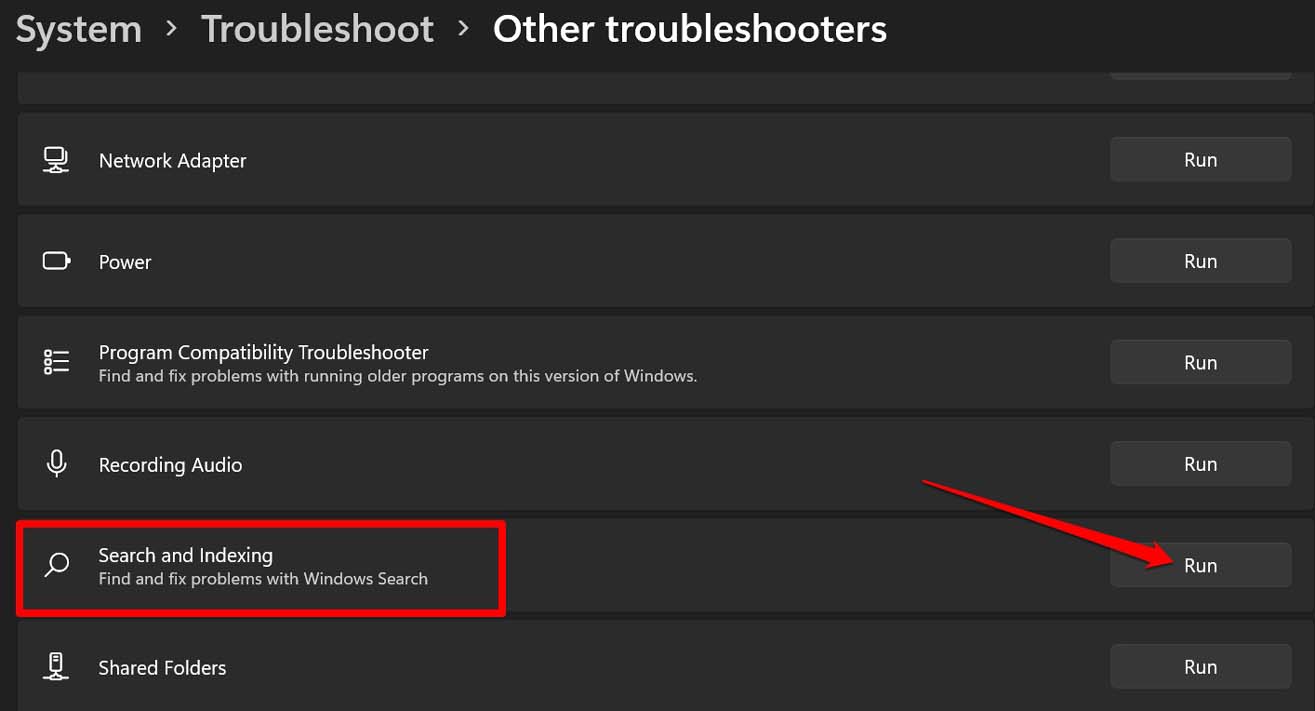
- Next, click on Other Troubleshooters.

- Scroll to the option Search and Indexing and click on the button Run.

This tool will now look for problems that are causing technical issues on the search feature of Windows work and fix the same.
7. Reregister the Default Apps of Windows
It may be some problem with the default apps of Windows that is causing the search option to not work as it should. So, the fix here is to re-register the default apps on your Windows computer.
- Open the PowerShell on your Windows PC with Administrator privilege.
- Enter the command I have mentioned below.
Get-AppXPackage -AllUsers |Where-Object {$_.InstallLocation -like "*SystemApps*"} | Foreach {Add-AppxPackage -DisableDevelopmentMode -Register "$($_.InstallLocation)AppXManifest.xml"} - Press Enter to execute the command.

- Restart your PC and then check if the search feature is now working or not.
8. Enable Collaborative Translation Framework on Windows
Collaborative Translation Framework or CTF Loader is a program that manages all the inputs done by the user through the physical keyboard, on-screen keyboard, or through voice instructions. You can usually locate it on the Task Manager.
If the CTF Loader is disabled then the inputs cannot be processed which includes inputting anything on the Windows search.
To enable the CTF Loader,
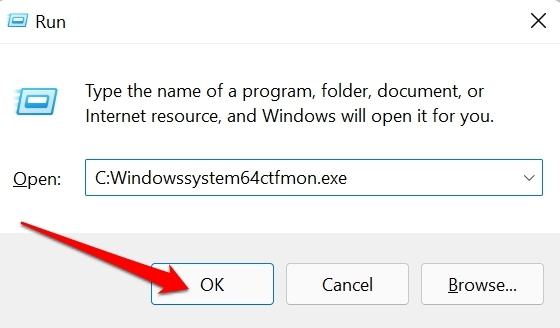
- Press Windows + R and bring up the Run command box.
- Type C:Windowssystem64ctfmon.exe

- Press the enter key after typing in the above command.
That’s it. I hope that the issue of you being unable to type in the search bar on Windows 11 will be solved after implementing the troubleshooting methods listed above.
If you've any thoughts on How to Fix Unable to Type in Search Bar on Windows 11?, then feel free to drop in below comment box. Also, please subscribe to our DigitBin YouTube channel for videos tutorials. Cheers!

