In this guide, we will show you different methods to fix the issue of Ethernet not working in Windows 11. While WiFi is usually the go-to mode for network connection, however, some instances might require you to try out the wired connectivity method.
This tried and tested traditional approach could come in handy if your PC’s wireless drivers aren’t able to identify the nearby WiFi signals. Likewise, some users are inclined towards these Ethernet cables as the latter are usually known to provide a faster network speed than their wireless counterparts.
All in all, there could be quite a few reasons why one would prefer to opt for the wired connection mode. However, some users on the latest iteration of the OS aren’t able to make full use of the same as they aren’t able to establish a successful network connection via the Ethernet.
If you are also on the same page, then fret not. In this guide, we will show you some handy methods that shall help you fix the Ethernet not working in Windows 11. Follow along.
Best Methods to Fix Ethernet Working Issues in Windows 11
Do note that there’s no universal fix as such for this issue. You will have to try out each of the below-mentioned workarounds until one of them spells out success. So keeping that in mind, let’s get started.
Fix 1: The Basic Fixes
It is recommended that you try out the basic fixes first. In some cases, these are more than enough to fix the underlying issue.
- So start off by making sure that the Ethernet cable isn’t damaged or bent in at any spot.
- Consider removing the cable from your PC and then re-insert it back in.
- Likewise, do the same from the router’s end as well.
- It is also advised that you restart your router and your PC once.
Try out these tweaks and then check if they are able to fix the issue of Ethernet not working in Windows 11.
Fix 2: Re-Enable Ethernet Adapter
Disabling and re-enabling the adapter will give it a fresh instance to work upon and this, in turn, could fix the Ethernet-related issues. There are two ways of doing so- via the Settings menu and through Device Manager. We have listed both these methods below. You may try out the one that you find easier to execute:
Via Windows Settings
- Hit the Windows+I shortcut keys to open the Settings menu.
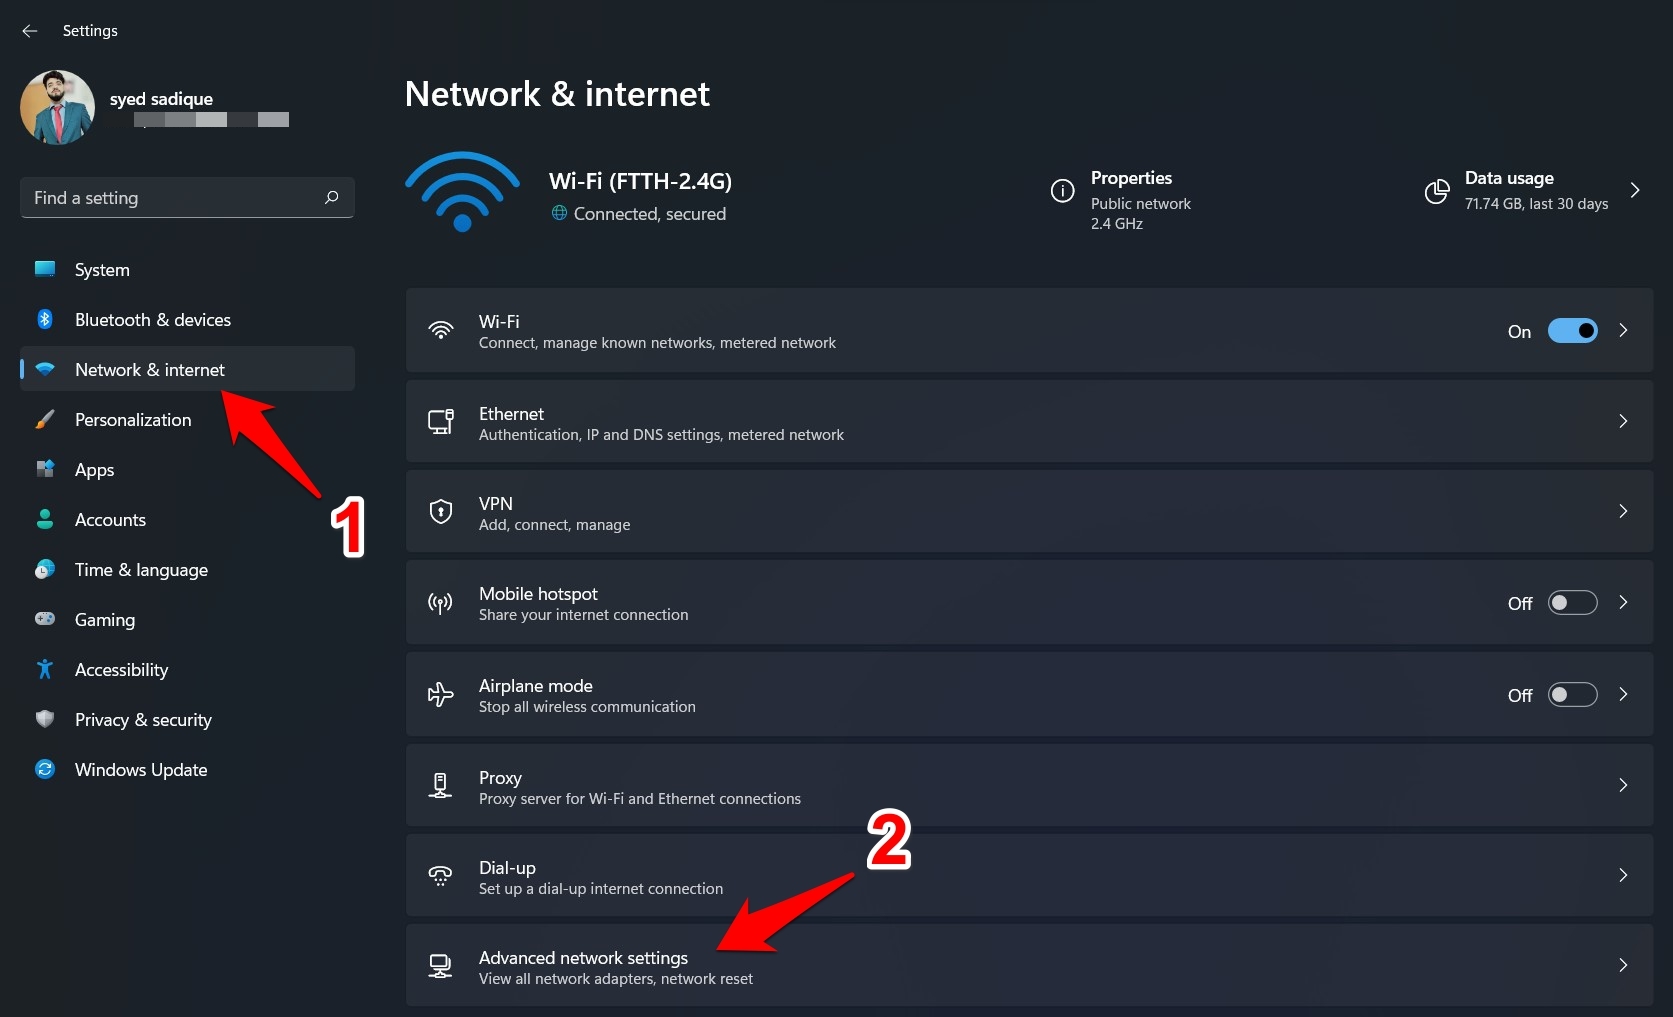
- Select Network & Internet from the left menu bar and go to the Advanced network settings.

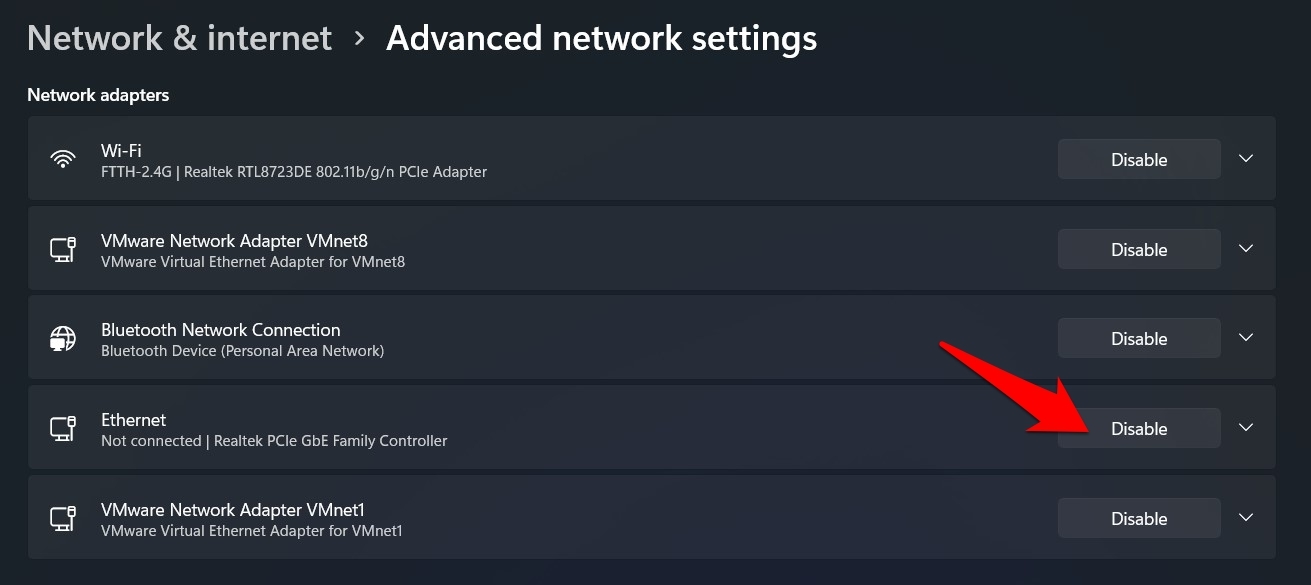
- Now click on the Disable button next to Ethernet.

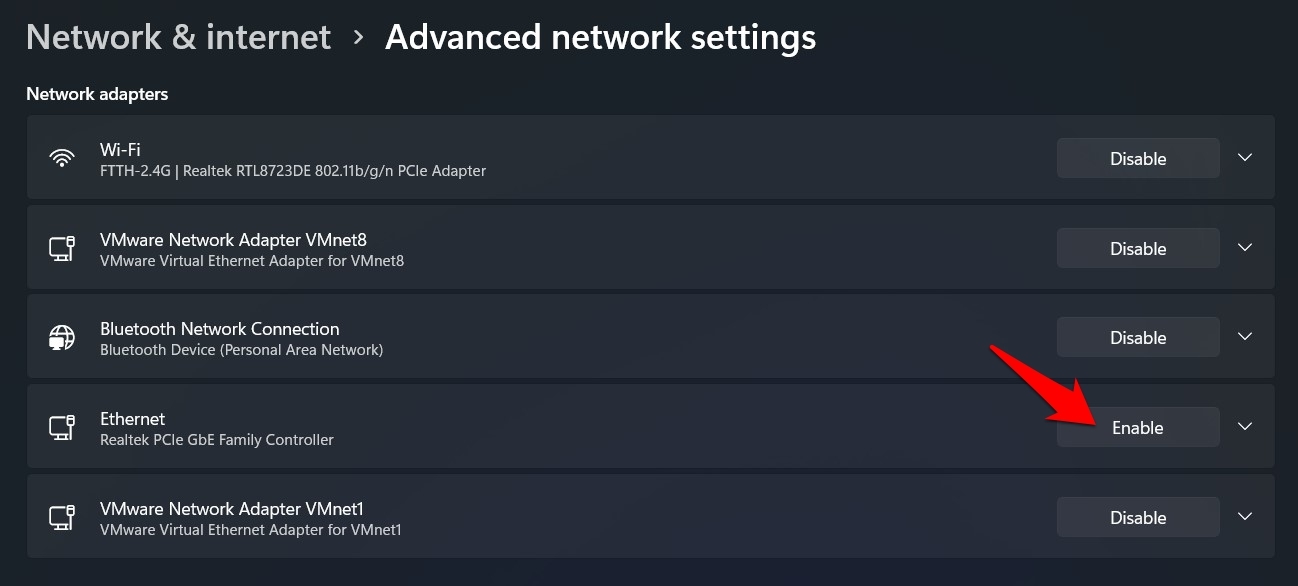
- Once it gets disabled, wait for a few seconds and then hit the Enable button.

- After it is up and running again, verify whether it has fixed the issue of Ethernet not working in Windows 11.
Via Device Manager
- Right-click on the Start menu and select Device Manager from the list.
- Then click on the Network Adapter section to further expand it.
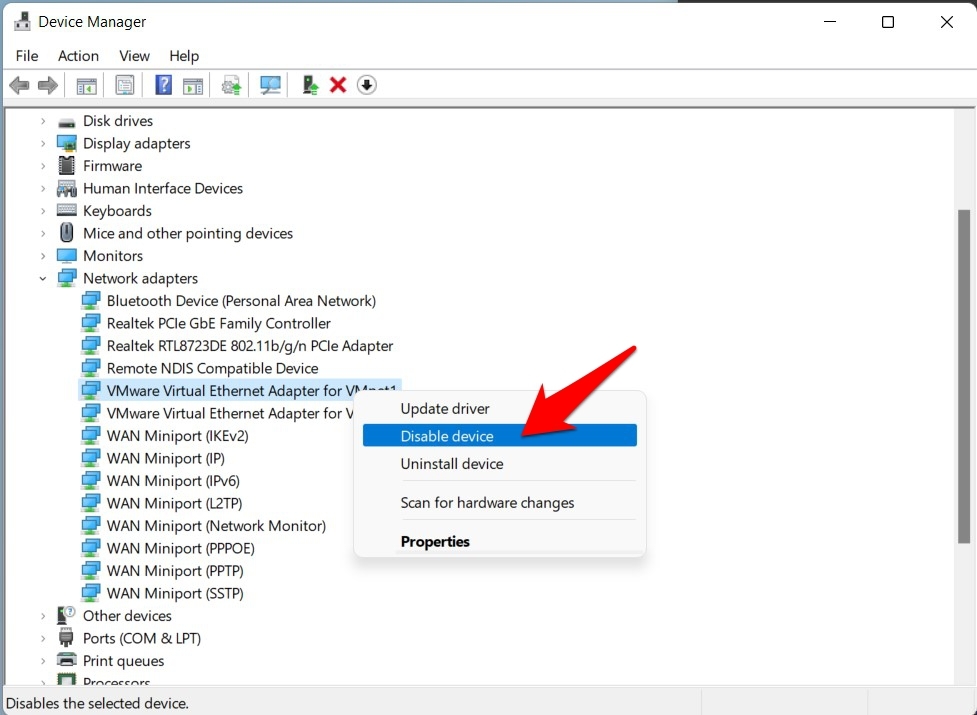
- Now right-click on your Ethernet Adapter and select Disable Device.

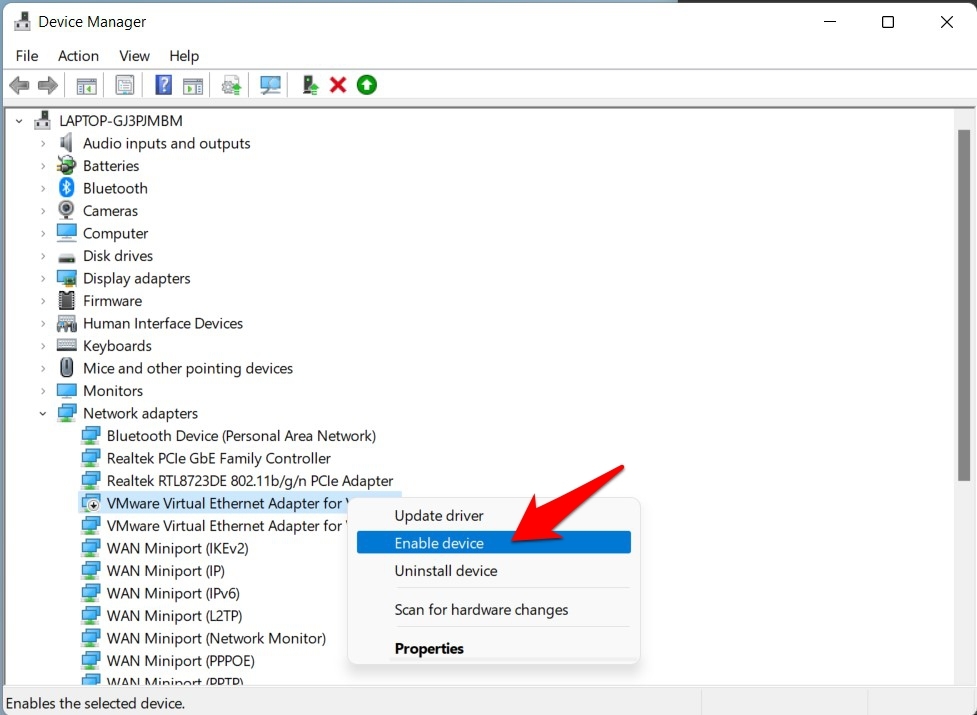
- Wait for a few seconds and then again right-click on your adapter. This time, select the Enable Device option.

- Now verify if it is able to fix the Ethernet not working in Windows 11 issue.
Fix 3: Update Ethernet Adapter Drivers
If you are using an old or outdated driver pertaining to the Ethernet, then it could lead to a few issues while trying to establish a successful network connection. Therefore, you should consider updating these drivers to their latest builds, which could be done as follows:
- Use the Windows+X shortcut keys and select Device Manager from the menu that appears.
- Then expand the Network Adapter section and right-click on your Ethernet drivers.
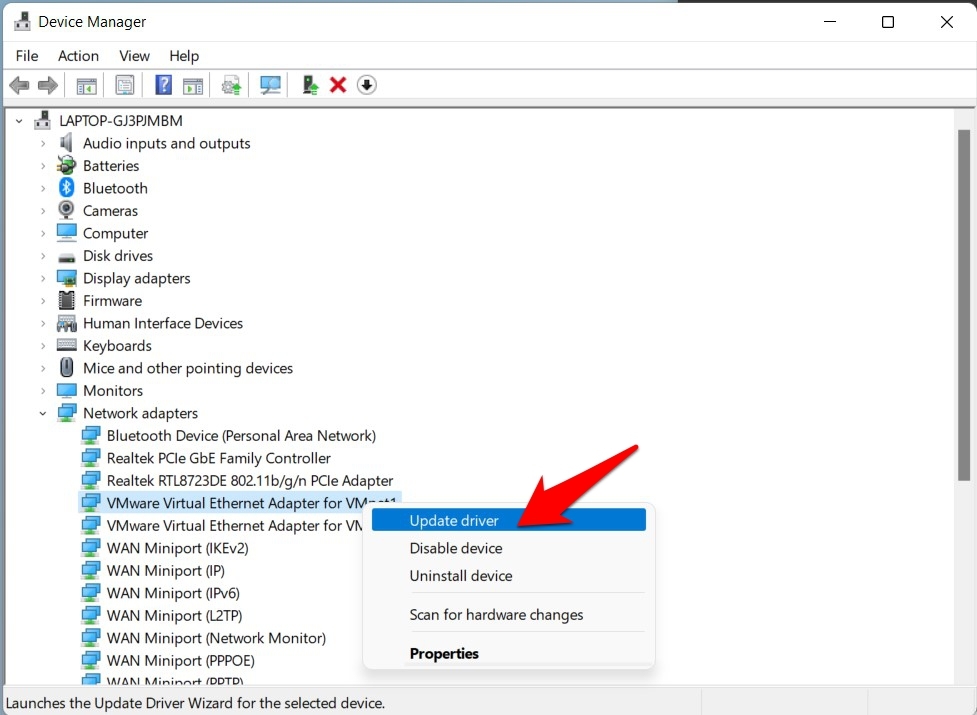
- Select Update Driver from the menu that appears.

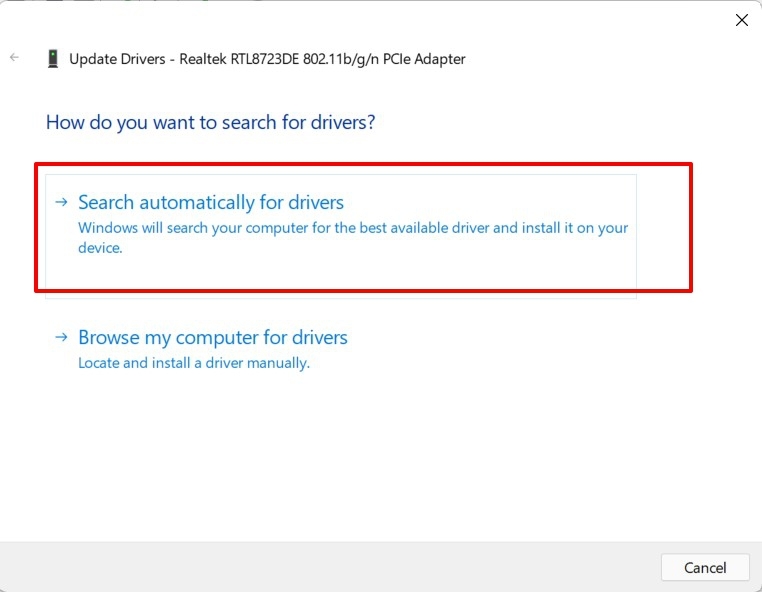
- After that, choose Search Automatically for drivers.

- Windows will now search online for the latest ethernet drivers, so make sure you’re connected to the internet via WiFi.
- If the new drivers are found, they will subsequently be downloaded and installed onto your PC.
- Once that happens, restart your PC and then check if the Ethernet not working in Windows 11 has been fixed or not.
Fix 4: Network Adapter Troubleshooter
Windows 11 comes with a built-in troubleshooter app that is designed specifically to deal with network-related issues. Taking it even further, one of its components is made to scan and fix the issues pertaining to the ethernet. And this is exactly what we require at this point in time. So let’s put this troubleshooter app to test right away:
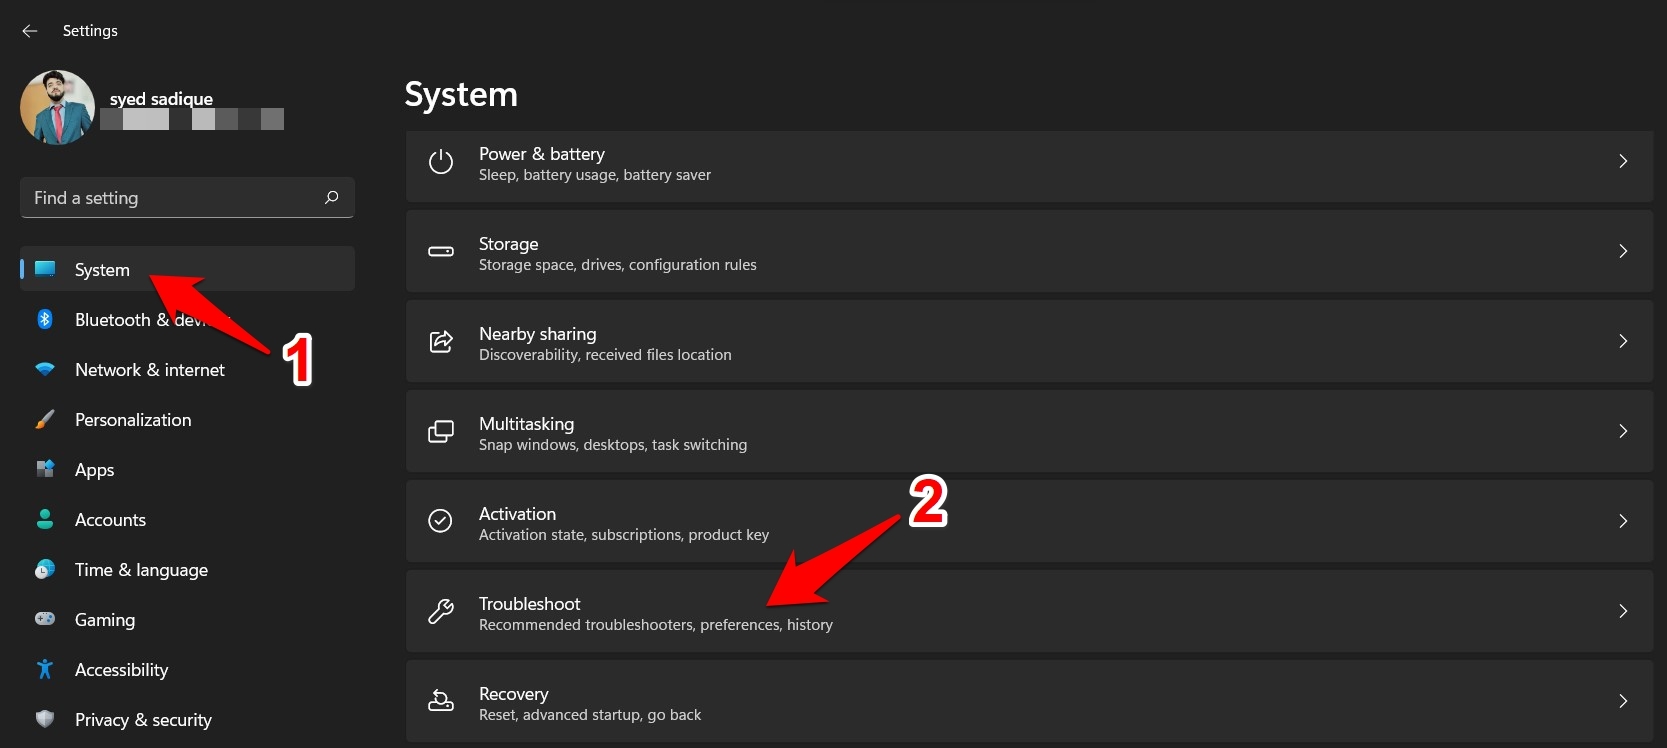
- To begin with, bring up the Settings menu via Windows+I shortcut keys.
- Then select System from the left menu bar and go to the Troubleshooter section.

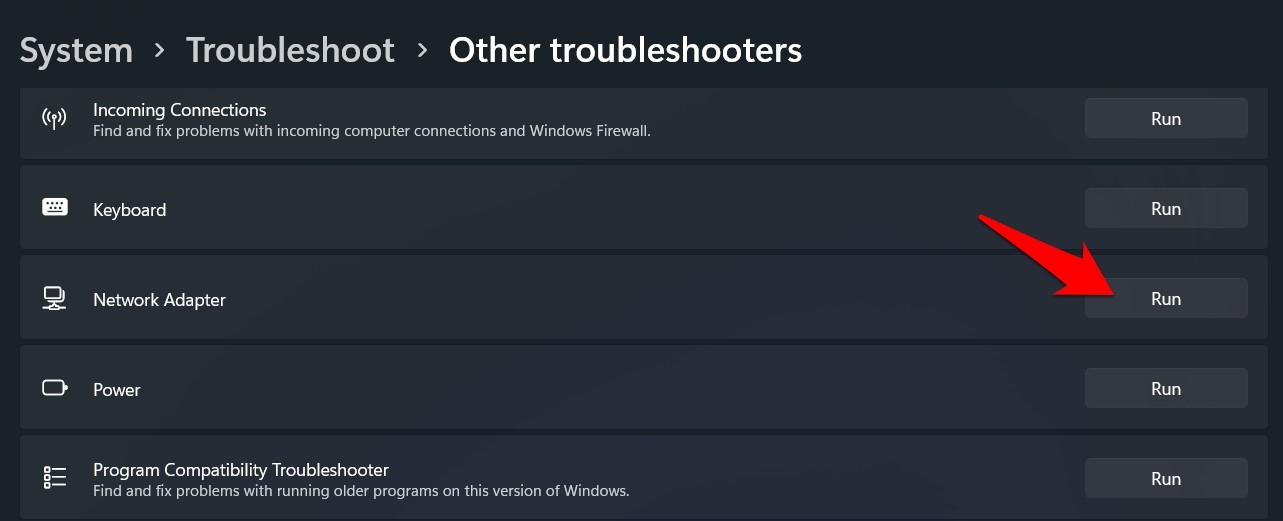
- Now head over to Other Troubleshooter and click Run next to Network Adapter.

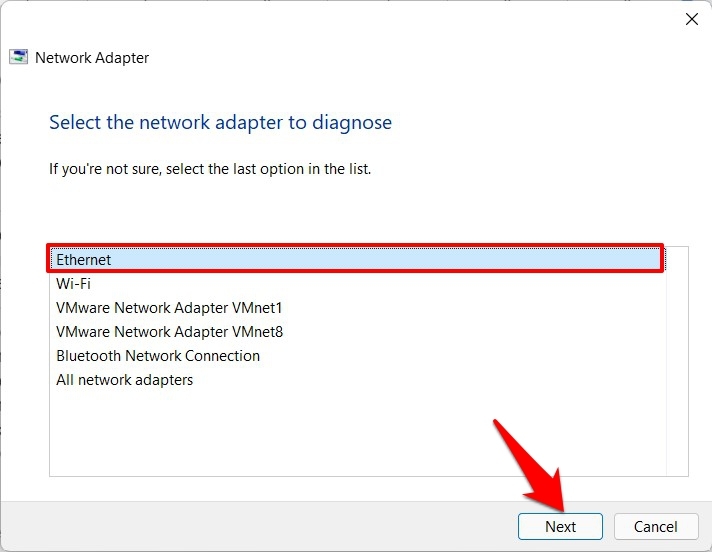
- Select Ethernet from the list of network adapters to diagnose and click Next.

- Windows will now perform a scan related to the issues with this adapter and shall then bring up the associated fix as well.
- Select the most appropriate fix from the list to apply it. Then reboot your PC and verify if it is able to fix the issue of Ethernet not working in Windows 11.
Fix 5: Re-Install Ethernet Adapter Drivers
If the network adapter drivers or its configuration file gets corrupted, then simply updating it to the latest build will do no good. Rather, you should consider taking the nuclear approach of uninstalling them from your PC and then re-installing it back again. Here’s how it could be done:
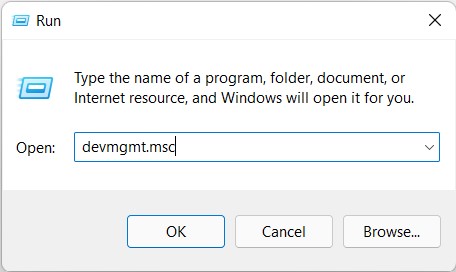
- Bring up the Run dialog box via Windows+R shortcut keys.
- Then type in devmgmt.msc it and hit Enter. This shall launch the Device Manager.

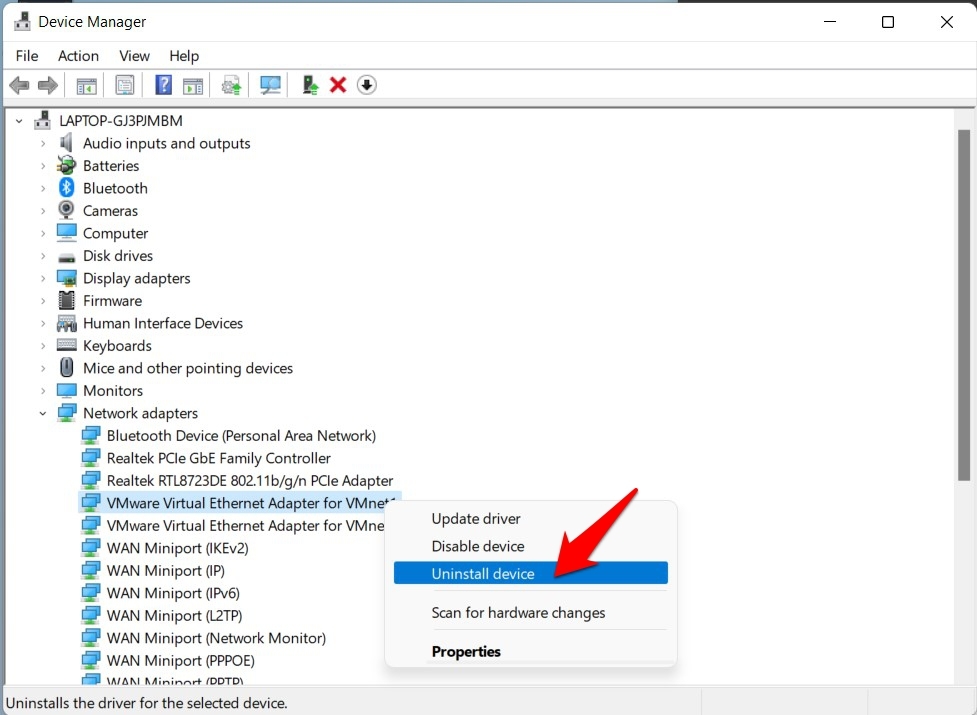
- Now to the Network Adapter section and right-click on your ethernet adapter.
- Select Uninstall Device from the menu that appears.

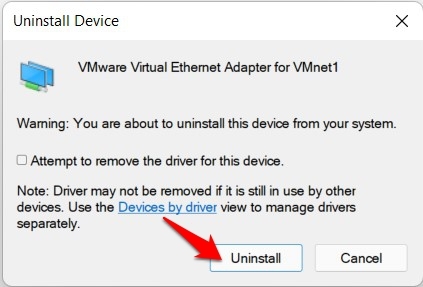
- After that, click Uninstall from the confirmation dialog box.

- Once the drivers have been removed, restart your PC. As soon as it boots up, Windows should automatically install the Ethernet drivers.
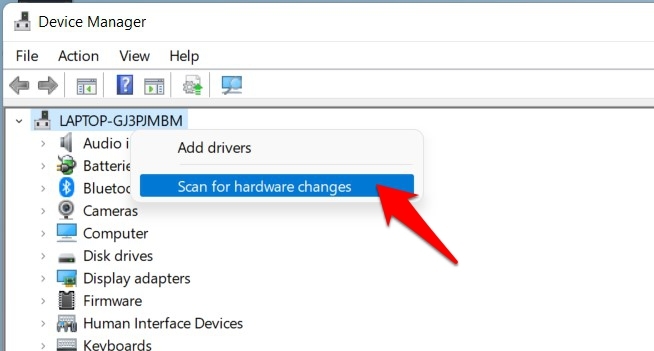
- However, if that doesn’t happen then open Device Manager, right-click on your PC name situated at the top, and select Scan for hardware changes.

- Windows will now search for the missing drivers and install them right away. When that is done, verify if the Ethernet not working in Windows 11 issue has been fixed or not.
Fix 6: Reset Network
If none of the aforementioned methods spelled out success, then you should consider resetting your PC’s network settings back to its factory default, i.e. exactly how it came shipped out of the box. Here are the required instructions for the same:
- Use the Windows+I shortcut to open the Settings page.
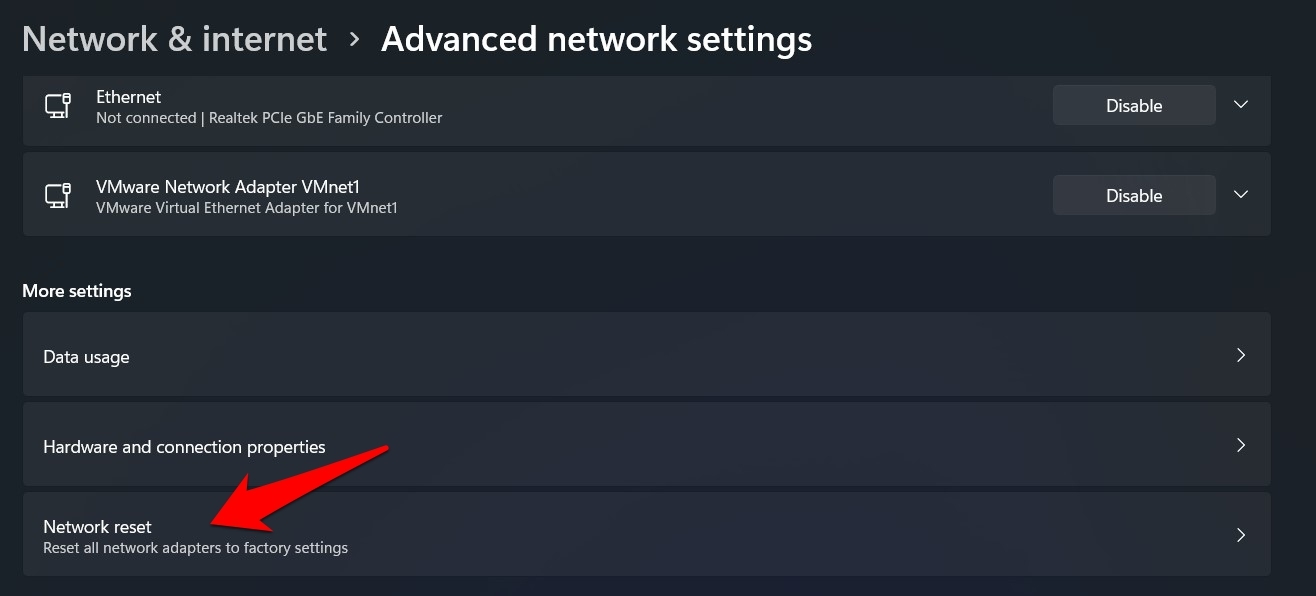
- Then select Network & Internet from the left menu bar and go to the Advanced network settings.

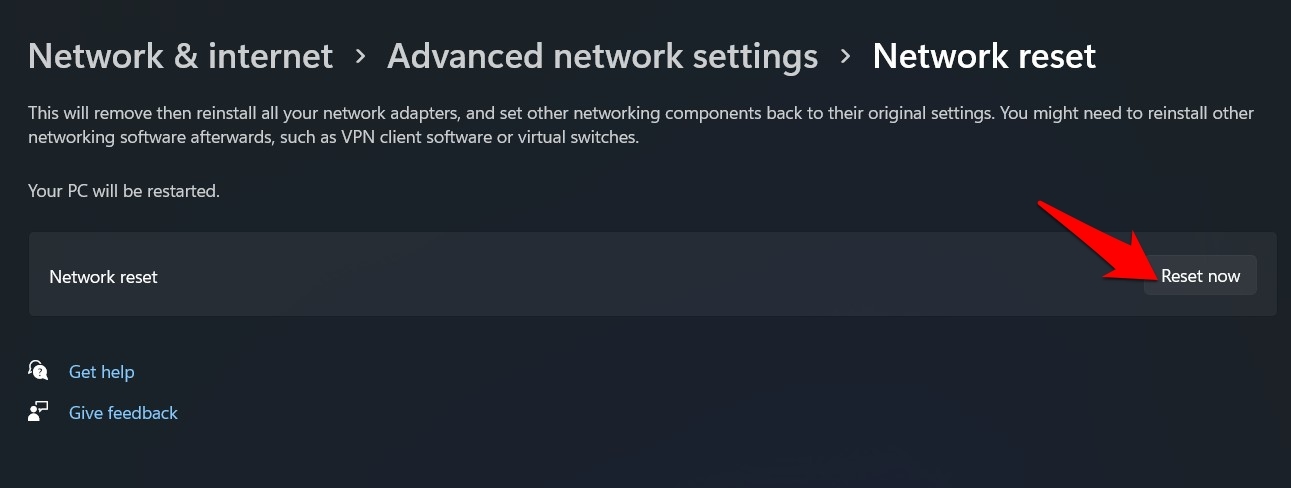
- Scroll to the More Settings section and click on Network Reset.

- Finally, click on Reset Now > Yes in the confirmation dialog box that appears.

- Windows will revert the network settings to their default state and this, in turn, should fix the ethernet issue as well.
Conclusion
So with this, we round off the guide on how you could fix the issue of Ethernet not working in Windows 11. We have shared six different methods for the same. Do let us know in the comments section which one worked out in your favor.
If you've any thoughts on How to Fix Ethernet Not working in Windows 11?, then feel free to drop in below comment box. Also, please subscribe to our DigitBin YouTube channel for videos tutorials. Cheers!
