Windows 11/10 can’t connect to this network is one of those errors inherited from Windows 10 edition. It is a situation that baffles many users and ends up creating confusion on what is causing the network error. There are several contributing reasons why Windows 11/10 can’t connect the selected network, and we will identify the culprit to resolve it.
Why Does Windows 11 Show ‘Can’t Connect to this Network‘ Error?
I have upgraded the software to the latest Windows 11 in the machine and it is indeed having shortcomings from the predecessor. Of course, you can solve it without assistance from the third-party tools available out there. However, I want to point out general solutions to fix the network problems before proceeding to the advanced solutions. Do not skip them, even if you have already tried it a few minutes back.
- Shut down and power the Windows machine back on
- LAN cable wear and tear can create connection problems
- Remove the LAN cable and clean the cable using a dry cotton cloth
- Remove the cable from the Wi-Fi router and clean it with a dry cloth
- Connect a smartphone or tablet to the same network and confirm the internet status
- Use Wi-Fi instead of LAN cable to connect internet
- Contact ISP to confirm servers uptime
I urge the readers to go through every troubleshoot that I have suggested above, and it will make a difference while moving to advanced solutions. It’s time to apply advanced solutions since you have gone through the basics.
Troubleshoot Internet Connection
Microsoft equipped Troubleshoot tool in the earlier Windows 10 version, and it has been passed down to the 11th edition. We should make good use of it since it can go through multiple factors.
- Press the “Start” key and click on the “Settings” icon.

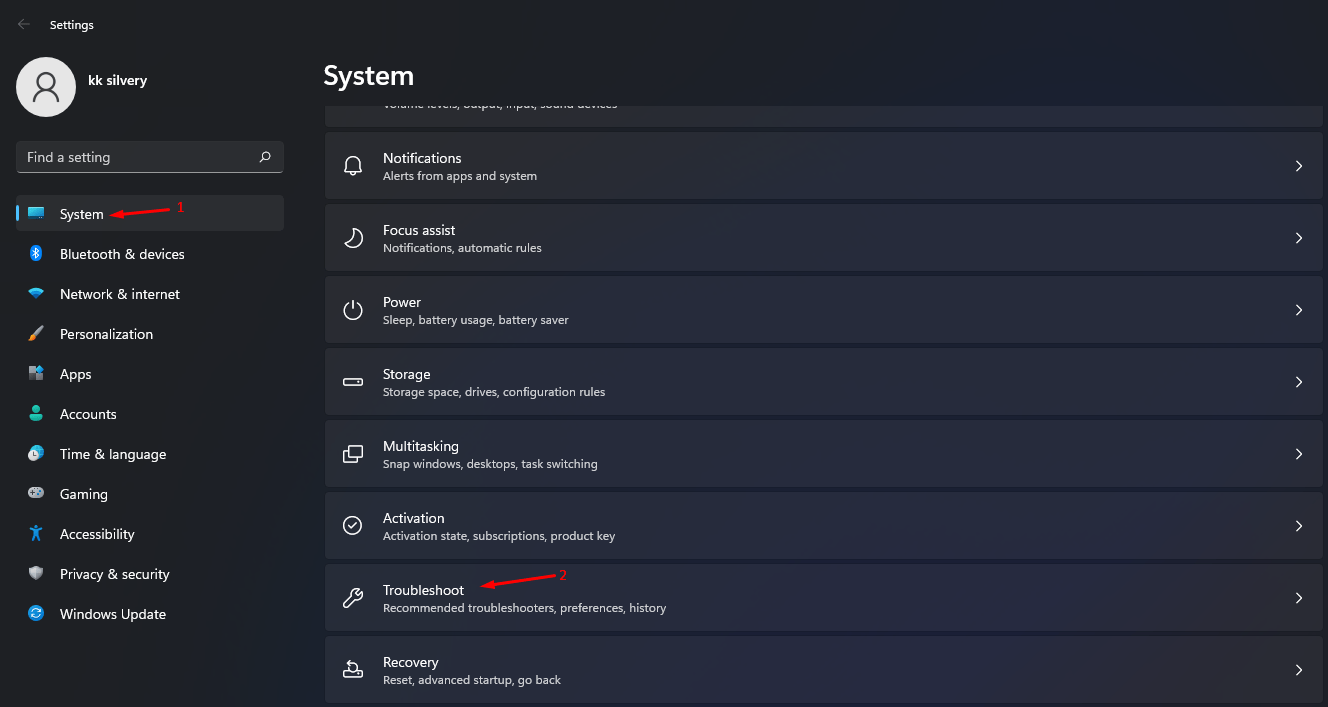
- Choose “System”.

- Click on “Troubleshoot” to continue.

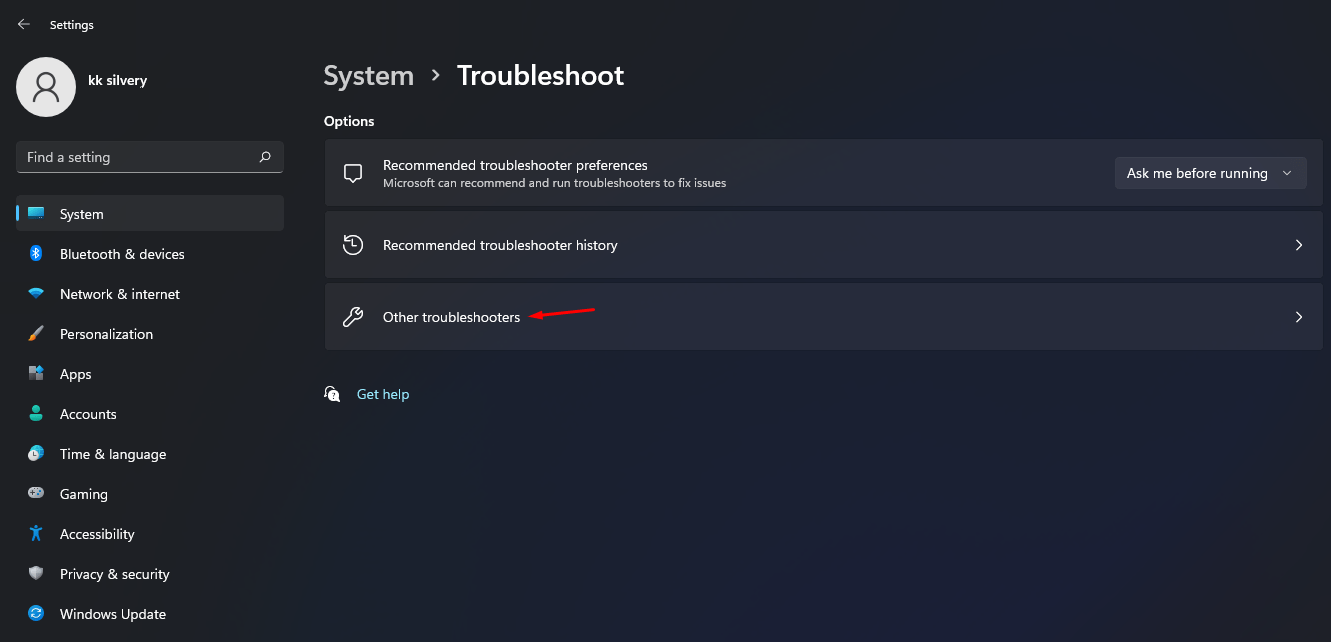
- Select “Other troubleshoots” to view more options.

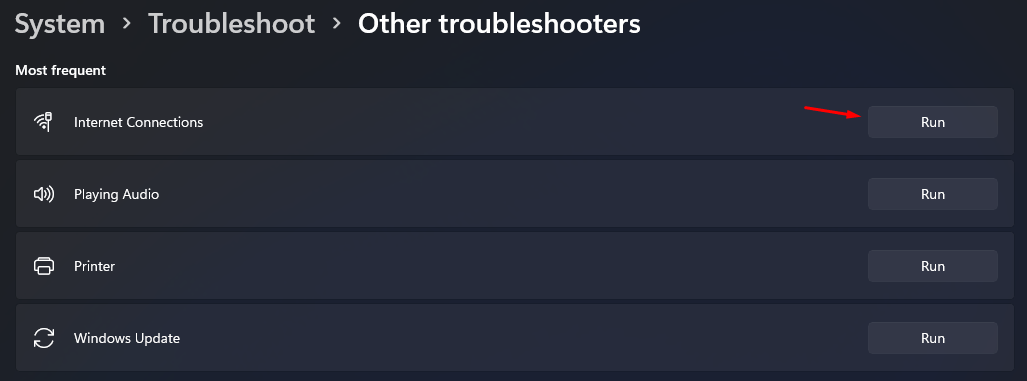
- Find “Internet Connection” and then click on “Run” to scan the network for problems.

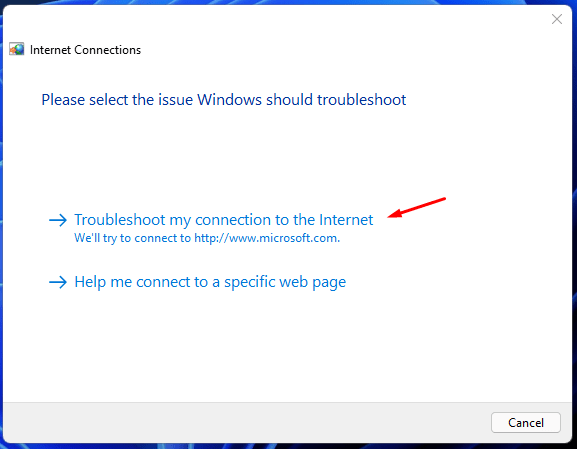
- A new window will pop up on the screen and click “Troubleshoot my connection to the internet” to run the scan.

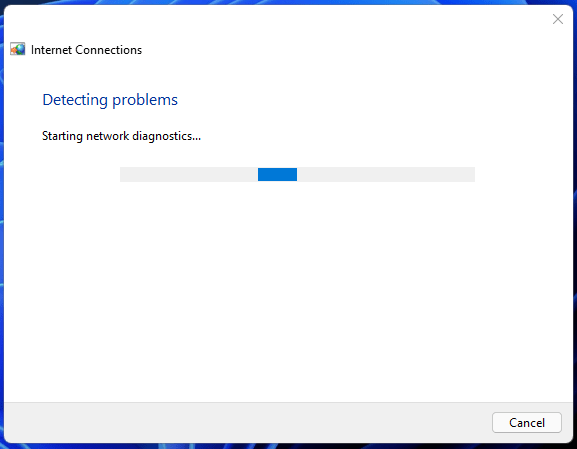
- Let the tool run a deep scan, which takes about one minute or less to finish the task.
Note: Older machines might take longer than two minutes to finish the network scan.

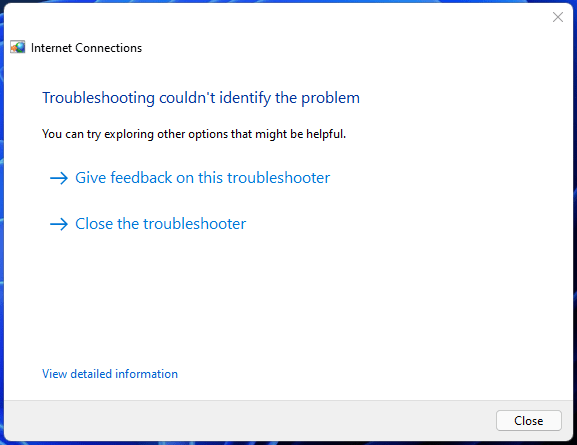
- My Windows 11 PC doesn’t have network problems.

A disparate result might have shown in your case, so take necessary action to resolve the Windows network problem.
Let Router or Modem Sleep
When was the last time you let the Wi-Fi router or internet modem rest? The majority of the machines require sleep time for optimal performance and to cool off the heating components. Of course, it will assist the machine to restart the comms again and eliminate problematic errors out of the equation.
- Power off the Wi-Fi router or modem.
- Let it sleep for ten minutes or so.
- Turn it back on after the shut-eye period ends.
In case, if the machine doesn’t have a power switch, then you can remove the power cable from the socket. Do not worry about short circuits because I have done this several times in the past on the same router, and never faced any complications whatsoever.
Disable Ethernet Authentication
All new Windows 11 shifted the EAP protection from network adapter settings into the GUI itself. Let me show you how you can disable Ethernet authentication on Windows PC.
- Press Windows Key + I keys together to open Settings.
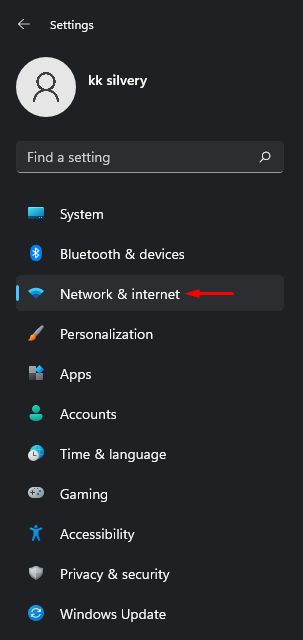
- Click on “Network & Internet” to continue.

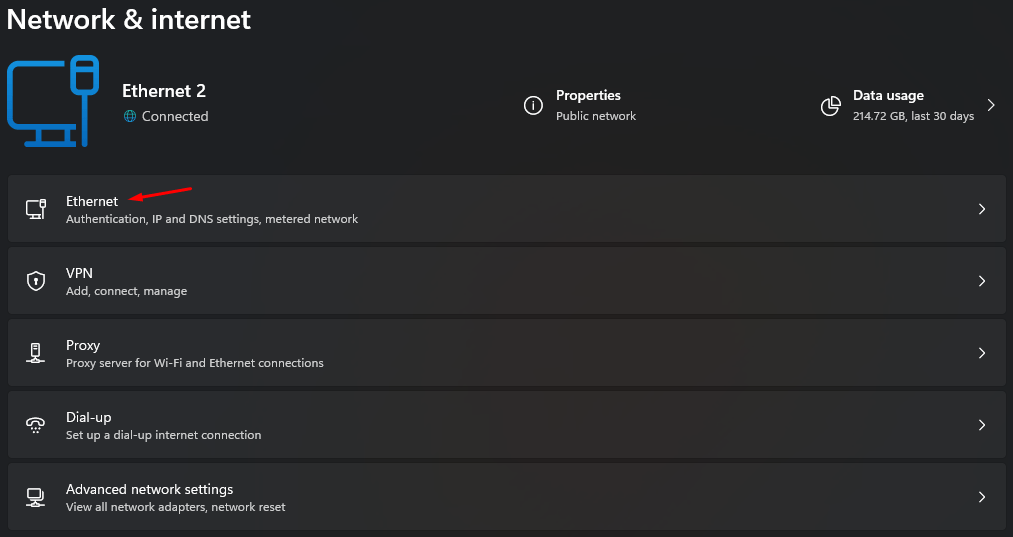
- Choose “Ethernet” to continue.

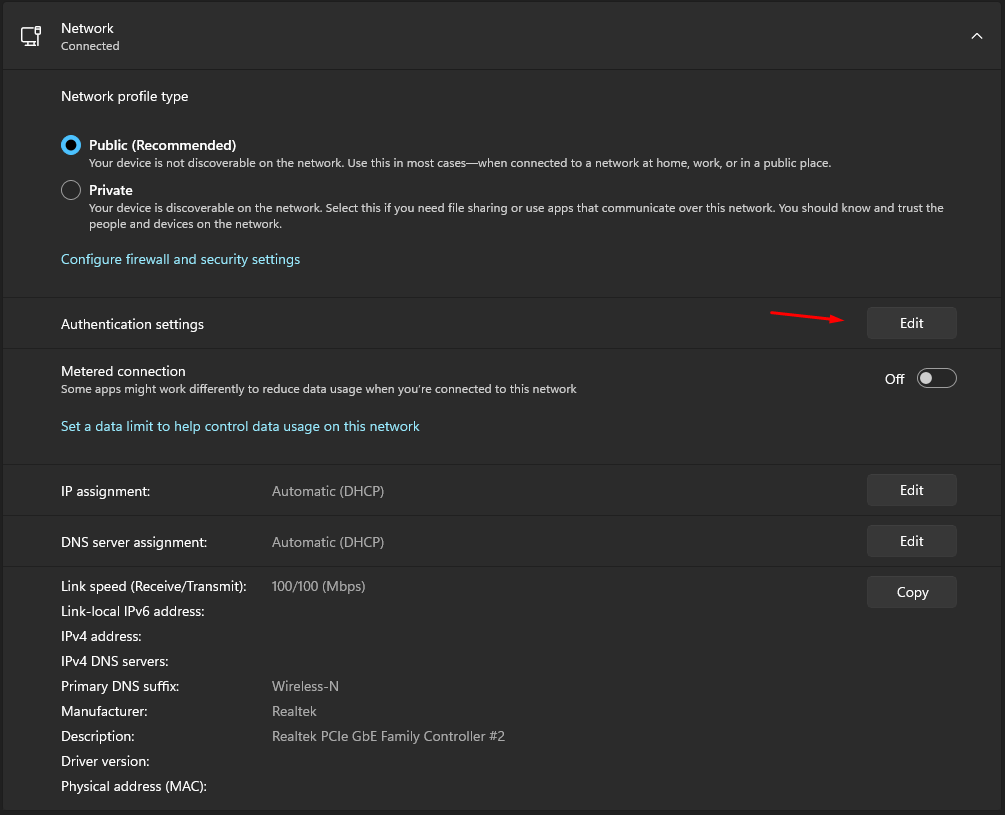
- Find “Authentication Settings” and then click on “Edit” to view more options.

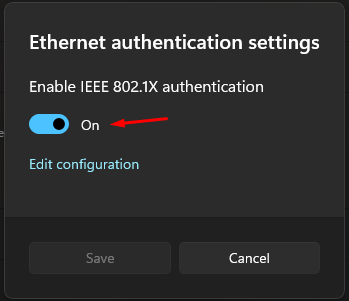
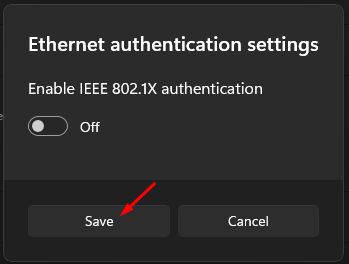
- Click on the button to disable EAP.

- Click on “Save” to confirm the changes.

Restart Windows PC to save changes and make it effective from the next session. You can always go back and revert the EAP modifications but make sure to reboot the PC.
Update Network Driver
Windows 11 is an evolving software, and you have to keep the drivers updated to avoid software and hardware communication complications. Let me show you a safe way to update it, and then move on to the advanced solution.
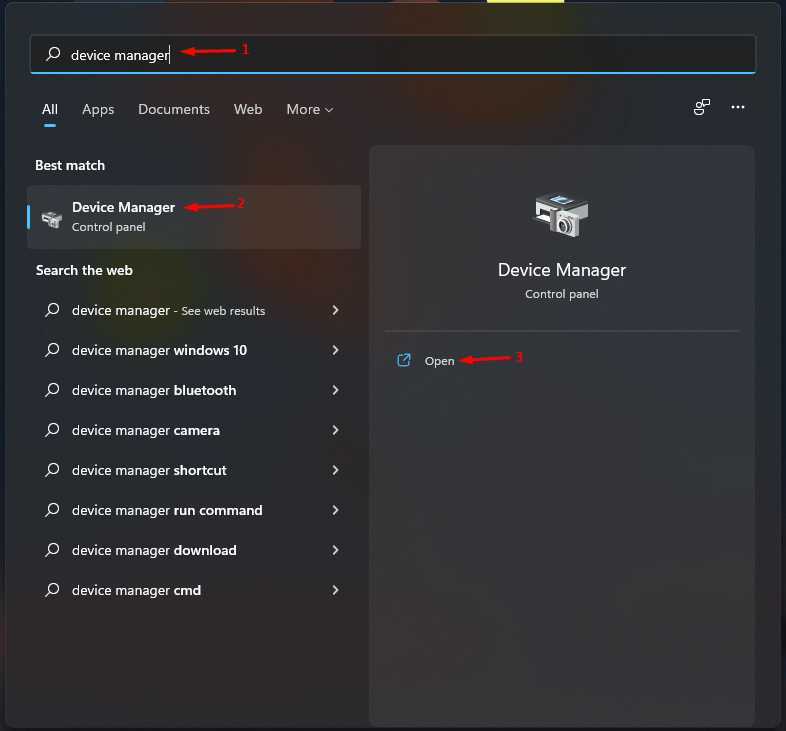
- Press the “Start” key.
- Search “Device Manager” and open it.

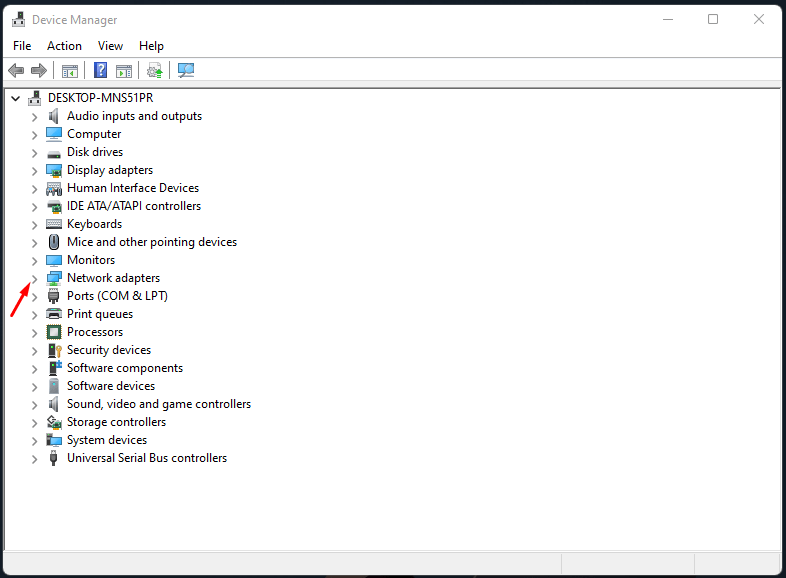
- Click on the drop-down button beside “Network Adapters”.

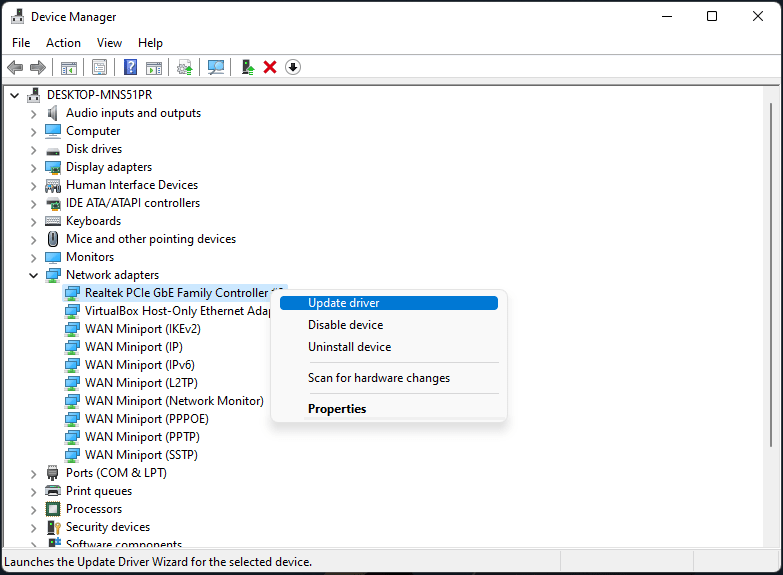
- Click to select the network adapter and right-mouse click to view more options, and then choose “Update driver” to continue.

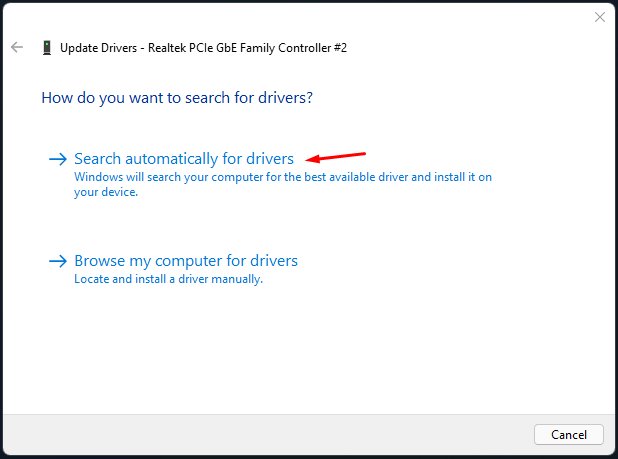
- Click on “Search automatically for drivers” to continue.

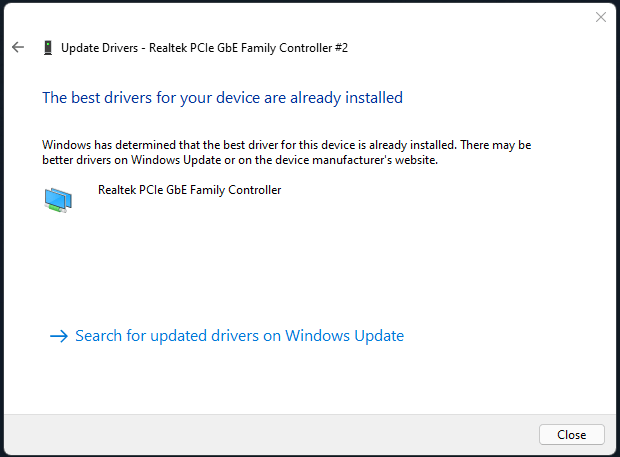
- My Windows 11 PC has the latest offering from the Realtek manufacturer.

- My Windows 11 PC has the latest offering from the Realtek manufacturer.
You can manually search for the updated and stable network drivers from the official laptop or motherboard website. I prefer the manual hunt since they are designed specifically for the machine, and it’s worth your time.
Forget and Reconnect to the Wi-Fi Network Again
A miscommunication is happening between the Wi-Fi router and the wireless module in the machine. Erase the configuration in the Windows by forgetting the network and re-connect to the same network again. You have to enter the wireless network password, so make sure to note it down beforehand.
- Click on the Wi-Fi icon located in the Action Center.
- Now, right-click the Wi-Fi icon to view more options.
- Click on “Forget” to remove the wireless network.
- Windows 11 will keep the network in the search list, so double-click on the network name and enter the password.
- Enter the password and then click on “Connect”.
- You have successfully connected to the Wi-Fi network.
Now, try to connect the Windows 11 PC to the internet.
Faulty LAN Port
It’s not common for the on-board network adapters to reach end-of-life (EOL) and we should address the faulty hardware as well. I propose three solutions that you can consider and save yourself a lot of funds.
- Claim the warranty, which is an ideal solution, and stick to what you have.
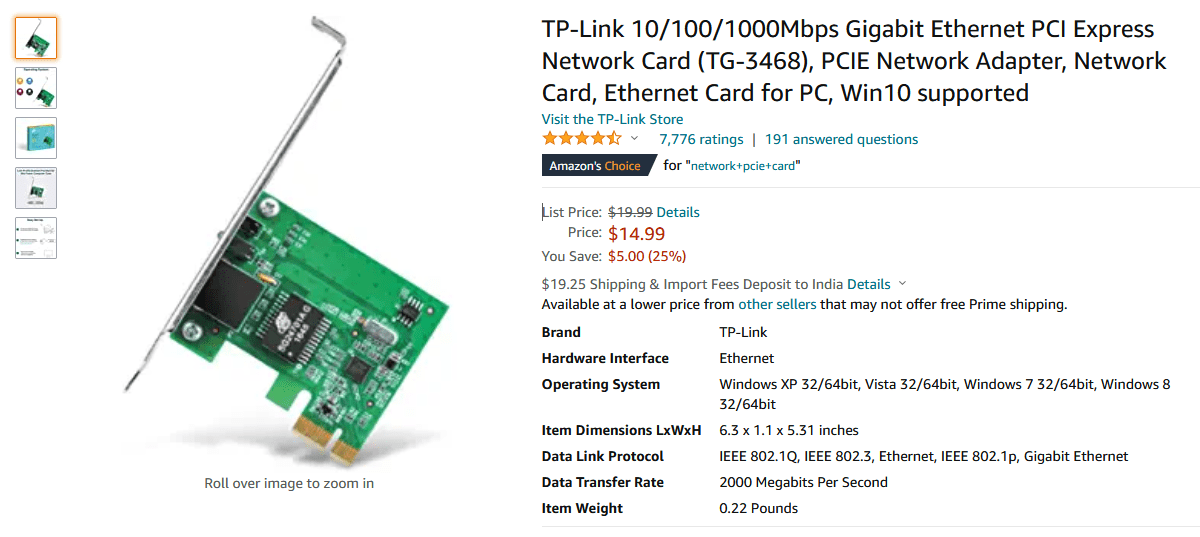
- Ran out of warranty? Why not purchase PCI Express Network Card for under $15?

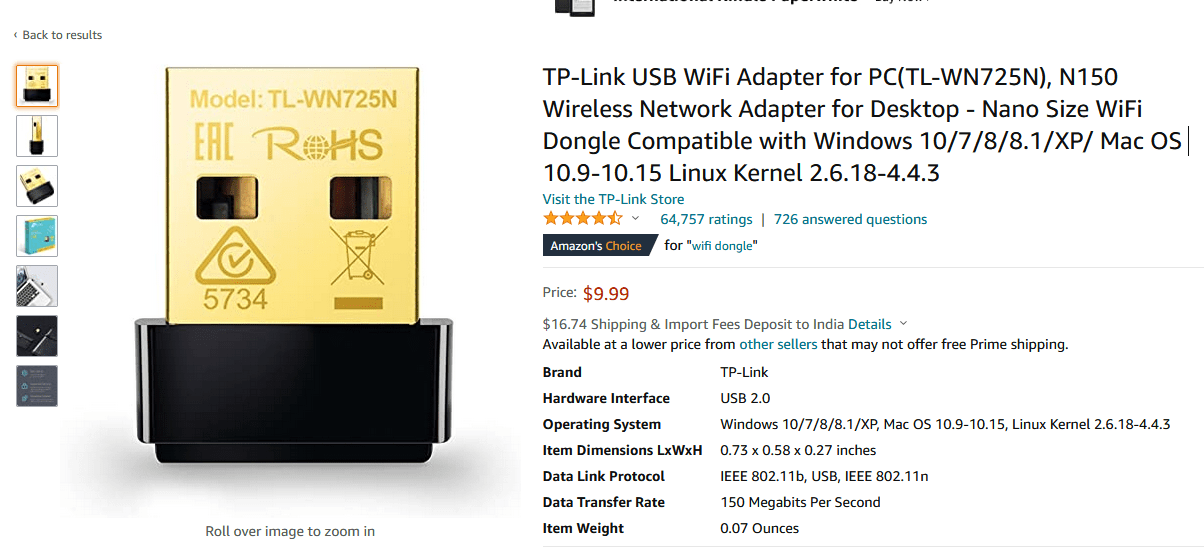
- Buy a Wi-Fi dongle under $10?

- Get the onboard network adapter repaired from the official store.
I would choose the PCI network card because it will utilize the maximum internet bandwidth and draw the highest download/upload speeds. USB Wi-Fi dongle is a reasonable solution, but it’s not recommended for gaming and has signal limitations.
Disable VPN Network
Many Windows administrators have set up VPN points in the machine. Disable VPN in the PC and solve Windows can’t connect to this network error.
- Press Windows Key + I to open Settings.
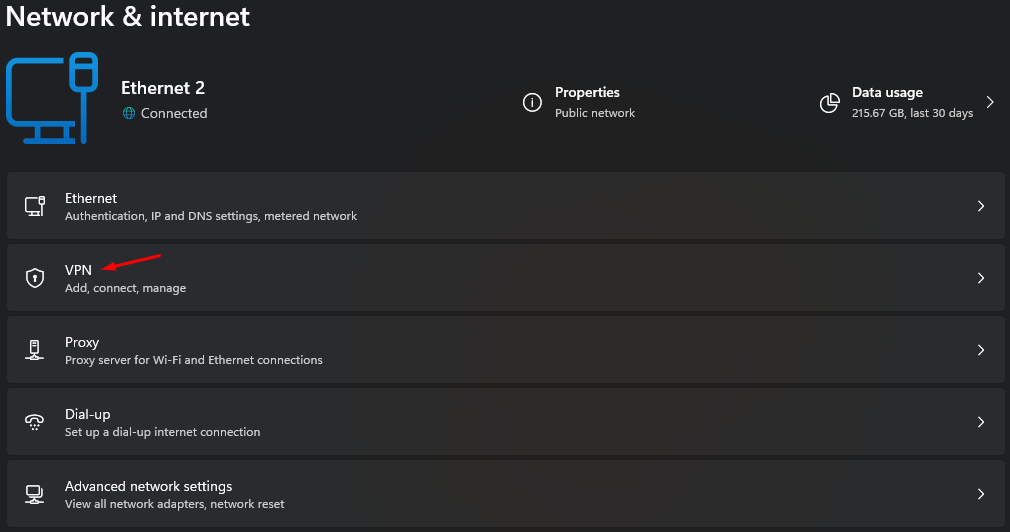
- Click on “Network & Internet” to view more options.
- Choose “VPN” to view more options.

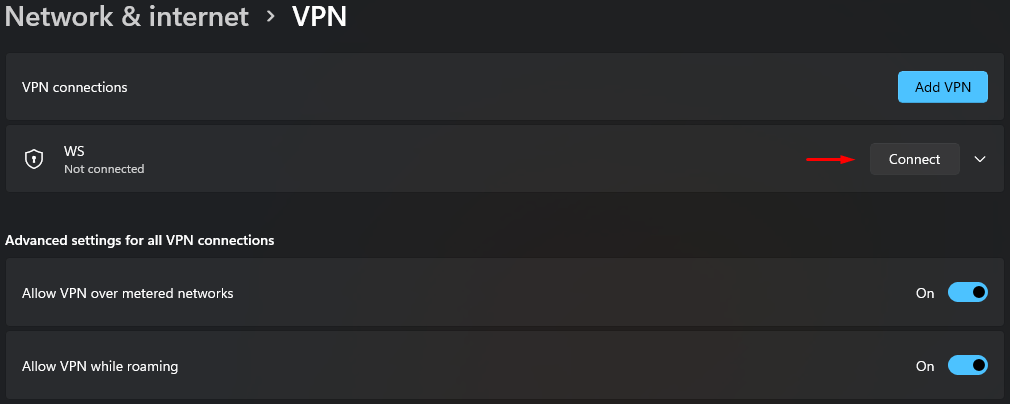
- Make sure VPN is disabled under “VPN Connections”.

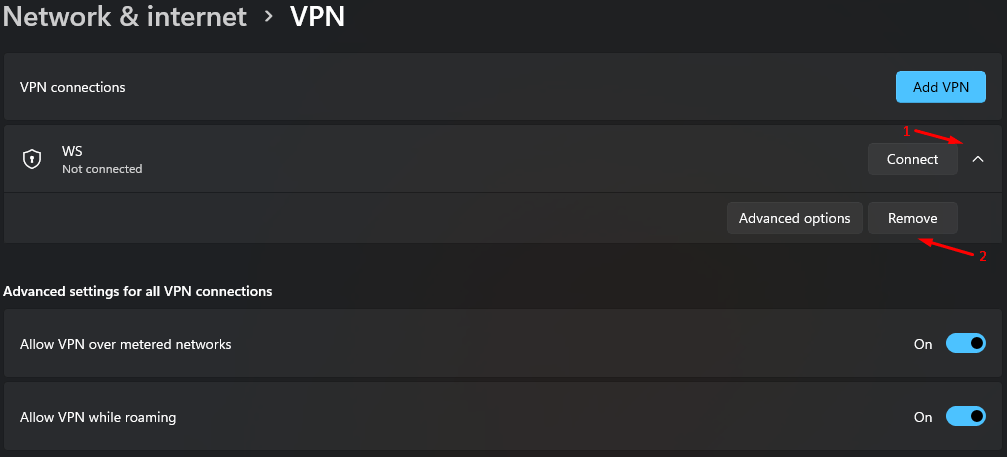
- You can take another step ahead and remove the VPN point if you believe that it is causing the issue. Click on the drop-down icon and click on “Remove” to delete the VPN point.

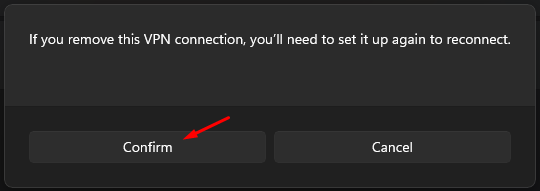
- Click on “Confirm” to save changes.

Restart Windows 11 machine to save the changes and dump the temporary files. You can set up a VPN point again on Windows 11 PC, but there is no way to recover the previous access points.
System Restore
Windows 11 inherited System Restore from its predecessors and its delightful news. A system restore won’t interfere with the stored data and restores the software to an earlier point. Back up the data in another storage drive as a precautionary measure.
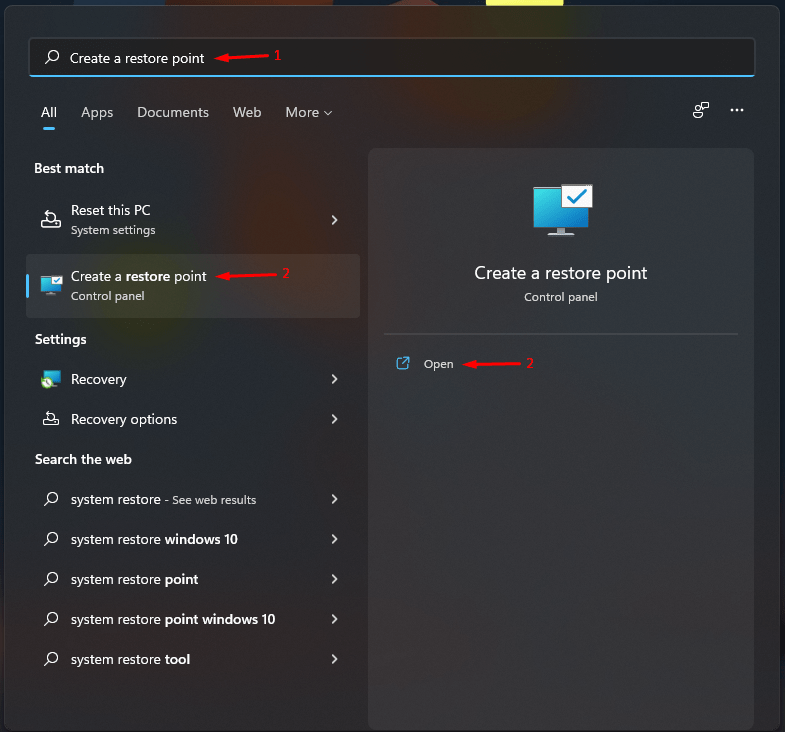
- Press the “Start” key.
- Type “Create a restore point” and click to open it.

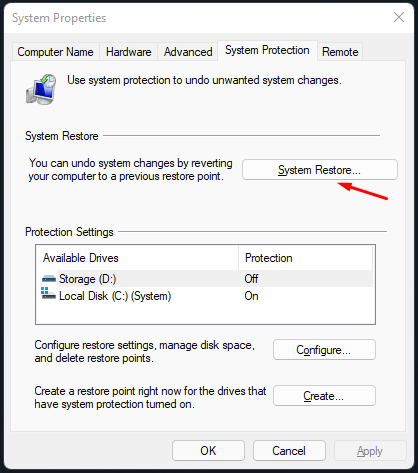
- Click on the “System Restore” option.

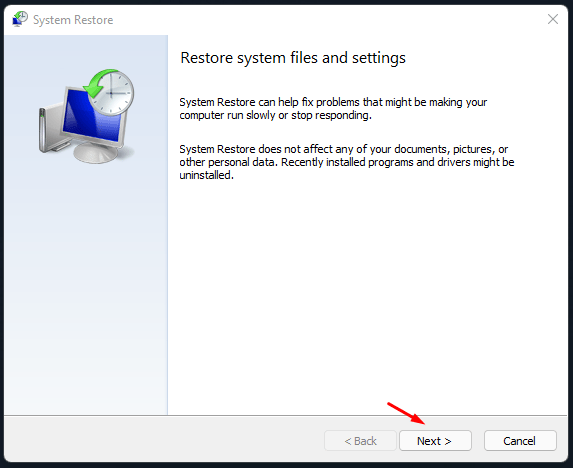
- Click on “Next” to proceed further.

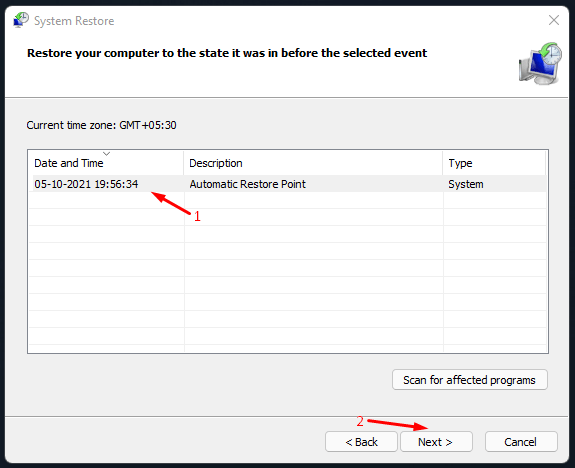
- Select a restore point and click on “Next” to proceed further.

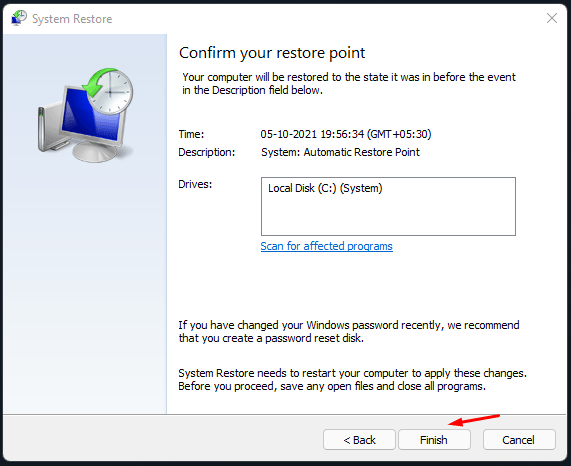
- Click on “Finish” to start restoring the machine to an earlier point.

Your Windows 11 machine will restart and start the restoration process, meanwhile do not unplug the power cable. Older machines with mechanical drives will take a longer time to finish the restoration process. The lock screen will show up on the screen after the System Restore is finished.
Bottom Line
I have shown you working solutions to fix “Windows can’t connect to this network” in the Windows 11 or earlier version. The visual instructions may seem different for Windows 10 users, but the solutions are effective for both operating systems. You can uninstall the network drivers from Windows PC. But make sure to download Windows 11/10 compatible drivers from the official site beforehand. Let us know which solution fixed the “Windows can’t connect to this network” error in the comment section below.
If you've any thoughts on [7+ Methods] Fix ‘Can’t Connect to this Network’ in Windows 11, then feel free to drop in below comment box. Also, please subscribe to our DigitBin YouTube channel for videos tutorials. Cheers!
