There is a common problem that users regularly face: being unable to connect to the printer. It’s a problem where your computer and printer struggle to communicate and encounter the “Windows Cannot Connect to the Printer” error on Windows 11. This can be a real headache when you just need to print something important. If you are experiencing the same issue, this guide is here to make your printing experience smoother.
In this guide, we’ll walk you through the process in easy and simple terms, ensuring that your printer is always prepared when you need it, whether you need it for work documents, school assignments, or personal projects. So let’s get this annoying issue resolved and your printing tasks back on track.
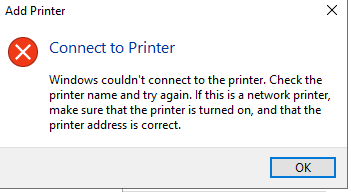
Top Ways to Fix Windows Cannot Connect to the Printer Error
Here’s a step-by-step guide to help you resolve the “Windows Cannot Connect to the Printer” issue on Windows PC
1. Check Printer Connections and Power
Ensure that your printer is turned on and properly plugged in. Printers require electricity to operate, the same as when you charge your phone. Make sure the cables are securely attached as well. Make sure your printer is on the same network as your computer if you’re using Wi-Fi. These simple procedures can frequently resolve the “Windows Cannot Connect to the Printer” issue and allow you to resume printing.
2. Restart the Printer
Just like a quick nap can refresh us, turning off the printer and then turning it back on helps it refresh its connections. The “Windows Cannot Connect to the Printer” issue usually gets fixed by doing this. Try it, and your printer might begin operating normally once more. To do so:
- Press the power button to turn off your printer.
- You must disconnect the power line from your printer after the printer’s display goes off.
- Before reattaching the power cable, wait at least 20 seconds.
- You are now able to order a test print from your Windows PC and check for connection problems.
If the problem still exists, try the other solutions mentioned below.
3. Check Printer Hardware
It’s important to inspect the printer’s hardware. There are possibilities that your printer had a paper jam or ran out of ink or toner; in that case, it wouldn’t print correctly. Check your printer for any issues, including paper jams, empty ink cartridges, and any obvious hardware faults. By fixing these physical problems, you can frequently fix the “Can’t Connect to Printer” error and make sure your printer is prepared to function whenever you need it.
4. Update your Printer Driver
Updating your printer’s driver is like giving it new instructions to work better. For your computer and printer, drivers act as interpreting services. Installing it can fix glitches causing the “Can’t Connect to Printer” error, making your printer and computer communicate smoothly again.
To do so, follow the instructions below:
- Press the Windows key to bring up the Start menu, then type “Device Manager” into the search box.
- To get a list of all the linked printers, click Open and choose Print Queues.
- Right-click on your printer name from the list.
- Select Update driver from the context menu that appears.
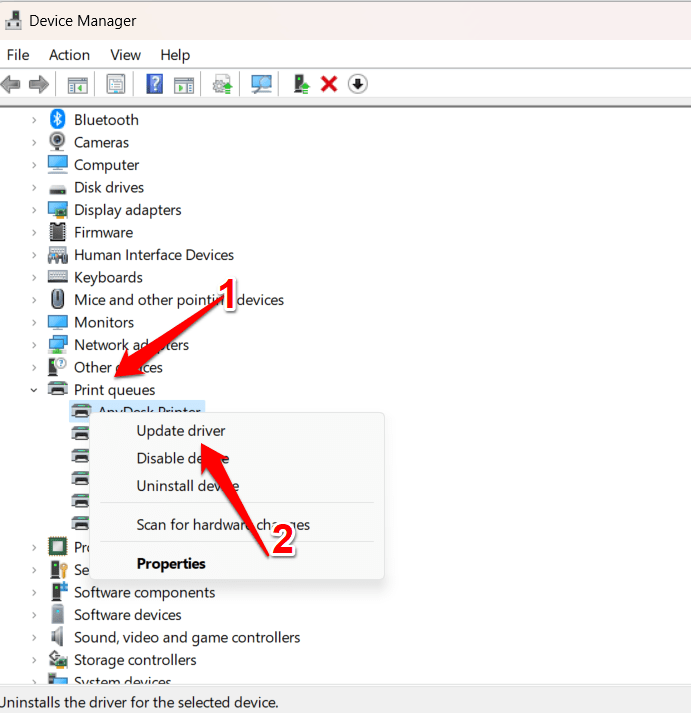
- To view a list of all the connected printers, click Open and then choose Print Queues.
- In the list, right-click the name of your printer.
- Select Update driver from the context menu that appears.
5. Run the Printer Troubleshooter
Running the Printer Troubleshooter is like having a detective find and fix issues for you. In Windows 11, it’s a built-in tool that hunts down problems causing the “Can’t Connect to Printer” error.
Here are the steps you need to follow to run a printer troubleshooter:
- Press Win + I to open the Settings app.
- In Settings, click “System” from the left-hand list.
- Scroll down and select “Troubleshoot” on the right.
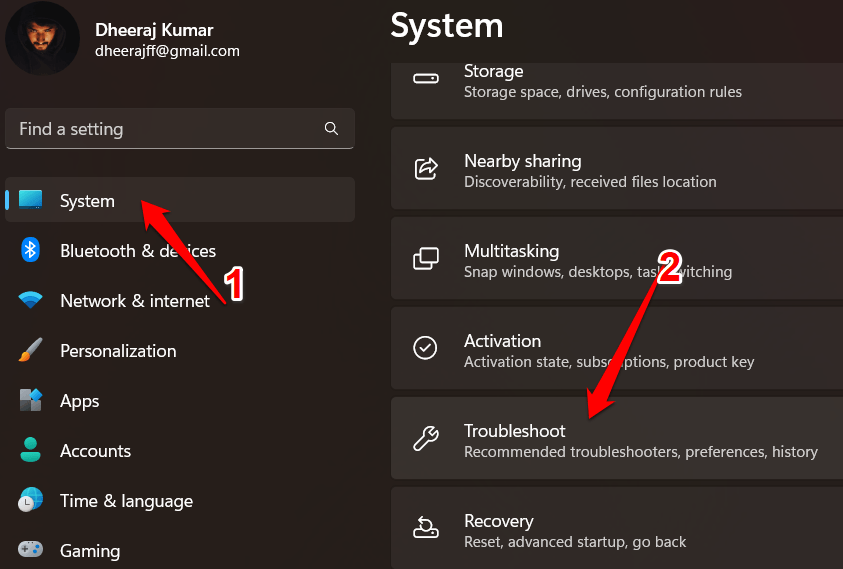
- Look for “Other troubleshooters” and choose “Printer.”
- Click “Run” under the Printer troubleshooter.
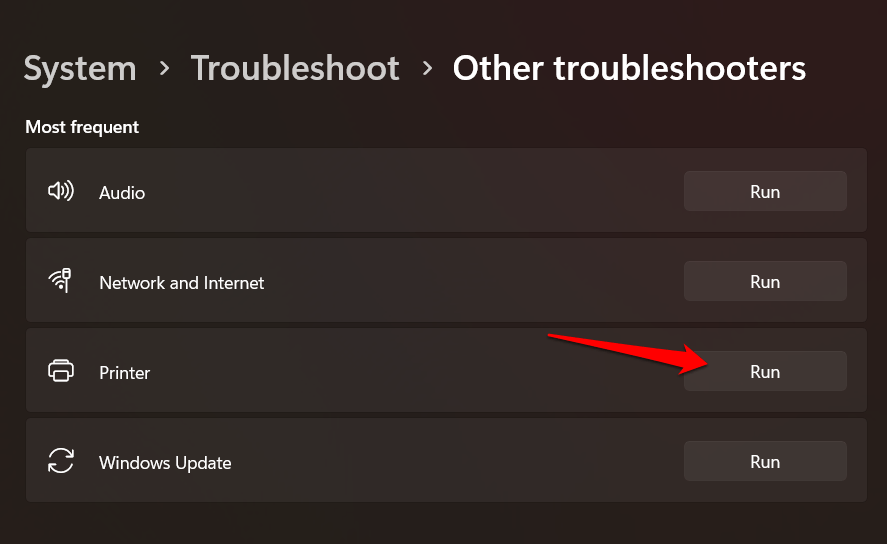
- Follow the simple on-screen instructions.
- Once all the fixes are applied, click Close the troubleshooter.
- Restart your computer and check the connectivity once more.
6. Restart the Print Spooler Service
Restarting the Print Spooler Service can often resolve printer connection issues on Windows 11. It works like a quick reset for the printer’s communication mechanism, which can assist in resolving small issues that lead to the “Can’t Connect to Printer” error.
- Press Win + R on your keyboard to open the Run dialog.
- In the Run dialogue box, type “services. msc” and hit Enter.
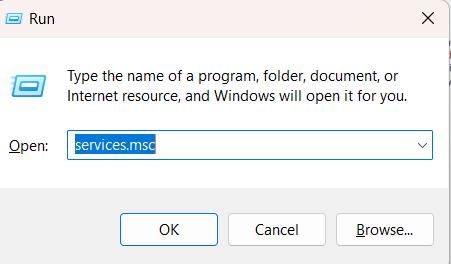
- In the Services window, scroll down to find “Print Spooler” in the list
- Right-click on “Print Spooler” and select “Restart” from the context menu.
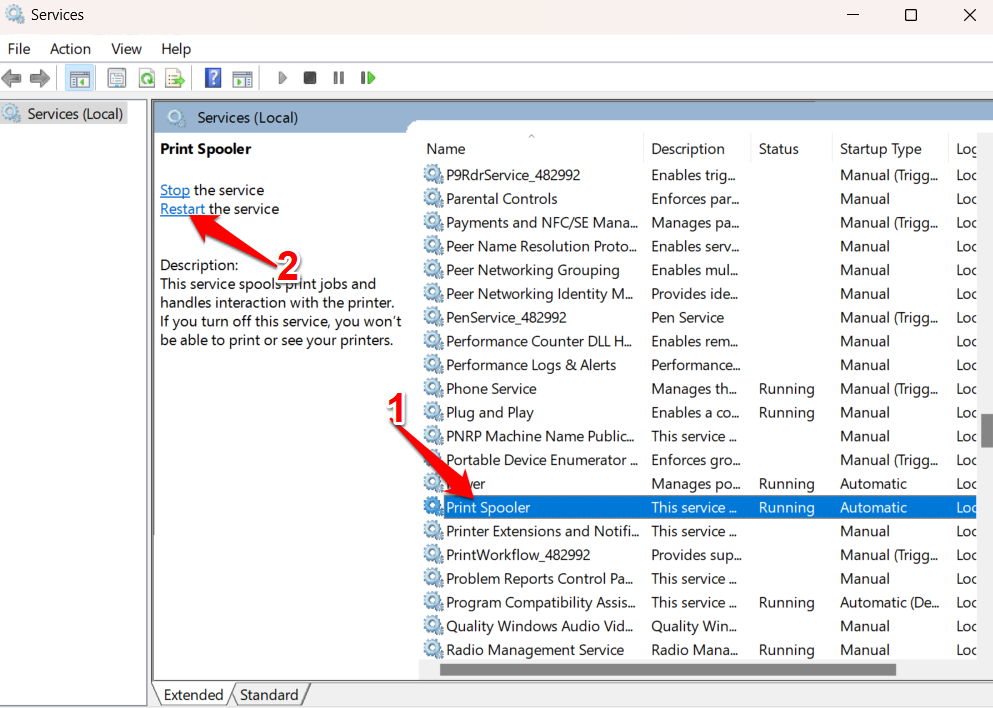
Give it a moment to restart. Once done, close the Services window and check if the printer issue is resolved.
7. Reset Printer Settings
Resetting printer settings may be helpful if none of the troubleshooting techniques mentioned above were successful. It’s like beginning again. Any customized settings are removed when you reset the printer, which restores it to its factory defaults. This can fix issues like the “Can’t Connect to Printer” error caused by misconfigured settings.
However, be cautious, as it might delete personalized settings. Check your printer’s manual or website for specific instructions on how to reset your model, and remember to reconfigure any necessary settings after the reset.
Final Words
Dealing with printing issues can be frustrating, especially when faced with errors like “Can’t Connect to Printer. The good news is that these hiccups can often be resolved without too much hassle. These glitches are like temporary roadblocks that you can overcome with patience and a bit of know-how. So, don’t worry if you encounter printer problems; take a deep breath and follow these steps. Your printer will be back to smooth operation in no time, and soon you’ll be back to smooth and hassle-free printing.
If you've any thoughts on How to Fix Unable to Connect to Printer Error on Windows 11?, then feel free to drop in below comment box. Also, please subscribe to our DigitBin YouTube channel for videos tutorials. Cheers!
