Everyone faces a ton of errors and difficulties when we migrate to a new environment/operating system. The errors may vary from app installation errors to common usage errors.
Errors are pretty common when you shift from a full GUI-based operating system to a semi-command-based operating system like Ubuntu. In the Linux community, there is a saying, if you don’t get any errors while using Linux, this means that you are not properly using the system.
Linux OSs like Ubuntu and Mint is considered as one of the easiest Linux as you can do everything with the graphical user interface. But OSs like Arch Linux are totally command based unless you are using any desktop environment.
We, in this article, tried to cover the widespread errors and their solutions in as simple as possible straightforward methods/steps. Follow carefully and let us know whether you ended in solving the error or not.
Fix All Application Installation Error in Linux
Here are the Best Solutions to Fix Various Types of Software Application Installation Error on Linux PC System
Error Type 1: sub-process /usr/bin/dpkg returned an error code (1)
This is one of the common errors Ubuntu or any Debian based distros faces while installing any software package from either terminal or software center.

This is one of the examples we encountered while updating the Chrome Stable package. This means either the corrupt or broken.
Fix 1: Reconfiguring the dpkg package database
We are going to use a simple command to reconfigure the dpkg database, as this error may be caused due to any interruption while the installation.
$ sudo dpkg --configure -a
After executing this command, try the installation, and check if you are facing the same error or not. If yes then proceed to Fix 2.
Fix 2: Force Installation of the Package
Since the dpkg was not the issue, try this command to forcefully install the troublesome package.
We are going to show you two different commands, which actually work in a similar way, it will fix the broken dependencies to terminate the error.
$ sudo apt install -f
or
$ sudo apt install--fix-broken
Error Type 2: could not get lock /var/lib/dpkg/lock
This error can be encountered while using the apt-get command in the terminal. This error basically says us that the dpkg is not currently available to use. This can explain two things, there is already an app is being installed, or the app installation was interrupted in the middle of the process.
The error usually looks like this,
Could not get lock /var/lib/dpkg/lock – open (11: Resource temporarily unavailable)
E: Unable to lock the administration directory (/var/lib/dpkg/), is another process using it?
or
E: Could not get lock /var/lib/apt/lists/lock – open (11: Resource temporarily unavailable)
E: Unable to lock directory /var/lib/apt/lists/
E: Could not get lock /var/lib/dpkg/lock – open (11: Resource temporarily unavailable)
E: Unable to lock the administration directory (/var/lib/dpkg/), is another process using it?
Fix 1: Find and Kill the Process
In this method, we are manually going to find the process which is running and then will have to manually stop/kill the process(es).
First, use the following command to search the running process(es),
$ ps aux | grep [a]pt
or
$ pgrep -a apt
Now you have the process number, we are going to use the following command to kill the process,
$ sudo kill process_number
or
$ sudo kill -9 process_number
If you don’t search and figure out the process number/process id, use the following command to kill all the ongoing process(es),
$ sudo killall apt apt-get
Fix 2: By Deleting the Lock
In case, the above fix didn’t work in your case, we will try to delete the lock to get rid of the error, use the following command to do so,
$ sudo rm /var/lib/apt/lists/lock
$ sudo rm /var/cache/apt/archives/lock
$ sudo rm /var/lib/dpkg/lock
Execute these commands one by one, and cross verify the lock directory from the error itself and then use the rm command. For example, if your error contains /var/cache/apt/archives/lock, then only use the directory.
Error Type 3: add-apt-repository: command not found
This error is encountered when you are trying to add a new software from the PPA (Personal Package Archive) repository. PPA is one of the many ways that is used to install software into the Linux system.
We are first going to use the following command to update/sync the repository database,
$ sudo apt-get update

If the execution completes without any error then only proceed to the next step.
Actually, add-apt-repository isn’t like the other command package found in Ubuntu/Debian systems, we are going to install the software-properties-common package to install the add-apt-repository.
$ sudo apt-get install software-properties-common

Error Type 4: E: Unable to locate package
This is one of the errors I used to face whenever I use to try the apt-get or apt command to install any package. Well if we take a deep look into the error, the error is self-explanatory, that the system couldn’t find the package to install.
This error will look like this,
$ sudo apt-get install package_name
Reading package lists… Done
Building dependency tree
Reading state information… Done
E: Unable to locate package package_name
Now, the error is self-explanatory, but is it the same case with the solution too? I am worried to say that it is not.
Fix 1: Check Package Name
We are going to start with a simple solution, check for typos, spelling mistakes, if this is not the case with your situation, then we will have to look for other solutions.
Fix 2: Check the Compatibility of the Package
Now, we are going to check whether the package is available for your version of Ubuntu or not.
Use the following command to check your Ubuntu Version (Release and Codename),
$ lsb_release -a
Now, we know the release and codename of our Ubuntu (In our case 20.04 Focal), we will head to the Ubuntu Package Manager Website.
Scroll down to the search section, and search the package you were trying to install,
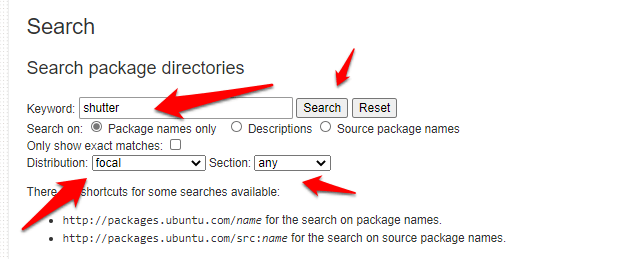
If the package is not available in the repository, then it is not possible to install that package on your Linux machine.
Error Type 5: Failed to download repository information
Many new Linux users prefer the GUI based Software Center to install new applications/software. This “Failed to download repository information” error is encountered in that Software Center only.
The error looks like this,
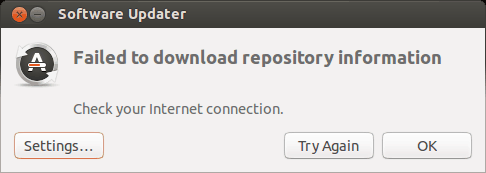
As you can see that the error also says to ‘Check your internet connection’, but it is weird as the internet is perfectly working.
In this case, the only solution is to update the apt repository and observe the result to figure out the original error that is occurring that pop-up.
$ sudo apt update
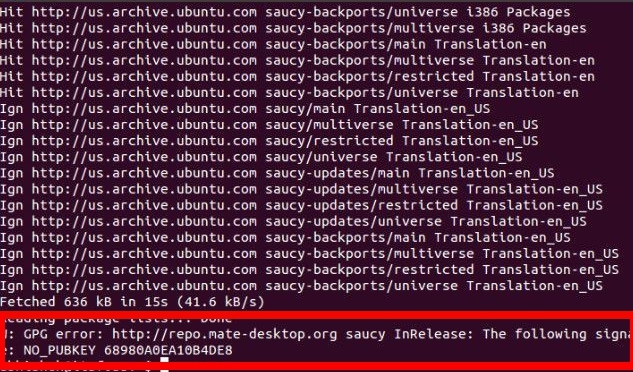
In the above result, see the last two lines of the result, it can be different in your case, note that error and comment below, we will be more than happy to help you out. Also, alternatively, you can search for that error in any Ubuntu community to see the solution to that particular error.
Error Type 6: Failed to download package files
This is another similar error to the above ‘Failed to download package files’ error, but the good thing about this error is that it is solvable.
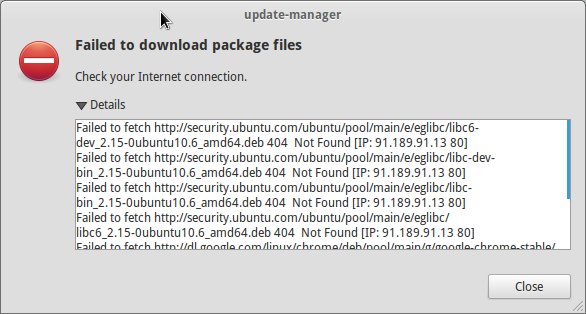
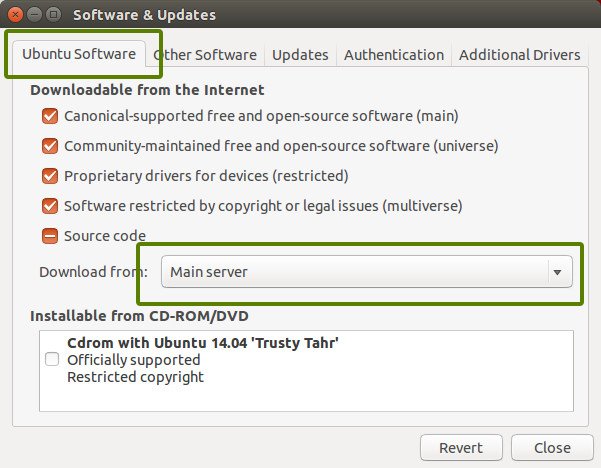
The error says that the new version of the already installed software is available but it is not available to that particular mirror, so we will have to connect to the main server to update the issue.
For connecting to the main server, open Software & Updates and select the Main server from the drop-down menu of the ‘Download from’ label.
Conclusion: Fix all Linux App Install Errors on your Unbuntu System with this detailed guide listed above. If you have any query please comment below 🙂
If you've any thoughts on How to Fix All App Installation Errors in Linux?, then feel free to drop in below comment box. Also, please subscribe to our DigitBin YouTube channel for videos tutorials. Cheers!
