Modern processors are now expected to include multi-core CPUs, enabling them to effectively manage several tasks at once. The CPU may operate on several tasks simultaneously when it has several cores, improving speed and performance.
Certain demanding jobs can still strain a system to its breaking point, even with the newest processors boasting numerous cores and more incredible rates. This is due to the possibility that not all cores will constantly be active.
With the help of this post, you can easily enable all cores in Windows 11 and utilize all of your CPU’s capabilities.
Why Enable CPU Cores in Windows 11?
Processor cores are distinct processing units with processing capacity found in a computer’s central processing unit (CPU). Each core can handle computation tasks independently since it has hardware and memory. With more cores, a CPU can handle more tasks simultaneously and perform better overall.
The CPU contains numerous cores that can do various tasks simultaneously, just as your brain has multiple areas that can cooperate. The CPU can handle more demanding apps and multitask more effectively thanks to these cores, which function similarly to little independent processing units.
For example, a CPU with several cores may manage multiple tasks seamlessly, such as editing a video, web browsing, and talking with friends, without any interference from one task affecting the others.
Windows automatically keeps track of the available CPU cores and uses them only when performance demands are met. However, if your computer isn’t working well, you can manually enable all or part of the cores. Splitting up the task over several cores might get more fantastic performance.
How to Check the Number of Cores on your Windows 11 PC
A processor’s Number of cores is quite helpful if you play games, do a lot of audio work, or edit videos. It can be useful when you’re testing the power of your CPU, turning on all the cores, or debugging issues. In Windows, you may also find out how many logical and physical cores there are.
Use these procedures to find out how many cores your processor has if you don’t know:
- You can utilize the keyboard shortcut Ctrl + Shift + Esc or right-click your taskbar to access the Task Manager.
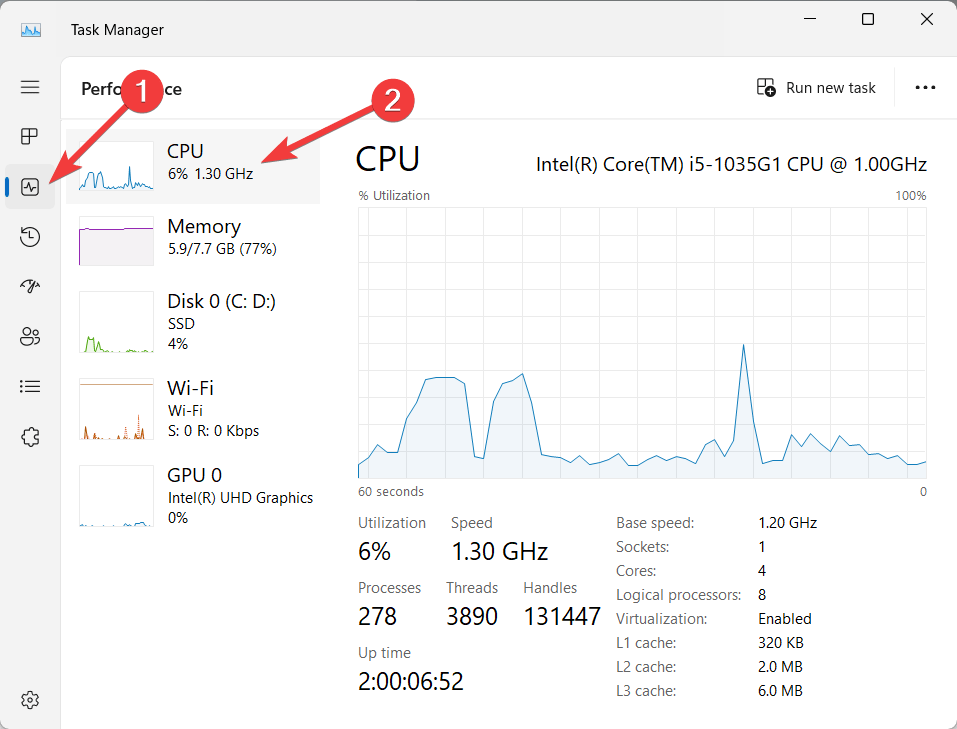
- Switch to the Performance tab from the left menu and then select CPU from the window’s left-hand menu. You’ll also notice Logical processors, the total Number of processors your system currently has (including HyperThreading).

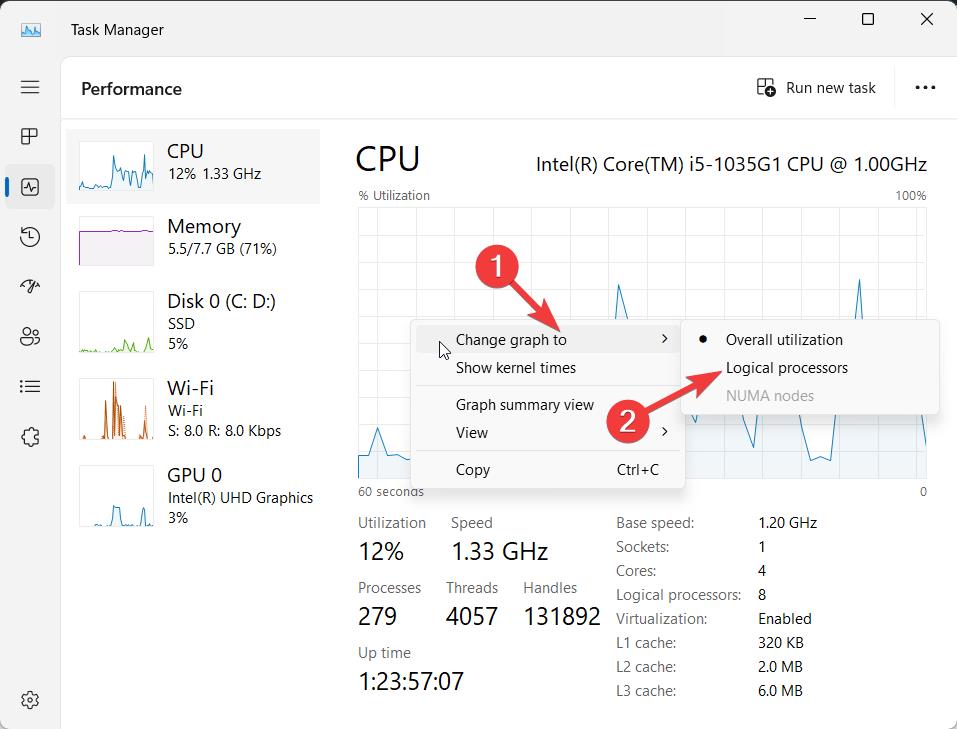
- You can learn more about the functionality of each logical CPU core in your PC and its total Number of cores. This helps you decide if your needs require using all the CPU cores. For this, right-click on the CPU graph, select Change graph to from the context menu and then select Logical Processors to display performance graphs for each CPU core.

- This will change the Task Manager’s graphical interface to show smaller plots for each CPU core.
How to Enable Multi-Core Support in BIOS?
Here is the step-by-step process to enable multi-core support on your Windows 11 PC from the BIOS settings:
Firstly, initiate a complete shutdown of your PC.
After shutdown, power it back on and press the designated BIOS entry key to access the settings. Typically, this key is one of the following: F2, F10, Delete, or Esc. The key might be visible on your screen as the system boots up.
Once inside the BIOS, navigate to the CPU settings. While the menu structure can vary, you’ll likely find it under headings such as Advanced Settings, Advanced Options, or Processor Configurations.
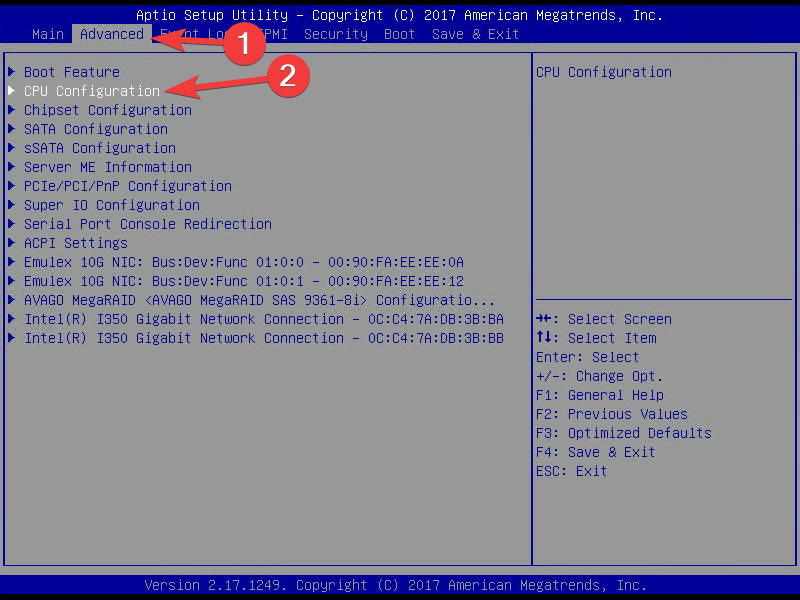
Locate the Active Processor Cores or Multi-core Support settings. These options may reside under Advanced CPU Features or Core Technology. Adjust the setting value to ‘All’ or the maximum available cores. 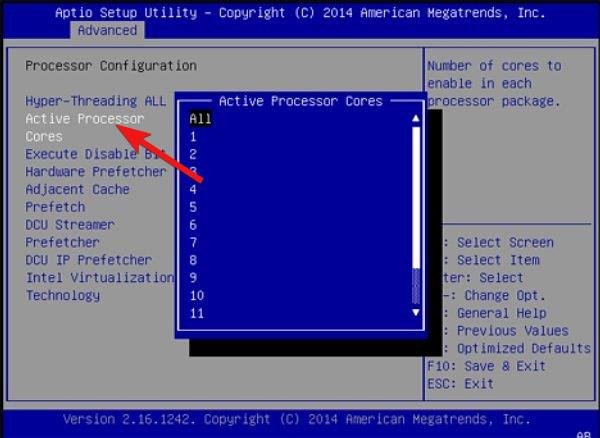
After enabling multi-core support, refrain from exiting the BIOS just yet. It’s necessary to activate HyperThreading as well.
Enable the HyperThreading feature from the BIOS
An Intel-only feature called HyperThreading divides a CPU’s physical core into multiple virtual cores, also known as logical processors, each of which functions as a separate processor. This suggests that even more tasks might be finished simultaneously, further increasing the processor’s performance. For example, if four physical cores were hyperthreaded, each core would become two logical cores or eight processors.
This capability also has to be enabled via the System BIOS. To do so, you need to locate the BIOS’s HyperThreading settings, then select the Enabled option. 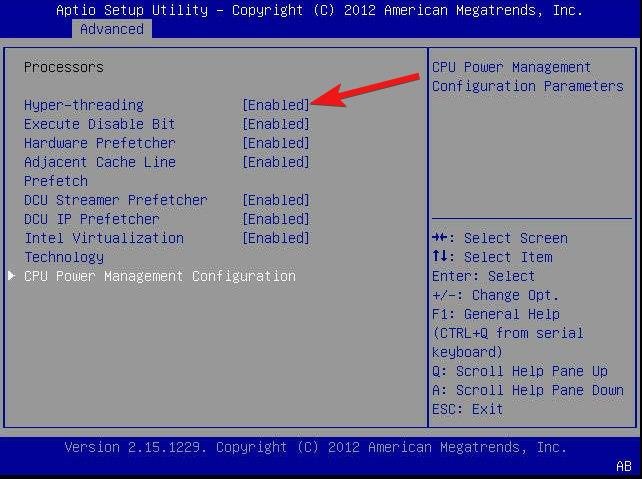
You may quit BIOS and save the settings now that it’s activated.
Enable CPU cores using the System Configuration Tool
You may control the Number of active cores on your CPU with Windows’ robust built-in utility, System Configuration. Thus, you can determine the Number of cores your system needs to operate at its best.
The System Configuration tool can be accessed by following these steps:
- Use the keyboard shortcut Windows + R to open the Run dialog box. After typing “msconfig” into the Run box, click OK next. This will cause the System Configuration window to open.

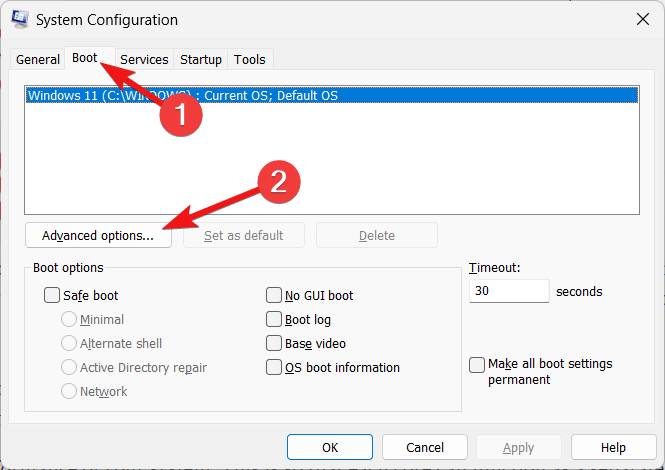
- Switch to the Boot tab of the System Configuration window and press the Advanced Options button located there to open a new window.

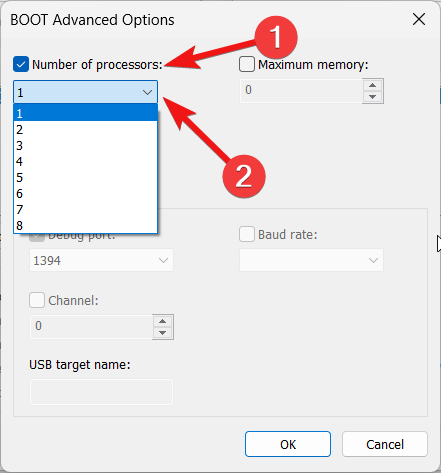
- After ticking the box next to the Number of processors option, choose the necessary Number of processors from the drop-down menu. To get the best performance out of your CPU, use every processor.

- Click OK.
- After selecting Apply, click OK to ensure the modifications take effect.
- To ensure the modifications take effect, restart your computer.
Enabling all of your CPU’s cores will greatly improve the performance of your system. This is so that each core can function as a separate processing unit and handle multiple tasks simultaneously. When all cores are enabled, your CPU can distribute workloads more efficiently and improve system performance.
Conclusion
We believe tampering with CPU cores is not the best action. We advise leaving it at default and letting Windows handle the primary management if you are already running Windows 11.
Adjust the process affinity if you believe your system can operate more efficiently. Doing this frees up specific CPU cores for more essential tasks.
If you've any thoughts on How to Enable All CPU Cores in Windows 11, then feel free to drop in below comment box. Also, please subscribe to our DigitBin YouTube channel for videos tutorials. Cheers!

