In this guide, I am going to explain to you how to disable lock screen in Windows 11. A lock screen is useful if you want to protect your PC from being accessed by someone else. Some other users may dislike the lock screen on their computers and they may not even need it in the first place. So, they prefer to boot up their computer and straight away land on the home screen.
Keep in mind that there is no setting available within the Windows settings to disable the lock screen in Windows 11. You have to make changes in the Registry settings of Windows to remove the lock screen. Also, you may make changes in the Group Policy Editor of Windows to disable the lock screen.
There is a catch though. While modifying the registry of Windows is accessible in all versions of Windows OS, the same cannot be said about the Group Policy Editor. If you have Windows 11 Home Edition, then you won’t be able to locate the group policy editor unless you are on Windows Professional or Enterprise edition.
Disable Lock Screen in Windows 11 by Modifying the Windows Registry
Here is the step-by-step approach to disable the lock screen on your Windows 11 PC.
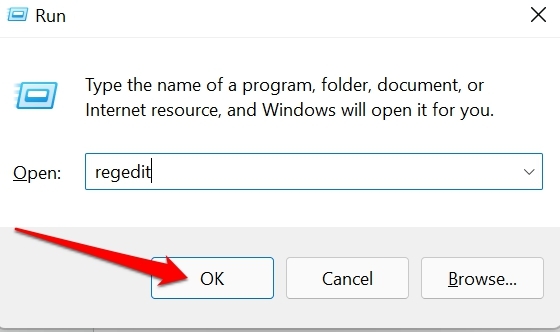
- Press the Windows + R keys.
- The Run dialog box shows up and you have to type Regedit and press enter.

- If you are asked to confirm regarding making changes or modifying your system click on Yes to allow.
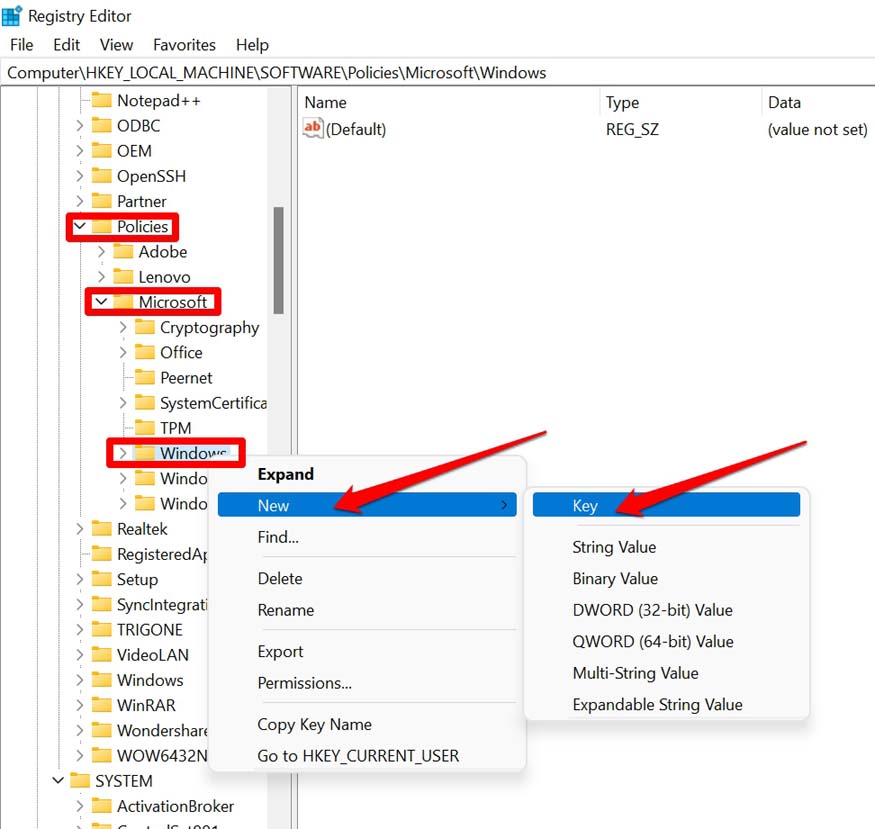
- Once the registry editor opens, follow this path on the registry.
HKEY_LOCAL_MACHINE\SOFTWARE\Policies\Microsoft\Windows
- Once you navigate to the Windows key, right-click on it and from the menu select New > click on Key.

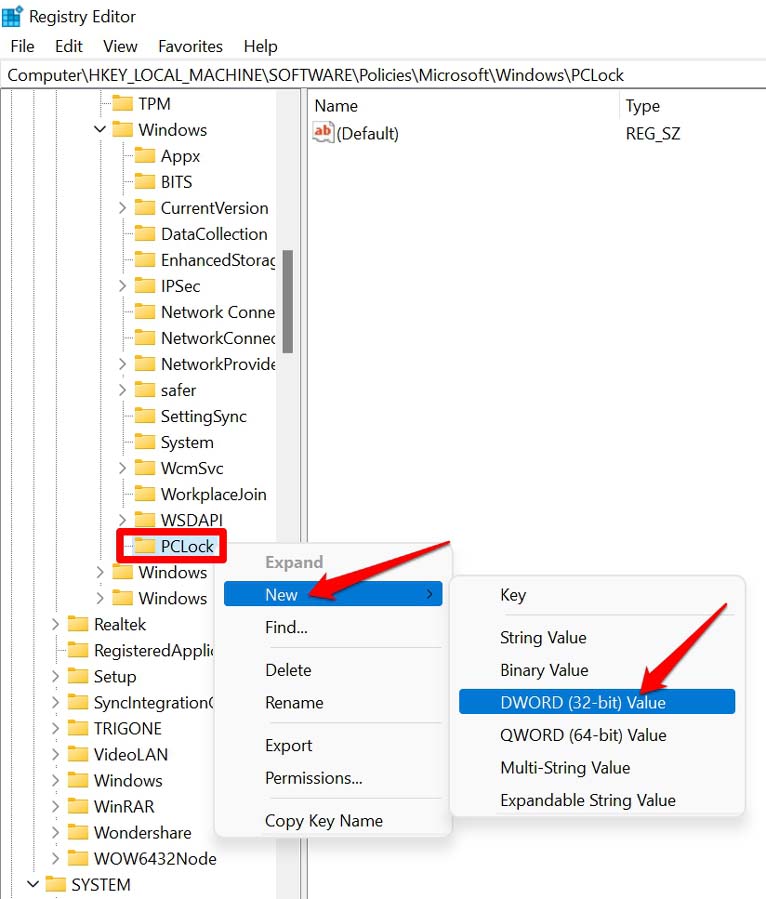
- When asked for naming the key give any name of your choice possibly a small and convenient name. For example, I gave the name PCLock.
- Now, the PCLock key will be created. Right-click on it> Select New > from the expanded menu click on DWORD (32-bit) Value.

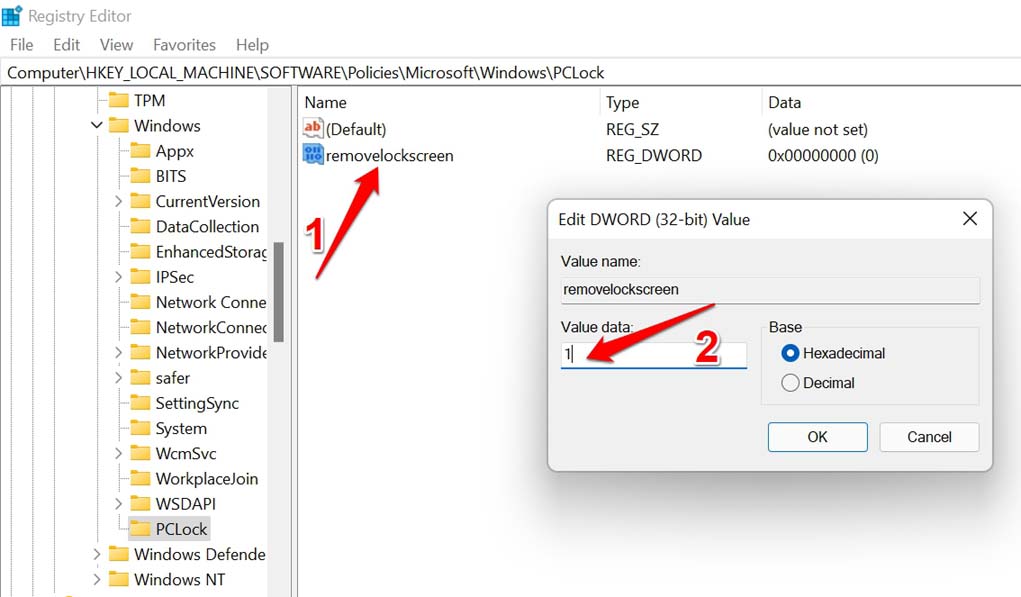
- You have to name the DWORD(32-bit)Value. Name it something convenient. For instance, I have named it removelockscreen.
- Now, double-click on removelockscreen.
- Set Value data to 1 and click OK.

- Close the registry and exit.
Now, restart your computer, and this time you will land on the home screen directly without coming across the lock screen. You have successfully disabled the lock screen on Windows 11.
Disclaimer: The above process of modifying the registry is not a cakewalk. You must be careful while you implement all the steps. One wrong step can render the computer operating system useless. DigitBin will not be responsible for any incidental software corruption issues you may face due to the wrong implementation of registry modification steps.
Additionally, I suggest creating a system restore point on your computer. If any steps go wrong, you can restore your system through the restore point.
If you want to get the lock screen back on your PC, then all you need to do is access the registry and follow the steps up to Step-3 as mentioned above.
Then under the Windows Key, you created the PCLock key. Simply delete the PCLock key or whatever you may have named it. Then close the registry editor and restart the computer. You should be able to see the lock screen.
Disable Lock Screen in Windows 11 Using Local Group Policy Editor
Here is another way to disable lock screen in Windows 11. This is quite simpler as compared to modifying the registry as we did above. You have to access the local group policy editor of Windows OS and directly enable an option and have the screen lock disabled.
The group policy editor for Windows will be by default available on Windows Professional and Enterprise Edition. If you are on Windows OS Home edition, then you may try to stick to modifying the registry of Windows and disable the lock screen.
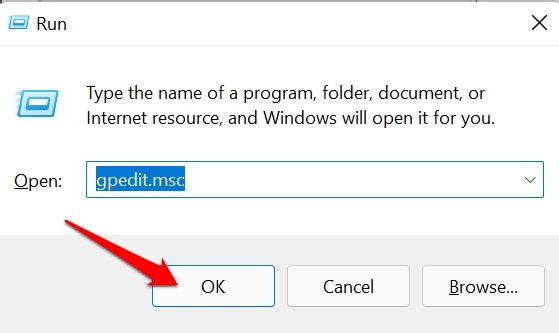
- Press Windows + R to invoke the run dialog box.
- Type in gpedit.msc and press enter.

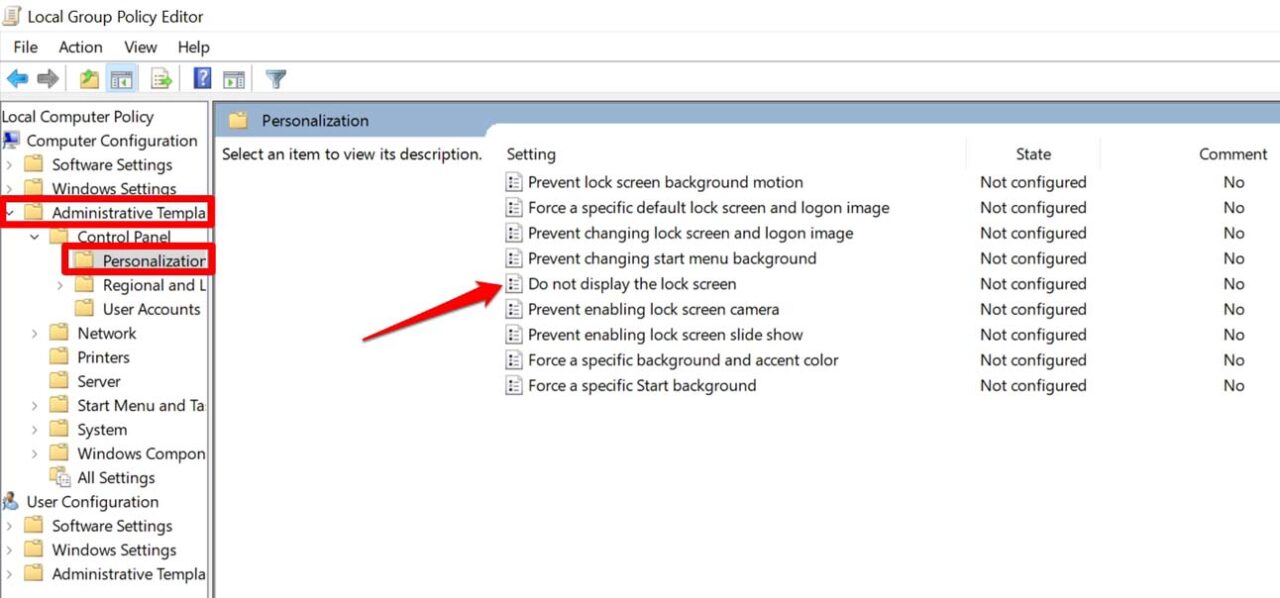
- The Local Group Policy Editor box opens up.
- On the left-hand panel, click these elements in this order.
Computer Configuration > Administartive Temlplates > Control Panel > Personalization - Click on Personalization.
- Under the Personalization settings, you will see an option Do Not Display the Lock Screen.
- Double click on Do Not Display the Lock Screen to open its settings.

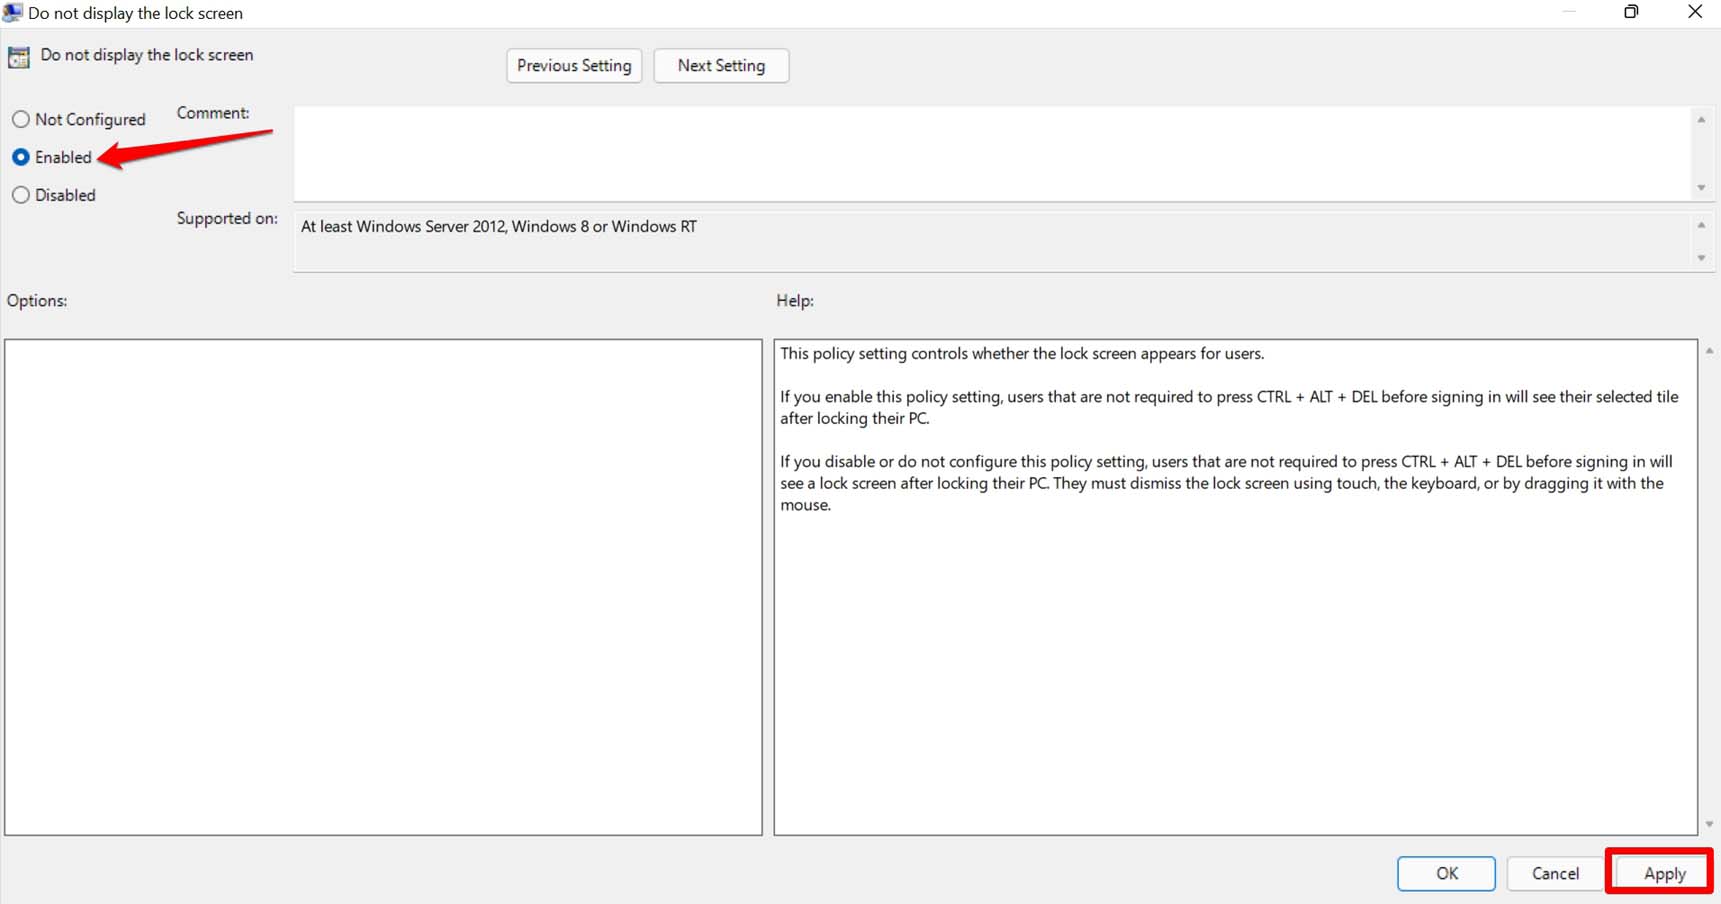
- As the settings box opens, click on the option Enabled.
- Then to apply the changes, click on Apply and click on OK.

- Now, close the local group policy editor.
- Restart the computer and now you will directly end up on the home screen without having to come across the lock screen.
Now, if you want to revert the changes then follow the same steps mentioned above. At Step -8, click on the radio button Disabled. Then click Apply and OK. Alternatively, you may also select Not Configured. This will enable the lock screen as well.
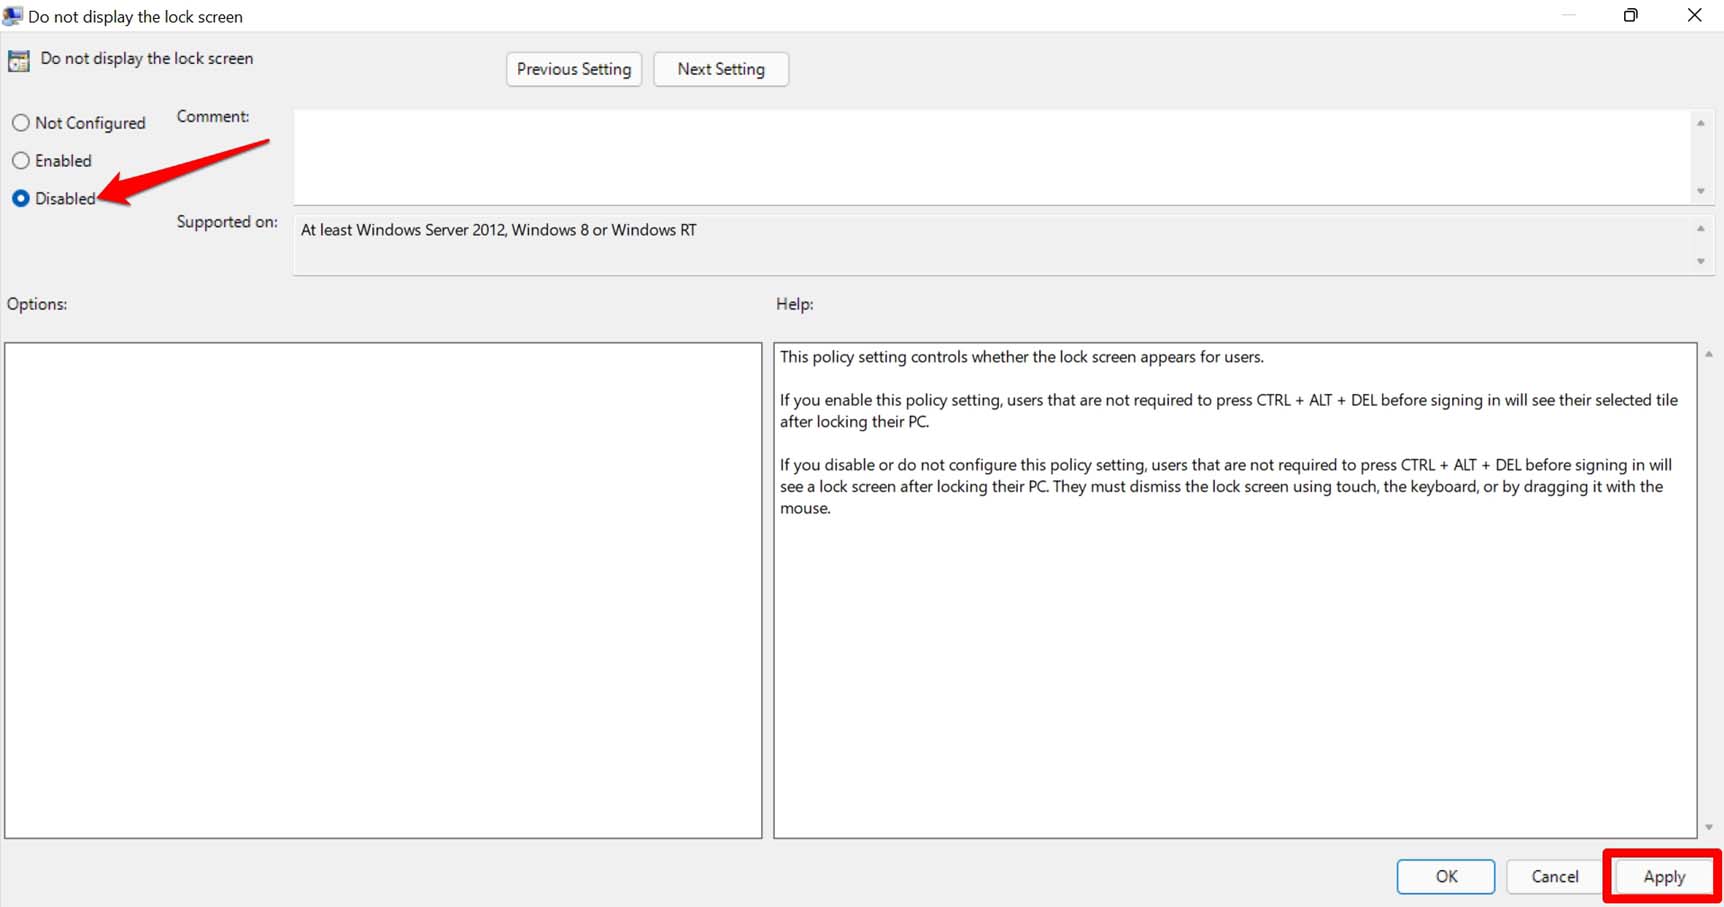
Restart the computer and you will be greeted with the lock screen once again after the PC boots up.
So, these are the two easy ways by which you will be able to disable the lock screen in Windows 11 computer.
If you've any thoughts on How to Turn OFF the Lock Screen in Windows 11?, then feel free to drop in below comment box. Also, please subscribe to our DigitBin YouTube channel for videos tutorials. Cheers!

