Users of Android devices, usually smartphones, can gain root access through rooting to gain control over various subsystems. But, in order to modding your Android device, you need to disable the DM Verity on your Google Pixel 7 and 7 Pro, and trust me, not many users are familiar with how to do this. That’s the reason why we are here. In this article, you will learn some simple steps that will help you do so. Therefore, let’s get started with the guide.
Prerequisite: Unlock Bootloader
Step 1: To begin, you must download the Android SDK platform tool on your computer. From this link, download and extract the Android Studio SDK files. You will use this throughout the entire process to disable DM Verity on your Pixel.
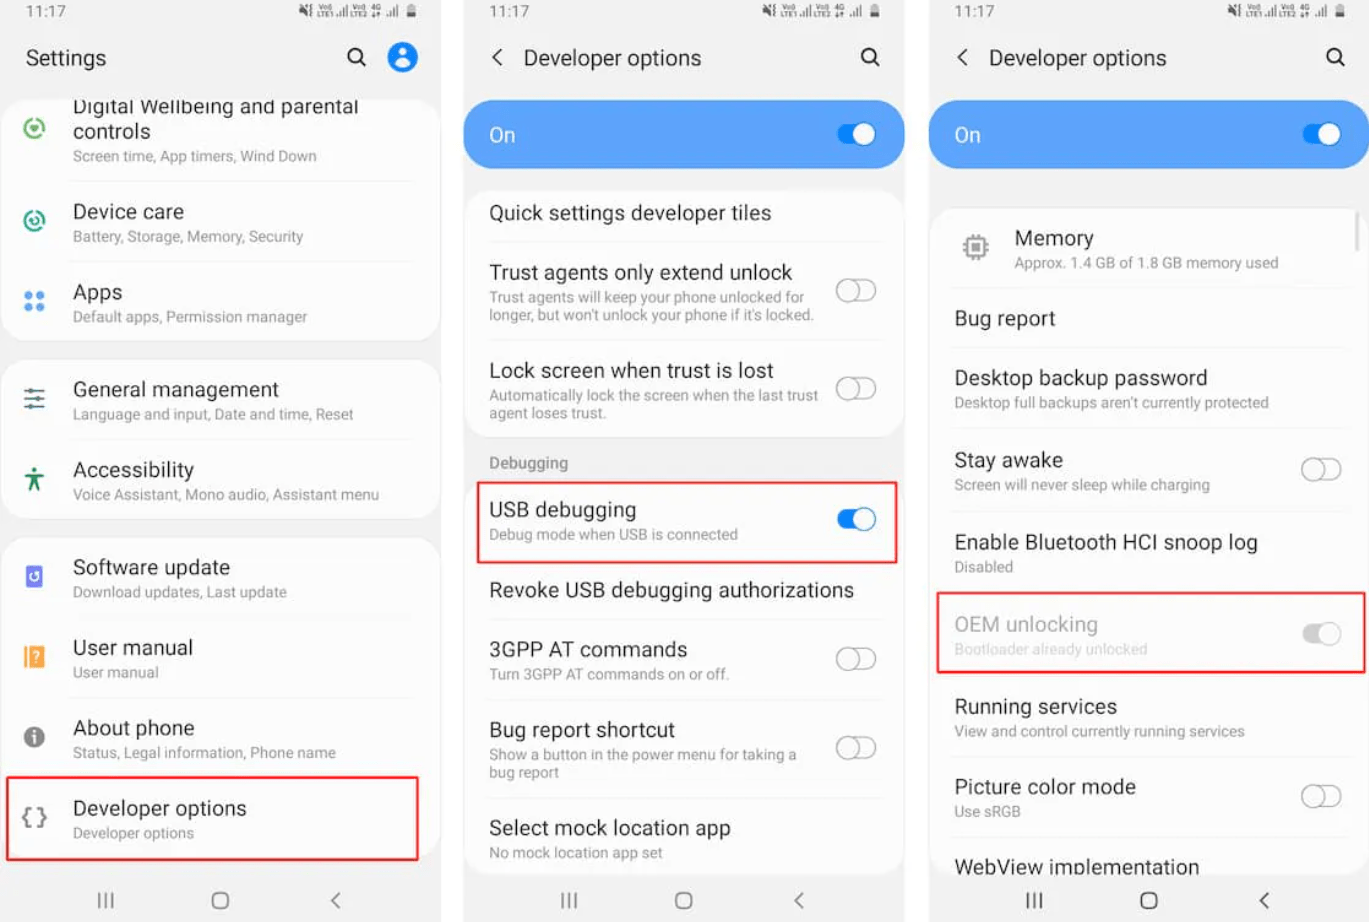
Step 2: You must enable USB debugging and OEM locking for your Pixel to be recognized by the Android SDK in ADB mode.
- Go to the settings menu on your Google Pixel 7 or 7 Pro.
- Tap on About Phone.
- To view the build number, tap it seven times.
- Go back to settings and tap the system tab.
- Select the Developer option.
- Make sure USB debugging and OEM unlocking are enabled.

Step 3: You must unlock the bootloader to flash a custom ROM. You will lose all your data on the phone, and also your warranty will be void. Here’s how to unlock your bootloader.
Activate fast boot mode on Pixel 7 and 7 Pro
- You will need to connect your device to your computer
- You can now open the command prompt by typing CMD in the address bar and hitting enter.
- Then, in the command prompt, type ADB reboot bootloader.
- Using the fastboot devices command, confirm that Fastboot is connected. You will be able to get the device ID from this.
Unlock Bootloader
- Using the fastboot flashing unlock command, unlock your Pixel 7 or Pixel 7 Pro bootloader.
- To confirm, press the volume key, select Unlock Bootloader, and then press the power key.
- Once your device has rebooted, you will see unlocked in bold letters.
- Your bootloader has been unlocked successfully.
Step 4: In order to proceed further, you must download the factory image of your Pixel device.
- Download the factory image for the Google Pixel 7 and Google Pixel 7 Pro.
Make sure to download the exact version of the factory image that is present on your device. You can check it by going into:
- Initially, tap on the settings.
- Then, go to the about and hit the build number. Now follow these steps:
- Your computer should now have the factory image extracted to your preferred location.
- You can send the vbmeta.img file to your smartphone by opening the image folder and copying the vbmeta.img file.
Step 5: Here are the steps you need to follow to boot your phone into Fastboot mode:
- Go to the SDK folder and type CMD in the address bar.
- To restart the bootloader, type adb reboot bootloader in the Command Prompt.
- You can now verify your device’s fast boot connection by typing fastboot devices.
- Now your device is in Fastboot mode.
Steps to Disable DM Verity on Google Pixel 7 and 7 Pro
That’s it. Now, you are set to disable the DM Verity on Google Pixel 7 and 7 Pro. Therefore, if you have performed all the five steps mentioned above, then you must perform these steps:
- Execute this command on CMD: fastboot flash vbmeta –disable-verity –disable-verification vbmeta.img.
- In your Google Pixel 7 and Google Pixel 7 Pro, you have successfully disabled the DM version.
That’s it. Now, you have disabled the DM Verity on Google Pixel 7 and 7 Pro. We hope you find this article helpful.
If you've any thoughts on How to Disable DM Verity on Google Pixel 7 and 7 Pro?, then feel free to drop in below comment box. Also, please subscribe to our DigitBin YouTube channel for videos tutorials. Cheers!


