
Sometimes your Windows computer may malfunction or crash due to some system issues. You try various troubleshooting methods to fix the problem but it won’t budge. Your PC keeps showing various errors and continues to crash during your sessions. Rest assured it is not the end of the world. You can restore your system to a timeline before the point when the problems first started to occur on the computer.
Windows 11 offers the System Protection feature that allows you to virtually travel back in time to restore the Windows OS to a perfectly working condition. For that, you have to create a restore point on your PC when it is functioning without any problem. This guide explains how to enable system protection on Windows 11 and create a restore point.
How to Enable System Restore in Windows 11
Even though you can manually create a restore point in your PC, Windows OS automatically creates it every week. The operating system is smart enough to replace the older restore point and replace it with a new one. Windows follows this practice to manage the storage on your PC.
Manually creating restore points (Yes! You can create more than one restore point) allows you the flexibility to move back to any of the previous timelines when the system was devoid of any errors.
To create a restore point in Windows 11, you must enable system restore on the PC.
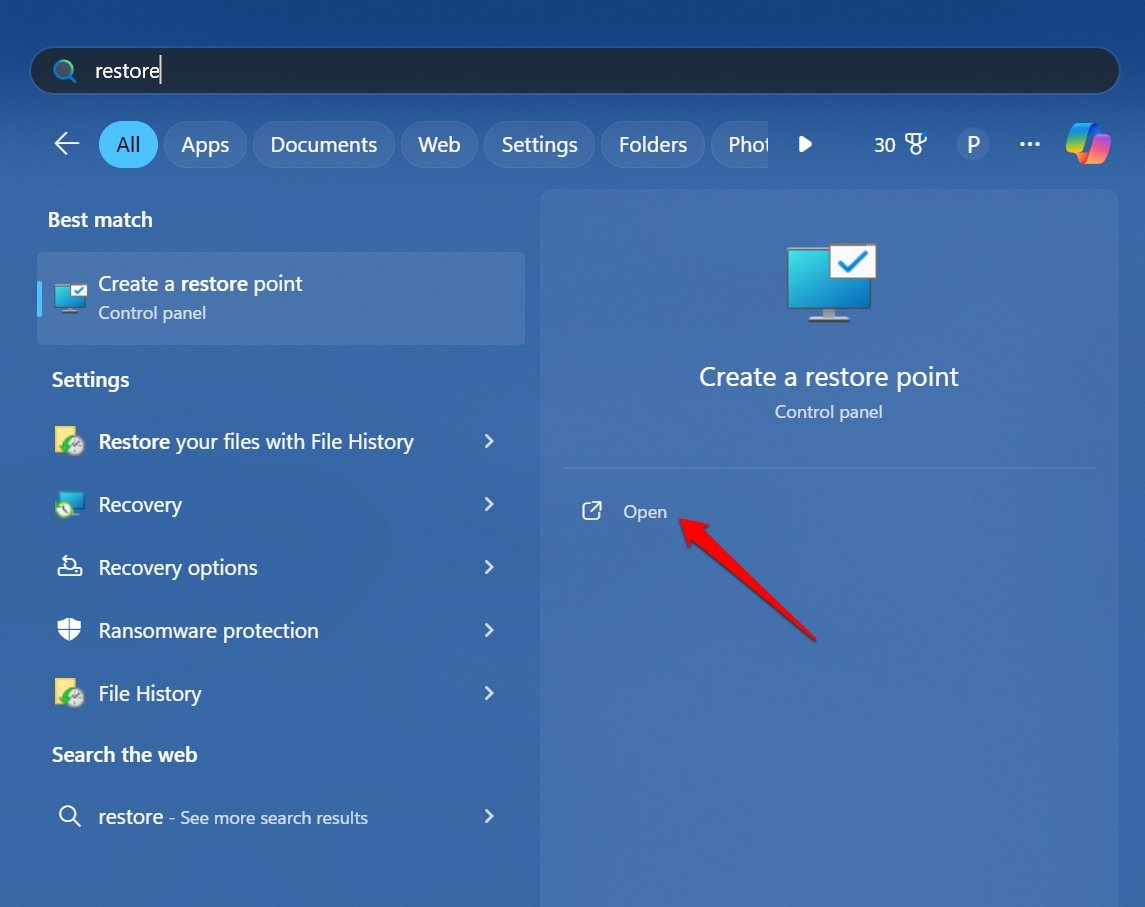
- Press the Windows key to initiate the search.
- Type restore point in the search box.
- Click Open when ‘Create a Restore Point‘ appears in the search results.

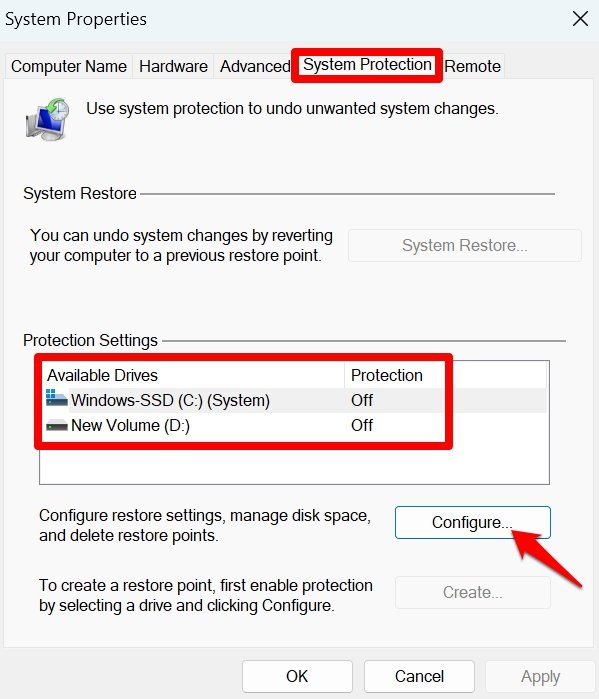
- Navigate to the System Protection tab on the System Properties dialog box.
- If Protection Settings is set as Off, click the Configure button.

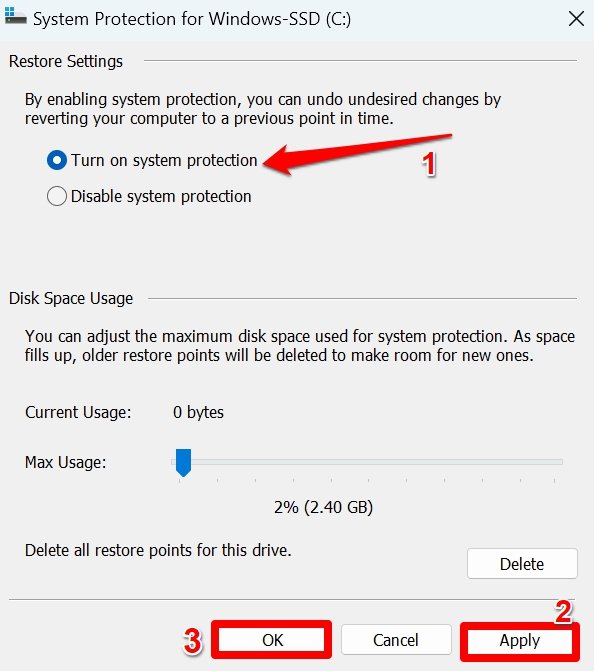
- Select ‘Turn on System Protection‘
- Also, go to Disk Space Usage to enable maximum storage allocation to create restore points.
- Click Apply > OK to save the changes.

Create a Restore Point in Windows 11
Follow these steps to manually create one or more Restore Points on your PC.
- Press the hotkeys Windows+S to view the search panel.
- Type Create a restore point in the search box.
- Click Open.
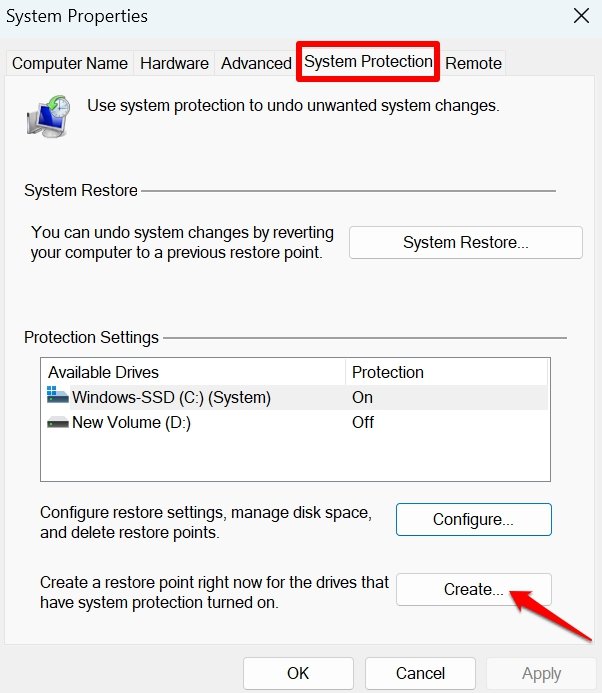
- Go to the System Protection tab.
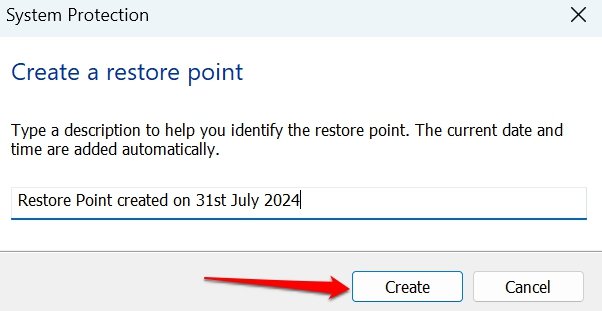
- Click on the button Create.

- Set a name for the Restore Point.
- Click Create to validate the new restore point.

- Finally, click the Close button on the prompt that appears citing that the Restore Point has been created successfully.
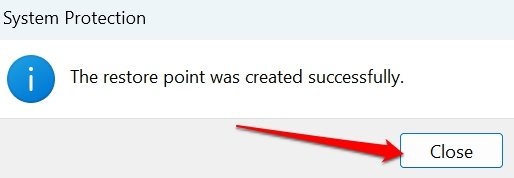

Note: It may take some time to create the restore point. So, don’t close the System Protection tab.
When you encounter any technical problem in Windows 11, select the most recent restore point when the PC showed no error. You can check out the steps to restore the system.
How Does System Restore Affect the System Files and the Personal Files
The system won’t create a restore point for personal files on your PC. Creating a restore point usually comprises backing up installed apps, the system registry, and various other important system components. Only the same elements are restored which get included in a restore point.
Let us assume that you created a restore point three weeks ago. Followed by which, last week you installed two new apps on your PC. Presently, if some problem occurs in the system, you proceed to restore the system using the same restore point you created three weeks ago.
Once the system is restored, you won’t find those two apps you installed on your PC previously. It means those apps were not included in the restore point as you did not install them around the time you created the restore points.
System Restore Can Bring back Uninstalled Apps
There is another interesting catch to system restoration as well. Let’s assume you created a restore point and then a week later ended up uninstalling a few apps from your PC.
Presently to address any bug on Windows 11, if you restore the system to a point you created previously, you will also find the deleted apps back on your PC. The system goes back to the timeline in the past when you had not deleted those apps.
Now, some apps when restored on Windows OS may require a fresh setup. Nonetheless, this describes how important it is to manually create restore points on the PC to overcome unforeseen technical issues that may stop your work on the computer.
As for the personal files, I suggest regularly backing them to the cloud or other external storage. In the event of a restore or reset, you can fetch your data smoothly and reuse them on the computer.
Bottom Line
Understanding how to create and retrieve restore points can come in handy when your Windows 11 computer is facing serious bug issues or a malware attack.
Access the system protection and with a single click go back to the Windows experience that had no technical problems. Restoring the system allows you to continue using your PC without any hiccups.
If you've any thoughts on How to Create a Restore Point in Windows 11, then feel free to drop in below comment box. Also, please subscribe to our DigitBin YouTube channel for videos tutorials. Cheers!