Due to its reliability and accessibility, PDF is one of the most common and selected file formats for sending or presenting documents. However, it is important to ensure that PDF files don’t fall into the wrong hands, in case they store sensitive information. This is why password protection is a must for every individual file when you’re sending it to someone.
If you want to create an encrypted PDF from a Microsoft Word file, then this guide will help you. Here, we will show you the best ways to protect your PDF format with an encrypted password on Microsoft Word. Let’s get right to it.
Best Ways to Password Protect Word Doc to PDF
You can easily protect your PDF file with an encrypted password on Word. Whether you’re using Windows 11 or 10, you can utilize Microsoft Word to create a protected PDF file without any third-party applications.
Many third-party software programs are available online that let you add password protection to a PDF file. Still you don’t need to install any third-party apps; you can just do it with Microsoft Word on your PC.
We have outlined two best ways that you can try out on Microsoft Word to create a protected PDF instantly. Let’s jump right to it.
1. Encrypt Word Doc using Save As Feature
- Navigate to the Windows search menu by pressing the Windows Key.
- In the search bar, type Word and click Open.
 From the tab section, choose File and then click on Open.
 Choose the PDF file from the file manager for which you want to add an encrypted password.
- Once you added the PDF file, click on the File option again.
 On the sidebar, click on the Save As option.
 Choose the location on your PC file manager where you would like to save the document.
- This will launch the Save As dialog box. Make sure to provide your File name.
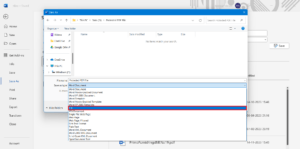
 Then, click on the drop-down menu next to Save as type option.
- Select PDF from the given options.
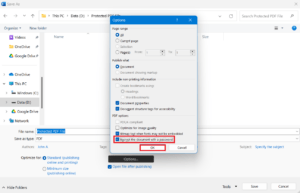
 Next, click on the Options button in the dialog box.
 Check mark the box next to Encrypt the document with a password and click OK.
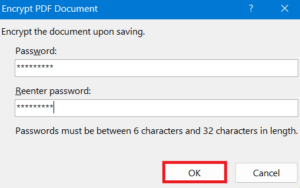
 Now you will be directed to Encrypt PDF Document.
- Create a password according to the given instructions and click OK.
 Under the Save as dialog box, click Save to confirm the changes.
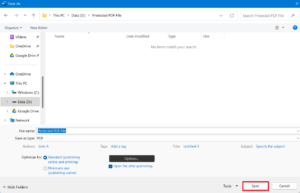
Once you finish with these steps, you’ll need a password to access the PDF file, which will make it readable when opening it on your computer.
2. Protect PDF using Export Feature
You can also use the Export feature on Microsoft Word to protect your PDF with an encrypted password. Here’s how:
- Head over to the Windows search menu by pressing the Windows Key.
- In the search bar, type Word and click Open.
 From the tab section, click on the File tab.
 Click on New to create a new Word document or choose Open to open an exciting document.
 Once you added the file to the Word document then, click on the File tab again.
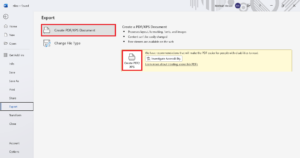
- On the sidebar, click Export.
 Choose Create PDF/XPS Document. This will launch the publish as PDF or XPS dialog box.
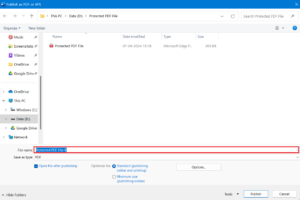
 Now choose the location on your PC file manager you would like to save the document.
- Enter the file name of your PDF and ensure to select PDF from the Save as type drop-down menu.
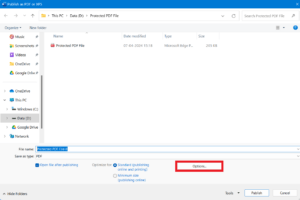
 Then, click the Options button on the dialog box.
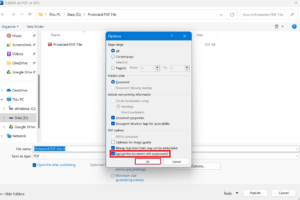
 Check mark the box next to Encrypt the document with a password and click OK.
 Now you will be directed to Encrypt PDF Document.
- Create a password according to the given instructions and click OK.
 Under the Save as dialog box, click Publish to make the changes.
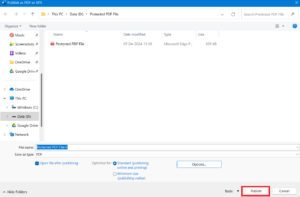
Now, you have successfully added an encrypted password to your PDF file. Whenever you open that file on your computer or share it with someone, a password is needed, without which you can’t access the PDF file.
Bottom Line
That’s it. This is how you can easily create a protected PDF from a Microsoft Word file on your computer. The process to create an encrypted PDF password with Microsoft Word is straightforward; you just need to follow simple steps. We have listed two effective methods that you can check out to create an encrypted PDF password on Microsoft Word.
If you've any thoughts on How to Create a Protected PDF from Microsoft Word File, then feel free to drop in below comment box. Also, please subscribe to our DigitBin YouTube channel for videos tutorials. Cheers!

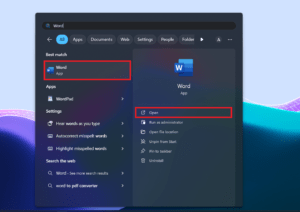 From the tab section, choose File and then click on Open.
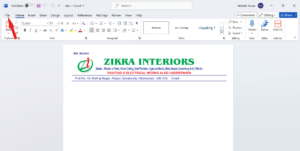
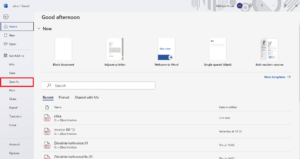 Choose the location on your PC file manager where you would like to save the document.
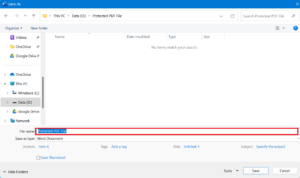 Then, click on the drop-down menu next to Save as type option.
 Next, click on the Options button in the dialog box.
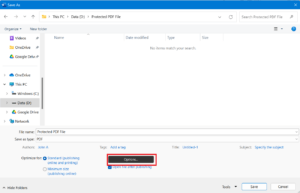 Check mark the box next to Encrypt the document with a password and click OK.
 Now you will be directed to Encrypt PDF Document.
 Under the Save as dialog box, click Save to confirm the changes.
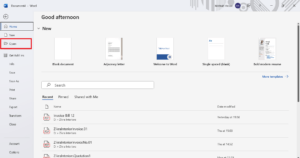 Once you added the file to the Word document then, click on the File tab again.
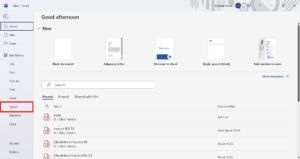 Choose Create PDF/XPS Document. This will launch the publish as PDF or XPS dialog box.
 Now choose the location on your PC file manager you would like to save the document.
 Then, click the Options button on the dialog box.
 Check mark the box next to Encrypt the document with a password and click OK.
 Now you will be directed to Encrypt PDF Document.


