Every day we are diving into the world’s technology, and we find the convenient information that is needed for us and to remember them, we are taking a quick screenshot.
When we find something a bit interesting on the internet, whether it is related to a technology or something according to a particular category, we are instantly ready to take a screenshot to share it with individuals. In addition, you can use the particular screenshots for your projects.
Capturing a screenshot isn’t quite hard, all you have to do is press and hold the Windows + PrtSc key simultaneously on the keyboard and it will capture the screenshot automatically.
As soon as you take a screenshot, it will be saved to a default location on your computer. However, you will find the screenshots in this location that are C: \Users\[User Name]\Pictures\Screenshots.
But there may be a situation where you want to change the screenshot’s default path to a dedicated folder or a selected drive. So, if you are looking to change the default screenshot location on your Windows 11, you’re in the place.
Here, we show you step-by-step instructions on how to change the default screenshot location on a Windows PC.
Why Change the Default Screenshot Location on Windows 11?
First, why is it necessary to change the default screenshot location? Well, there are various possibilities for changing the screenshot’s location. Here, we have outlined the reasons, so have a look at it.
- If your current driver might be running out of storage space, you should consider switching to the default screenshot location.
- You might want to keep the screenshots in a different folder for individual purposes, like personal projects. It might be easier for you to select the screenshots you want from a dedicated folder.
- Changing the default screenshot location to a specific folder that is synced with iCloud storage helps you share and access much easier from other devices.
- You can also save screenshots to a USB or an external drive to ensure they are saved and create a backup. In case the system goes wrong, your screenshot will be safe without any loss.
Steps to Change the Default Screenshot Location
If you want to take quick screenshots of your screen, you have to press the Win + PrtScr key together on your keyboard and it will capture the screenshots automatically. This is the only way you can take a screenshot of your screen.
Additionally, if you want to capture a specific part of the information on the screen, you have to press Ctrl + Shift + S keys simultaneously on the keyboard.
While you can capture the screenshot by following any method. The image will be saved to the default screenshot location on your computer. Let’s take a quick look at how you can easily change the default screenshot’s location on File Explorer:
- Open the File Explorer from the taskbar by clicking the icon from the desktop home screen or go select from the start menu. You can also hold the Win + E key on the keyboard to launch the File Explorer.
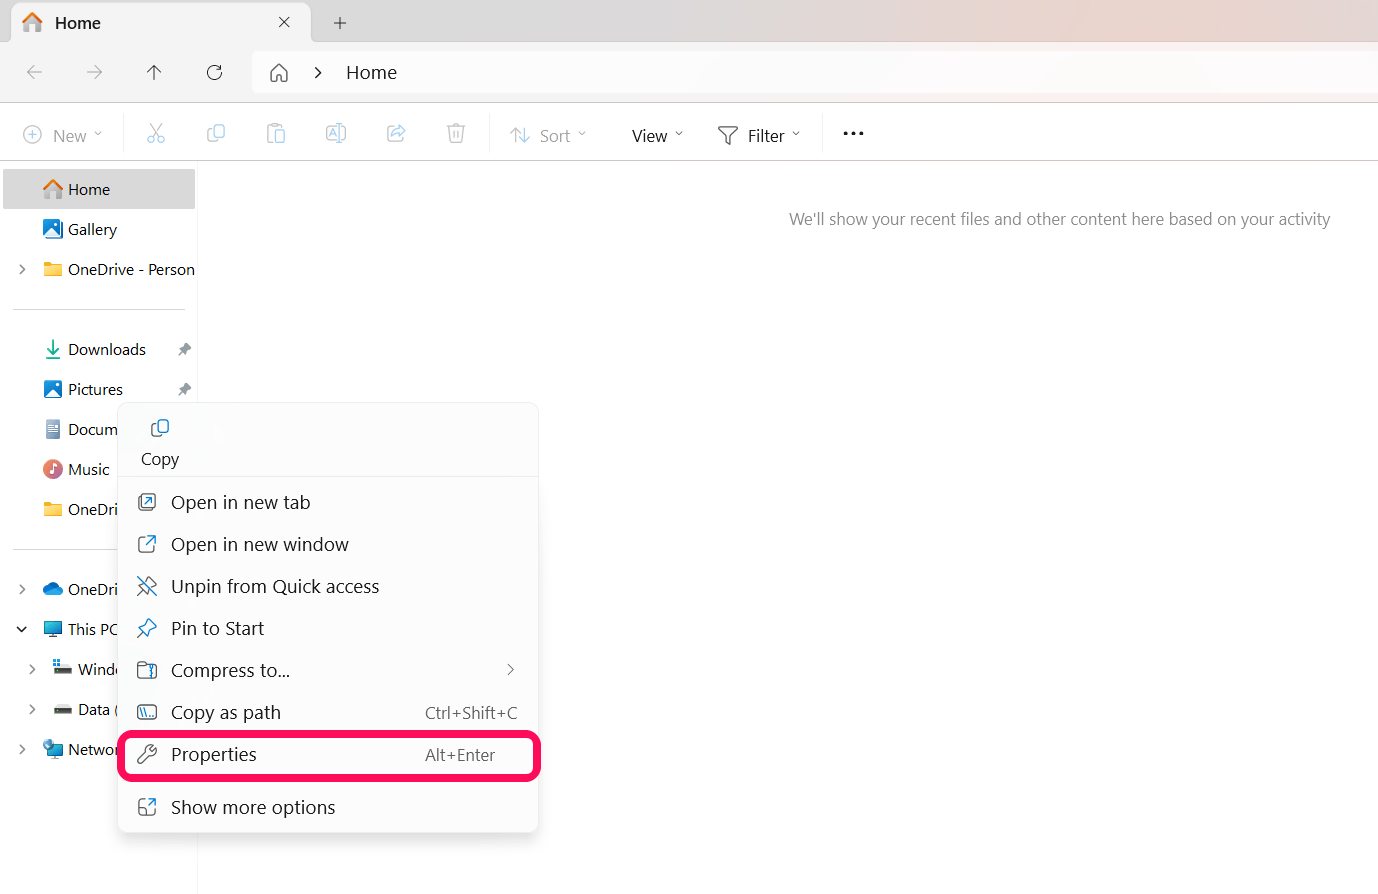
- Navigate to Pictures from the navigation pane on the left.
- Right-click on the Screenshots folder and select Properties.

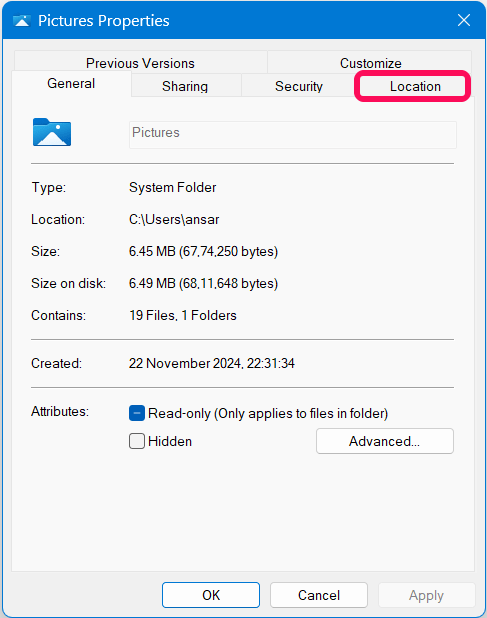
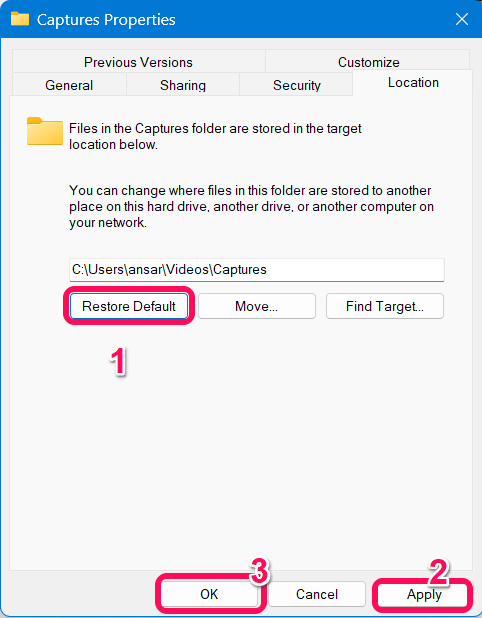
- In the Properties window, click on the Location tab at the top.

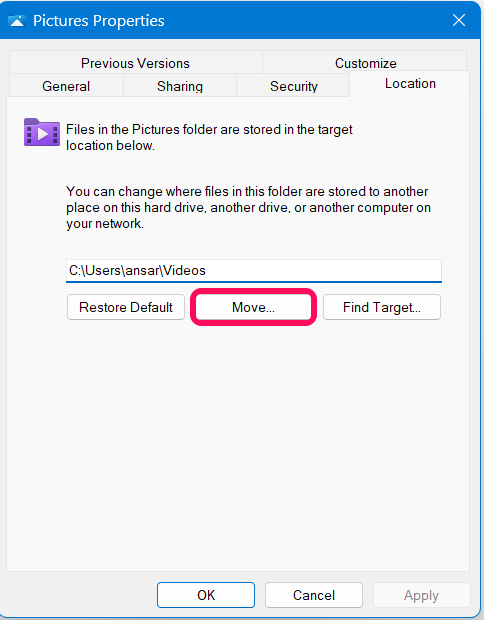
- Then, click Move and select the new location path which your screenshots will be saved.

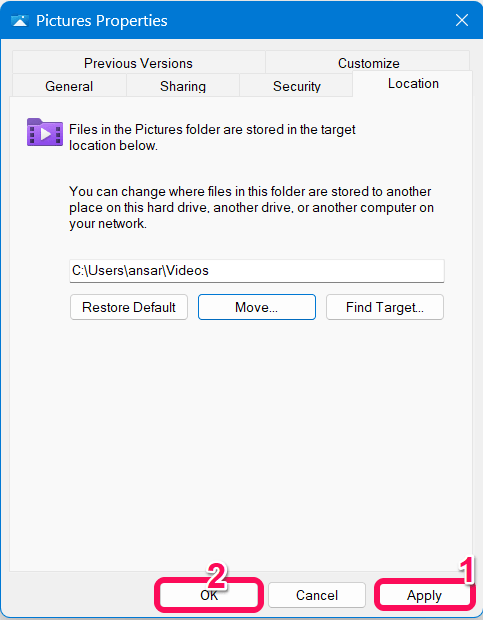
- After choosing the location, click Apply followed by OK to save the changes.

Remember to make sure the folder is created or present in the location path that you have chosen. This means that the screenshots folder will merge with whatever folder you have selected on the File Explorer.
Once you change the location path of the screenshots, you can verify it. For that, take a screenshot by pressing the Win + PrtScr key and then launch the File Explorer. Afterward, navigate to the newly selected folder and verify the screenshots whether it is available or not.
How to Restore Default Screenshot Location on Windows 11
In case you want to revert the changes to the original screenshot location, here is how to do it.
- Launch File Explorer by holding the Win + E key on the keyboard.
- Navigate to the newly selected folder, and right-click on it and select Properties.
- Then, click on the Location tab from the top bar and click the Restore default.
- Click Apply followed by OK to confirm the changes.

Now you can confirm the changes by taking a screenshot and then checking the default screenshot location which is typically saved in the Pictures folder. It also saved the screenshots under the Screenshot folder inside the Picture.
Bottom Line
This is how you can change the default screenshot location on Windows 11 by following the aforementioned methods. It’s a good idea to change the location path of the screenshots to a new path destination folder. Whether you want to save the screenshots as a project or if you want to share them with individuals as information, changing the screenshots’ default location makes your task much easier.
You can also retrieve the changes to the default screenshot location back by following the aforementioned ways. We hope you have found this guide helpful.
If you've any thoughts on How to Change Default Screenshot Location on Windows 11, then feel free to drop in below comment box. Also, please subscribe to our DigitBin YouTube channel for videos tutorials. Cheers!
