Supercharged with multiple useful features, Windows 11 allows you to power off your computer screen when there is a prolonged period of inactivity. This setting is useful in various ways: it helps conserve battery. It prevents unauthorized users from accessing data from your computer.
By default, the screen timeout feature is enabled on your Windows 11 PC. However, you have the freedom to tweak the screen timeout duration to meet your requirements. Interestingly, there are not one but many ways to change the screen timeout duration on your Windows 11 which are suitable for amateur as well as experienced users.
So, without wasting any time, let’s delve right into them one at a time!
Top Ways to Change the Screen Timeout Duration on Windows PC
Here are different methods by which you can change the timeout of the lock screen on your Windows 11 PC:
1. Change the Lock Screen Timeout using Windows Settings
You can use the built-in Windows settings app to change the timeout settings of your Windows 11 PC. Let’s have a look at the step-by-step process of changing the Windows 10 screen lock timeout settings:
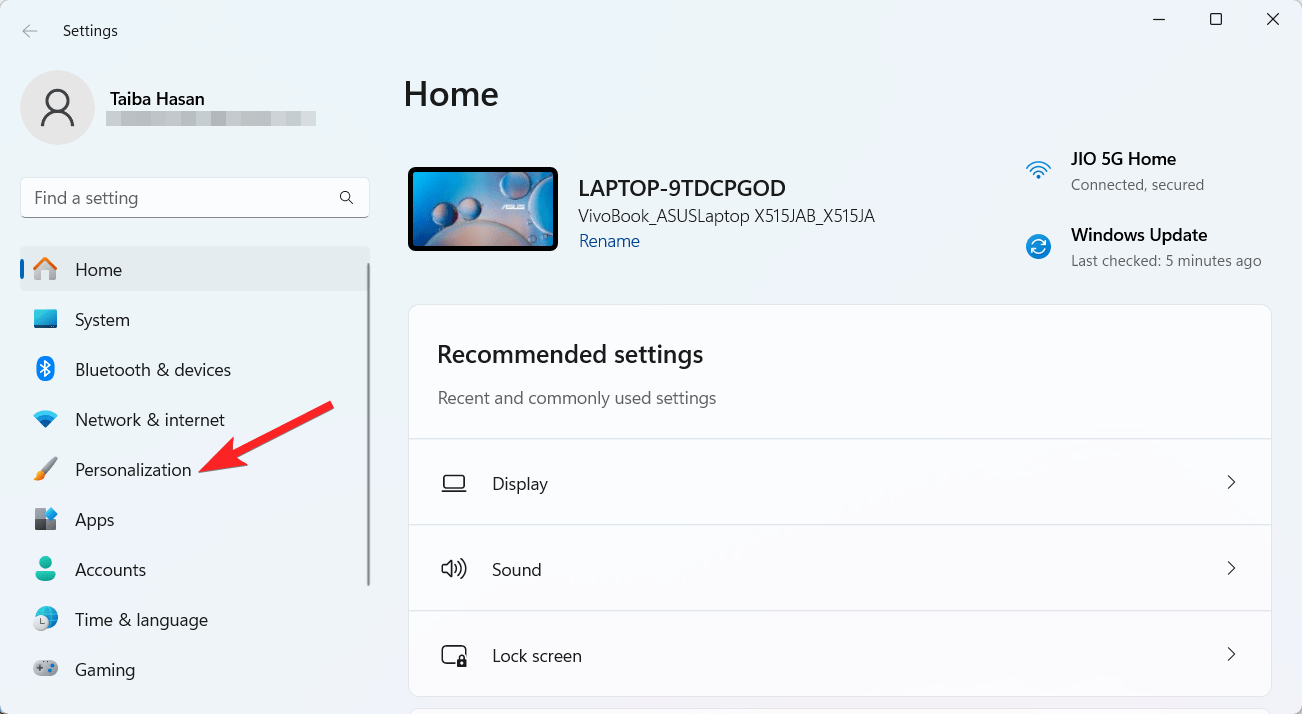
- Launch the System Settings app using the Windows + I shortcut.
- Choose the Personalization option from the left sidebar of the Settings window.
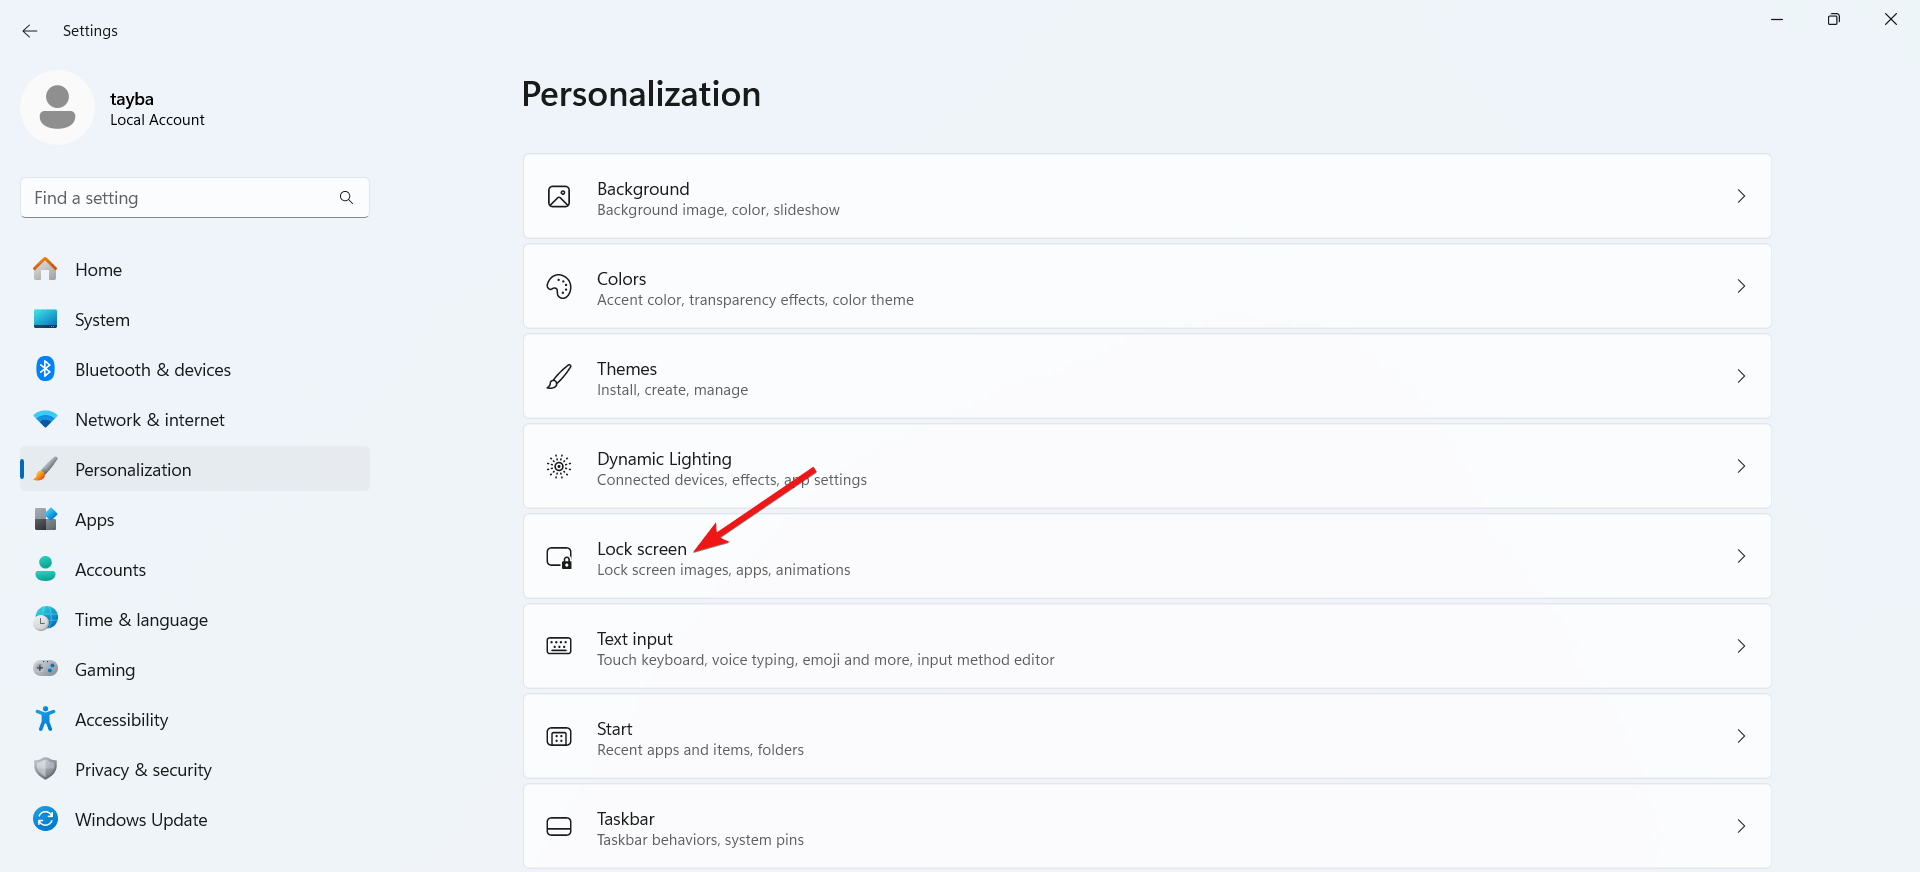
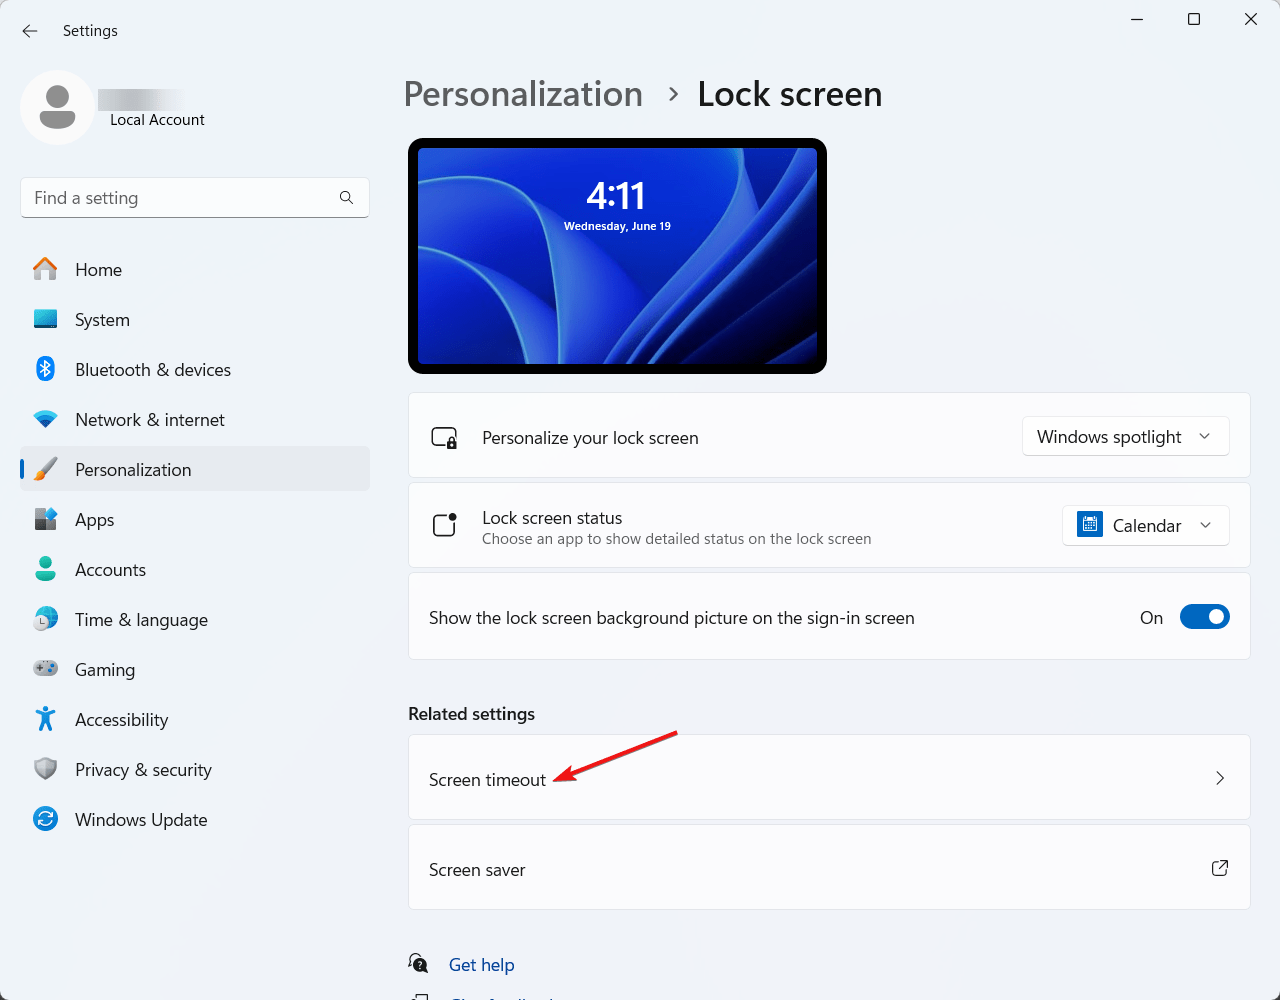
- Select Lock Screen from the right hand of the right sidebar.
- Next, select the Screen timeout option located under the Related settings section.
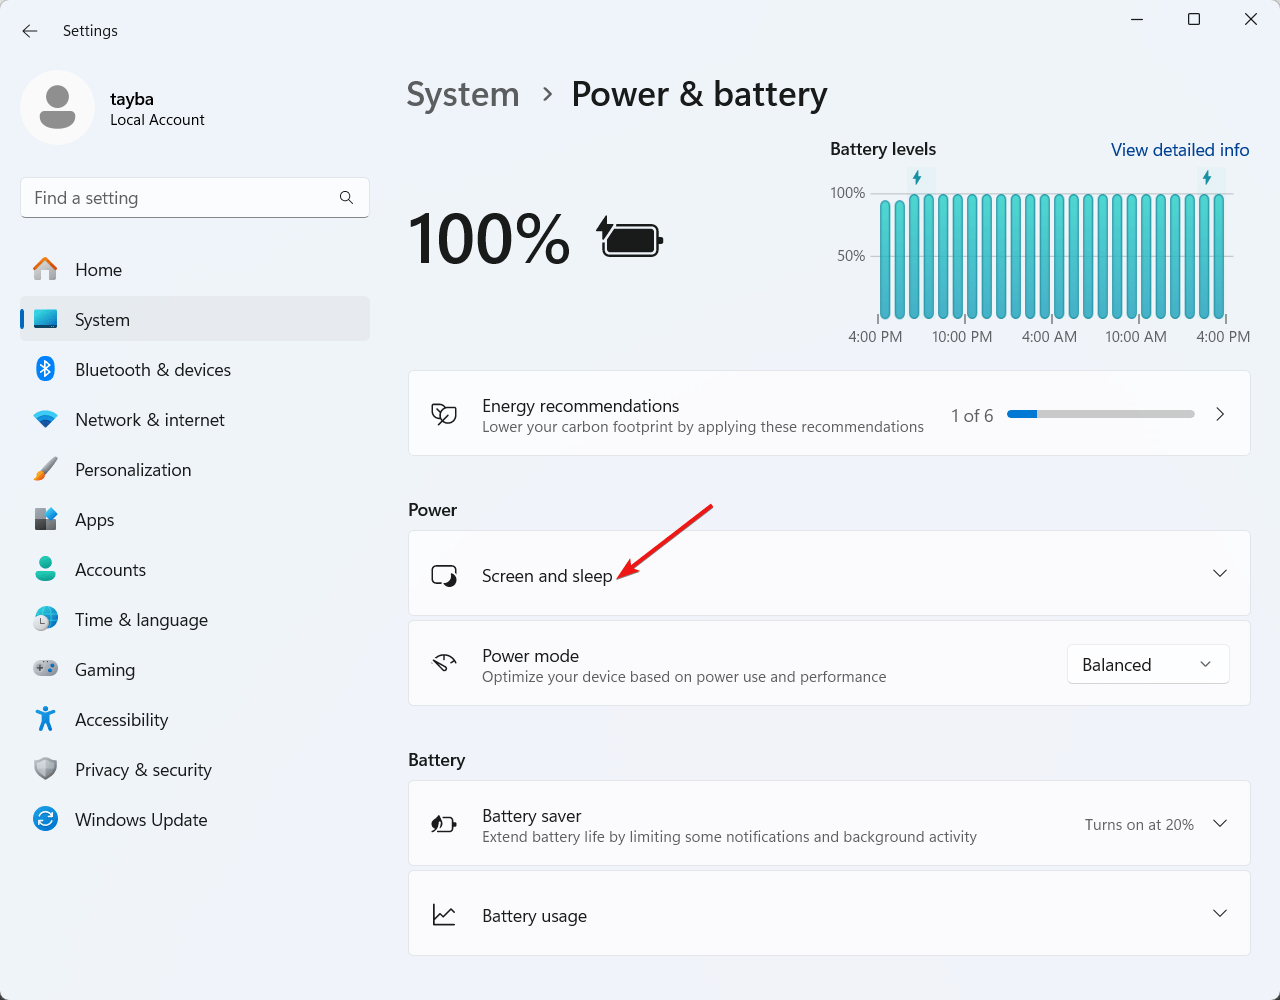
- Now click on the Screen and Sleep option under the Power menu to reveal the hidden options.
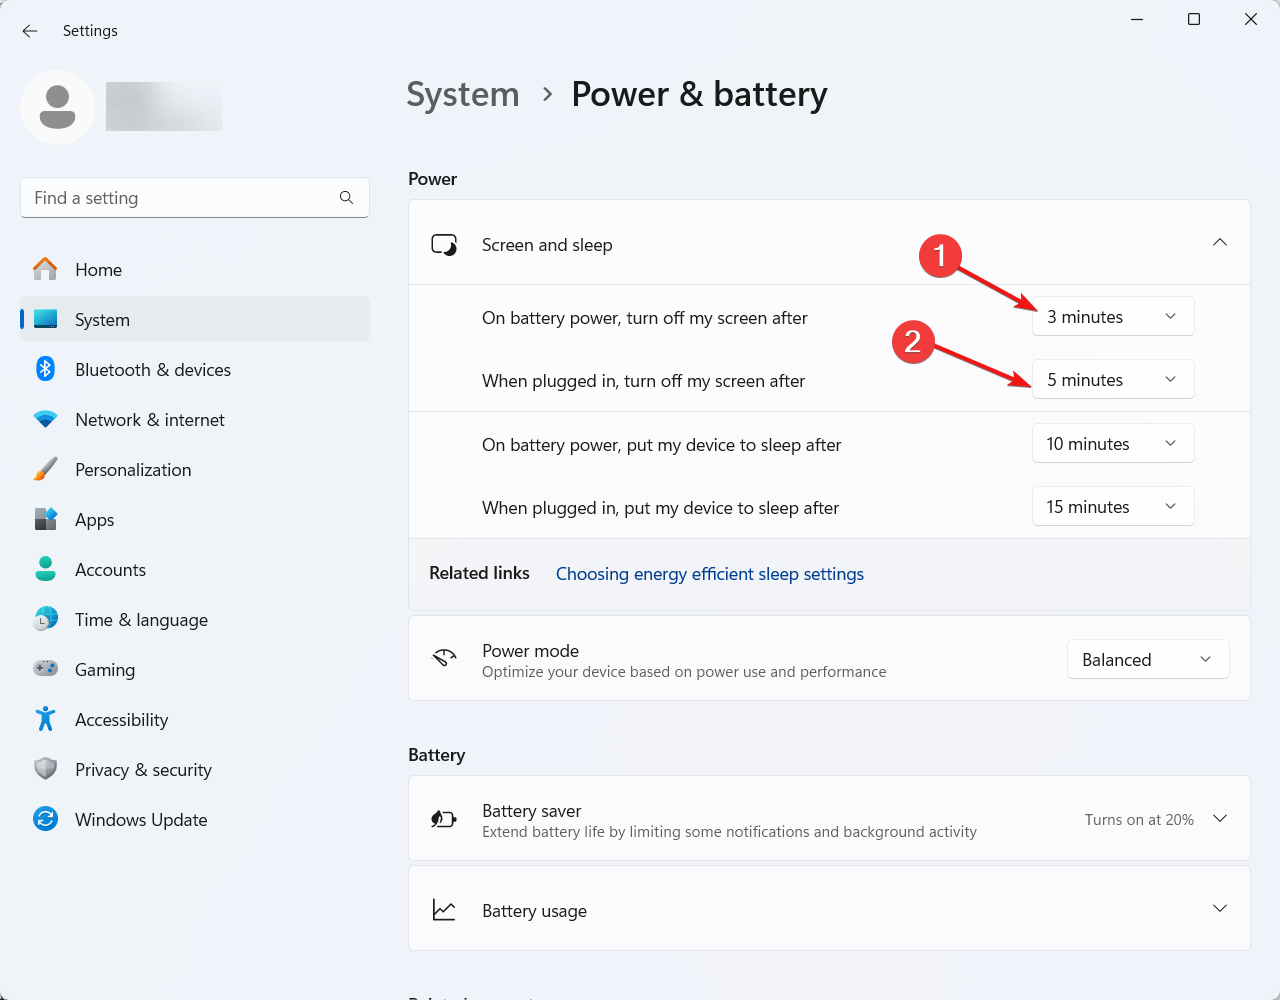
- Now click the drop-down menu next to On battery power, turn off my screen after, and select the preferred timeout value.
- Similarly, expand the drop-down menu next to When plugged in, and turn off my screen after choosing the relevant timeout duration in minutes.
After this, exit the System Settings window and reboot your Windows 11 PC to apply the changes made.
2. Change the Screen timeout settings using the Command Prompt
You can also configure the screen timeout settings using the Windows Command Prompt tool. Here is the step-by-step process of doing so:
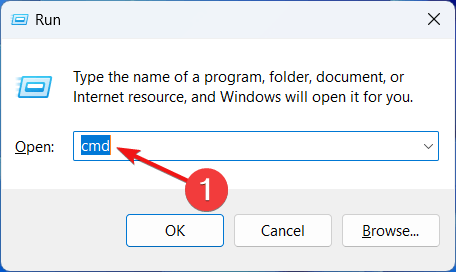
- Launch the Run dialog box using the Windows + R shortcut key combination.
- Type cmd in the text box and use the Ctrl + Shift + Enter shortcut key combination to launch Command Prompt with elevated permissions.
- Now one by one type the following commands and press the Enter key after each to execute the command. Replace duration with the time limit in seconds after which you want the lock screen to appear.
powercfg.exe /setacvalueindex SCHEME_CURRENT SUB_VIDEO VIDEOCONLOCK duration
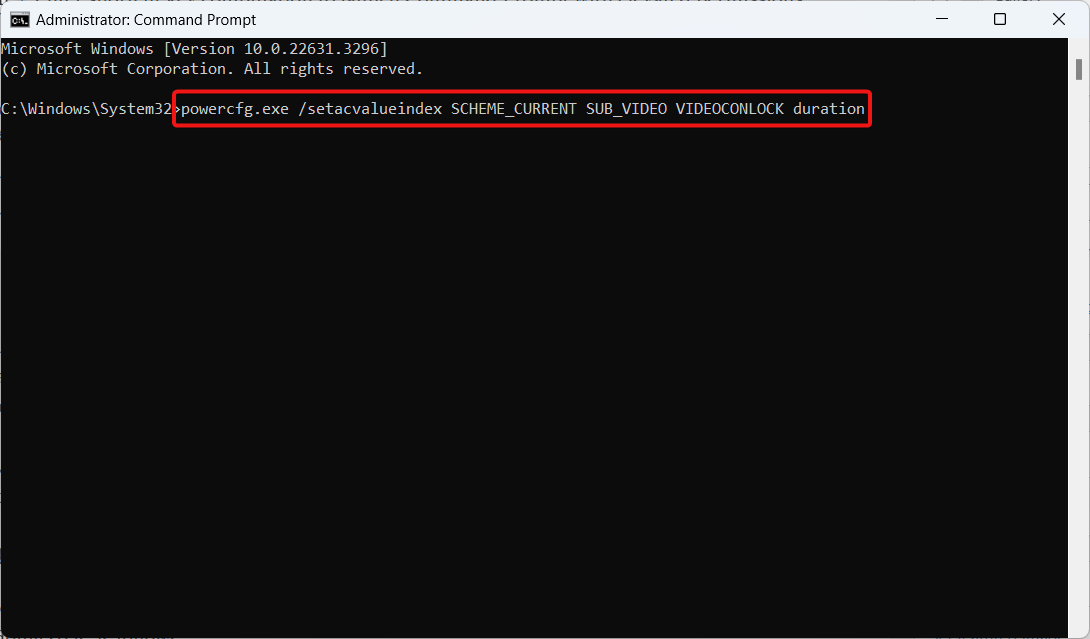
- Finally, execute the following command to activate the current timeout scheme.
powercfg.exe /SETACTIVE SCHEME_CURRENT
- Now exit the command prompt window and reboot your PC.
3. Change screen timeout settings using the Control Panel
Control Panel, an essential component of the Windows 11 PC, enables you to tweak the time duration after which the screen times out automatically if the device remains idle. The step-by-step process of doing so is as follows:
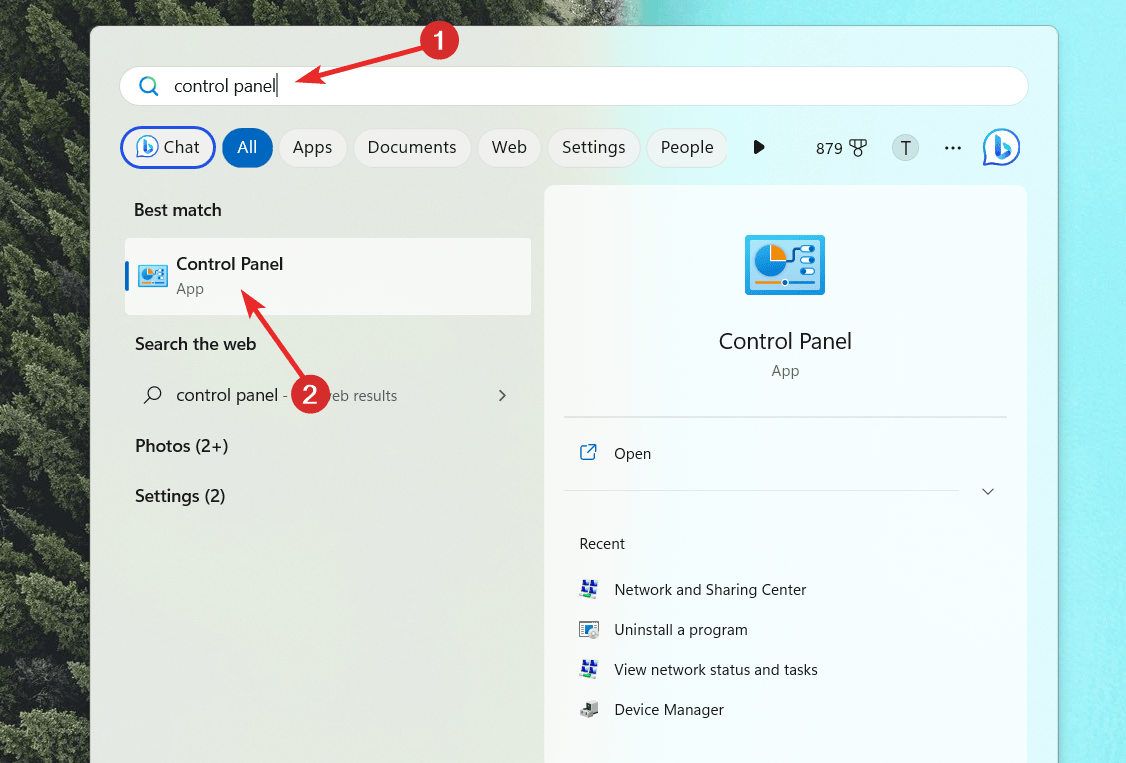
- Press the Start button and type Control Panel in the search box on top. Click the Control Panel icon located in the search results section.
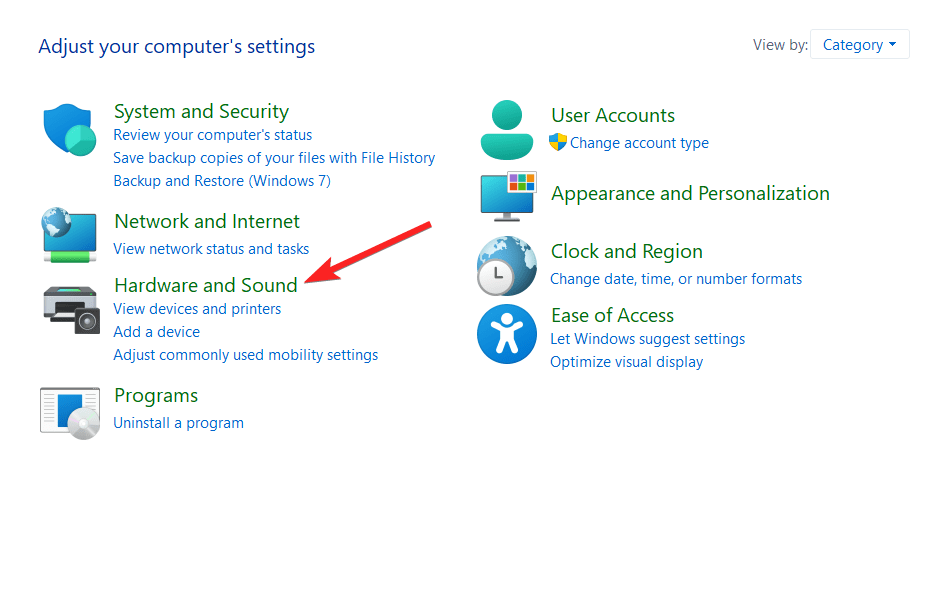
- In the Control Panel window, choose Hardware and Sound to view the related settings.
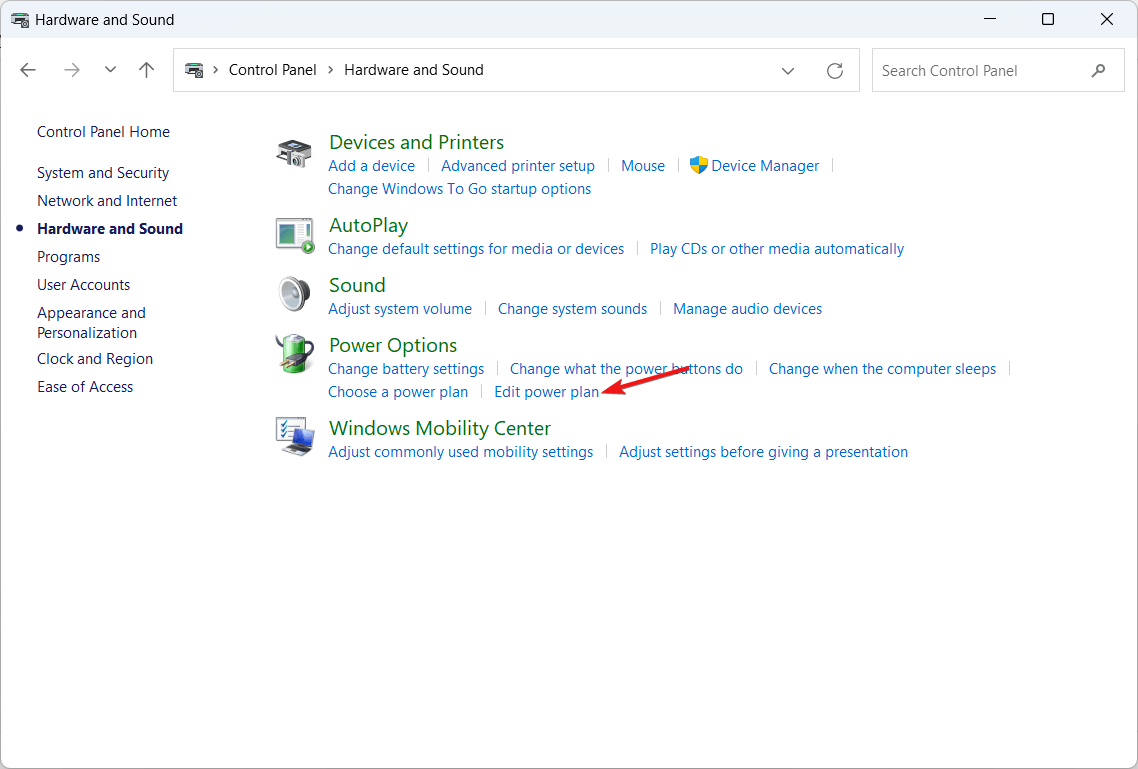
- Next, click Edit Power Plan located under the Power Options section.
- Now expand the Turn off the display dropdown under the On battery and Plugged in sections and choose your preferred timeout duration.
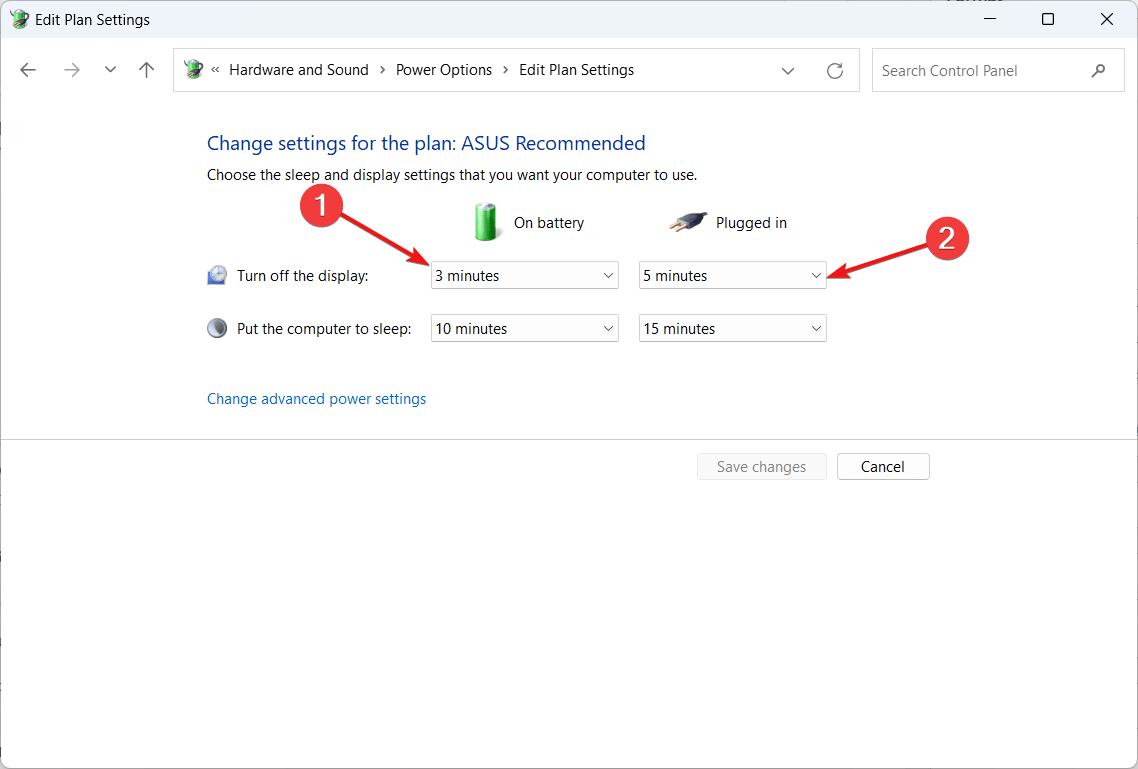
- Finally, press the Save Changes button and exit the control panel window.
4. Change Screen timeout duration using Windows PowerShell
Similar to Command Prompt, you can leverage the Windows PowerShell tool to change the screen timeout duration on a Windows 11 PC. Interestingly, unlike the Command Prompt, this is possible by executing a single command in the PowerShell window. Having said that, let’s see how to go about it.
- First of all, you need to launch the Windows PowerShell terminal. For this, right-click the Windows icon and choose the Terminal (Admin) option from the Quick Links menu.
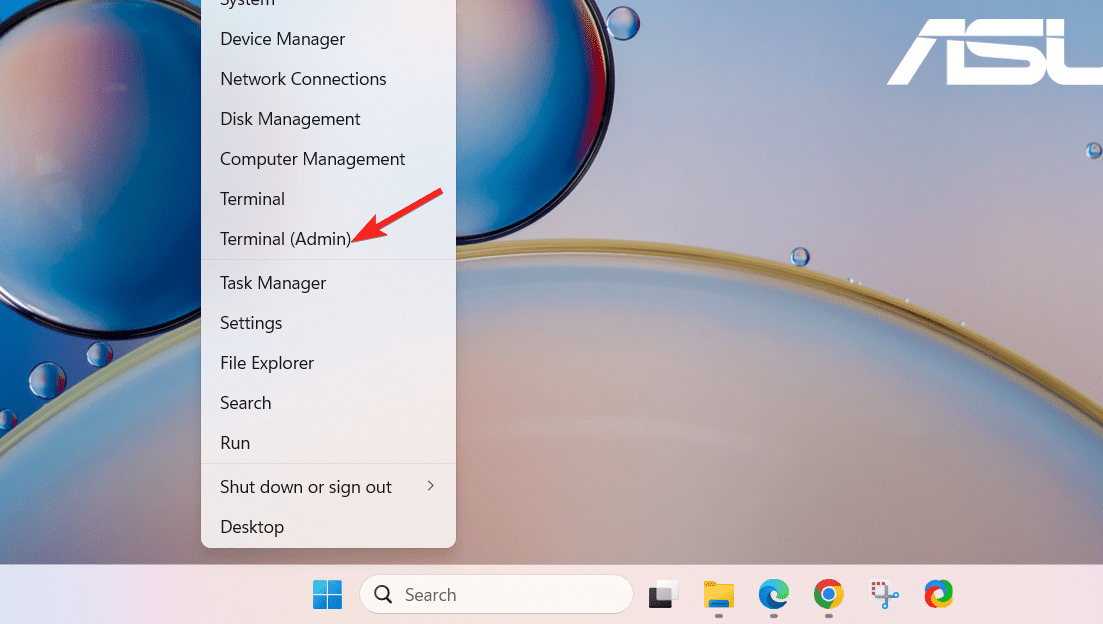
- Press the Yes button on the User Action Control window to launch Windows PowerShell in administrative mode.
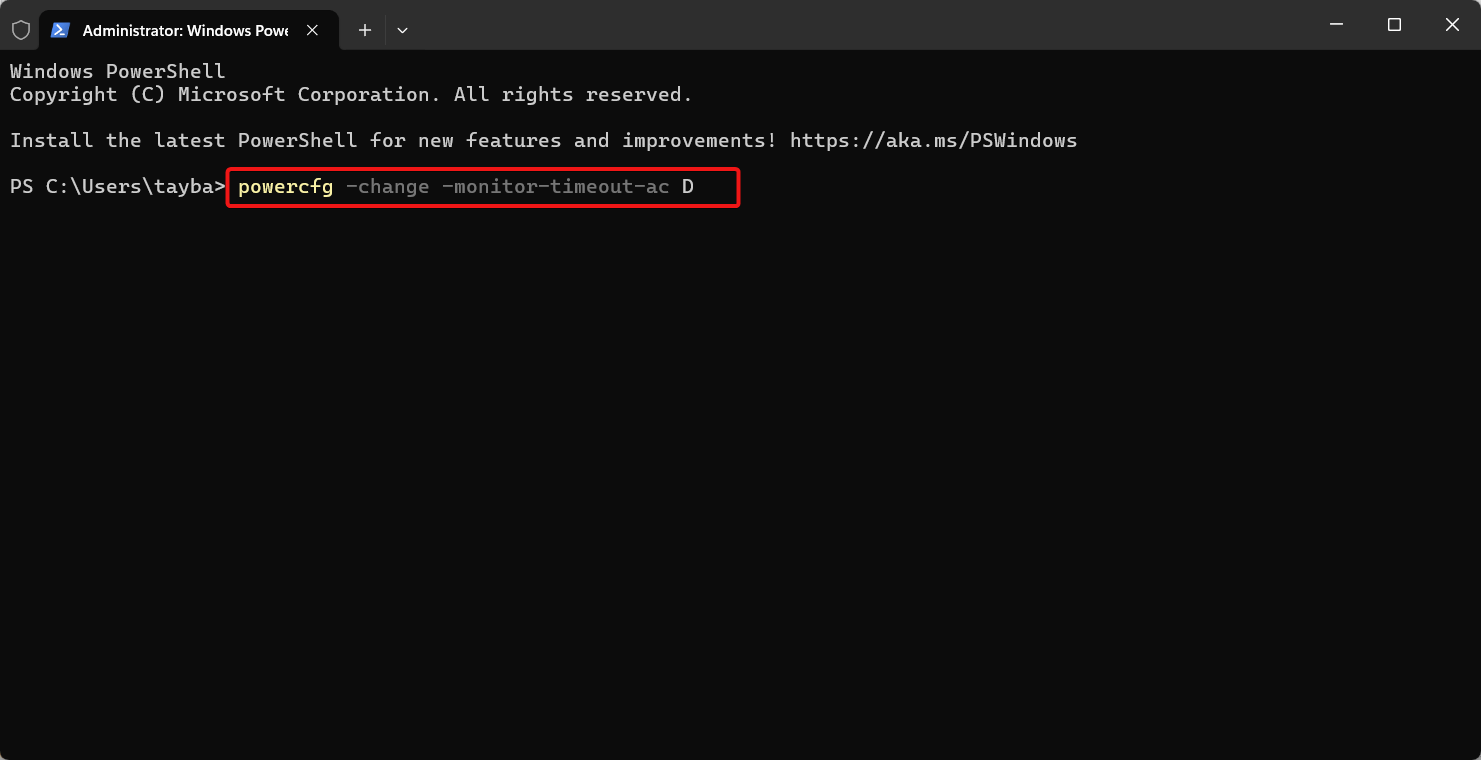
- Now type or paste the following command and press the Enter key to set the screen timeout duration. Here, you need to replace D with the screen timeout duration in seconds.
powercfg -change -monitor-timeout-ac D
5. Change Screen Timeout duration using Windows Registry Editor
Just like other settings, you can \set the screen timeout settings in Windows 11 using the Windows Registry Editor. The advantage of this method is that the settings prevail over the other Windows settings. However, you need to be extra cautious while editing the Windows Registry to prevent your Windows 11 PC from malfunctioning. Having said that, let’s proceed to change the screen timeout using Registry Editor on a Windows 11 PC.
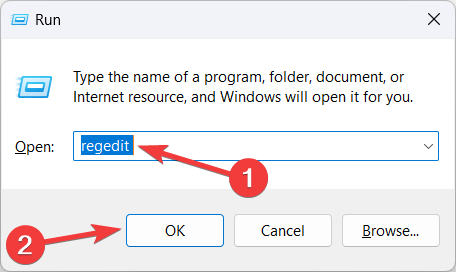
- Use the Windows + R shortcut to launch the Run dialog box. Type regedit in the search bar and press the Enter key to execute the command.
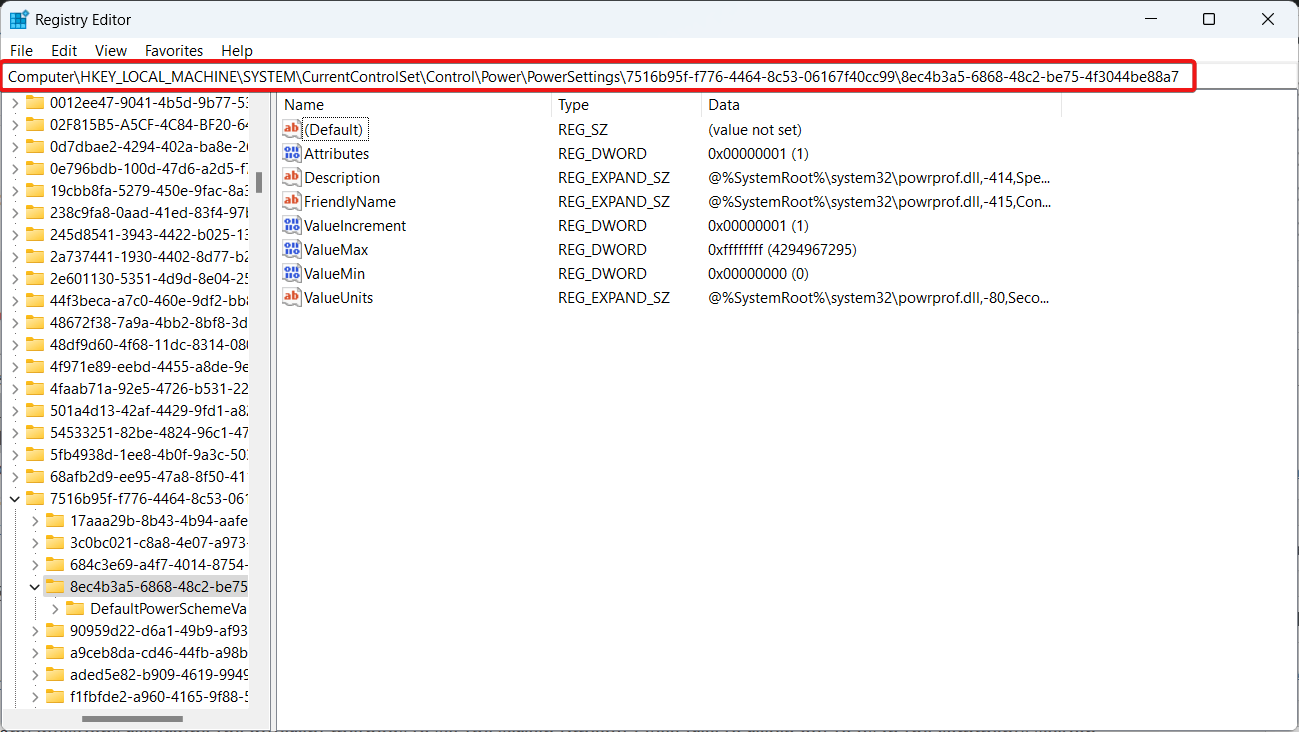
- Now, using the address bar on top, navigate to the following location:
HKEY_LOCAL_MACHINE\SYSTEM\CurrentControlSet\Control\Power\PowerSettings\7516b95f-f776-4464-8c53-06167f40cc99\8EC4B3A5-6868-48c2-BE75-4F3044BE88A7
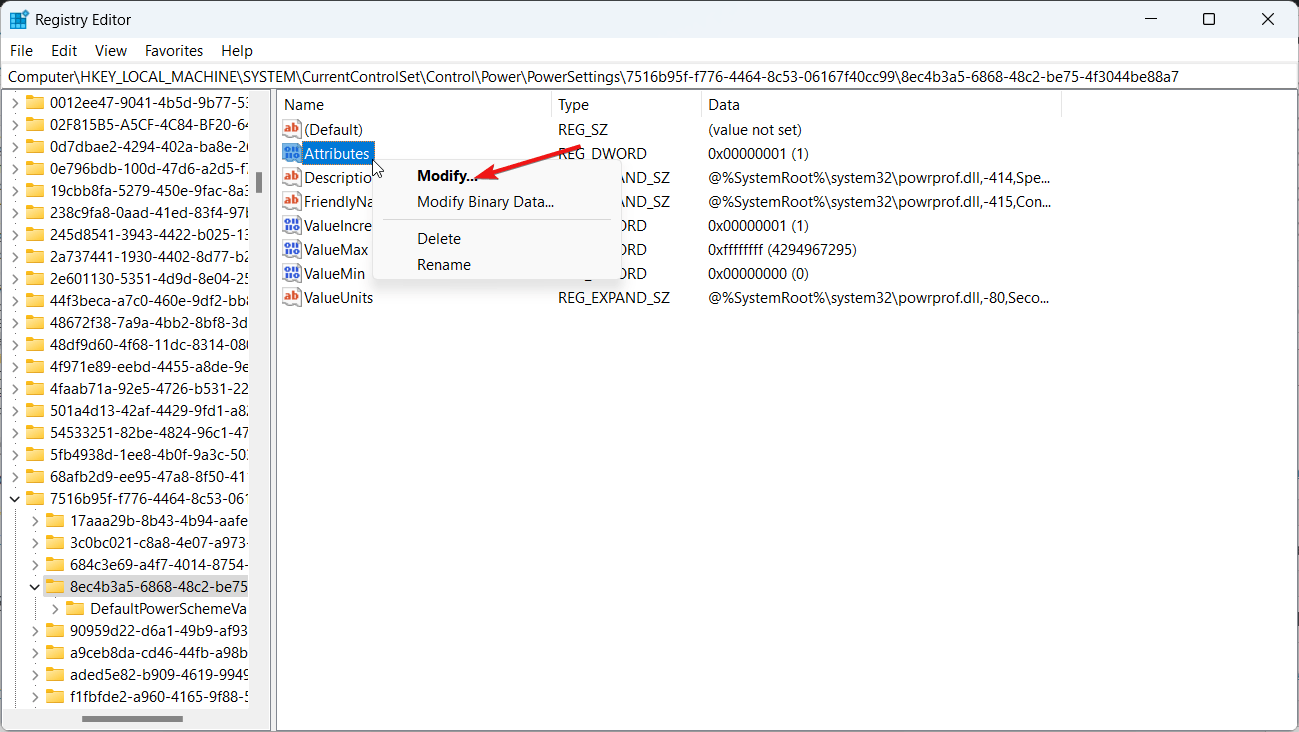
- Now look for Attributes in the right section of the Registry Editor window. Right-click it and choose Modify from the context menu.
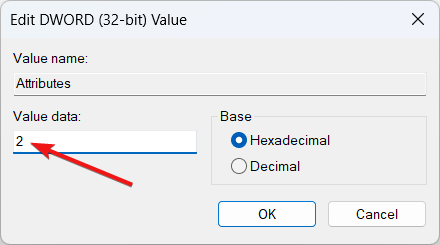
- Now assign 2 in the Value Data field and click the OK button to save the changes.
- Now exit the registry editor window and restart your Windows PC.
Conclusion
There you go! The methods discussed above allow you to easily change the screen timeout settings based on your preference. Once you set a particular time duration for the screen timeout, the device will automatically turn off after your Windows 11 PC is left idle without any activity.
Do you have any questions regarding the different methods to set the screen timeout? Feel free to reach out to us in the comments section.
If you've any thoughts on How do you Change the Screen Timeout in Windows 11, then feel free to drop in below comment box. Also, please subscribe to our DigitBin YouTube channel for videos tutorials. Cheers!