The iPhone’s default storage is never enough with the amount of data users store these days. So, users depend on iCloud backup.
Even Apple offers only 5GB of iCloud storage for each Apple ID. This is insufficient for any user to create a backup of a massive amount of data they generate and save on the iPhone.
So, this guide explains two ways to back up selected photos to iCloud.
The first trick explained in this guide allows you to create a backup of selected photos and videos on your iPhone to iCloud through a shared album.
You can access this shared album on other devices, PCs, or Macs. Since a computer has more storage, you can even download the photos for offline storage or viewing.
This method also facilitates creating a dedicated webpage for the shared album to view in the browser.
The second trick enables you to select photos from the iCloud library while you are logged into your iCloud account on Safari.
Each workaround contains pros and cons, that is discussed in the guide. That will help you choose your method for backing up iPhone photos.
How to Create Shared Albums on iPhone?
Shared Albums allow you to upload selected photos and videos to iCloud without consuming your iCloud storage.
This feature is handy for those who want to back up specific photos/videos on their iPhones holding precious memories. You can create a backup of such images or videos without paying for additional iCloud storage space.
Back-Up Photos Using a Shared Album on the iPhone
With a shared album, you can access your favorite photos and videos on any of your Apple devices if they are synced under the same Apple ID.
The content stored in shared albums won’t consume the iCloud storage. Thus, you save a significant amount of storage on iCloud.
Follow these steps to add your preferred photos and videos to a shared album on your iPhone to share it across your Apple devices.
As it is a shared album, you may share it with others (users with an Apple ID). Otherwise, you may exclusively share it with yourself.
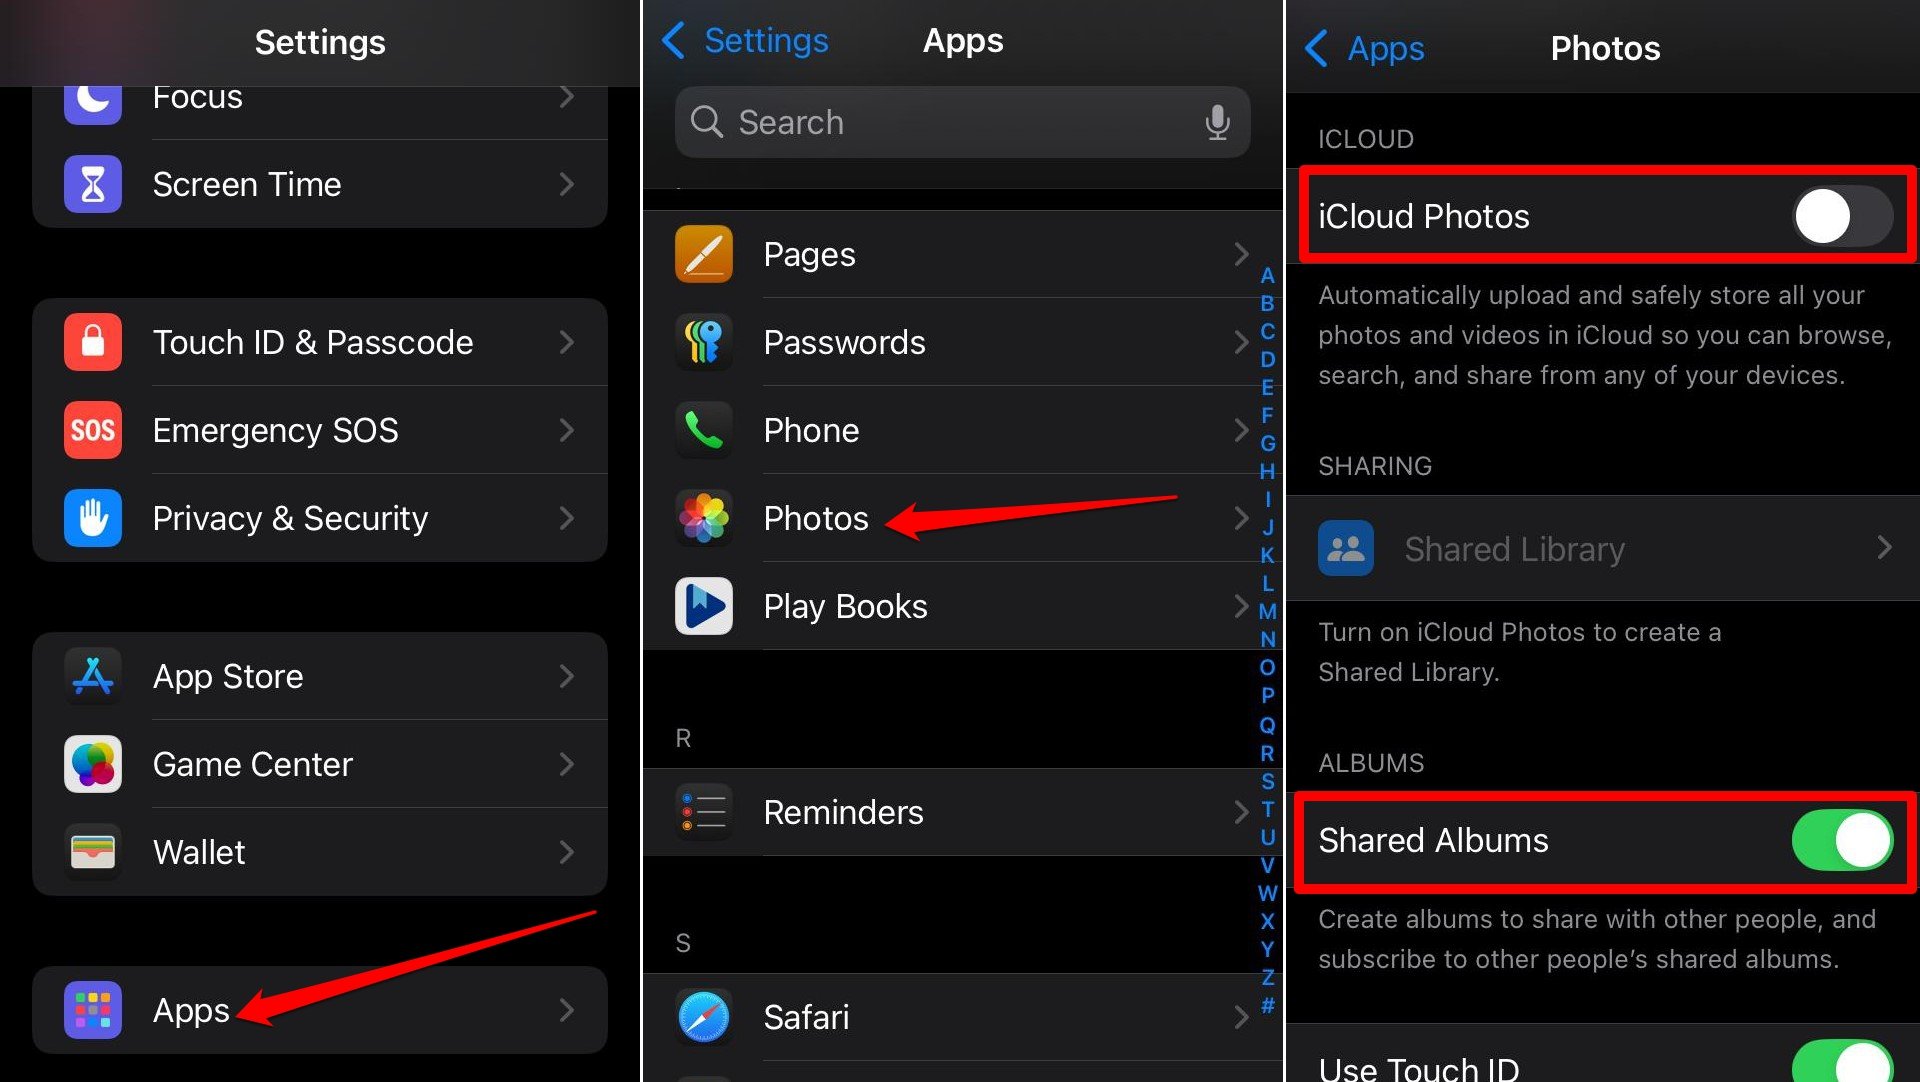
- Open the iPhone’s Settings.
- Go to Apps > Photos app.
- Turn off the toggle beside iCloud Photos.
- In the same Photos settings menu, turn on the option for Shared Albums.

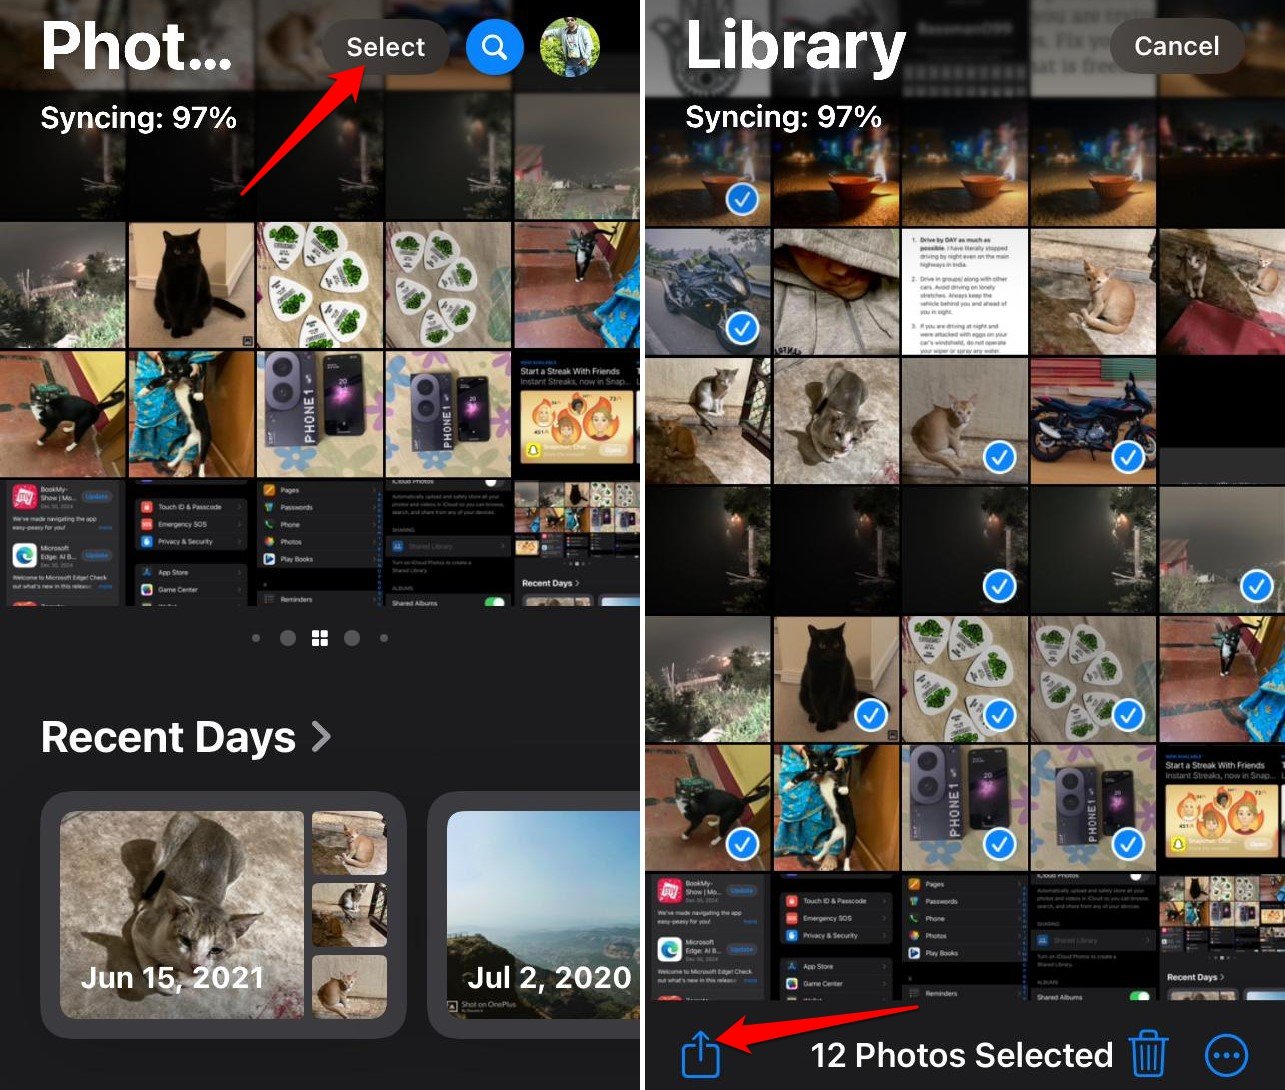
- Go to App Library and launch the Photos.
- Press the select button at the top and select the photos and videos you want to save on iCloud through a shared album.
- Tap the Share icon at the bottom.

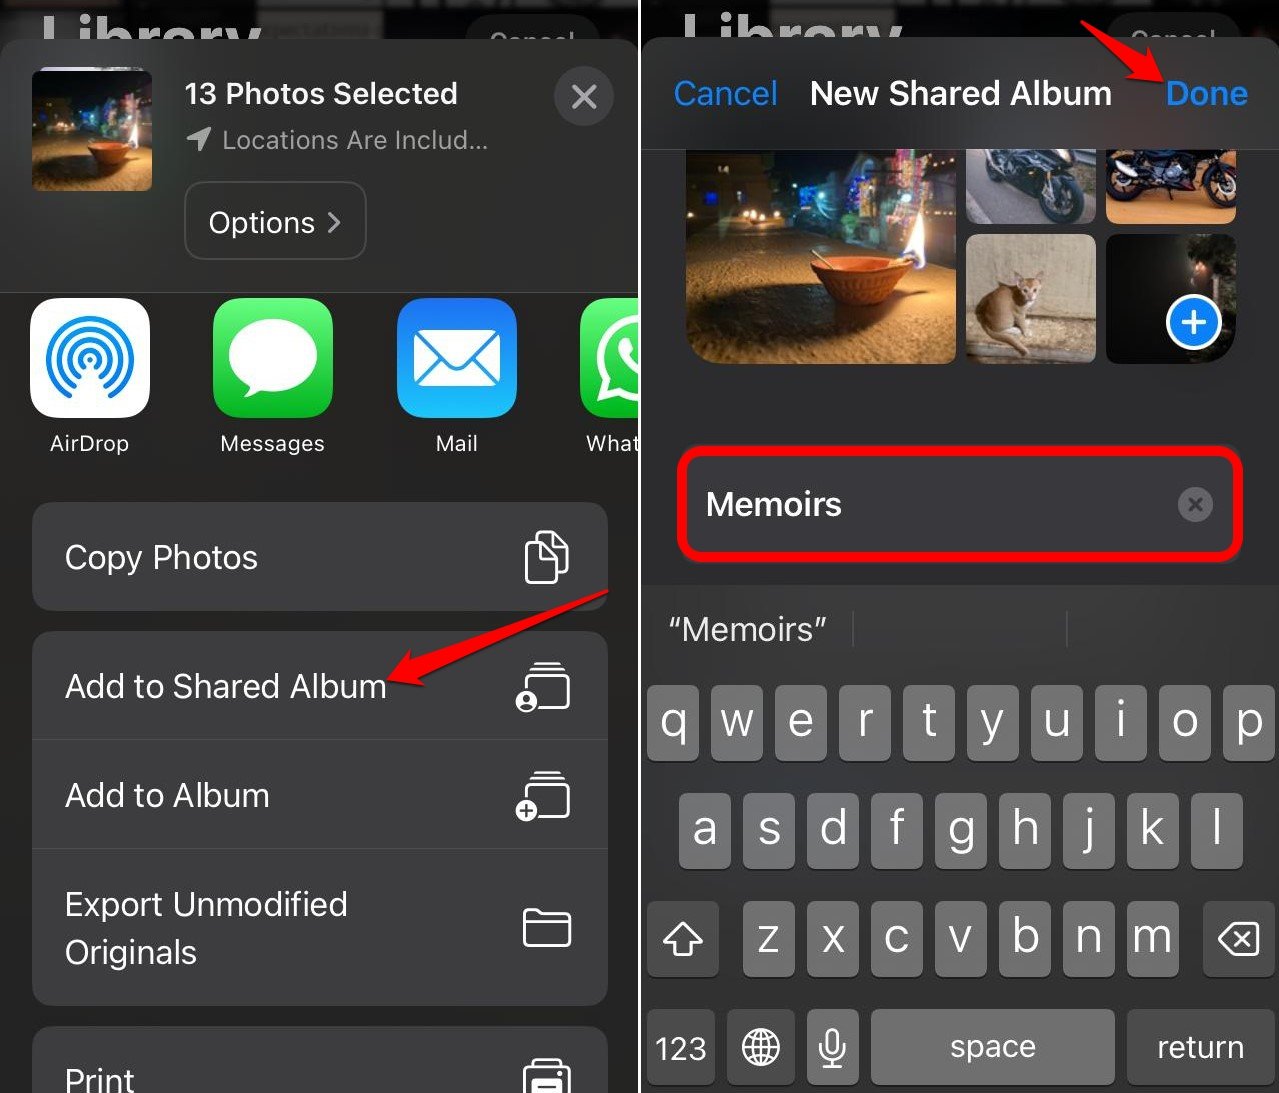
- Select Add to Shared Album.
- Set the name of the shared album and press Done.

Now, you can view the Shared Album within the Photos app by scrolling down the section.
How to Generate a Link for the Shared Album?
You can create a link for the shared album to open it on any browser.
- Launch the Photos app on your iPhone.
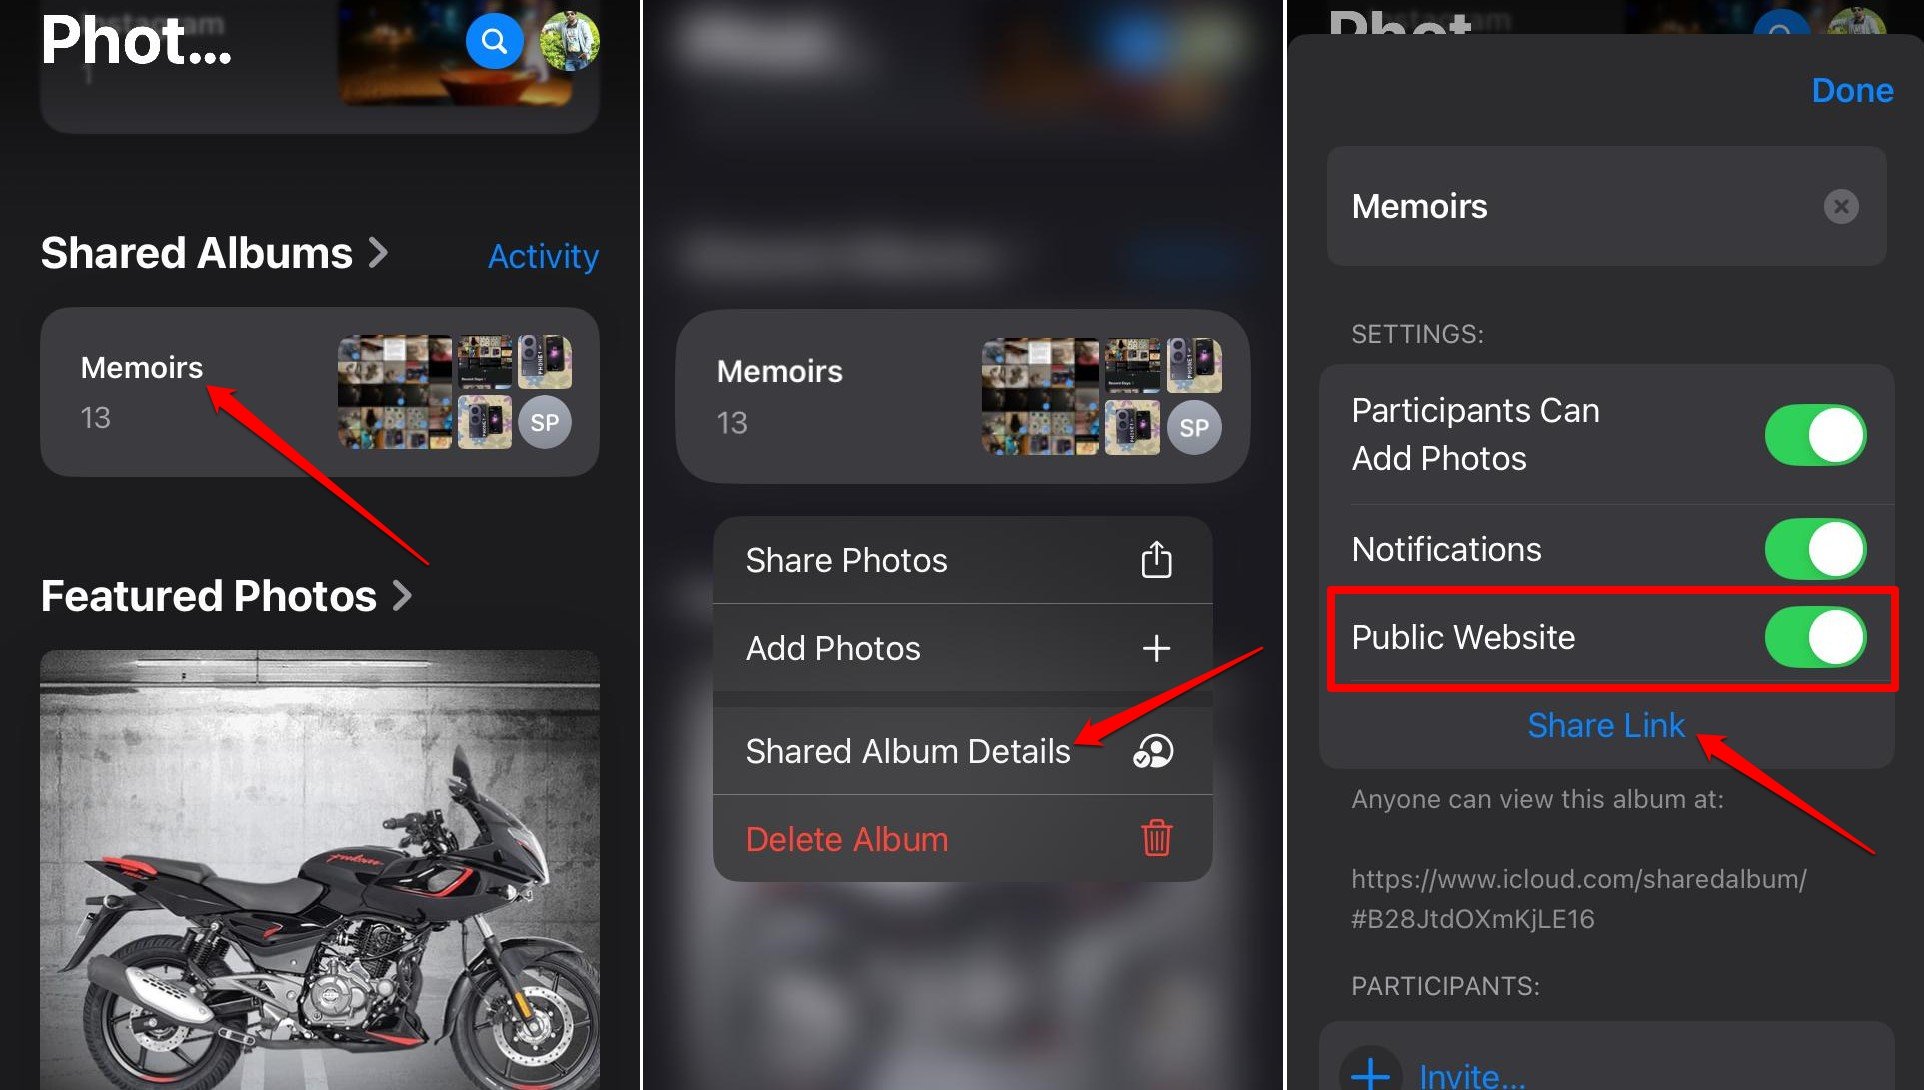
- Go to Shared Albums and long press on the album you want to share.
- You may select the Share Photos option to share the album manually with your contacts.
- Else, tap on Shared Album Details.
- Enable the toggle next to the Public Website option to generate the link for the shared album.
- Tap on Share Link.

Now, you can copy the link and share it with anyone or simply paste it on any web browser address bar and view the contents of the shared album.
In a shared album, you can upload upto 5000 photos and videos. Also, you can create as many shared albums as you want.
You don’t have to worry about clearing iPhone storage or buying extra iCloud storage. The shared album or its content won’t expire until you delete it manually.
There is a significant downside to creating a photo/video backup using Shared Albums.
The photos backed up via shared album are of lower resolution. Even the resolution of the videos saved in a shared album reduces from 4K/1080p to 720p.
Only fifteen-minute videos are supported in a shared album.
Upload your Photos to iCloud via Safari
Do you have a lot of photos stored in the iCloud photo library?
You may want to select a few important photos from that and create a different backup.
This method allows selecting your images and upload them to the Safari web browser.
There is no need to rely on the Photos app. It’s a direct option for users who want to pick and choose specific images to back up.
You can easily access all the photos you have backed up across all your Apple devices.
Steps to Create Back Up of Photos from iCloud Photo Library
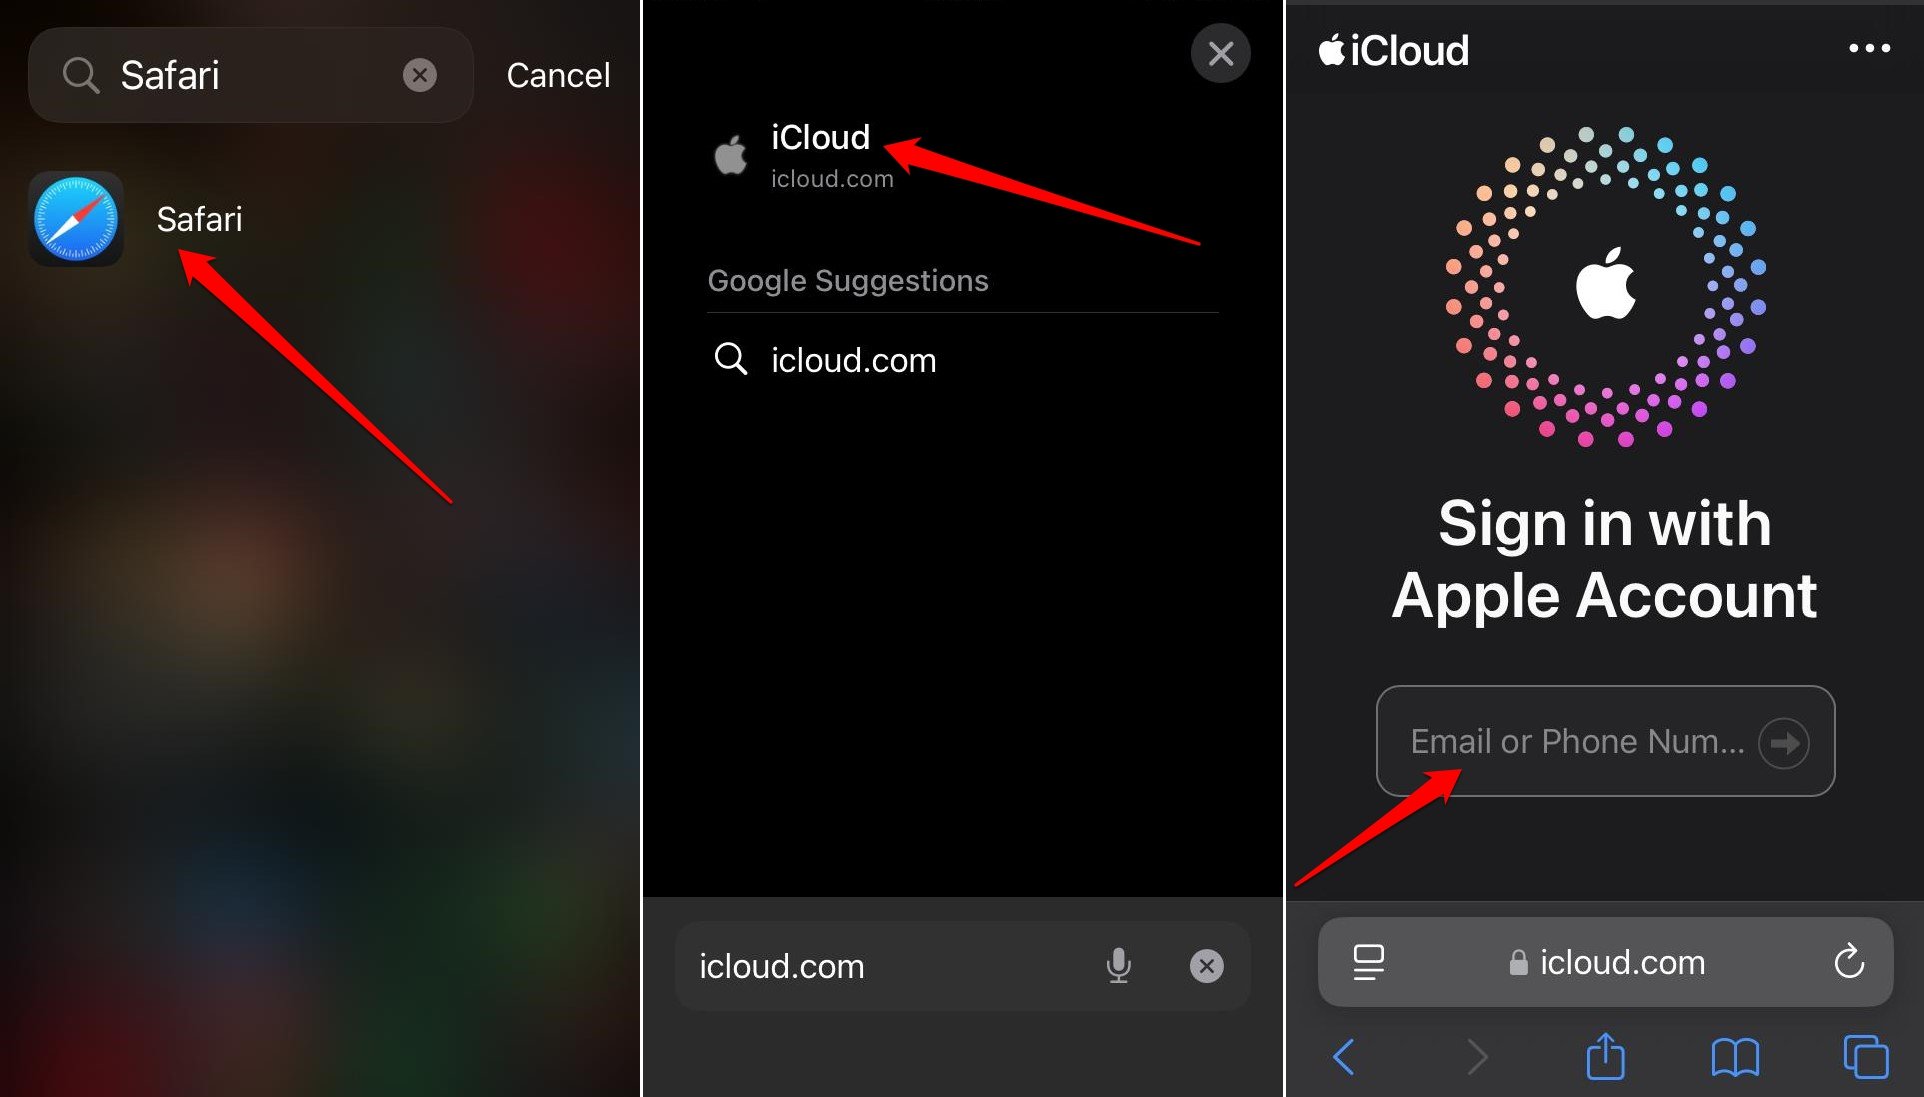
- Open the Safari app on your iPhone.
- In the address bar type iCloud.com.
- Enter your Apple ID and password on the iCloud website to access your account.

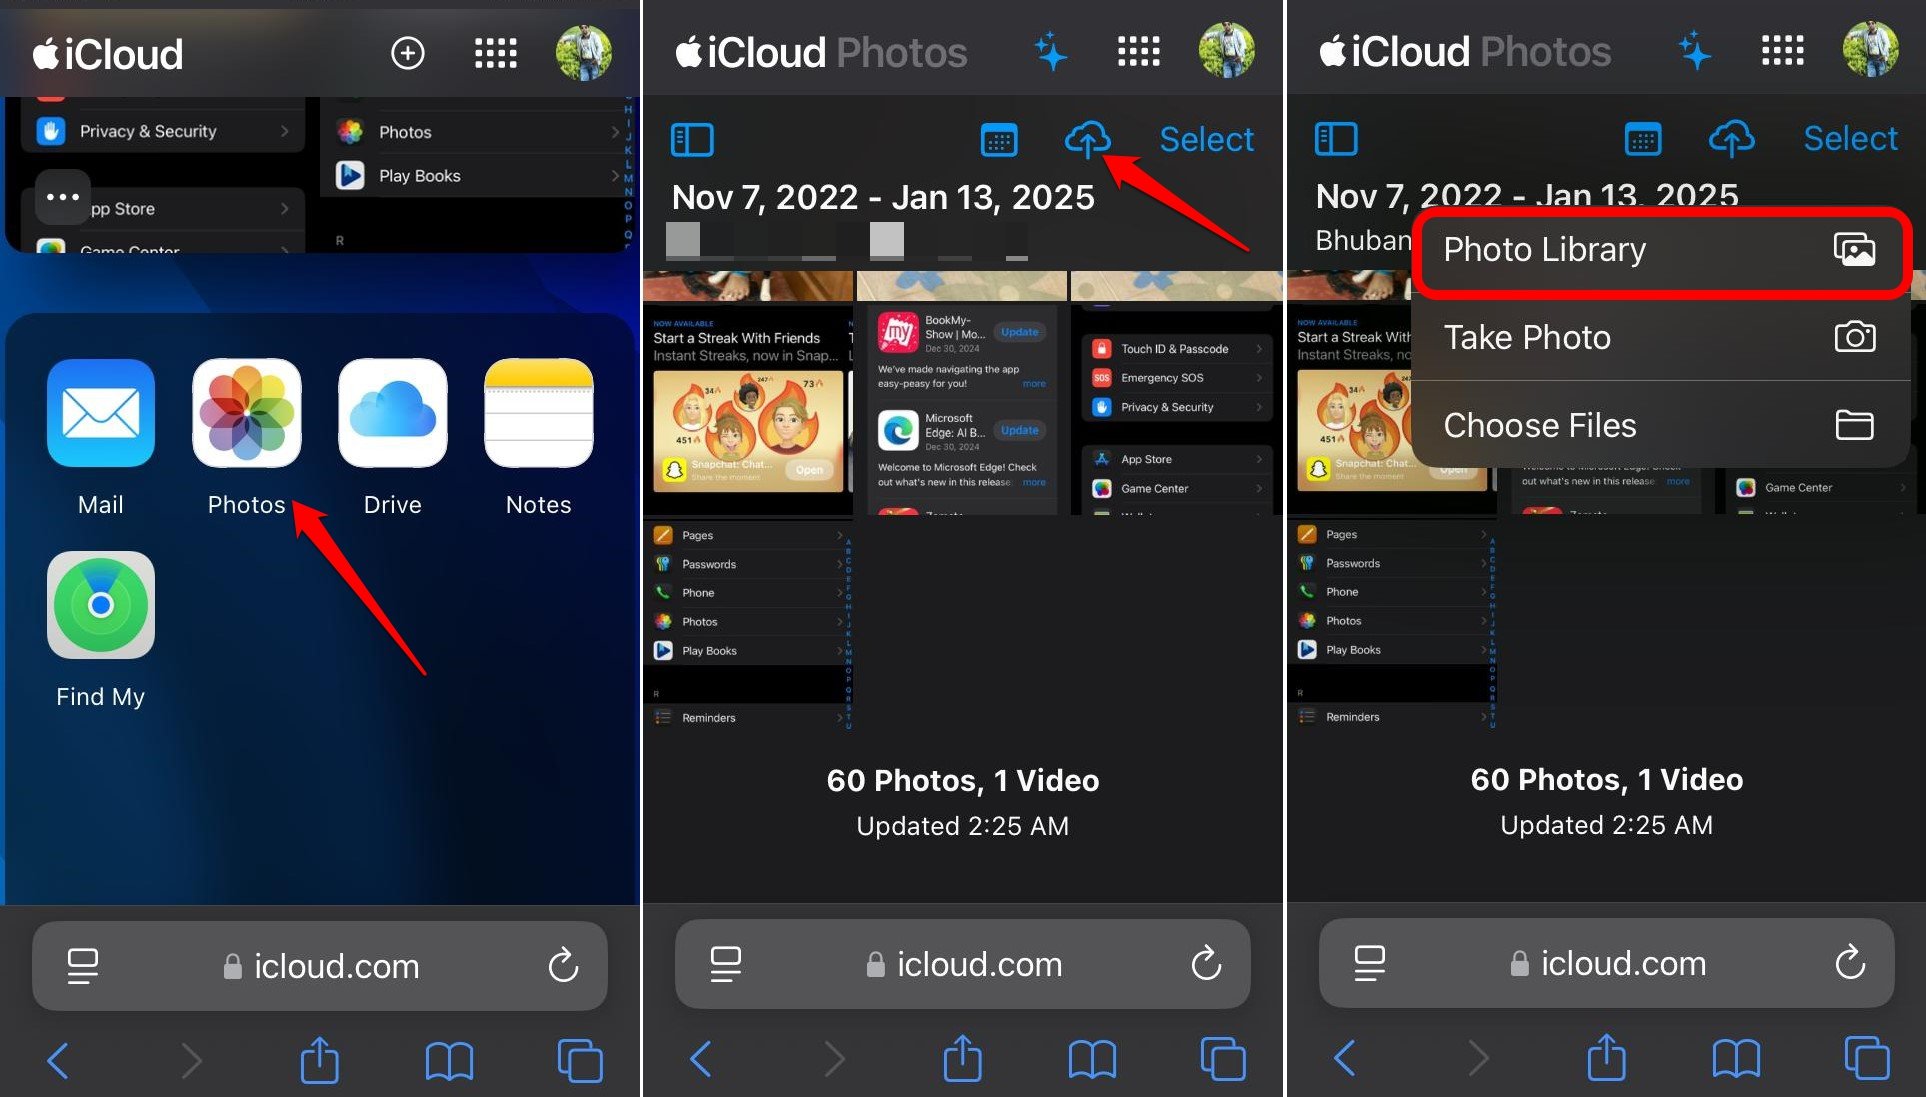
- Once logged in, click on the Photos icon. It will give you access to your iCloud Photo Library where photos from your Apple devices are backed up.
- Press the Upload icon (a cloud with an upward arrow).
- Tap Photo Library to browse the storage and select the photos you want to upload.

In this method, you can upload the photos in their original resolution.
There will be no loss in the image quality as it happens with the Shared Album backup method.
There are two downsides you must be mindful of before deciding to upload images directly to Safari.
This method does not support uploading PNG images. Also, you cannot create a backup of videos on your iPhone using this method.
What Method Should You Use?
I suggest using Shared Albums to back up multiple photos and videos as they do not consume iCloud storage.
Create a backup of iPhone images using Safari uploads if you prioritize photo quality and don’t want low-resolution images in the backup.
However, the Safari direct upload method won’t be ideal for creating a backup of the PNG images as it doesn’t support the format. It also lacks support for uploading videos.
We already have a YouTube video demonstrating the steps explained in both methods. Check that out if you have any doubts about following the steps.
Frequently Asked Questions(FAQs)
Do Shared Albums Take Space in iCloud Storage?
NO. Shared Albums have separate free storage in the iCloud.
Can I Add JPEG and PNG Images to a Shared Album?
You can add up to 5000 photos in JPEG and PNG format in a Shared Album.
Does Direct Upload to Safari Support All Formats of Image?
Direct Upload to Sfafri doesn’t support PNG images.
Can I Upload a Video in the Safari Backup Method?
NO. In direct upload to Safari, you cannot create a backup of a video.
Is There a Time Limit on Videos Uploaded to Shared Albums?
YES. In a shared album, only the videos of fifteen minutes are allowed.
Bottom Line
Often some photos and videos are too precious for you to delete permanently. That’s why you should create a backup of those files.
Both the techniques for file backup, Shared Album, and Safari Uploads are equally useful.
You can save your photos and videos while making them accessible on other Apple devices.
If you run out of free iCloud storage or don’t want to purchase extra iCloud storage, these methods should help you create a backup for your photos or videos.
If you've any thoughts on How to Backup Only Selected Photos to iCloud on iPhone, then feel free to drop in below comment box. Also, please subscribe to our DigitBin YouTube channel for videos tutorials. Cheers!
