A signature plays a crucial role when you want to accept a document with a handwritten signature that mainly represents a person’s name, typically written in a unique style. If you’re going to accept a document, you must have to add a signature, no matter whether you choose a handwritten or a digital sign.
There are many ways to add a signature to a Word document using Microsoft Word. In this guide, we show you how to add a signature in a Word document including instructions for both digital and handwriting signatures. Let’s get straight to it.
Ways to Add a Handwritten Signature in Word Document
Here we have shared the different methods to insert a signature in a Word document for both handwritten and digital signatures. Let’s look at them.
1. Insert a Handwritten Signature in Microsoft Word
Adding a handwritten signature to a Word document is pretty simple. After adding a handwritten image, you can crop it, and insert typed text such as job title, phone number, and date.
Here’s how to add a handwritten signature in Microsoft Word:
- Open the Microsoft Word on your computer and launch the file.
- Place the cursor on the spot in your document where you want to add a signature.
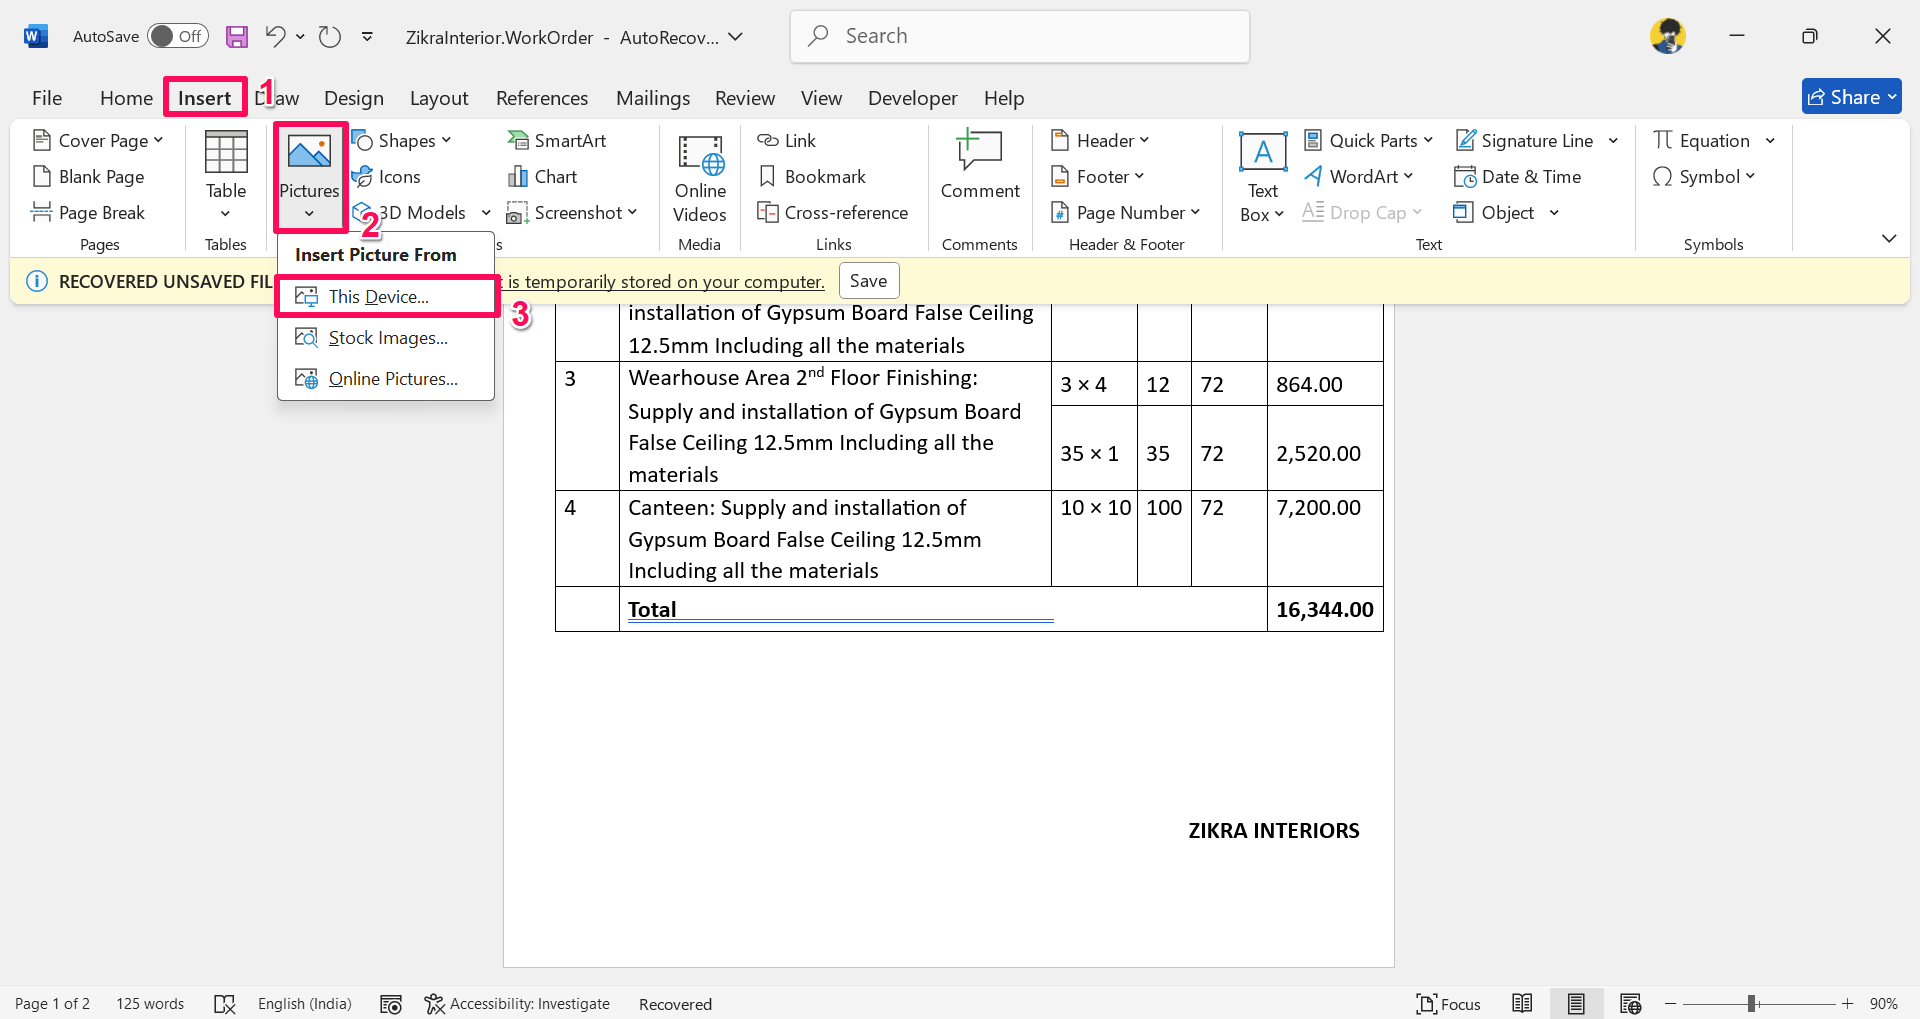
- Click on the Insert tab at the top bar and click on Pictures.
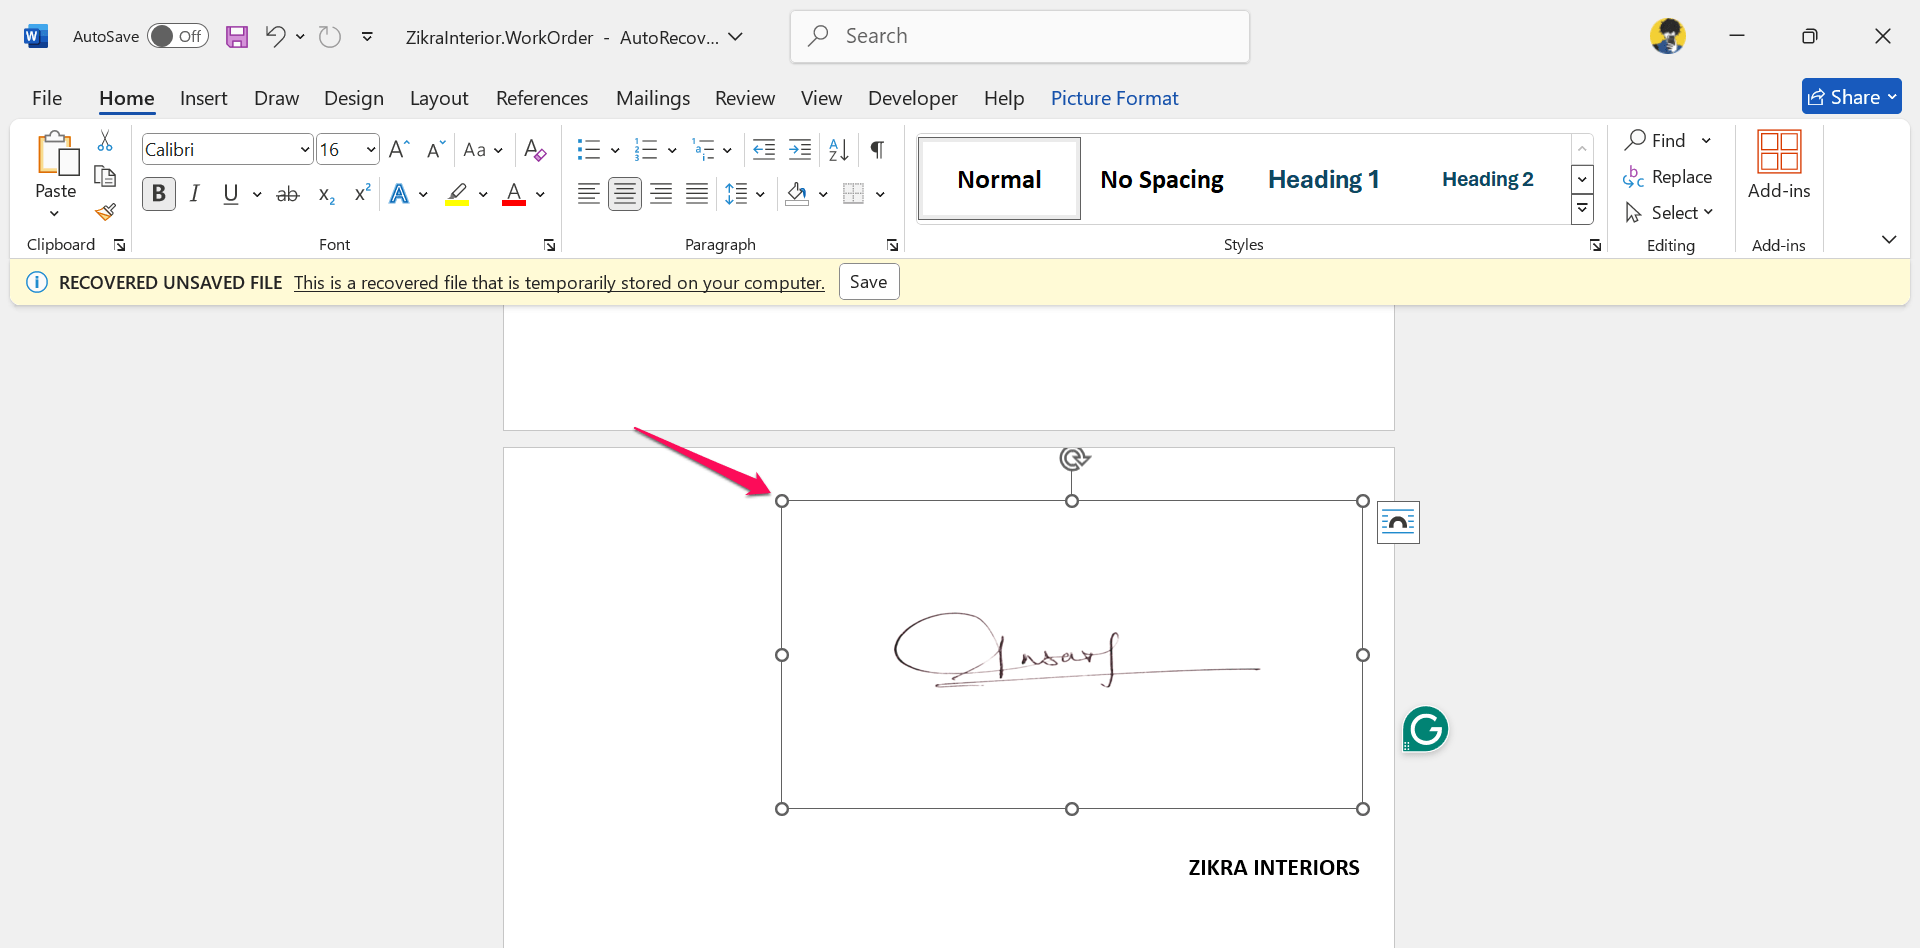
- Then, choose “This Device” from the menu and select the signature image you took. On Mac, choose “Picture From File.”

- Once the signature image is added, click on the Picture Format tab and press the Crop button.
- Drag the corner edges of the image to adjust the signature you want to keep and hit Enter.

If you are going to add a handwritten sign on your document, then ensure to click the photo to brighten it. However, you can also edit the image by expanding the exposure to an appropriate level to insert the perfect sign that matches with your document page.
You’re done! This is how you can insert a handwritten signature on your document in Microsoft Word. In case, if you want to add a digital signature to a document, then you should follow the below workarounds.
2. Draw a Digital Signature in a Word Document
If you don’t have a signature image or won’t consider inserting a handwritten signature, you can use the Draw tab to digitally draw a signature using your touchpad or mouse. Here’s how:
- Place the cursor where you want to add a signature on your document.
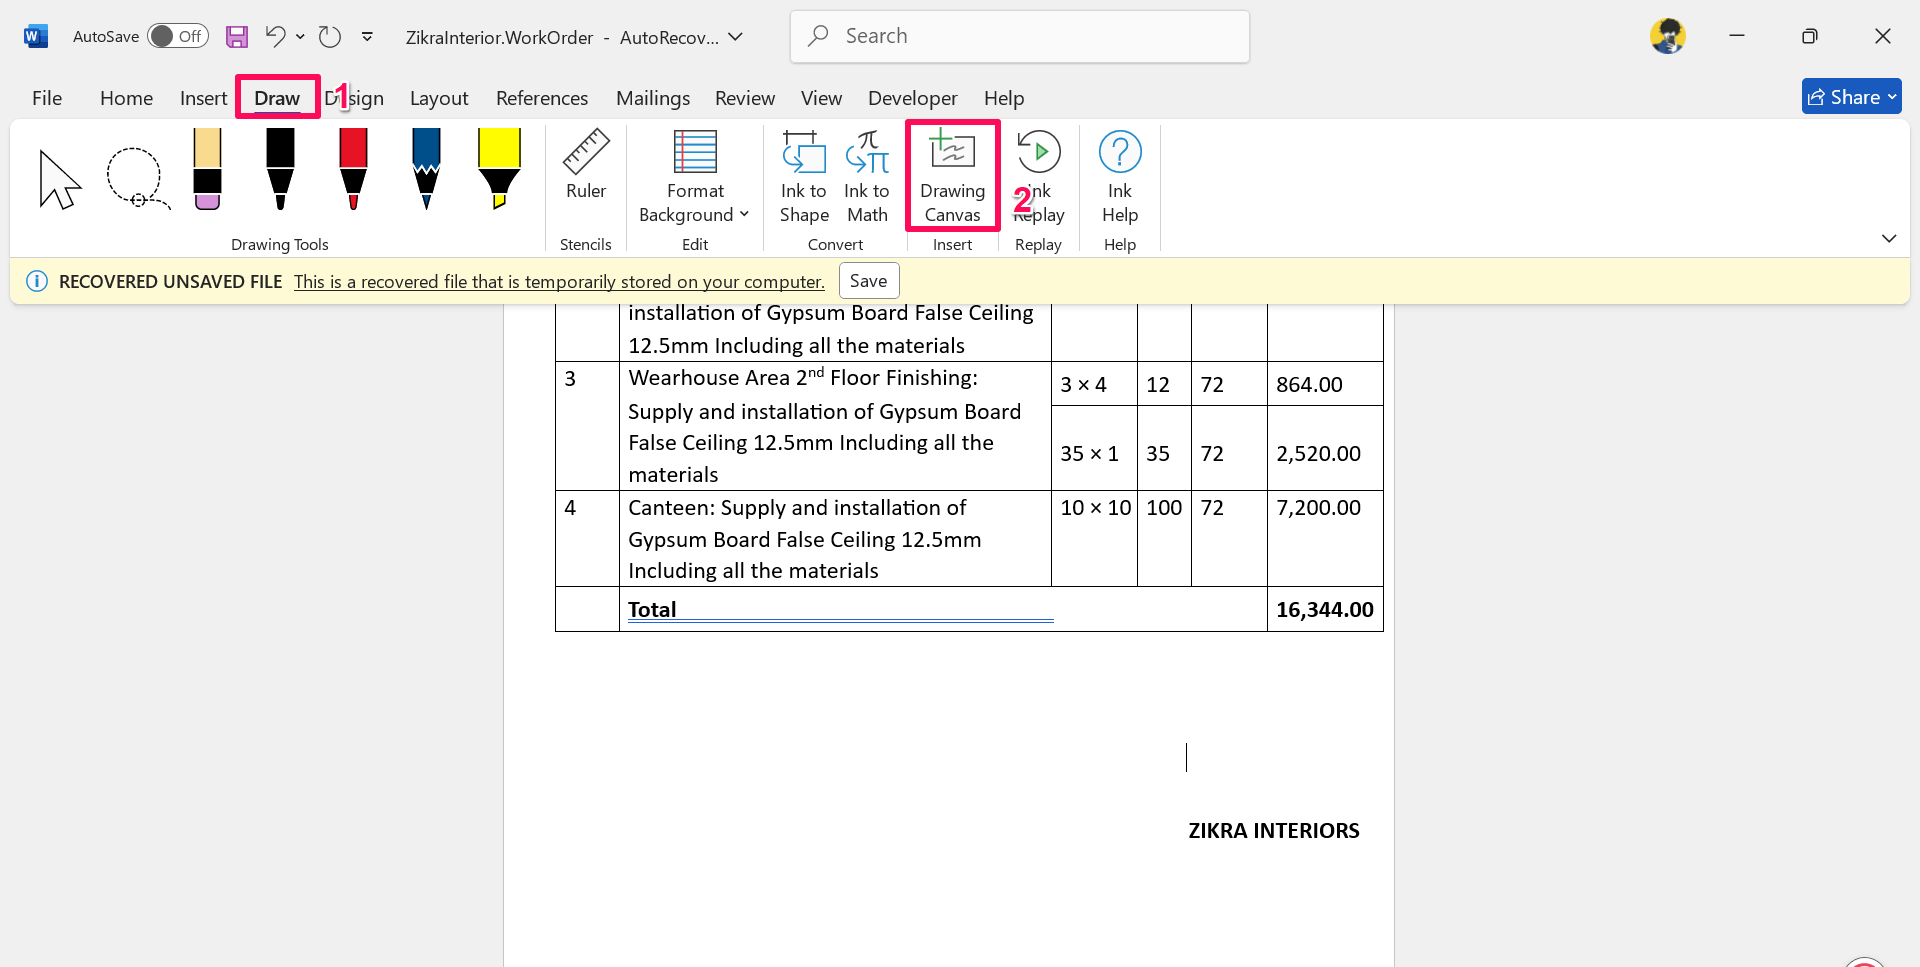
- Click on the Draw tab and choose “Drawing Canvas” under the Insert section. On Mac, choose “Draw with Trackpad” if applicable.

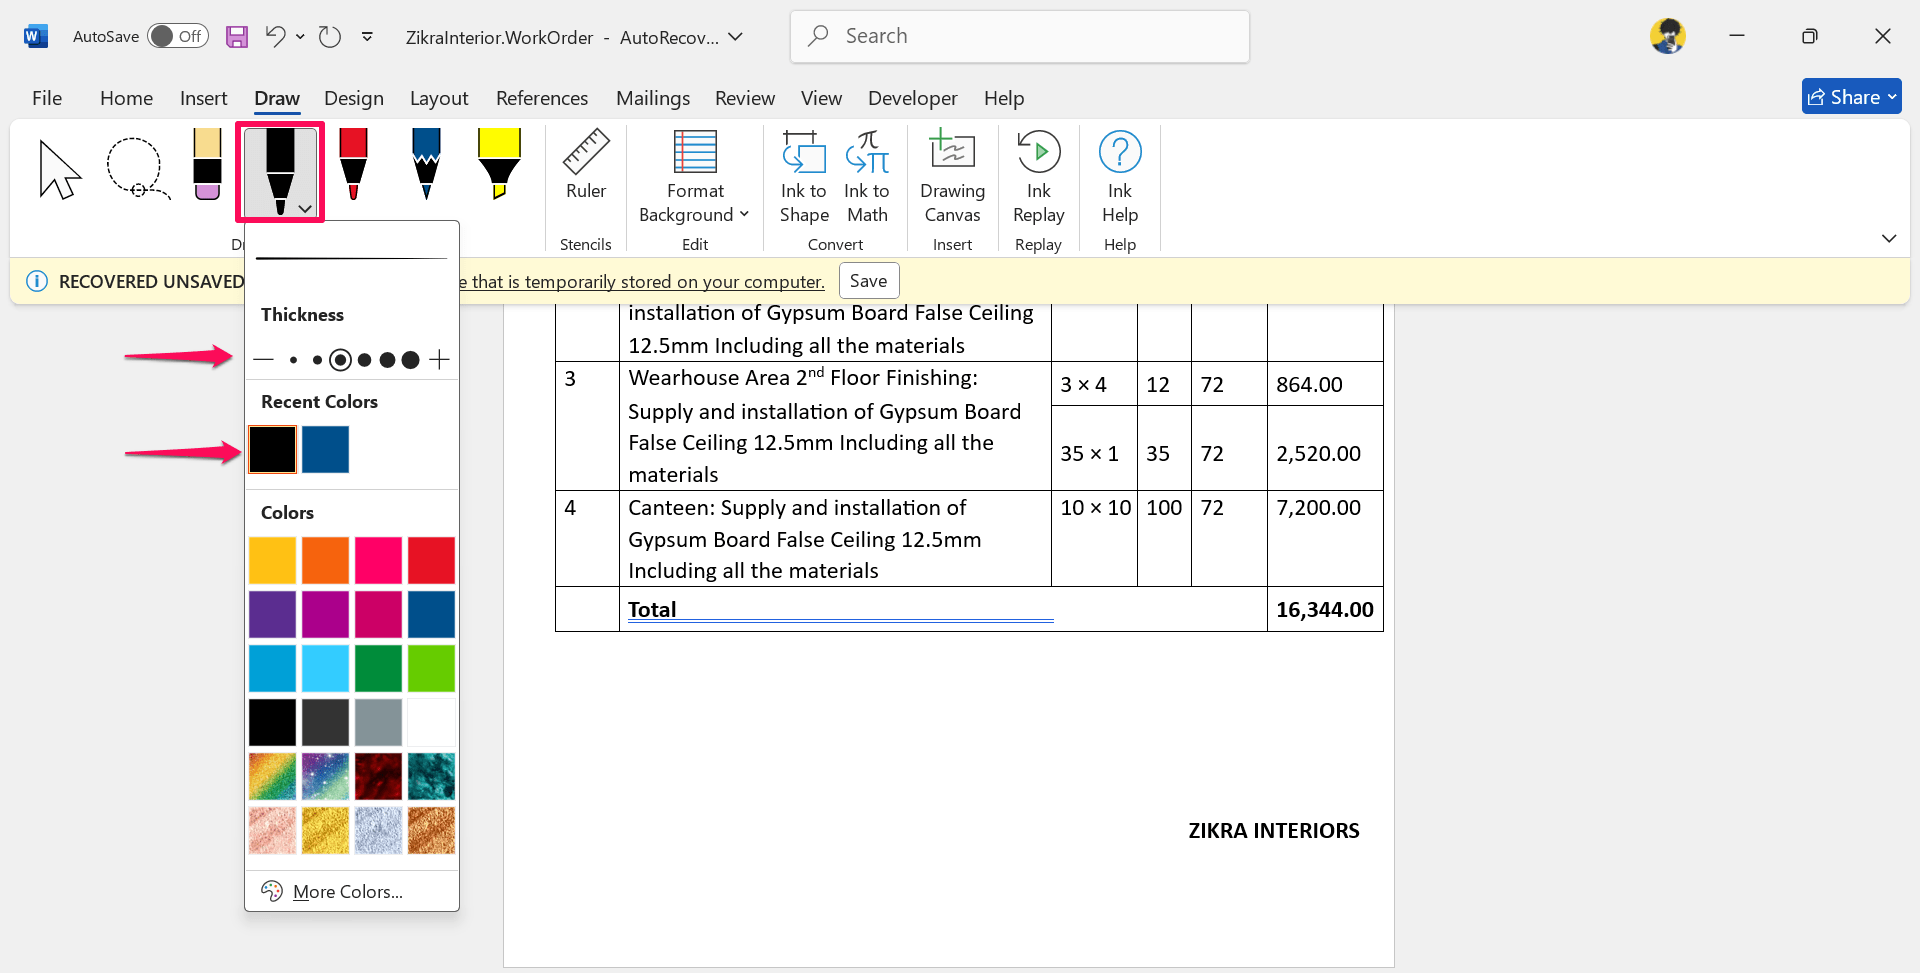
- Now choose a drawing tool like the pen and click the drop-down menu to select the black color.
- Then, choose the thickness of the pen and use the mouse or trackpad to draw the sign name inside the canvas.

Once you draw the signature then you can drag the corner edges if you want to resize it to another location.
3. How to Add a Signature Using Text in Word
If you are planning to re-utilize the signs in a Word document you created for future use, you can save it altogether. In addition, you can add a signature text in Word form. Here’s how:
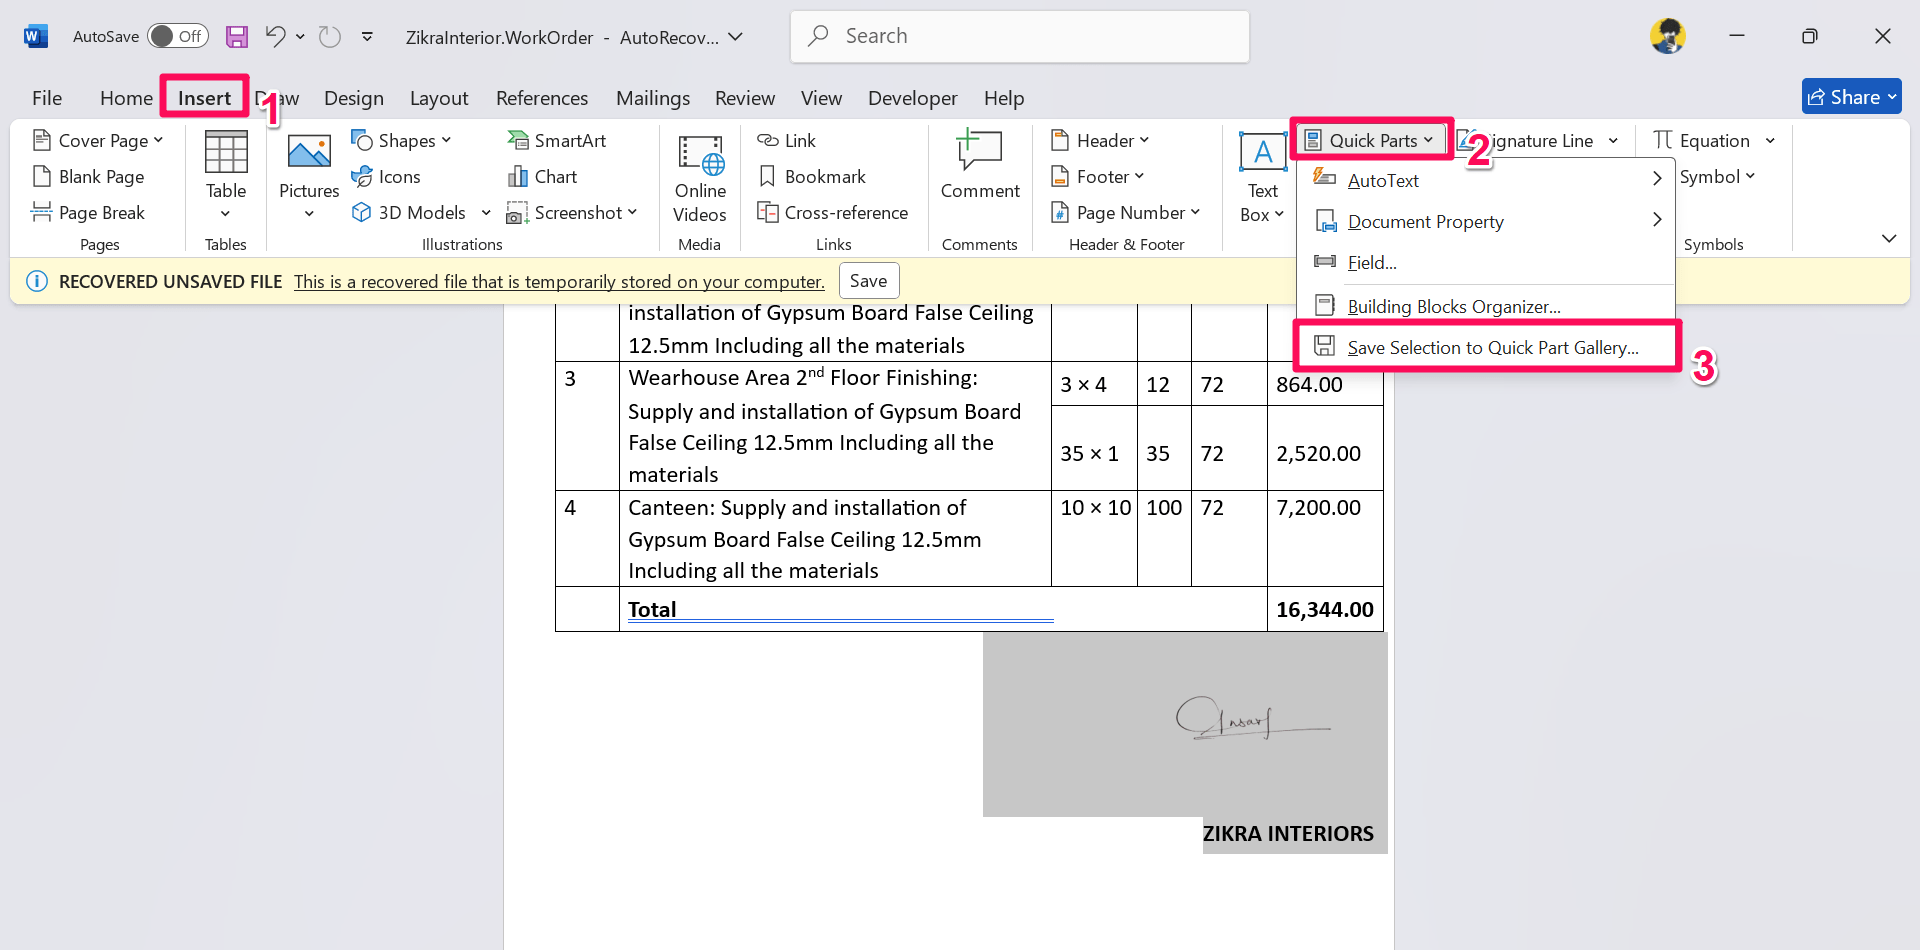
- Open the Word document and select the image of your signature and the text beneath it.
- Click on the Insert tab at the top bar and click on Quick Parts.
- Then click on the “Save Selection to AutoText Gallery.”

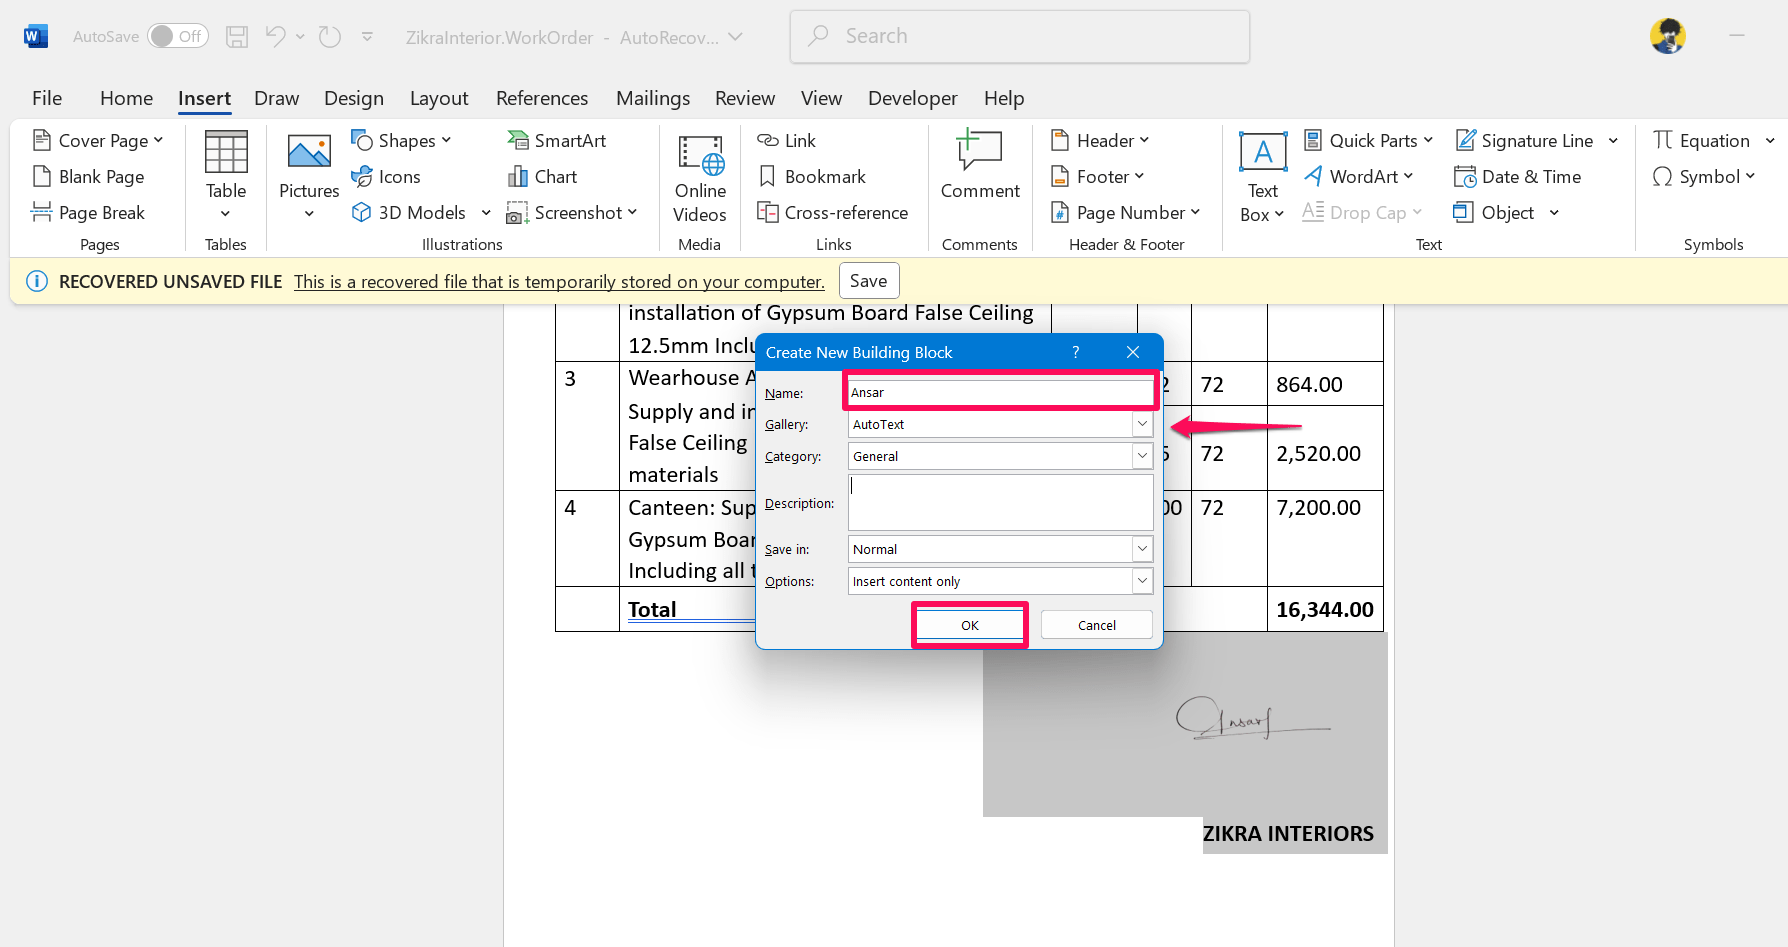
- In the pop-up menu, click on Name to add a name and choose AutoText in the Gallery drop-down menu.
- Finally, click on the OK button.

Now when you want to add a signature and text to your Word document, simply place your cursor on the spot where you’d like to insert a signature and click the Insert tab. Then, click on Quick Parts > AutoText and select the name from the list you gave it.
How to Add a Signature Line in Microsoft Word Document
Microsoft Word lets you add a signature line in the document. It includes the signer’s name and its title like Manager. In addition, users can add their e-mail addresses as well. Here’s how to add a signature line in your Word document:
- On Microsoft Word, click the Insert tab at the top bar.
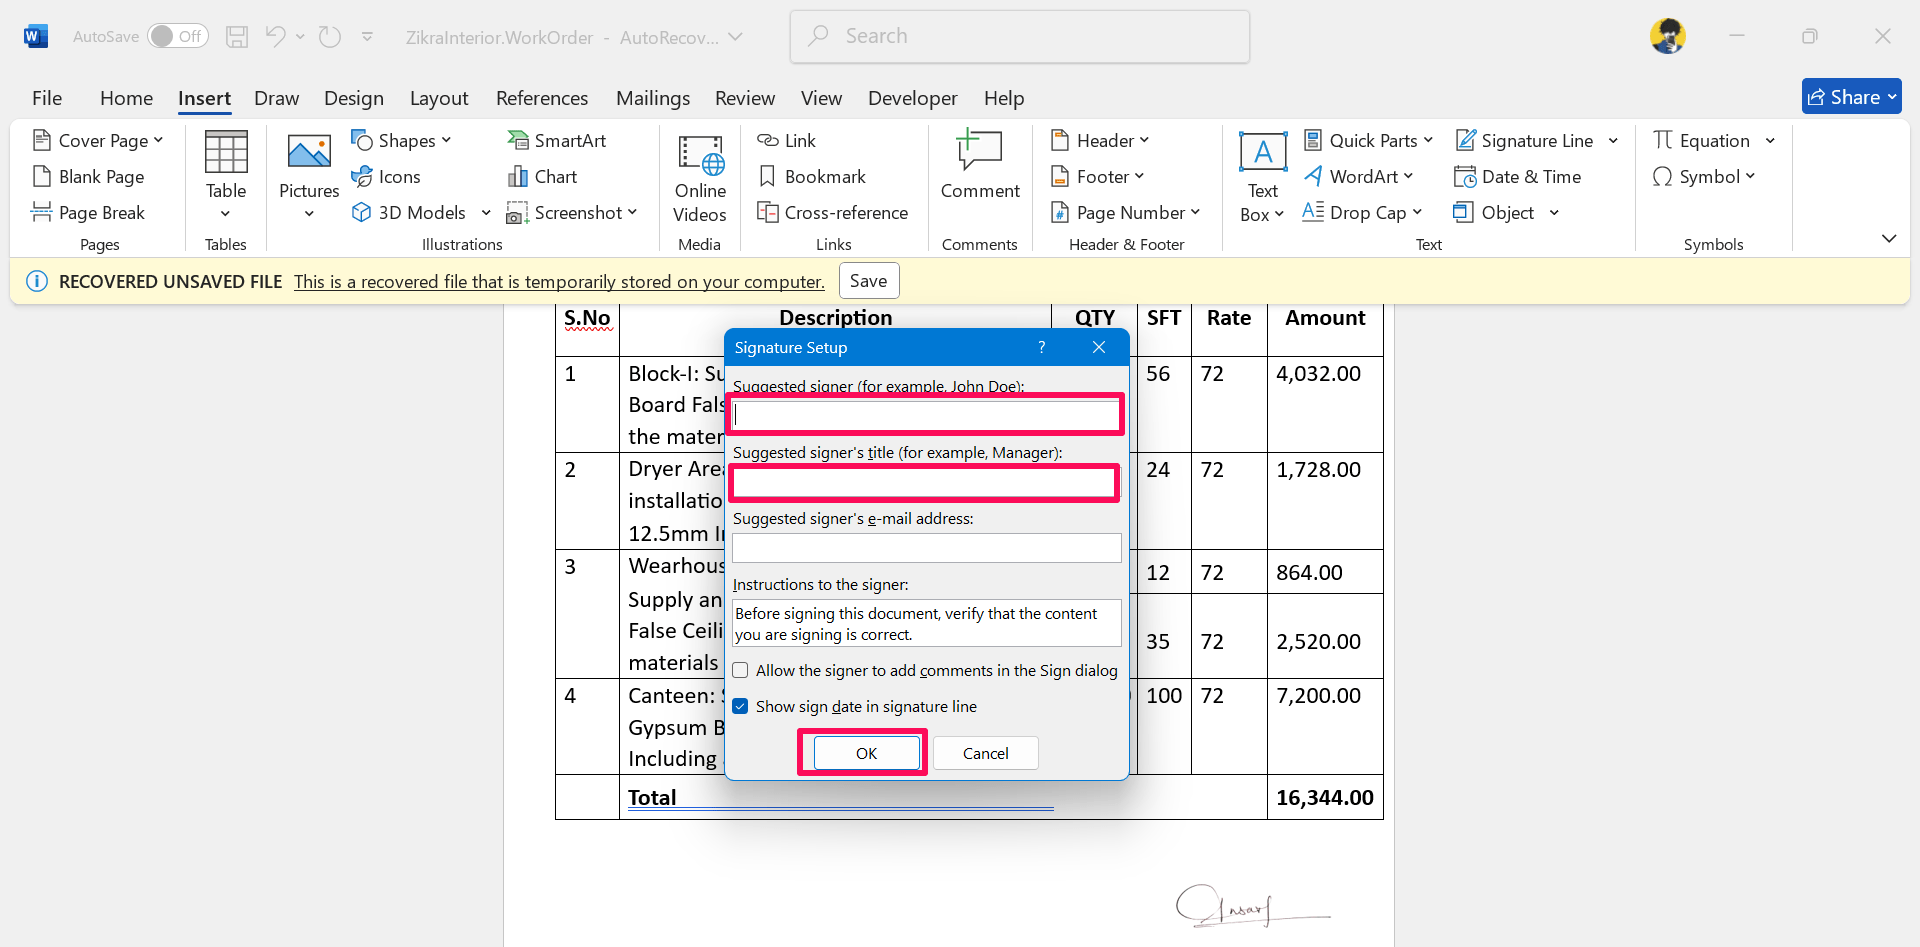
- Click on the Signature Line and it will bring the pop-up window on the screen.
- Enter your name in the Suggested Signer section and add your title.
- Then, add your e-mail address in the third section and click OK.

That’s how you can quickly add a signature line to your Word document. However, you can choose “Show sign date in the signature line.” Afterward, you will see a signature line on the document where you can draw a signature on it through a handwritten or digital method.
Final Words
That’s it. This is how you can quickly insert a handwritten and digital signature on your Word document using the above methods. It’s always best to sign into your document for an agreement before handing it to your organization or individuals for proof.
You can either choose a handwritten sign or a digital one which you can easily draw on your document on Microsoft Word. I hope you have found this guide helpful.
If you've any thoughts on How to Add a Handwritten Signature in Word Document, then feel free to drop in below comment box. Also, please subscribe to our DigitBin YouTube channel for videos tutorials. Cheers!
